41
When you turn on the camera for the first time or if the date/time/zone has
been reset, the date/time/zone setting screen will appear. Follow the steps
below to set the time zone first. If you set the camera to the correct time zone
for where you currently live, when you travel to another time zone you can
simply set the camera to the correct time zone for your destination to update
the camera’s date/time automatically.
Note that the date/time appended to recorded images will be based on
this date/time setting. Be sure to set the correct date/time.
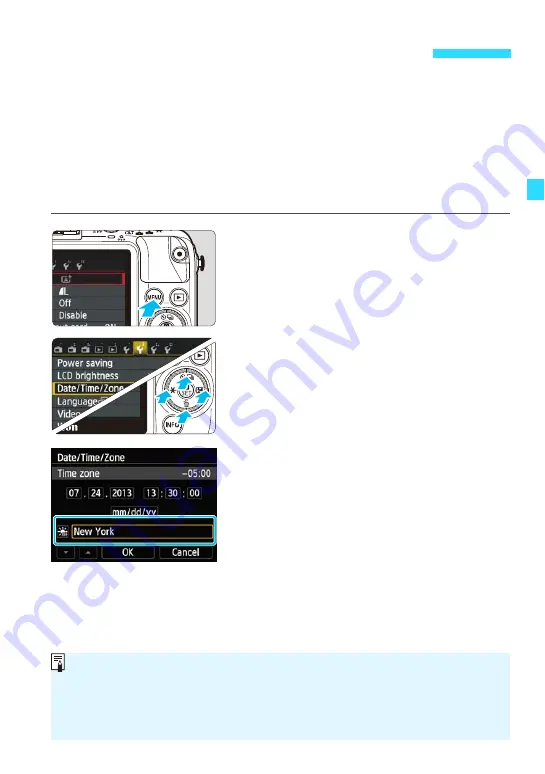
1
Display the menu screen.
Press the <
M
> button.
2
Under the [
5
2] tab, select [Date/
Time/Zone].
Press the <
Y
> <
Z
> keys to select the
[
5
2
] tab.
Press the <
W
> <
X
> keys to select [
Date/
Time/Zone
], then press <
0
>.
3
Set the time zone.
[London] is set by default.
Press the <
Y
> <
Z
> keys to select the
time zone box.
Press <
0
> so <
a
> is displayed.
Press the <
W
> <
X
> keys to select the
time zone, then press <
0
>. (Returns
to <
b
>.)
3
Setting the Date, Time, and Zone
The menu setting procedure is explained on pages 54-56.
In step 3, the time displayed on the upper right of the screen is the time
difference compared with Coordinated Universal Time (UTC). If you do not
see your time zone, set the time zone while referring to the difference with
UTC.
Содержание EOS M2
Страница 1: ...INSTRUCTION MANUAL E EOS M2 W ...
Страница 134: ......
Страница 174: ......
Страница 228: ......
Страница 284: ......
Страница 355: ...MEMO 355 ...
Страница 356: ...MEMO 356 ...
Страница 363: ...MEMO 363 ...


