


138
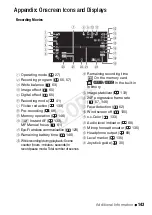
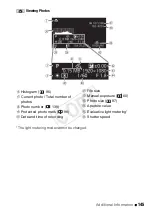
Additional Information
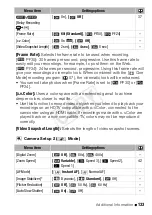
[LCD Screen Dimmer]:
When
s
et to [
On], the LCD
s
creen i
s
dimmed.
Doing
s
o i
s
ideal when u
s
ing the camcorder in location
s
where the LCD’
s
illumination could become a nui
s
ance to other
s
. Hold
pre
ss
ed
down for about 2
s
econd
s
to re
s
tore the LCD’
s
normal brightne
ss
.
• Dimming the LCD
s
creen doe
s
not affect the brightne
ss
of your record-
ing
s
or the brightne
ss
of the playbac
k
image on a TV.
• When the
s
creen dimmer i
s
s
et to [
Off], the LCD
s
creen will return
to the brightne
ss
level that wa
s
in u
s
e before the
s
creen wa
s
dimmed.
[TV Type]:
When you connect the camcorder to a TV u
s
ing the
s
upplied
S
TV-250N
S
tereo Video Cable,
s
elect the
s
etting according to the type of
TV in order to di
s
play the picture in full and in the correct a
s
pect ratio.
[
Normal TV]: TV
s
et
s
with 4:3 a
s
pect ratio.
[
Wide TV]: TV
s
et
s
with 16:9 a
s
pect ratio.
• When the TV type i
s
s
et to [
Normal TV], during the playbac
k
of
video originally recorded with an a
s
pect ratio of 16:9, the picture will not
be di
s
played full
s
creen.
[Speaker Volume]:
Adju
s
t (
) the volume of the playbac
k
. You can al
s
o
adju
s
t the volume u
s
ing the joy
s
tic
k
guide (
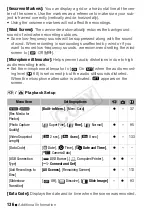
[Demo Mode]:
The demon
s
tration mode di
s
play
s
the camcorder’
s
main
feature
s
. It
s
tart
s
automatically when the camcorder i
s
powered with the
compact power adapter if you leave it turned on without a memory card
for more than 5 minute
s
.
• To cancel the demo mode once it ha
s
s
tarted, pre
ss
any button or turn
off the camcorder.
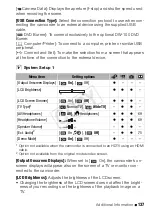
System Setup 2
Menu item
Setting options
[Notification Sounds]
[
High Volume]
,
[
Low Volume], [
Off]
z
z
z
–
[Power Saving Mode]
[
On]
, [
Off]
z
z
z
–
[Quick Start]
[
Off],
[
10 min]
,
[
20 min], [
30 min]
z
–
–
–
[
C
ontrol for HDMI]
1
[
On],
[
Off]
z
z
z
–
DISP.
CO
PY


