


Pa
g
e
20
- M
an
u
el
FA
00
13
2-
FR
- ve
rs
.
3
- 04/
2
0
17 - © C
am
e S
.p.
A
. - L
e c
onte
n
u d
e c
e m
an
u
el
e
st s
u
sc
ep
tib
le d
e s
u
b
ir d
es m
od
ifi
ca
tio
n
s à to
ut m
om
ent et s
an
s au
cu
n p
ré
avi
s.
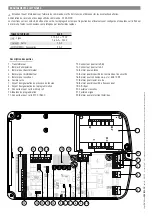
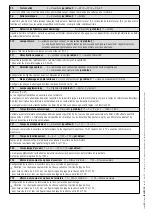
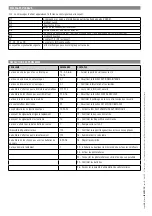
F5 Test
sécurité
0 = Désactivée (
par défaut
) / 1 = CX / 2 = CY / 3 = CX+CY
La carte contrôle le bon fonctionnement des photocellules avant chaque commande d'ouverture ou de fermeture.
F6 Action
maintenue
0 = Désactivée (
par défaut
) / 1 = Activée
La barrière s'ouvre et se ferme lorsque le bouton reste enfoncé. Bouton d'ouverture sur [2-3] et bouton de fermeture sur [2-4]. Lorsque cette
fonction est activée, tous les autres dispositifs de commande, y compris radio, sont désactivés.
F9
Détection de l'obstacle avant démarrage
0 = Désactivée (
par défaut
) / 1 = Activée
Quand la barrière est fermée, ouverte ou après un arrêt total, l'automatisme ne bouge pas si les dispositifs de sécurité (photocellules ou bords
sensibles) détectent un obstacle.
F10 Lampe-témoin
0 = allumée avec lisse levée et en mouvement (
par défaut
) /
1 = en phase d'ouverture, clignote toutes les demi-secondes en phase d'ouverture, clignote toutes les
secondes allumée en permanence avec lisse levée éteinte avec lisse abaissée.
Signale l'état de la barrière. La lampe est connectée sur [10-5].
F11 Désactivation
encodeur
0 = encodeur activé (
par défaut
) / 1 = encodeur désactivé*
Désactive la gestion des ralentissements, la détection des obstacles et la sensibilité.
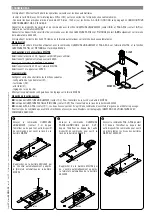
* Connecter les micro-interrupteurs à F-FC-FA.
F14
Sélection type capteur
0 = commande avec capteur transpondeur ou lecteur de cartes magnétiques
1 = commande avec clavier à code (
par défaut
)
Confi guration du type de capteur pour la commande de la barrière.
F15
Mode d'allumage du câble lumineux
0 = Lisse en mouvement (
par défaut
) / 1 = Lisse en mouvement et fermée
Confi gure les phases d'allumage du cordon lumineux branché sur 10 - E6.
F18 Lampe
supplémentaire
0 = Clignotant (
par défaut
) / 1 = Cycle / 2 = Accueil
Sortie sur [10-E1].
Le feu clignotant fonctionne en ouverture et en fermeture.
La lampe cycle reste allumée du début de l'ouverture de la barrière jusqu'à la fermeture totale (y compris le temps de fermeture automatique).
À défaut d'activation de la fermeture automatique, elle ne reste allumée que durant le mouvement.
La lampe d'accueil reste allumée pendant un délai fi xe de 180 secondes ou peut être réglée, voir fonction F 25.
F19
Temps fermeture automatique
0 = Désactivée (
par défaut
) / 1 = 1 s / 2 = 2 s / … / 180 = 180 s
L’attente avant la fermeture automatique démarre quand le point de fi n de course en phase d'ouverture est atteint. Cette attente peut être
réglée entre 1 et 180 s. L'intervention des dispositifs de sécurité en cas de détection d'un obstacle, après un arrêt total ou à défaut de
tension désactive la fermeture automatique.
F21
Temps de préclignotement
0 = Désactivée (
par défaut
) / 1 = 1 s / … / 5 = 5 s
Après une commande d'ouverture ou de fermeture, le feu clignotant connecté sur 10-E1 clignote de 1 à 10 s avant de commencer la
manœuvre.
F22
Temps de fonctionnement
5 = 5 s / ...../ 120 = 120 s (
par défaut
)
Temps de fonctionnement du motoréducteur en phase d'ouverture ou de fermeture.
Le temps de fonctionnement peut être réglé entre 5 s et 120 s.
F25
Temps lampe d'accueil
5 = 5 s / ...../ 120 = 120 s (
par défaut
).
La lampe supplémentaire reste allumée durant les manœuvres d'ouverture et de fermeture de la barrière.
Ce temps peut être réglé entre 5 et 120 s.
F28
Vitesse de manœuvre en phase d'ouverture
70 = Vitesse minimale / … / 100 = Vitesse maximale.
Confi guration de la vitesse d'ouverture de la lisse, calculée en pourcentage.
⚠
Attention : les champs des paramètres de vitesse varient en fonction du type de lisse :
- pour lisses à rotule, de 2 m et 4 m, confi gurer le pourcentage de la vitesse entre 70 et 100 ;
- pour lisses de 6 m et 8 m, confi gurer le pourcentage de la vitesse entre 80 et 100.
F29
Vitesse de manœuvre en phase de fermeture
70 = Vitesse minimale / … / 100 = Vitesse maximale.
Confi guration de la vitesse de fermeture de la lisse, calculée en pourcentage.
⚠
Attention : les champs des paramètres de vitesse varient en fonction du type de lisse :
- pour lisses à rotule, de 2 m et 4 m, confi gurer le pourcentage de la vitesse entre 70 et 100 ;
- pour lisses de 6 m et 8 m, confi gurer le pourcentage de la vitesse entre 80 et 100.
Содержание G4040E
Страница 33: ...AUTOMATIC BARRIERS FA00132 EN English EN INSTALLATION AND OPERATION G4040E G4040IE...
Страница 65: ...MANUEL D INSTALLATION G4040E G4040IE BARRI RES AUTOMATIQUES FA00132 FR Fran ais FR...
Страница 97: ...G4040E G4040IE FA00132 RU RU...
Страница 98: ...2 FA00132 RU 3 04 2017 CAME S p A CAME S P A 2 5 20 1 8 1 5 EN 12453 EN12445 8...
Страница 102: ...5 0 0 3 4 0 400 r 40 6 FA00132 RU 3 04 2017 CAME S p A 24...
Страница 103: ...1 N M 4 2 3 7 FA00132 RU 3 04 2017 CAME S p A 90 M N 600...
Страница 104: ...UNI5931 M8x20 G03756 G03750 8 FA00132 RU 3 04 2017 CAME S p A G03750 G03756...
Страница 105: ...UNI5931 M8x12 UNI5931 M8x20 L 1 3 4 2 UNI6954 2 9x13 UNI6954 3 9x19 9 FA00132 RU 3 04 2017 CAME S p A...
Страница 107: ...45 4 5 4 5 11 FA00132 RU 3 04 2017 CAME S p A 45...
Страница 113: ...1 8 9 1 8 9 17 FA00132 RU 3 04 2017 CAME S p A 89...
Страница 114: ...F i F i F 2 F 3 0 i 0 3 i 3 S1 GND 18 FA00132 RU 3 04 2017 CAME S p A ENTER 1 ENTER 10 ESC ENTER ENTER ESC ENTER...
Страница 119: ...ESC ENTER a 3 ESC ENTER i ESC ENTER c l i ESC ENTER o p I 23 FA00132 RU 3 04 2017 CAME S p A 1 3 ENTER 2 1 ENTER 3 4...
Страница 121: ...10 11 1 E 10 11 1 E ZL 38 4 25 FA00132 RU 3 04 2017 CAME S p A...
Страница 125: ...29 FA00132 RU 3 04 2017 CAME S p A 6...
Страница 127: ...31 FA00132 RU 3 04 2017 CAME S p A CAME S p A UNI EN ISO 14001...