background image


INSTALLAZIONE 

 INSTALLATION 

 MONTAGE 

 EINBAU 


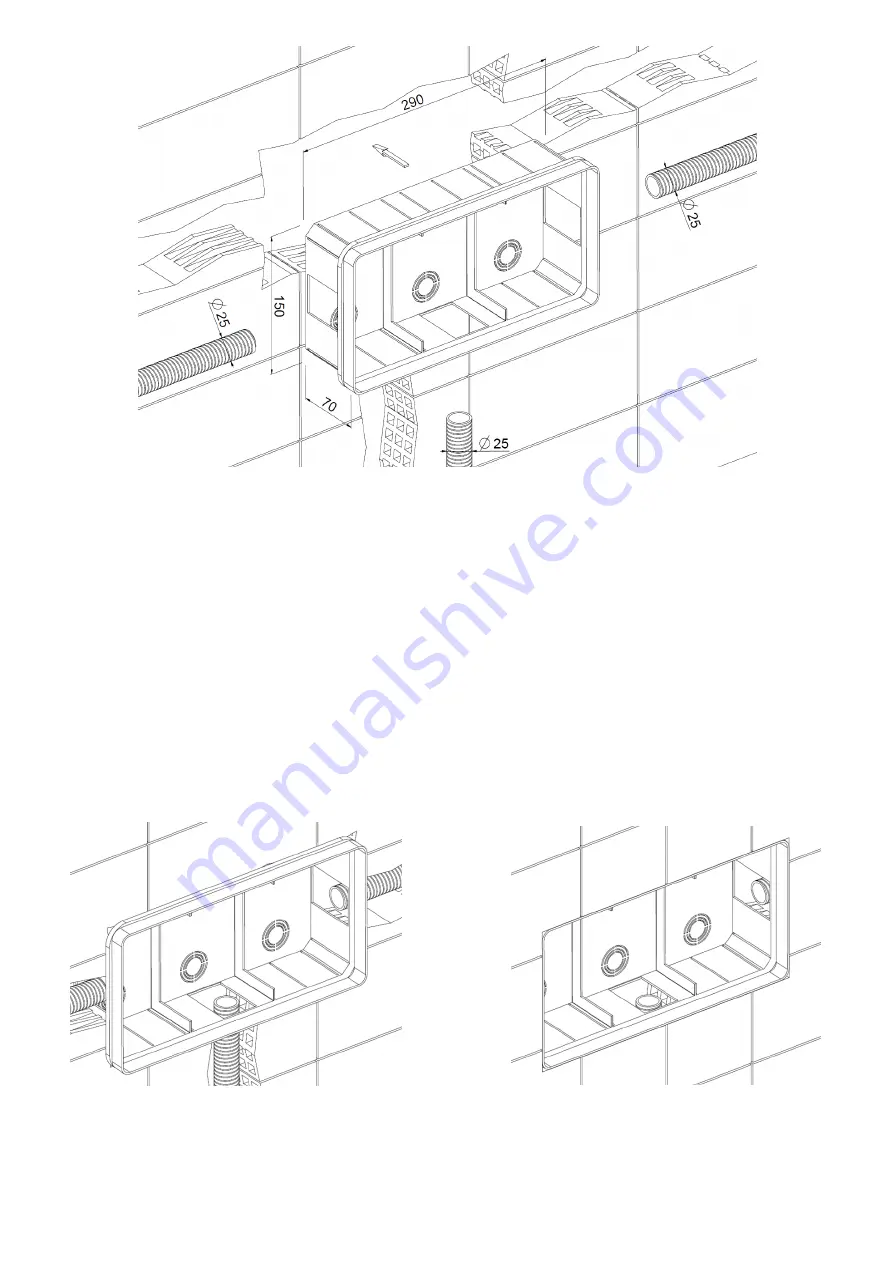
Eseguire uno scasso nel muro grezzo in prossimità della futura sede della centralina, avente dimensioni adatte per una 
cassetta di derivazione da incasso avente le seguenti misure minime 290x150x70 e per una canalina Ø25 mm di 
collegamento tra centralina e altoparlante o diffusore, tra centralina e pulsantiera e tra centralina ed interruttore generale 

oppure creare un’intercapedine nel cartongesso del controsoffitto o della parete

 
Make a hole in the rough wall near the future home of the control unit. The hole dimensions have to be fit for a 503E 3 
module mounting box (290x150x70 mm) and for a Ø25 mm cable duct connecting the control unit and the loudspeaker or 
diffuser, connecting the control unit and the switch control, connecting the control unit and the general switch or prepare a 
cavity into the plasterboard of the false ceiling or of the wall. 
 
Préparer un trou dans le mur brut près de la cavité où sera placé la central contrôle. Les dimensions du trou doivent être 
appropriées à celles 

d’une boîte d’encastrement 503E pour 3 modules

 (290x150x70 mm) et à les dimensions 

d’un caniveau 

de câble de Ø25 mm qui connecte la centrale contrôle et le haut-parleur ou diffuseur / la centrale contrôle et le bouton/ la 
centrale contrôle et le interrupteur général ou préparer une cavité dans le placoplâtre du faux plafond ou du mur. 
 
Machen Sie ein Loch in der rauen Wand in der Nähe der zukünftigen Heimat des Lautsprechers. Die Lochabmessungen 
müssen für eine Einbaukasten 290X150X70 und für eine Ø 25 mm Kabelkanal Anschluss der elektronischen Steuereinheit 
und den Lautsprecher angepasst werden oder bereiten einen Hohlraum in die Gipskartonplatten der Zwischendecke oder der 
Wand. 


Posizionare la cassetta di derivazione da incasso 

nello scasso, rifinire l’intonaco e applicare il rivestimento.


Position the built-in junction box into the hole, finish the plaster and apply the covering. 
 
Placer la boîte de dérivation encastrée dans le trou, finir 

l’enduit et appliquer le revêtement.


Positionieren Sie eine integrierte Anschlussdose in das Loch, beenden Sie den Putz und wenden Sie die Abdeckung. 

Содержание 0A100

Страница 1: ...NSTALLATION MONTAGE EINBAU DIFFUSORE AROMATERAPIA CON PLACCA IN OTTONE AROMATHERAPY DIFFUSER WITH PLATE IN BRASS DIFFUSEUR AROMATHERAPIE AVEC PLAQUE EN LAITON AROMATHERAPIE DIFFUSOR MIT PLATTE AUF MES...

Страница 2: ...ieta CALFLEX s r l che a norma di legge si riserva tutti i diritti This drawing is property of CALFLEX s r l All right reserved 122 90 15 44 21 item 6 UNC 84 DIFFUSORE AROMATERAPIA CON PLACCA ESTETICA...

Страница 3: ...tallation is made All hydraulic and electric connections must be perfectly isolated one from the other and stably fixed AVERTISSEMENTS L implant doit tre effectu par un personnel autoris certifi selon...

Страница 4: ...NTROLLO CENTRALE CONTR LE CONTROL UNIT BERPR FUNG STEUERUNG COLLEGAMENTO ELETTRICO in dotazione BRANCHEMENT LECTRIQUE fourni ELECTRICAL CONNECTION supplied ELEKTRISCHE VERBINDUNG ausgestattet COLLEGAM...

Страница 5: ...ation ATTENTION Pour un correct fonctionnement du syst me il faut galement acheter une centrale contr le pour aromath rapie musique une recharge de fragrance pour aromath rapie et un bouton de contr l...

Страница 6: ...imat des Lautsprechers Die Lochabmessungen m ssen f r eine 503E Modul 3 Einbaukasten und f r eine 25 mm Kabelkanal Anschluss der elektronischen Steuereinheit und den Lautsprecher angepasst werden Posi...

Страница 7: ...au mur avec l aide d un tournevis cruciforme Setzen Sie in der richtigen Position Blase Montagedose und befestigen Sie es an der Wand mit einem Kreuzschlitz Schraubendreher Collegare il diffusore al c...

Страница 8: ...e fino a udire 2 click uno per aggancio Fix the aesthetic plate to the mounting box support WARNING verify that the hooks are positioned in line with the attaching points and that the plate is accurat...

Страница 9: ...amente a contatto con la placca estetica Fix the covering plate to the aesthetic plate WARNING verify that the fragrance opening is faced downward and that the covering plate is perfectly agains the a...

Страница 10: ...en Pause 2 Minuten in Betrieb etc SPEGNIMENTO Per disattivare la diffusione della fragranza occorre premere il tasto della pulsantiera indicato da L avvenuto spegnimento sar indicato dal pulsante non...

Страница 11: ...uova nel diffusore fino a battutta Le cartucce hanno una durata di 60 ore di ventilazione continua Replace the refill with a new one Insert the new refill into the diffuser all the way down The refill...

Страница 12: ...chen Platte WARNUNG berpr fen dass der Duft ffnung nach unten ist Die Deckplatte muss v llig an die sthetische Platte kleben COME ORDINARE LE RICARICHE Inviando una mail di richiesta direttamente al f...

Страница 13: ...s the right to modify the technical features of its articles at any time without notice Pour une politique d am lioration continue CALFLEX S r l se r serve le droit d effectuer des modifications techn...

Страница 14: ...ONTAGE EINBAU CENTRALINA PER AROMATERAPIA E MYCALFLEXMUSIC POWER SUPPLY FOR AROMATHERAPY AND MYCALFLEXMUSIC CENTRALE CONTR LE POUR AROMATHERAPIE ET MYCALFLEXMUSIC STROMVERSORGUNG F R AROMATHERAPIE UND...

Страница 15: ...allation is made All hydraulic and electric connections must be perfectly isolated one from the other and stably fixed AVERTISSEMENTS L implant doit tre effectu par un personnel autoris certifi selon...

Страница 16: ...OL DRUCKKNOPF CENTRALINA DI CONTROLLO CENTRALE CONTR LE CONTROL UNIT BERPR FUNG STEUERUNG COLLEGAMENTO ELETTRICO in dotazione BRANCHEMENT LECTRIQUE fourni ELECTRICAL CONNECTION supplied ELEKTRISCHE VE...

Страница 17: ...taggio al fine di installare il prodotto in maniera corretta a tale proposito il produttore non risponde nel caso di un utilizzo o d installazioni errate WARNING For the correct use of the system buy...

Страница 18: ...le produit de fa on correcte Le producteur ce propos d cline toute responsabilit en cas d emploi inappropri et d incorrecte installation ACHTUNG F r die korrekte Nutzung des Systems kaufen Sie eine S...

Страница 19: ...la central contr le Les dimensions du trou doivent tre appropri es celles d une bo te d encastrement 503E pour 3 modules 290x150x70 mm et les dimensions d un caniveau de c ble de 25 mm qui connecte l...

Страница 20: ...er Ins rer le c ble du bouton contr le indiqu AROMA longueur de 3 m tres dans le caniveau provenant du diffuseur Stecken Sie das Kabel AROMA von der Schaltersteuerung 3 m L nge in den Kabelkanal Colle...

Страница 21: ...le avec indiqu MUSIC longueur de 5 m tres dans les caniveaux provenant des haut parleurs Stecken Sie die Kabel MUSIC von der Schaltersteuerung mit MUSIC 5 m L nge in den Kabelkanal von den Lautsprech...

Страница 22: ...assurer qu il n y a pas de courant dans l installation lectrique et apr s connecter l unit de contr le lectronique la ligne lectrique avec une borne lectrique deux p les Stellen Sie sicher dass es kei...

Страница 23: ...on un cacciavite Close the junction box with the cover by tightening the screws using a screwdriver Fermer la bo te encastr e avec le couvercle en serrant les vis avec un tournevis Schlie en Sie die A...

Страница 24: ...Minuten in Betrieb 2 Minuten Pause 2 Minuten in Betrieb etc SPEGNIMENTO Per disattivare la diffusione della fragranza occorre premere il tasto della pulsantiera indicato da L avvenuto spegnimento sar...

Страница 25: ...n minuto e poi riaccenderlo Se anche dopo questa procedura il prodotto risultasse ancora disconnesso bisogner procedere con una connessione manuale dal dispositivo consultare il manuale di istruzioni...

Страница 26: ...manuellement du dispositif consulter le mode d emploi de votre smartphone tablet ERSTE VERBINDUNG Schalten Sie das Ger t Bluetooth Modus durch Dr cken der Taste auf dem Switch Steuerung mit dem Symbo...

Страница 27: ...minutes from the loss of connection or after 4 hours from powering the device will turn off automatically EXTINCTION D sactiver la modalit Bluetooth en pressant pendant environ 5 secondes sur le bouto...

Страница 28: ...smartphone after some seconds the device will appear properly disconnected CONNEXIONS SUIVANTES Activer la modalit Bluetooth en pressant le bouton avec le symbole suivant Quand le dispositif est actif...

Страница 29: ...s the right to modify the technical features of its articles at any time without notice Pour une politique d am lioration continue CALFLEX S r l se r serve le droit d effectuer des modifications techn...

Отзывы: