


Cadillac User Experience (GMNA-Localizing-U.S./Canada-11434397) - 2018 -
crc - 5/2/17
38
REAR SEAT INFOTAINMENT
Menu (DVD/BD/USB/HDMI/VCD)
Only available in D (Drive). Press
MENU to display these options:
.
Tone Settings: Use to set bass,
mid, and treble on speakers only.
Once set, tone settings are for all
sources.
.
Auto Volume Control: Adjusts the
volume of the audio based on the
speed or ambient noise of the
vehicle. Some vehicles may be
equipped with the Bose AudioPilot
system. In these cases, the Auto
Volume main menu item is
replaced with the Bose AudioPilot
menu item. AVC or Bose
AudioPilot is available to use with
any source mode.
.
Traffic Announcements: Displays
traffic alerts in the RSI system.
The video will continue to play
and the audio will mute,
depending on the alert.
Closing the Menu (DVD/BD)
Touch Back or Exit to close a menu.
This will return to the previously
viewed screen.
Power
Press the power button on the front
screen to turn the RSI screen on or
off. The front screen will continue to
operate when the overhead screen(s)
are turned off. A red lit power button
indicates the rear screens are on.
A white lit power button indicates the
rear screens are off.
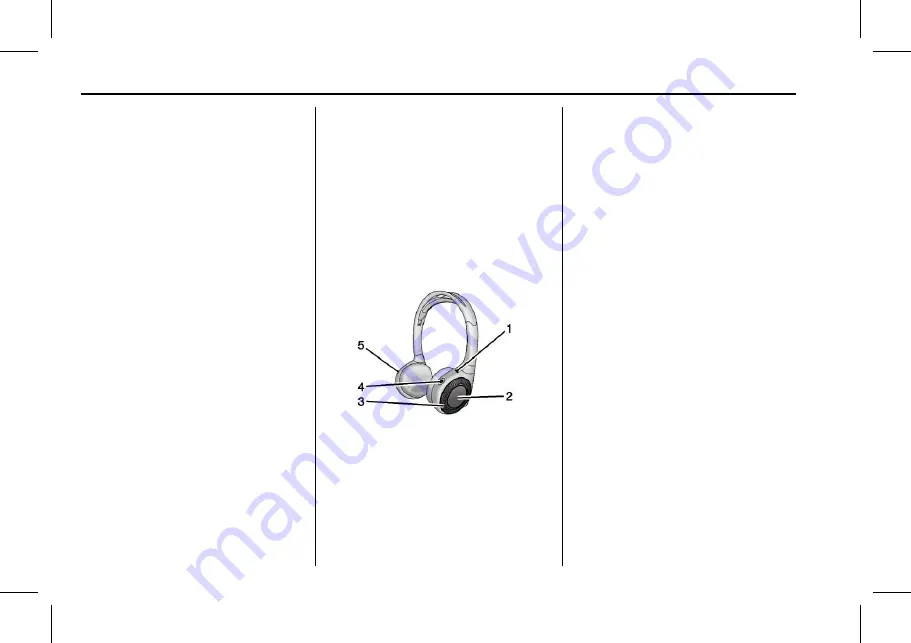
Headphones
1. Power Indicator Light
2. Channel 1 or 2 Switch
3. Volume Control
4. Power Button
5. Battery Cover
RSI includes two or four 2-channel
new digital wireless headphones,
depending on the vehicle model. The
headphones are used to listen to
various multimedia. The wireless
headphones have a power button,
Channel 1 or 2 switch, and a volume
control. The digital headphones
cannot be interchanged with previous
models of GM headphones.
Press the power button to turn on the
headphones. A light on the
headphones comes on. A flashing light
indicates the headphones are not in
range. Move them closer to the
forward overhead screen until the
light stops flashing. If the light does
not come on, check the batteries.
Intermittent sound or static can also
indicate weak batteries. See
“
Battery
Replacement
”
later in this section.
Turn the headphones off when not
in use.
Press the center of the right side of
the headphone to change the channel.
Channel 1 will provide audio
associated with screen 1 and channel 2
will provide audio associated with
screen 2.
When a third row screen is available,
the screen will display the selection
related to 1 on the remote control. If 1


