Chapter 9 Appendix
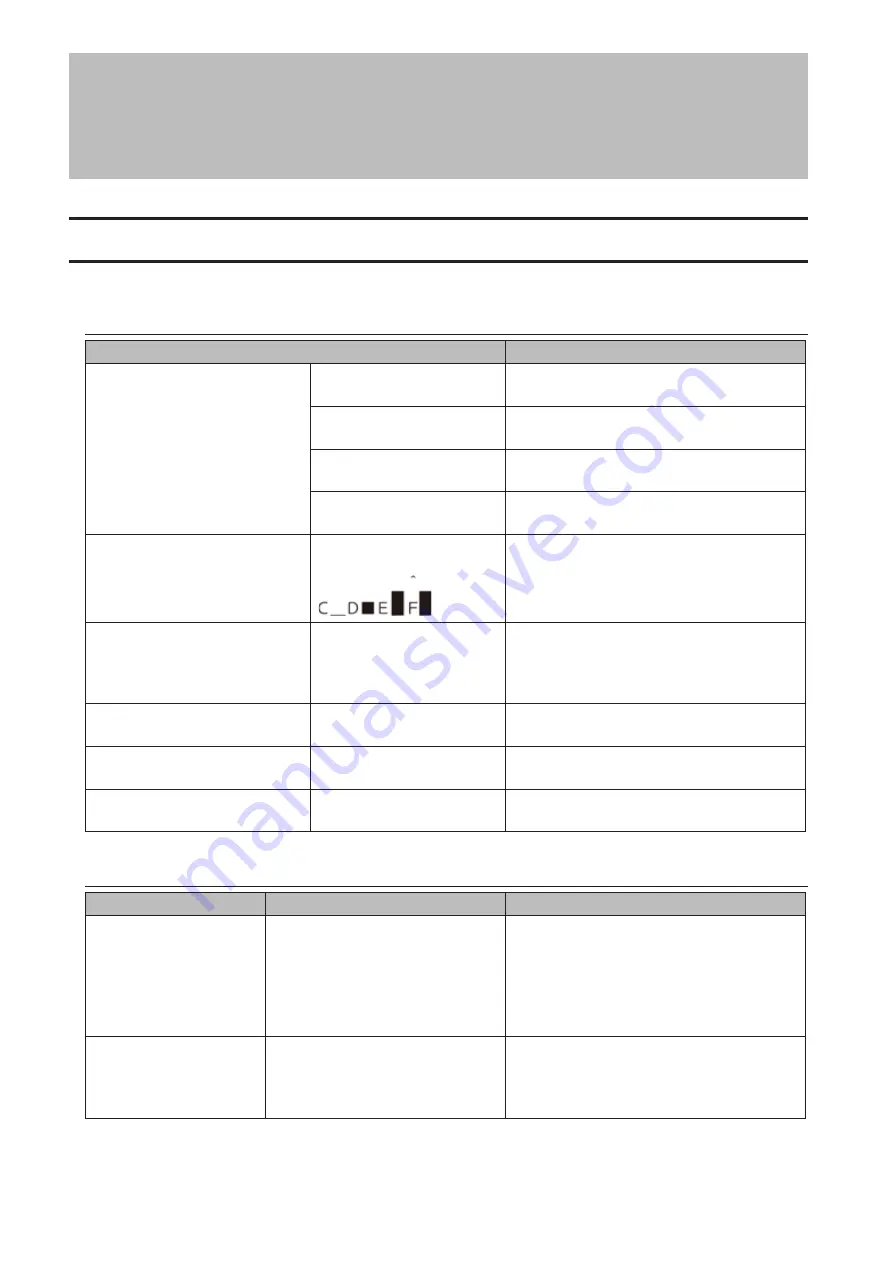
LCD Panel
The LCD panel can be cycled through different modes by pressing the display button on the front of the TeraStation.
Modes
LCD Message
Description
Link Speed
Note:
When an Ethernet cable is
connected to LAN Port 2, "LINK
SPEED 2" is displayed.
LINK SPEED
No LINK
Not connected to network.
LINK SPEED
10Mbps
Connected at 10 Mbps.
LINK SPEED
100Mbps
Connected at 100 Mbps.
LINK SPEED
1000Mbps
Connected at 1000 Mbps full duplex.
Disk Space Used
HDD
USED
Bar graphs are shown to indicate the used
space for the C, D, E, and F internal drives of
the TeraStation. When a hard drive is full, it is
indicated by "^".
Hostname/IP Address
WS5200DR2xxx
192.168.11.150
Displays the hostname and IP address.
Note:
If the hostname contains multibyte
characters, they will be replaced with
question marks (?) on the LCD panel.
Calendar/Clock
DATE TIME
2013/1/1 11:11
Displays the date and time set in the
TeraStation.
Installed OS
Windows Storage Server
2012 R2
Displays the OS installed on the TeraStation.
IP Address 2
NETWORK2
192.168.11.151
Displays the IP address of LAN port 2 when
an Ethernet cable is connected to LAN port 2.
Errors and Status
LCD Message
Description
Corrective Action
SYSTEM Error E11
Fan Failure
An error occurred in the fan speed.
Check that no foreign objects or dust are
clogging the fan. If any foreign objects or
dust are found, use a pair of tweezers, air
duster, or other tool to remove them. If the
error is displayed again, contact Buffalo
technical support for assistance.
SYSTEM Error E12
Cooling Failure
A rise in the system temperature
may have exceeded the allowable
safety value.
Do not place objects in the area around
the TeraStation. Also, move the TeraStation
to a cool location. Make sure that the
TeraStation's fan is working normally.
99
Содержание TeraStation WS5200DN2
Страница 5: ...Chapter 1 Getting Started Diagrams WS5600DN2 WS5600DR2 WS5400DN2 WS5400DR2 4...
Страница 23: ...4 Click Next 5 Enter the volume size that you want to create and click Next 22...
Страница 26: ...2 Click Disk Management 3 Right click the volume that you want to format and select Format 25...
Страница 39: ...4 Click Next 38...
Страница 40: ...5 Select Custom and click Next 39...
Страница 41: ...6 Click Add Items 7 Select the backup source folders or drives and click OK 40...
Страница 42: ...8 Click Next 41...
Страница 43: ...9 Specify the schedule to run the backup and click Next 42...
Страница 46: ...3 Right click on Local Backup and click Recover The recovery wizard will start 4 Click Next 45...
Страница 47: ...5 Select the date when backing up the data and click OK 46...
Страница 51: ...2 Click Change 3 Select Domain enter a domain name and click OK 50...
Страница 53: ...Installing DFS 1 In Server Manager click Dashboard Add roles and features 2 Click Next 52...
Страница 54: ...3 Select Role based or feature based installation and click Next 4 Click Next 53...
Страница 56: ...7 Click Next 8 Click Install 9 Click Close to finish 55...
Страница 57: ...Creating Namespaces 1 In Server Manager click Tools DFS Management 2 Click Namespaces New Namespace 56...
Страница 58: ...3 Enter a hostname for the namespace server and click Next 57...
Страница 59: ...4 Enter a name for the namespace and click Next 58...
Страница 63: ...2 Click Replication New Replication Group 62...
Страница 64: ...3 Select the type of replication group and click Next 63...
Страница 65: ...4 Enter a name for the replication group and click Next 64...
Страница 66: ...5 Enter the hostname of the file server for the replication source and click Next 65...
Страница 67: ...6 Click Add 66...
Страница 68: ...7 Enter the path of the replication source and click OK 67...
Страница 69: ...8 Click Next 68...
Страница 70: ...9 Enter the hostname of the file server for the replication target and click Next 69...
Страница 77: ...3 Right click the user whose password will be changed and click Set Password 4 Click Proceed 76...
Страница 80: ...3 Right click Groups and choose New Group 4 Enter a group name and click Add 79...
Страница 81: ...5 Click Advanced 6 Click Find Now 80...
Страница 82: ...7 Select the users to be registered to the group then click OK 8 Click OK 81...
Страница 86: ...8 Choose Everyone and check Allow for Change 85...
Страница 87: ...9 In the Security tab click Edit Add 10Enter Everyone under Enter the object names to select then click OK 86...
Страница 109: ...For Customers in China CCC A For Customers in Taiwan BSMI For Customers in Korea KC A 108...


