LAN
USB
USB
EJECT
ON
OFF
AUTO
ROUTER
1
2
3
4
POWER
INTERNET
16
11
18
14
15
17
12
10
13
Chapter 1 Product Overview
- 11 -
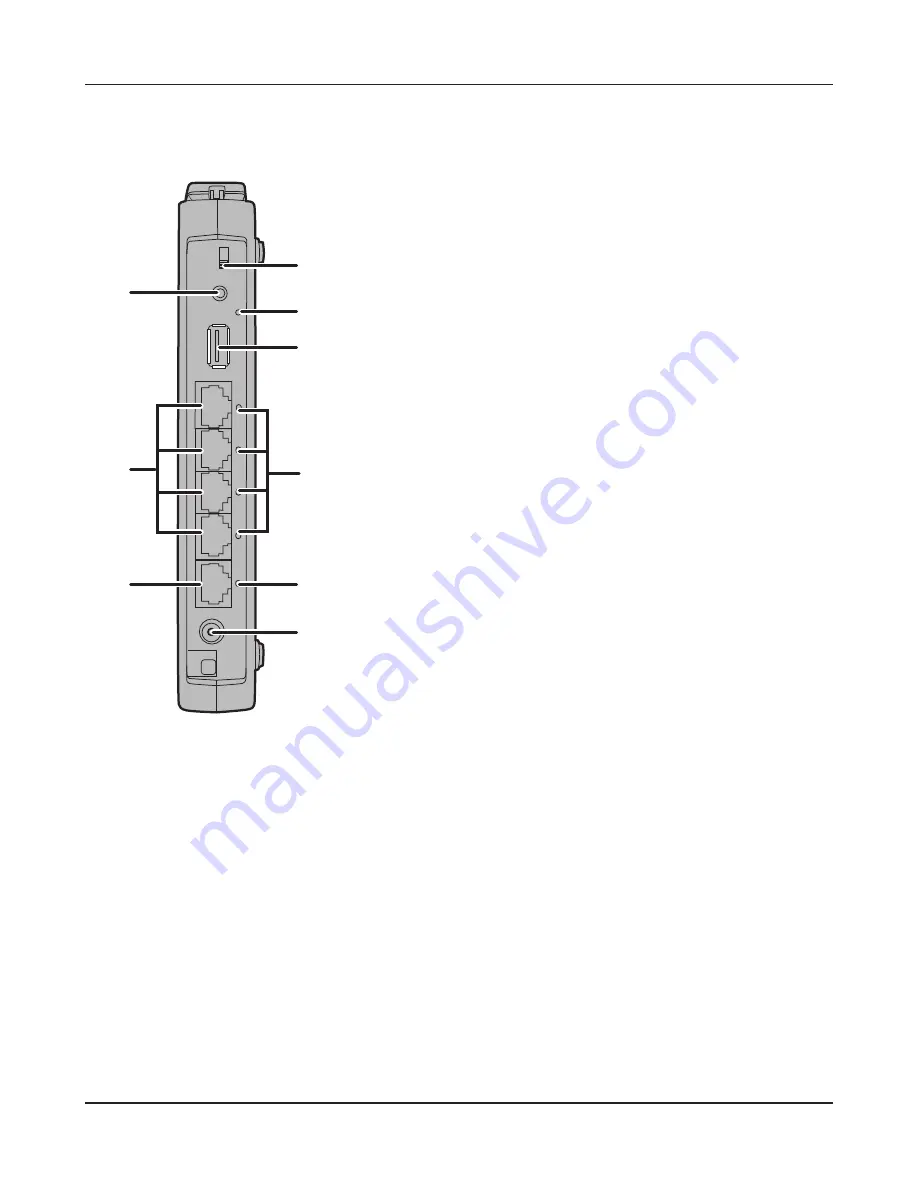
Back Panel
10
Router Switch
Switches router mode between enabled, disabled, and auto.
On:
Router functionality is enabled (router mode).
Off:
Router functionality is disabled (bridge/AP
mode).
Auto:
This switches between modes automatically
based on whether or not another router is
detected on the Internet port. The default setting
for this switch is Auto.
11
USB Eject Button
To dismount a USB hard drive, hold down this button until
the USB LED flashes (about 3 seconds). The USB drive can
then be unplugged safely.
12
USB LED (Blue)
On:
The USB disk is connected.
Off:
The USB drive can be removed or no USB drive is
connected.
Flashing: Overcurrent detected.
Note: When this LED is blinking, the connected USB drive
cannot be used. Remove the connected USB drive. If
the LED continues to blink even after the USB drive is
removed, restart the AirStation.
Do not remove the USB drive or turn off the
AirStation while the USB LED is on.
13
USB Port
Connect the USB drive.
Note: USB hubs are not supported.
14
LAN Port
Connect your computer, hub, or other Ethernet devices to these ports.
This switching hub supports 10 Mbps,100 Mbps, and 1000 Mbps
connections.
15
LAN LED (Green)
On:
An Ethernet device is connected.
Flashing:
An Ethernet device is communicating.
Содержание AirStation Nfiniti WZR-HP-G300NH
Страница 6: ...2 3 Web Interface Structure 5 ...
Страница 39: ... 5 Chapter 11 Restoring the Default Configuration 132 Chapter 12 Shared Folders and the USB Port 133 ...
Страница 54: ... 20 Chapter 3 Installation User friendly firmware update screen ...
Страница 69: ...Chapter 4 Configuration 35 VPN server Router Mode Only Configure the VPN server ...
Страница 77: ...Chapter 4 Configuration 43 AOSS AOSS Status and Settings ...
Страница 83: ...Chapter 4 Configuration 49 WMM Set priorities for specific communications ...
Страница 98: ... 64 Chapter 4 Configuration Movie Engine QoS Configure Movie Engine options ...
Страница 115: ...Chapter 4 Configuration 81 ECO Configure Eco mode from this screen ...
Страница 123: ...Chapter 4 Configuration 89 Diagnostic System Info View system information for the AirStation ...
Страница 151: ...Chapter 8 Network USB Navigator 117 7 Click Yes 9 Click Next 8 Click Next ...
Страница 155: ...Chapter 8 Network USB Navigator 121 6 Click Agree 8 Click Install 7 Click Continue ...


