- 110 -
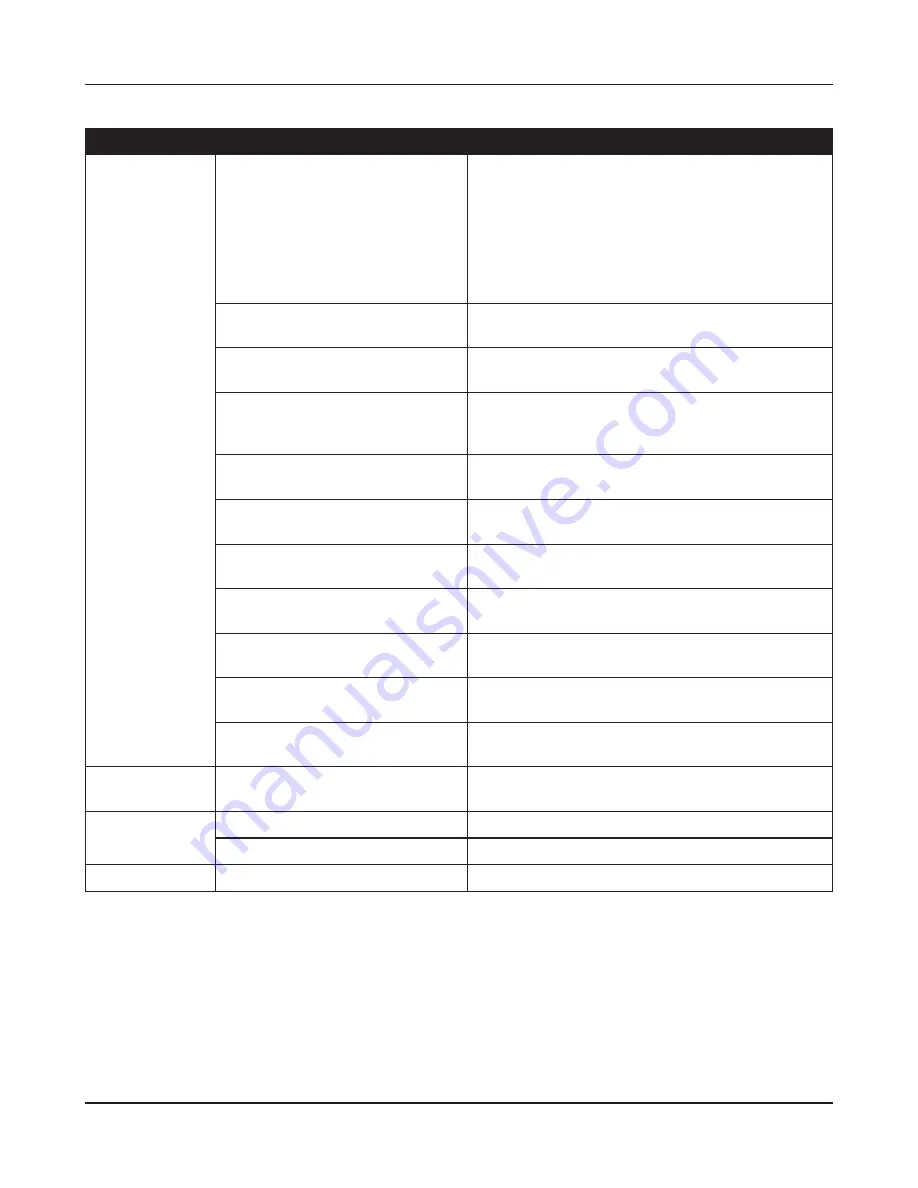
Chapter 7 Default Configuration Settings
Feature
Parameter
Default Setting
LAN
LAN Side IP Address
Router Mode (Router Switch AUTO/ON):
192.168.11.1 (255.255.255.0)
Bridge Mode (Router Switch OFF):
192.168.11.100 (255.255.255.0)
Bridge Mode (Router Switch AUTO):
Obtain automatically from DHCP Server
DHCP Server Function
(Router Mode only)
Enabled
DHCP IP Address Pool
(Router Mode only)
192.168.11.2 for up to 64 Addresses
LAN Side IP Address
(For IP Unnumbered)
(Router Mode only)
none
Lease Period
(Router Mode only)
48 Hours
Default Gateway
(Router Mode only)
AirStation's IP Address
DNS Servers
(Router Mode only)
AirStation's IP Address
WINS Server
(Router Mode only)
Do Not Specify
Domain Name
(Router Mode only)
Assigned Domain Name
Default Gateway
(Bridge Mode only)
none
DNS Server Address
(Bridge Mode only)
none
DHCP Lease
(Router Mode only)
Current DHCP Client Information
none
NAT
(Router Mode only)
Address Translation
Enabled
Log Output of Deleted Packets
Disabled
Route
Routing Information
none
Содержание AirStation Nfiniti WZR-HP-G300NH
Страница 6: ...2 3 Web Interface Structure 5 ...
Страница 39: ... 5 Chapter 11 Restoring the Default Configuration 132 Chapter 12 Shared Folders and the USB Port 133 ...
Страница 54: ... 20 Chapter 3 Installation User friendly firmware update screen ...
Страница 69: ...Chapter 4 Configuration 35 VPN server Router Mode Only Configure the VPN server ...
Страница 77: ...Chapter 4 Configuration 43 AOSS AOSS Status and Settings ...
Страница 83: ...Chapter 4 Configuration 49 WMM Set priorities for specific communications ...
Страница 98: ... 64 Chapter 4 Configuration Movie Engine QoS Configure Movie Engine options ...
Страница 115: ...Chapter 4 Configuration 81 ECO Configure Eco mode from this screen ...
Страница 123: ...Chapter 4 Configuration 89 Diagnostic System Info View system information for the AirStation ...
Страница 151: ...Chapter 8 Network USB Navigator 117 7 Click Yes 9 Click Next 8 Click Next ...
Страница 155: ...Chapter 8 Network USB Navigator 121 6 Click Agree 8 Click Install 7 Click Continue ...


