5 - 3
Fai
lure Investigation
fo
r El
ect
ronic
Part
s
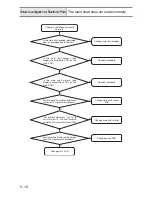
Failure Investigation for Electronic Parts The power is not turned on.
• The power is not turned on
or
• Nothing is displayed on the liquid crystal display (LCD).
Connect it properly.
N
Y
Change power cords.
Is the resistance between the two terminals at
both ends 1
Ω
or below when the power cord
is removed from the plug outlet and the inlet?
N
Y
Is the power cord properly
connected to both the inlet and the
plug outlet?
Connect it properly.
Is connector CN21 on the main
PCB properly connected?
N
Y
Is lead on the panel properly connected
to connector CN10 on the main PCB?
Y
Connect it properly.
N
To the next page
Connect it properly.
N
Is the voltage between pins 1 and 2, and 3 and 4
of connector CN21 on the main PCB 38.0 - 42.0V,
22.8 - 26.4V, respectively, when the power is ON?
N
Is the power lead properly connected to
connector CN101 on the power PCB and
the power switch's fasten tab terminal?
Y
Y
To the next page
Содержание PR-600II
Страница 1: ......
Страница 2: ......
Страница 20: ...2 2 Main parts Main unit ...
Страница 33: ...2 15 Disassembly Feed unit Main unit ...
Страница 44: ...2 26 Needle thread unit Main unit ...
Страница 47: ...2 29 Disassembly Needle bar change unit Main unit ...
Страница 50: ...2 32 Thread wiper unit Main unit ...
Страница 54: ...2 36 Needle bar unit Main unit ...
Страница 60: ...2 42 Upper shaft unit Main unit ...
Страница 70: ...2 52 Lower shaft unit Main unit ...
Страница 73: ...2 55 Disassembly Power unit Main unit ...
Страница 78: ...2 60 Thread cut unit Main unit ...
Страница 82: ...2 64 Thread tension unit Main unit ...
Страница 91: ...2 73 Disassembly Operation panel Main unit ...
Страница 98: ...2 80 ...
Страница 100: ...3 2 Operation panel Main unit ...
Страница 108: ...3 10 Thread tension unit Main unit ...
Страница 118: ...3 20 Thread cut unit Main unit ...
Страница 122: ...3 24 Power unit Main unit ...
Страница 128: ...3 30 Lower shaft unit Main unit ...
Страница 132: ...3 34 Upper shaft unit Main unit ...
Страница 147: ...3 49 Assembly Needle bar unit Main unit ...
Страница 157: ...3 59 Assembly Thread wiper unit Main unit ...
Страница 162: ...3 64 Needle bar change unit Main unit ...
Страница 166: ...3 68 Needle thread unit Main unit ...
Страница 170: ...3 72 Feed unit Main unit ...
Страница 188: ...3 90 Main unit Main unit ...
Страница 206: ...4 4 Inspection Blunt needle 1 Touch the needle tip with your finger to check that the needle tip is not blunt ...
Страница 244: ...4 4 Inspection Blunt needle 1 Touch the needle tip with your finger to check that the needle tip is not blunt ...
Страница 282: ...4 42 ...
Страница 311: ...6 1 6Maintenance ...
Страница 333: ......


