background image

68

Ch. 3 Functions

Functions

Deleting a file

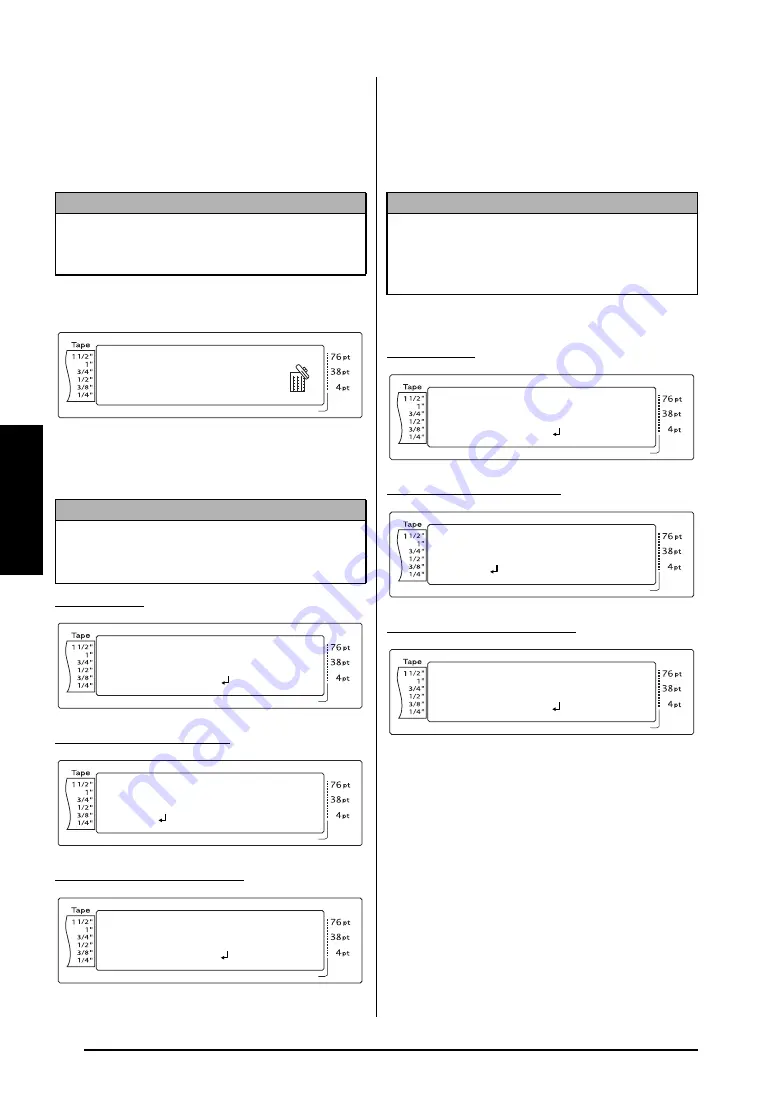
To delete a file that has been saved:

1

Hold down 

d

 and press 

8

. The MEM-

ORY screen appears.

2

Press 

m

 or 

g

 until 

!

 moves beside

CLEAR

.

3

Press 

n

.  The CLEAR screen appears in the

display with the currently selected file num-
ber. 

For a text file:

For a TZ tape template file:

For an AV label template file:

4

Press 

m

 or 

g

 until the file number con-

taining the text that you wish to delete is
displayed. The file name is shown beside
the file number and the text stored under
the selected file number is shown in the
bottom line. 

5

Press the space bar so that 

!

 appears to the

right of the file name.

For a text file:

For a TZ tape template file:

For an AV label template file:

6

Repeat steps 

4

 and 

5

 until 

!

 appears to

the right of all files to be deleted. Files
marked with 

!

 will be deleted.

NOTE

An Auto Format template that has been stored in
the memory can be deleted by holding down 

d

and pressing 

8

 from the Auto Format


function. 

NOTE

To quit the Memory Clear function without erasing
any text

, press 

e

 (OR hold down 

d

 and

press 

8

).

Length

Margin

Font

Width

Size

1


2


3


4


5


6


7


8


9


A


B


C


D


E


F


K Q

Q

Q

Q

Q

Q

Q

Q

Q

Q

Q

Q

Q

Q

Q

Q

Q

Q

Q

Q

Q

Q

Q

Q

R

R

R

R

R

R

G

H

I

J

AUTO

1.10

HELSINKI

A

AUTO

03/04

RECALL

MEMORY

CLEAR
PRINT

L

M

P

P

Length

Margin

Font

Width

Size

1


2


3


4


5


6


7


8


9


A


B


C


D


E


F


K Q

Q

Q

Q

Q

Q

Q

Q

Q

Q

Q

Q

Q

Q

Q

Q

Q

Q

Q

Q

Q

Q

Q

Q

R

R

R

R

R

R

G

H

I

J

AUTO

1.10

HELSINKI

A

AUTO

CLEAR

FILE[00:NAMETAG ]
R. Becker ABC Tran

L

M

Length

Margin

Font

Width

Size

1


2


3


4


5


6


7


8


9


A


B


C


D


E


F


K Q

Q

Q

Q

Q

Q

Q

Q

Q

Q

Q

Q

Q

Q

Q

Q

Q

Q

Q

Q

Q

Q

Q

Q

R

R

R

R

R

R

G

H

I

J

AUTO

1.10

HELSINKI

A

AUTO

CLEAR

3/4"

00

TZ[00:VIDEO

]

S

FAVORITE SONGS

L

M

Length

Margin

Font

Width

Size

1


2


3


4


5


6


7


8


9


A


B


C


D


E


F


K Q

Q

Q

Q

Q

Q

Q

Q

Q

Q

Q

Q

Q

Q

Q

Q

Q

Q

Q

Q

Q

Q

Q

Q

R

R

R

R

R

R

G

H

I

J

AUTO

1.10

HELSINKI

A

AUTO

CLEAR

AV2067

00

AV[00:ADDRESS1]

R. Becker ABC Impo

L

M

NOTE

To see other parts of the selected text file

, press

j

 or 

k

.

Auto Format template files of the same tape
width are displayed grouped together.

Length

Margin

Font

Width

Size

1


2


3


4


5


6


7


8


9


A


B


C


D


E


F


K Q

Q

Q

Q

Q

Q

Q

Q

Q

Q

Q

Q

Q

Q

Q

Q

Q

Q

Q

Q

Q

Q

Q

Q

R

R

R

R

R

R

G

H

I

J

AUTO

1.10

HELSINKI

A

AUTO

CLEAR

FILE[00:NAMETAG ]
R. Becker ABC Tran

P

L

M

Length

Margin

Font

Width

Size

1


2


3


4


5


6


7


8


9


A


B


C


D


E


F


K Q

Q

Q

Q

Q

Q

Q

Q

Q

Q

Q

Q

Q

Q

Q

Q

Q

Q

Q

Q

Q

Q

Q

Q

R

R

R

R

R

R

G

H

I

J

AUTO

1.10

HELSINKI

A

AUTO

CLEAR

3/4"

00

TZ[00:VIDEO

]

S

FAVORITE SONGS

P

L

M

Length

Margin

Font

Width

Size

1


2


3


4


5


6


7


8


9


A


B


C


D


E


F


K Q

Q

Q

Q

Q

Q

Q

Q

Q

Q

Q

Q

Q

Q

Q

Q

Q

Q

Q

Q

Q

Q

Q

Q

R

R

R

R

R

R

G

H

I

J

AUTO

1.10

HELSINKI

A

AUTO

CLEAR

AV2067

00

AV[00:ADDRESS1]

R. Becker ABC Impo

P

L

M

Содержание P-Touch 3600

Страница 1: ... Read this User s Guide before you start using your P touch Keep this User s Guide in a handy place for future reference USER S GUIDE USER S GUIDE USER S GUIDE 9600 3600 9600 3600 ...

Страница 2: ... labels You can print professional looking labels in no time The quality and performance of this P touch make it an extremely practical machine to meet all your labelling needs Although this P touch is easy to use we suggest that you read this User s Guide carefully before starting Keep this manual nearby for future reference NOTE The P touch will make a noise when it is turned on or while it is p...

Страница 3: ...to select letter j or k to select n Adding a symbol s m or g to select category j or k to select symbol n Adding a new line n Adding a new block d n Adding a barcode d i Type barcode data n Adding a special char acter to the barcode d i s m or g to select special character n Changing a barcode parameter d i m j or k to select parameter m or g to select setting n Editing text Deleting text b OR q D...

Страница 4: ... j or k to select WIDTH m or g to select setting n Changing the character style d 1 2 or 3 j or k to select STYLE1 or STYLE2 m or g to select setting n Changing the line effects d 1 2 or 3 j or k to select LINE EFFECTS m or g to select setting n Changing the frame d 1 2 or 3 j or k to select FRAME m or g to select setting n Changing the text align ment d 1 2 or 3 j or k to select ALIGNMENT m or g ...

Страница 5: ...xt m or g to select EDIT MORE n Type in each line of text then n 3 Changing the style of the Auto Format tem plate m or g to select CHANGE STYLE n m or g to select format style n 4 Quitting the Auto Format function m or g to select EXIT n n Printing text Previewing the label d 9 j or k to scroll Changing how the labels are cut d f m or g to select setting n Printing using the cur rent print option...

Страница 6: ...e n Recalling a previously saved file d 8 m or g to select RECALL n m or g to select file number n Deleting a previously saved file d 8 m or g to select CLEAR n m or g to select file number Space bar so appears n n Printing a previously saved text file d 8 m or g to select PRINT n m or g to select file number Space bar so appears n ...

Страница 7: ... replacing a tape cassette 7 Connecting the P touch to a computer 8 Installing the Software Printer Driver 9 Reading the User s Guide 25 Using P touch Editor 3 2 25 Using P touch Quick Editor 27 Uninstalling the Software Printer Driver 31 Attaching labels 33 Assembling stamps 35 Chapter 3 Functions 37 Performing basic operations 38 Entering text 40 Editing text 45 Formatting 46 Printing 62 Storing...

Страница 8: ...LESHOOTING 84 MACHINE SPECIFICATIONS 88 Appendix 89 Symbols 90 Special barcode characters 93 Fonts 93 Sizes and widths 94 Type styles 96 Framing and shading patterns 98 Pre set templates 99 Template text styles 104 INDEX 106 ACCESSORIES 110 P touch CONTACT INFORMATION for Canada Only 114 ...

Страница 9: ...1 Ch 1 Before You Start Before You Start Chapter 1 Before You Start ...

Страница 10: ...N Top view Cover release button Tape compartment cover LCD display Keyboard AC adaptor connector USB port RS 232C port P touch 3600 Cover release button Tape compartment cover LCD display Keyboard AC adaptor connector USB port Recharging indicator P touch 9600 ...

Страница 11: ...52 D Tape Margin setting p 55 6 Frame setting p 53 E Font setting p 48 7 Style1 setting indicators p 50 F Character width setting p 50 8 Style2 setting indicators p 51 G Character size setting p 48 9 Text Alignment setting indicators p 53 H Character size setting indicator p 48 I French Caps indicator p 40 Handle Battery compartment cover PT 9600 only Tape exit slot Length Margin Font Width Size 1...

Страница 12: ...o the Advanced Functions booklet 7 Return key p 39 3 Macro key PT 9600 only Refer to the Advanced Functions booklet 8 Backspace key p 45 4 PF keys PT 9600 only Refer to the Advanced Functions booklet 9 Interface key PT 9600 only Refer to the Advanced Functions booklet 5 Space bar p 40 1 2 3 8 9 7 4 5 6 P touch 9600 P touch 3600 ...

Страница 13: ...5 Ch 2 Getting Started Getting Started Chapter 2 Getting Started ...

Страница 14: ...touch the cutter s edge Use only the AC adaptor designed exclusively for this machine Use of any other adaptor will void the warranty Do not try to disassemble the AC adaptor When the machine is not being used for a long period of time disconnect the AC adaptor and for the PT 9600 only remove the rechargeable battery to prevent it from leaking and damaging the machine Use only the Ni MH rechargeab...

Страница 15: ...iety of types colors and sizes enabling you to make distinctive color coded and stylized labels AV label cassettes are also available for expanded addressing and filing capabilities This machine has been designed to allow you to change the cassettes quickly and easily 1 Press the cover release button and then lift open the tape compartment cover NOTE Only use the AC adaptor designed exclusively fo...

Страница 16: ...e is equipped with a USB port allowing you to use a USB cable to connect the P touch to a computer running Windows or Mac OS and print labels created using the P touch Editor software NOTE For stamp and AV label cassettes the tightening of the ink ribbon does not apply since they are not equipped with ink ribbons If you are using a new tape cassette provided with a stopper be sure to remove the st...

Страница 17: ...Professional or XP Hard disk free space At least 20 MB 100 MB for a full installation Memory At least 64 MB Monitor VGA or higher graphics card USB port CD ROM drive NOTE To exit Interface mode for a USB connection and return to the text press any key The P touch cannot enter Interface mode for a USB connection while it is printing feeding tape or in Interface mode for an RS 232C con nection PT 96...

Страница 18: ...box appears NOTE Do not connect the P touch to the computer before installing the software otherwise it may not be installed correctly Be sure to connect the P touch only when you are instructed to do so NOTE If the dialog box does not automatically appear double click My Computer on the desktop and then double click the CD ROM drive containing the CD ROM For Windows XP click My Com puter in the S...

Страница 19: ...rmat tem plates Help and fonts are installed Compact Only P touch Editor 3 2 is installed For a Custom installation Selecting Custom then clicking the Next button displays a dialog box that allows you to select which options to install Only the options with a check mark beside them will be installed In addition to the basic options listed for a Typical installation the User s Guide can also be ins...

Страница 20: ...on page 14 To install the serial printer driver refer to the Advanced Functions booklet 9 When installation of P touch Editor is fin ished a dialog box appears allowing you to upgrade P touch Editor 3 2 so that it will be compatible with Access 2000 To upgrade P touch Editor 3 2 for Access 2000 click the Yes button and then follow the instructions that appear If you do not wish to upgrade P touch ...

Страница 21: ...ROM drive containing the CD ROM For Windows XP click My Com puter in the Start menu and then double click the CD ROM drive containing the CD ROM Next double click Setup exe to display the dialog box NOTE To install just the printer driver click the lower button Driver The first Driver Setup dialog box appears allowing you to select whether the P touch will be connected through the USB port or the ...

Страница 22: ...t Installing the USB printer driver With Plug and Play new devices connected to the system are detected and their drivers are automatically installed If the P touch 9600 3600 is to be connected through the USB port its driver will be installed with Plug and Play Be sure to read the installation instructions described below before installing the printer driver supplied on the CD ROM NOTE To change ...

Страница 23: ...og box appears indicating that the printer driver has been installed 4 Click the Finish button 1 In the dialog box that appears allowing you to select whether the P touch will be con nected with a USB cable or an RS 232C cable select USB cable and then click the OK button A dialog box appears informing you that the PT 9600 3600 printer driver will be installed 2 Click the Next button A dialog box ...

Страница 24: ...d installing the software for the PT 9600 3600 6 Click the Finish button A dialog box appears indicating that the installation is finished 7 Select Yes I want to restart my computer now or Yes restart immediately if the printer driver was installed separately click the Finish button to restart the computer and then remove the CD ROM from the computer Replacing or adding a USB printer driver To rep...

Страница 25: ...n the desktop and then double click the CD ROM drive containing the CD ROM For Windows XP click My Com puter in the Start menu and then double click the CD ROM drive containing the CD ROM Next double click Setup exe to display the dialog box NOTE If Replace with new Brother PT 9600 3600 is selected the previously installed printer driver is deleted and replaced with a new one Select this option wh...

Страница 26: ...Finish button A Driver Setup dia log box appears indicating that the printer driver has been installed A Select Yes restart immediately click the Finish button to restart the computer and then remove the CD ROM from the com puter On a Macintosh Computer The Mac version of the software is for a Macin tosh with an English operating system If the software is installed on a Macintosh with an operating...

Страница 27: ...the P touch Editor 3 2 folder to open it 6 Double click the P touch Editor 3 2 Installer icon in the folder that appears The installer starts up 7 Select the installation method For a basic installation Clicking the Install button immediately starts installing all options For a custom installation Clicking the Custom Install button dis plays a dialog box that allows you to select which options to ...

Страница 28: ...r starts up and then the Introduction dialog box appears 7 Click the Next button The Choose Product Components dialog box appears 8 Select the installation method For a typical installation Click the Next button to immediately start installing all options For a minimal installation Select Minimal from the Feature Set list and then click the Next button to start install ing just the P touch Editor ...

Страница 29: ... touch Editor is installed a dialog box appears indicating that the installation is finished A Click the Done button and then restart the computer Installing the P touch Quick Editor software The P touch Quick Editor software provides quick access to the more simple label designing features for easy text input and instant printing of labels Install the P touch Quick Editor soft ware onto a Macinto...

Страница 30: ...dicating that the installation is finished click the Quit button 8 When the dialog box appears asking if you wish to restart the computer click the Restart button to restart the computer 1 With the P touch and the Macintosh turned off connect the P touch to the computer using the enclosed USB interface cable as described on page 9 Be sure to leave the P touch turned off 2 Turn on the Macintosh 3 I...

Страница 31: ...d a dialog box appears indicating that the installation is finished 0 Click the Done button and then restart the computer Installing the printer driver Mac OS X v10 1 or v10 2 To install the printer driver 1 With the P touch and the Macintosh turned off connect the P touch to the computer using the enclosed USB interface cable as described on page 9 Be sure to leave the P touch turned off 2 Turn o...

Страница 32: ...he P touch 9600 3600 2 Pull down the Apple menu and select Chooser to display the Chooser window 3 In the list on the left click the PT 9600 3600 icon Then select the appropriate printer from the list on the right 4 Close the Chooser window to confirm your settings 1 Turn on the P touch 9600 3600 2 Double click the Applications folder on the Macintosh HD to open it 3 Double click the Utilities fol...

Страница 33: ...uide P touch Editor 3 2 On a Macintosh Computer To view the User s Guide from the CD ROM Double click Main htm in the User s Guide folder within the P touch Editor 3 2 folder on the CD ROM To view the User s Guide installed on the hard disk Double click Main htm in the User s Guide folder within the P touch Editor 3 2 folder installed on the computer Using P touch Editor 3 2 P touch Editor 3 2 mak...

Страница 34: ...the help for the Mac version of P touch Editor 3 2 double click Main htm in the Help folder within the P touch Editor 3 2 folder installed on the computer NOTE Although the screens shown in the following expla nations are for Windows 98 98 SE and Me the operations for Windows 2000 and XP and Macin tosh are the same unless specifically mentioned Menu bar Draw toolbar Print toolbar Layout area Datab...

Страница 35: ...ails Using a function available with Microsoft Access 97 Excel files can be linked to mdb files With this function data changed in Excel is automatically updated with the P touch Editor Using P touch Quick Editor P touch Quick Editor enables you to design a simple label layout quickly and easily In addi tion to the various functions available through the buttons in the toolbar right clicking Win d...

Страница 36: ...licking its icon in the system tray at the right of the taskbar On a Macintosh computer NOTE To view the help for the Mac version of P touch Quick Editor double click Help html in the P touch Quick Editor folder installed on the com puter NOTE Although the screens shown in the following expla nations are for Windows 98 98 SE and Me the operations for Windows 2000 and XP and Macin tosh are the same...

Страница 37: ...ect the desired symbol 4 Click the OK button The selected symbol is added at the left of the text Changing the background color The background color of the layout can be changed to suit your preference To change the background color Windows Right click in the label view or text box select Background Color in the menu that appears and then click the desired color from the list Macintosh Hold down t...

Страница 38: ...s only P touch Quick Editor can be hidden by clicking the Hide button Re display P touch Quick Editor by clicking its icon in the system tray at the right of the taskbar Quitting P touch Quick Editor To quit P touch Quick Editor Do either of the following Right click the P touch Quick Editor icon in the system tray and then click Exit in the menu that appears Right click in the label view or text ...

Страница 39: ... 6 In the dialog box that appears indicating that the application is deleted click the OK button Uninstalling the printer driver Uninstall the PT 9600 3600 printer driver from a PC as described below To uninstall the printer driver 1 Turn off the P touch 9600 3600 and then disconnect it from the computer 2 Insert the enclosed CD ROM into the com puter s CD ROM drive A dialog box auto matically app...

Страница 40: ...tor software PT 9600 3600 Prefs icon for the printer driver To uninstall the P touch Editor 3 2 software 1 Double click the Applications folder on the Macintosh HD to open it 2 Double click the P touch Editor 3 2 folder to open it 3 Double click the Uninstall P touch folder 4 Double click the Uninstall P touch icon in the folder that appears The uninstaller starts up 5 Click the Uninstall button A...

Страница 41: ...rinted on laminated tapes can easily be removed if an Auto Cut set ting with a half cut 1 3 5 or 7 was used refer to page 62 Non laminated tape Labels printed on non laminated tapes can be folded in half so that the inside edges of the two backing pieces come off the label enabling the backing to easily be peeled off Iron on transfer tape Iron on transfer tape is used to transfer your text onto ga...

Страница 42: ...nt at the location where you wish to attach it in such a way that the printed text can be read correctly Cover the label with another piece of cloth and use an iron set to a medium high temperature 320 to 356 F 160 to 180 C to press down firmly for 15 to 30 seconds For more details refer to the instructions included with the fabric tape cas sette NOTE White garments made from 100 cotton with a pla...

Страница 43: ...the slit in the side of the stamp holder 5 Hold the end of the stamp film in place with your thumb and then pass the stamp film through the guides while pulling it tight 6 Fold the other end of the stamp film over the other side of the stamp holder and hold it in place with your finger 7 Fit the frame over the stamp film and then push the frame down into place NOTE If an Auto Format stamp template...

Страница 44: ...o prevent ink spills When the stamp is not being used firmly cover it with the cap and always store it standing up with the stamp facing downward Do not leave the stamp laying on its side or leaning Store stamp film holders and stamp film cas settes in a location where they are not exposed to high temperatures high humidity or direct sunlight NOTE Use 1 2 12 mm wide tape to make an identifica tion...

Страница 45: ...37 Ch 3 Functions Functions Chapter 3 Functions ...

Страница 46: ... right Hold down k until the cursor moves to the desired position To move the cursor to the end of the cur rent line of text Hold down d and press k To move the cursor to the beginning of the next text block Hold down h and press k m up arrow key To move the cursor up to the previous line Press m once To move the cursor up several lines Hold down m until the cursor moves to the desired position To...

Страница 47: ...CD display espe cially when the function that you have chosen will delete or affect files In these cases press n is like answering yes To select an item from a list or to apply the selected setting Press n Cancel key e The Cancel key can be used to quit most func tions and return to the previous display without changing the text Some questions asking you to confirm a com mand may appear on the LCD...

Страница 48: ...l letter or a symbol printed on the top half of certain keys Hold down h or t and press the key of the desired letter or symbol Caps key c Caps mode allows you to type uppercase letters continuously without holding down h or t Enter or exit Caps mode by pressing c When the P touch is in Caps mode the Caps indicator on the left side of the display comes on To type in many uppercase letters 1 Press ...

Страница 49: ...tion d n In order for one section of the text to have a dif ferent number of lines than other sections of the text or in order to apply a different format to a section of the text Refer to Block format func tions on page 47 a new text block must be created using the New Block function NOTE To exit Alt mode at any time release a The Alt indicator goes off NOTE A single block of text can only contai...

Страница 50: ...they are combined with The following table shows the available characters NOTE A single label can only contain a maximum of fifty text blocks If the max number of lines per label have already been entered 50 and you press n OR hold down d and press n the error message 50 LINE LIMIT REACHED will appear To split a text block into two position the cur sor under the character that you want to start th...

Страница 51: ...ained in step 2 and holding down d while pressing n Press just n after selecting the last accented character in the series L M N O Length Margin Font Width Size 1 23 4 5 6 7 8 9 A B C D EFKQ Q Q Q Q Q Q Q Q Q Q Q Q Q Q Q Q Q Q Q Q Q Q Q R R R R R R G H I J AUTO 1 10 HELSINKI A AUTO ACCENT a u A U PRESS THE REQUIRED CHARACTER Length Margin Font Width Size 1 23 4 5 6 7 8 9 A B C D EFKQ Q Q Q Q Q Q Q...

Страница 52: ...code OR press e at any time hold down d and press i NOTE To select the default setting press the space bar To return to the barcode data without changing any parameters press e OR hold down d and press i Length Margin Font Width Size 1 23 4 5 6 7 8 9 A B C D E FKQ Q Q Q Q Q Q Q Q Q Q Q Q Q Q Q Q Q Q Q Q Q Q Q R R R R R R G H I J AUTO 1 10 HELSINKI A AUTO PARAMETER CODE 39 O N Length Margin Font Wi...

Страница 53: ...te 2 Hold down q until all of the characters that you wish to delete are removed Line out function d q With the Line Out function you can easily remove an entire line of text To delete a line of text 1 Press j k m or g to position the cur sor within the line of text that you wish to delete 2 Hold down d and press q once Clear function d b When clearing the display before entering new text the Clea...

Страница 54: ... general appearance of the label The label formatting functions will be applied to the entire text In addition the Block Length function can be applied to single blocks Global format functions d 1 With the Global Format functions you change the appearance of the entire text by printing it with various settings applied Font Size Width Style1 Style2 Line Effects underline strikeout Frame Text Alignm...

Страница 55: ...will only be applied to the text block that the cursor is positioned in Line format functions d 3 The Line Format functions allow you to empha size a single line of the text by printing it with a Font Size Width Style1 Style2 Line Effects underline strikeout Frame or Text Alignment setting that is different from the rest of the text To change the Line Format functions 1 Press j k m or g to positio...

Страница 56: ... fonts which are proportional characters use different amounts of space NOTE This step may be skipped if settings for several for mat functions are being applied at the same time Length Margin Font Width Size 1 23 4 5 6 7 8 9 A B C D E FKQ Q Q Q Q Q Q Q Q Q Q Q Q Q Q Q Q Q Q Q Q Q Q Q R R R R R R G H I J L M N O AUTO 1 10 HELSINKI A AUTO P touch 1 _ Length Margin Font Width Size 1 23 4 5 6 7 8 9 A...

Страница 57: ...e Width Maximum Text Size in points 1 4 6 mm 12 3 8 9 mm 20 1 2 12 mm 28 3 4 18 mm 40 1 24 mm 64 1 1 2 36 mm 76 Label Sizes Maximum Text Size in points AV2067 Address labels 3 4 2 5 8 20 mm 67 mm 48 AV1957 Return address labels 3 4 2 1 4 19 mm 57 mm 36 AV1789 File folder labels 5 8 3 1 2 17 mm 89 mm 36 NOTE This step may be skipped if settings for several for mat functions are being applied at the...

Страница 58: ...unction STYLE2 on page 51 NOTE This step may be skipped if settings for several for mat functions are being applied at the same time Length Margin Font Width Size 1 23 4 5 6 7 8 9 A B C D E FKQ Q Q Q Q Q Q Q Q Q Q Q Q Q Q Q Q Q Q Q Q Q Q Q R R R R R R G H I J L M N O AUTO 1 10 HELSINKI A AUTO P touch 1 _ Length Margin Font Width Size 1 23 4 5 6 7 8 9 A B C D E FKQ Q Q Q Q Q Q Q Q Q Q Q Q Q Q Q Q Q...

Страница 59: ...isplay and a sample can be seen on the right side 3 Press m or g until the desired setting is displayed NOTE This step may be skipped if settings for several for mat functions are being applied at the same time NOTE If appears as a setting the Style1 func tion has already been applied to either a line in the current text block if the Block Format or the Global Format function is being set or a blo...

Страница 60: ... To apply several format settings at the same time continue pressing j or k to select the function then pressing m or g to select the desired setting Press n only after the necessary functions have been set OFF STRIKEOUT UNDERLINE Length Margin Font Width Size 1 23 4 5 6 7 8 9 A B C D E FKQ Q Q Q Q Q Q Q Q Q Q Q Q Q Q Q Q Q Q Q Q Q Q Q R R R R R R G H I J L M N O AUTO 1 10 HELSINKI A AUTO P touch ...

Страница 61: ...four ways NOTE This step may be skipped if settings for several for mat functions are being applied at the same time Length Margin Font Width Size 1 23 4 5 6 7 8 9 A B C D EFKQ Q Q Q Q Q Q Q Q Q Q Q Q Q Q Q Q Q Q Q Q Q Q Q R R R R R R G H I J L M N O AUTO 1 10 HELSINKI A AUTO P touch 1 _ Length Margin Font Width Size 1 23 4 5 6 7 8 9 A B C D EFKQ Q Q Q Q Q Q Q Q Q Q Q Q Q Q Q Q Q Q Q Q Q Q Q R R R...

Страница 62: ...skipped if settings for several for mat functions are being applied at the same time Length Margin Font Width Size 1 23 4 5 6 7 8 9 A B C D E FKQ Q Q Q Q Q Q Q Q Q Q Q Q Q Q Q Q Q Q Q Q Q Q Q R R R R R R G H I J L M N O AUTO 1 10 HELSINKI A AUTO P touch 1 _ Length Margin Font Width Size 1 23 4 5 6 7 8 9 A B C D E FKQ Q Q Q Q Q Q Q Q Q Q Q Q Q Q Q Q Q Q Q Q Q Q Q R R R R R R G H I J AUTO 1 10 HELSI...

Страница 63: ...n has already been applied to a block in the current text when the Global Format func tion is being set Changing the setting will can cel the setting that was previously applied To return the function to its default setting OFF press the space bar To return to the text without changing the for matting press e OR hold down d and press 1 or 2 Length Margin Font Width Size 1 23 4 5 6 7 8 9 A B C D EF...

Страница 64: ...splayed The tape margins are displayed in the currently selected unit of measurement inches or centi meters The unit of measurement can be changed with the Setup functions Refer to refer to page 74 To return to the text without changing the for matting press e OR hold down d and press 1 NOTE To apply several format settings at the same time continue pressing j or k to select the function then pres...

Страница 65: ...h is displayed in the currently selected unit of measurement inches or centi meters The unit of measurement can be changed with the Setup functions Refer to refer to page 74 To return to the text without changing the for matting press e OR hold down d and press 1 NOTE To apply several format settings at the same time continue pressing j or k to select the function then pressing m or g to select th...

Страница 66: ...he key when the desired setting is displayed The block length is displayed in the currently selected unit of measurement inches or centi meters The unit of measurement can be changed with the Setup functions Refer to refer to page 74 To return to the text without changing the for matting press e OR hold down d and press 1 or 2 NOTE To apply several format settings at the same time continue pressin...

Страница 67: ... The 15 tem plates available by pressing 6 v on the PT 3600 are designed specifically for the pre sized AV labels which allow you to quickly and eas ily create multiple copies of address and filing labels By pressing 7 w on the PT 3600 a wider variety of templates 39 with the PT 9600 31 with the PT 3600 are available for use with TZ tape The width and length of each label or stamp printed from a t...

Страница 68: ...Q Q Q Q Q Q Q Q Q Q Q Q Q Q Q R R R R R R G H I J AUTO 0 04 HELSINKI A 18P AUTO FORMAT 1NAME _ L M NOTE If g is pressed while the last field is displayed the first field appears If n is pressed while the last field is displayed the MENU screen appears To return to the first field while the MENU screen is displayed press e Accented characters page 42 symbols page 42 barcodes page 43 time stamps Ref...

Страница 69: ...emplate selected by pressing 7 a TZ tape cassette with the specified tape width must be installed Length Margin Font Width Size 1 23 4 5 6 7 8 9 A B C D EFKQ Q Q Q Q Q Q Q Q Q Q Q Q Q Q Q Q Q Q Q Q Q Q Q R R R R R R G H I J AUTO 1 10 HELSINKI A AUTO 01 04 MENU PRINT EXIT L M P P Length Margin Font Width Size 1 23 4 5 6 7 8 9 A B C D E FKQ Q Q Q Q Q Q Q Q Q Q Q Q Q Q Q Q Q Q Q Q Q Q Q R R R R R R G...

Страница 70: ...can be printed without wasting tape When the last label is printed press f to feed the chain of labels and cut it When setting 1 2 3 or 4 is selected the Auto Cut indicator in the upper right corner of the display comes on indicating that the labels will be cut off after the last label in the chain is printed The following Auto Cut settings are available NOTE To scroll the label preview back and f...

Страница 71: ... the tape then cut it This function can also be specified with the P touch Editor 3 2 software NOTE To return the function to its default setting 1 press the space bar To return to the text without changing the set ting for the Auto Cut function press e OR hold down d and press f NOTE Depending on the setting selected for the Auto Cut function TZ labels will automatically be cut after they are pri...

Страница 72: ... m or g and then release the key when the desired setting is displayed To quit the Repeat Printing function press e OR hold down d and press 4 NOTE After printing with the Auto Cut function set to 5 6 7 or 8 press f to feed the tape then cut it NOTE Only one numbering field can be selected from any text If you include a non alphanumeric character such as a symbol in the numbering field only the le...

Страница 73: ...ext can be edited or printed without changing the origi nally stored file However the Store function can be used to replace the previously saved file with the new edited one When a file is no longer needed or more space is necessary the Memory Clear function can be used to delete it With the Memory Print function either a single file or multiple files stored in the memory can be quickly selected f...

Страница 74: ... D E FKQ Q Q Q Q Q Q Q Q Q Q Q Q Q Q Q Q Q Q Q Q Q Q Q R R R R R R G H I J AUTO 1 10 HELSINKI A AUTO STORE FILE 00 _ L M Length Margin Font Width Size 1 23 4 5 6 7 8 9 A B C D E FKQ Q Q Q Q Q Q Q Q Q Q Q Q Q Q Q Q Q Q Q Q Q Q Q R R R R R R G H I J AUTO 1 10 HELSINKI A AUTO L M STORE TZ 00 _ Length Margin Font Width Size 1 23 4 5 6 7 8 9 A B C D E FKQ Q Q Q Q Q Q Q Q Q Q Q Q Q Q Q Q Q Q Q Q Q Q Q R...

Страница 75: ...nt file number NOTE An Auto Format template that has been stored in the memory can be recalled when you are asked to select a template in the Auto Format function NOTE To quit the Recall function without recalling any text press e OR hold down d and press 8 Length Margin Font Width Size 1 23 4 5 6 7 8 9 A B C D EFKQ Q Q Q Q Q Q Q Q Q Q Q Q Q Q Q Q Q Q Q Q Q Q Q R R R R R R G H I J AUTO 1 10 HELSIN...

Страница 76: ...NKI A AUTO 03 04 RECALL MEMORY CLEAR PRINT L M P P Length Margin Font Width Size 1 23 4 5 6 7 8 9 A B C D E FKQ Q Q Q Q Q Q Q Q Q Q Q Q Q Q Q Q Q Q Q Q Q Q Q R R R R R R G H I J AUTO 1 10 HELSINKI A AUTO CLEAR FILE 00 NAMETAG R Becker ABC Tran L M Length Margin Font Width Size 1 23 4 5 6 7 8 9 A B C D E FKQ Q Q Q Q Q Q Q Q Q Q Q Q Q Q Q Q Q Q Q Q Q Q Q R R R R R R G H I J AUTO 1 10 HELSINKI A AUTO...

Страница 77: ...select all files in the memory hold down d and press the space bar To remove a file from those that are to be deleted select the file and then press the space bar to remove the from the right side of the file name NOTE If all of the stored files were selected the message CLEAR ALL appears NOTE To go back and select different files to be deleted press e Length Margin Font Width Size 1 23 4 5 6 7 8 ...

Страница 78: ...bar to remove the from the right side of the file name NOTE To quit the Memory Print function without printing any text press e OR hold down d and press 8 Length Margin Font Width Size 1 23 4 5 6 7 8 9 A B C D E FKQ Q Q Q Q Q Q Q Q Q Q Q Q Q Q Q Q Q Q Q Q Q Q Q R R R R R R G H I J AUTO 1 10 HELSINKI A AUTO PRINT FILE 00 NAMETAG R Becker ABC Tran L M P Length Margin Font Width Size 1 23 4 5 6 7 8 9...

Страница 79: ...ry hold down d and press the space bar To remove a file from those that are to be printed select the file and then press the space bar to remove the from the right side of the file name NOTE The default setting NO CHANGE can be selected by pressing the space bar Length Margin Font Width Size 1 23 4 5 6 7 8 9 A B C D EFKQ Q Q Q Q Q Q Q Q Q Q Q Q Q Q Q Q Q Q Q Q Q Q Q R R R R R R G H I J AUTO 0 4 HE...

Страница 80: ...e display NOTE If multiple files are to be printed follow steps G and H to mark them with If only one file is to be printed steps G and H can be skipped Length Margin Font Width Size 1 23 4 5 6 7 8 9 A B C D E FKQ Q Q Q Q Q Q Q Q Q Q Q Q Q Q Q Q Q Q Q Q Q Q Q R R R R R R G H I J AUTO 1 10 HELSINKI A AUTO PRINT 3 4 00TZ 00 VIDEO S FAVORITE SONGS L M P Length Margin Font Width Size 1 23 4 5 6 7 8 9 ...

Страница 81: ...73 Ch 4 Machine Adjustments Machine Adjustments Chapter 4 Machine Adjustments ...

Страница 82: ...e function to its default setting inch press the space bar NOTE To apply several Setup settings at the same time continue pressing j or k to select the function then pressing m or g to select the desired setting Press n only after the necessary functions have been set Length Margin Font Width Size 1 23 4 5 6 7 8 9 A B C D E FKQ Q Q Q Q Q Q Q Q Q Q Q Q Q Q Q Q Q Q Q Q Q Q Q R R R R R R G H I J 01 0...

Страница 83: ...e Length function NOTE This step may be skipped if settings for several Setup functions are being applied at the same time NOTE To return the function to its default setting 0 press the space bar To decrease the label length select a lower value To increase the label length select a higher value Length Margin Font Width Size 1 23 4 5 6 7 8 9 A B C D EFKQ Q Q Q Q Q Q Q Q Q Q Q Q Q Q Q Q Q Q Q Q Q Q...

Страница 84: ... ting has been continuously adjusted the cutter may be dull Contact your service representative NOTE This step may be skipped if settings for several Setup functions are being applied at the same time NOTE To cut less deep select a lower value To cut deeper select a higher value Adjust the setting in small steps To return the function to its default setting 0 press the space bar NOTE To apply seve...

Страница 85: ... you try to print or use the Numbering function Repeat Printing func tion or Layout Preview function Type in some text before trying to perform any of these operations BUFFER FULL This message appears if you try to add a character a space a new line a new block a sym bol an accented character or a barcode after the maximum number of characters has already been entered Delete some existing text bef...

Страница 86: ...EEPROM ERROR This message appears if a checksum error occurred when the P touch was turned on or if the keyword was damaged and failed to initialize Contact your service rep resentative FEED ERROR This message appears if the AV label sensor cannot detect the labels Replace the AV label cas sette with one that is not empty If this error message appears even after a new AV label cassette is installe...

Страница 87: ...P touch can be added as a second printer Macintosh In the Chooser select the PT 3600 9600 as the printer This message appears if the wrong port is selected for a serial RS 232C connection Specify correct settings for the BAUDRATE BIT LENGTH PARITY and BUSY interface parame ters Check that the interface cable is correctly con nected INVALID CHARACTERS This message appears if a time stamp or user de...

Страница 88: ...unwanted file to make space for the new one MIN 4 DIGITS This message appears if less than the minimum four digits are entered as the barcode data Enter a minimum of four digits before pressing n NO FILES This message appears if no files are stored in the memory when you try to recall delete or print one Store a text file before try ing to recall delete or print one NO TAPE This message appears if...

Страница 89: ...This message appears if a 3 4 18 mm wide tape cassette is not installed when printing an Auto Format template created for 3 4 18 mm wide tape Install a 3 4 18 mm wide tape cassette SET 1 TAPE SET 24mm TAPE This message appears if a 1 24 mm wide tape cassette is not installed when printing an Auto Format template created for 1 24 mm wide tape Install a 1 24 mm wide tape cassette SET 1 1 2 TAPE SET ...

Страница 90: ...than the width of the installed tape PT 9600 only This message appears if the Lines of Text set ting for the ESC P interface mode exceeds the maximum possible for the installed tape Reduce the size of the characters install a tape with a greater width or select the AUTO text size setting Specify the correct setting for the installed tape TEXT TOO LONG This message appears if the length of the text...

Страница 91: ...e Length Block Margin and Block Length function is not within the allow able range This message appears if the specified characters cannot be found in the database This message appears if the val ues for the records to be printed is not within the allowable range Type in a value that is within the allowable range ERROR MESSAGE CAUSE SOLUTION ...

Страница 92: ...e reset button in the battery compartment at the bottom of the machine The text and formats in the display will be erased and under certain circumstances the entire contents of the memory will be cleared 2 The machine does not print or the printed characters are blurred Check that the tape cassette has been inserted properly If the tape cassette is empty replace it with a new one Make sure that th...

Страница 93: ... P touch Backup Manager 5 The machine has locked up i e noth ing happens when a key is pressed Reset the machine by PT 3600 unplugging the AC adaptor and leaving it unplugged for about one minute then and plugging it in again PT 9600 only pressing the reset button in the battery compartment at the bottom of the machine The text and formats in the display and all text files stored in the memory wil...

Страница 94: ...llers Use a dry cotton swab to wipe up and down along each roller while rotating them with your finger 4 Install a tape cassette close the tape com partment cover and then try printing again 5 If a blank streak still appears in the printed label repeat steps 2 through 4 using a cotton swab dipped in isopropyl rubbing alcohol If none of the above works contact your service representative The print ...

Страница 95: ... and remove the tape cas sette if one is installed Using a cotton swab clean off the metal piece in the exit slot to the left of cutter 9 The cutter does not cut correctly Change the HALF CUTTER setting Refer to page 76 The cutter may be dull Contact your ser vice representative Problem Solution Cotton swab Metal piece Area to be cleaned ...

Страница 96: ...ress labels 3 4 2 1 4 19 mm 57 mm AV1789 File folder labels 5 8 3 1 2 17 mm 89 mm Print head 384 dots height 360 dpi resolution Tape cutter Automatic full cut Automatic half cut Dimensions 9 1 3 W 11 15 16 D 4 H 237 W 302 D 101 H mm Weight 4 41 lbs 2 kg Character fonts 10 built in fonts Helsinki Brussels US San Diego Florida Brunei Bold Los Angeles Bermuda Script Istanbul and Letter Gothic Charact...

Страница 97: ...89 Appendix Appendix Appendix ...

Страница 98: ...01 D26 1 2 3 4 5 6 7 8 9 10 11 12 13 14 15 16 17 18 19 20 21 22 23 24 25 26 LETTER E01 E14 1 2 3 4 5 6 7 8 9 10 11 12 13 14 NUMBER F01 F40 1 2 1 3 1 4 1 2 3 4 5 6 7 8 9 0 1 2 3 4 5 6 7 8 9 10 11 12 13 14 0 1 2 3 4 5 6 7 8 9 15 16 17 18 19 20 21 22 23 24 25 26 27 28 0 1 2 3 4 5 6 7 8 9 29 30 31 32 33 34 35 36 37 38 39 40 PICTOGRAPH G01 G14 O 1 2 3 4 5 6 7 8 9 10 11 12 13 14 ELECTRICAL H01 H18 1 2 3...

Страница 99: ...1 22 23 24 25 26 27 28 29 30 31 32 33 34 35 36 37 38 39 40 41 42 SAFETY1 K01 K19 1 2 3 4 5 6 7 8 9 10 11 12 13 14 15 16 17 18 19 FIRE L01 L08 1 2 3 4 5 6 7 8 TRANSPORT M01 M13 1 2 3 4 5 6 7 8 9 10 11 12 13 EMERGENCY N01 N06 1 2 3 4 5 6 SAFETY2 O01 O43 1 2 3 4 5 6 7 8 9 10 11 12 13 14 15 16 17 18 19 20 21 22 23 24 25 26 27 28 29 30 31 32 33 34 35 36 37 38 39 40 41 42 43 Category Symbols ...

Страница 100: ...6 17 18 19 20 21 22 23 24 25 26 27 28 29 30 31 32 33 34 35 36 37 38 39 40 41 42 43 44 GENERAL S01 S27 1 2 3 4 5 6 7 8 9 10 11 12 13 14 15 16 17 18 19 20 21 22 23 24 25 26 27 GARDENING T01 T14 1 2 3 4 5 6 7 8 9 10 11 12 13 14 VEHICLES U01 U13 1 2 3 4 5 6 7 8 9 10 11 12 13 OCCASIONS V01 V18 1 2 3 4 5 6 7 8 9 10 11 12 13 14 15 16 17 18 Category Symbols ...

Страница 101: ... a fixed pitch font all characters use a fixed amount of space as opposed to all of the other fonts which are proportional characters use different amounts of space Value Character 1 2 Value Character Value Character Value Character 3 69 ENQ 87 ETB 4 70 ACK 88 CAN 11 71 BEL 89 EM 28 72 BS 90 SUB 29 73 HT 91 ESC 30 74 LF 91 32 75 VT 92 FS 59 76 FF 92 60 77 CR 93 GS 61 78 SO 93 62 79 SI 94 RS 63 _ 8...

Страница 102: ...ext sizes and widths are shown below Width Size WIDE NORMAL NARROW NARROWEST 76 points 72 points 64 points 56 points 48 points 40 points 36 points 32 points 28 points 24 points 22 points 20 points 18 points 16 points 14 points 12 points 11 points 10 points 9 points 8 points ...

Страница 103: ...e BRUSSELS font setting regardless of the font setting that is selected Characters printed using the smaller sizes may be difficult to read if certain style settings are selected Small characters may appear faint when they are printed 7 points 6 points 5 points 4 points Width Size WIDE NORMAL NARROW NARROWEST ...

Страница 104: ...ing NORMAL NORMAL NORMAL NORMAL NORMAL NORMAL Helsinki Brussels US San Diego Florida Brunei Bold Los Angeles Bermuda Script Istanbul Letter Gothic Style1 Setting NORMAL BOLD OUTLINE SOLID SHADOW INVERT Style2 Setting ITALIC ITALIC ITALIC ITALIC ITALIC ITALIC Helsinki Brussels US San Diego Florida Brunei Bold ...

Страница 105: ...tyles NORMAL BOLD OUTLINE SOLID SHADOW and INVERT The VERTICAL style setting cannot be combined with the ITALIC style setting Los Angeles Bermuda Script Istanbul Letter Gothic Style1 Setting NORMAL BOLD OUTLINE SOLID SHADOW INVERT Style2 Setting ITALIC ITALIC ITALIC ITALIC ITALIC ITALIC ...

Страница 106: ...ix Framing and shading patterns p 53 The following frame and shading patterns are available Set ting Sample Set ting Sample Set ting Sample 1 11 21 2 12 22 3 13 23 4 14 24 5 15 25 6 16 26 7 17 27 8 18 28 9 19 29 10 20 30 ...

Страница 107: ...abel Length Sample 1 ADDRESS 1 1 24 mm 3 2 80 mm 2 ADDRESS 2 1 24 mm 3 1 78 mm 3 ADDRESS 3 1 24 mm 4 1 104 mm 4 ADDRESS 4 1 1 2 36 mm 3 4 86 mm 5 ASSET 1 24 mm 3 3 84 mm 6 WALLPLATE 1 1 2 36 mm 7 3 186 mm 7 NAMEBADGE 1 1 18 mm 4 0 102 mm 8 NAMEBADGE 2 1 1 2 36 mm 3 9 98 mm 9 NAMEBADGE 3 3 4 18 mm 4 0 102 mm 10 SALE 1 1 2 36 mm AUTO ...

Страница 108: ... mm 14 FLOPPY 1 1 24 mm 2 8 70 mm 15 FLOPPY 2 1 24 mm 2 8 70 mm 16 FLOPPY 3 1 1 2 36 mm 2 8 70 mm 17 VCR VHS 1 3 4 18 mm 5 5 140 mm 18 VCR VHS 2 3 4 18 mm 5 5 140 mm 19 VCR 8mm 1 3 8 9 mm 2 9 73 mm 20 VCR 8mm 2 1 2 12 mm 3 6 92 mm 21 VCR VHSC 3 4 18 mm 3 2 81 mm No Template Name Tape Width Label Length Sample ...

Страница 109: ...1 2 12 mm 1 7 42 mm 26 FILE 1 1 1 2 36 mm 7 9 200 mm 27 FILE 2 1 24 mm 7 5 190 mm 28 STAMP NORMAL L STAMP L 1 24 mm 4 1 2 115 mm 29 STAMP NORMAL M STAMP M 3 4 18 mm 4 1 8 105 mm 30 STAMP 2LINE L STAMP L 1 24 mm 4 1 2 115 mm 31 STAMP VERTICAL M STAMP M 3 4 18 mm 4 1 8 105 mm No Template Name Tape Width Label Length Sample ...

Страница 110: ...2 2067 ADDRESS 2 AV2067 3 4 2 5 8 20 mm 67 mm 3 2067 ADDRESS 3 AV2067 3 4 2 5 8 20 mm 67 mm 4 2067 ADDRESS 4 AV2067 3 4 2 5 8 20 mm 67 mm 5 2067 ADDRESS 5 AV2067 3 4 2 5 8 20 mm 67 mm 6 2067 ADDRESS 6 AV2067 3 4 2 5 8 20 mm 67 mm 7 2067 ADDRESS 7 AV2067 3 4 2 5 8 20 mm 67 mm 8 1957 RETURN 1 AV1957 3 4 2 1 4 19 mm 57 mm 9 1957 RETURN 2 AV1957 3 4 2 1 4 19 mm 57 mm ...

Страница 111: ...mm 11 1957 RETURN 4 AV1957 3 4 2 1 4 19 mm 57 mm 12 1789 FILING 1 AV1789 5 8 3 1 2 17 mm 89 mm 13 1789 FILING 2 AV1789 5 8 3 1 2 17 mm 89 mm 14 1789 FILING 3 AV1789 5 8 3 1 2 17 mm 89 mm 15 1789 FILING 4 AV1789 5 8 3 1 2 17 mm 89 mm No Template Name Label Type Sample ...

Страница 112: ...les of the available template text styles are shown below CHAR style Sample Font Style ORIGINAL Template default ITALIC Template default ITALIC DYNAMIC ISTANBUL SOLID CUTE FLORIDA OUTLINE FORMAL BRUSSELS ITALIC ELEGANT US NORMAL NATURAL SAN DIEGO NORMAL ...

Страница 113: ...105 Appendix Appendix ...

Страница 114: ...k length 57 Block margins 57 Character size 48 49 Character style 51 Character width 50 Font 48 Framing 53 Global format 46 Label length 56 Line effect 52 Line format 47 Margins 55 Text alignment 54 Text in template 61 Text rotation 55 Character size 48 Character styles 50 51 CHECK DIGIT parameter 43 Cleaning Print head 86 Rollers 86 Clear function 45 Clear key 45 Clearing display 45 CODABAR speci...

Страница 115: ...nd formats 45 Text lines 45 Error messages 77 F Fabric tape 34 Feed Cut key 63 Font function 48 Format functions Block 47 Global 46 Format templates 59 Formatting Entire text 46 Text 46 Text automatically 59 Text blocks 47 Frame function 53 Framing 53 Functions Accent 42 Auto Cut 62 Auto Format 59 Barcode 43 Block Format 47 Block Length 57 Block Margin 57 Clear 45 Font 48 Frame 53 Global Format 46...

Страница 116: ...mber of blocks 42 Number of characters in memory 65 Number of lines 41 Text size 49 Memory functions 65 Mirror Printing function 58 Modes Alt 41 Caps 40 Insert 40 Multiple copies 63 N New Block function 41 New line 41 Non laminated tape 33 Numbering function 64 O Operating systems 9 Overwriting stored files 67 P PARAMETER menu 44 PC operating systems 9 PC connecting to 8 Picture add to text 42 Pic...

Страница 117: ...plies 110 Symbol function 42 Symbol key 42 Symbols 42 90 System configuration 9 18 T Tape Fabric 34 Iron on transfer 33 Laminated 33 Non laminated 33 Tape cassette Installing 7 Replacing 7 Tape compartment cover 2 Tape exit slot 2 Tape Length function 56 Tape Margin function 55 Tapes 110 Template text Editing 61 Entering 60 Printing 61 71 Style 60 71 Text Alignment function 53 Text formats 46 Text...

Страница 118: ...lack characters on white adhesive 1 38 99 TZ S661 Industrial strong adhesive black characters on yellow adhesive 1 38 99 1 24 mm wide laminated tapes TZ 151 Black characters on clear adhesive 1 25 99 TZ 251 Black characters on white adhesive 1 28 99 TZ 451 Black characters on red adhesive 1 28 99 TZ 651 Black characters on yellow adhesive 1 28 99 TZ 252 Red characters on white adhesive 1 28 99 TZ ...

Страница 119: ... on red adhesive 1 20 99 TZ 435 White characters on red adhesive 1 24 99 TZ 531 Black characters on blue adhesive 1 20 99 TZ 631 Black characters on yellow adhesive 1 20 99 TZ 731 Black characters on green adhesive 1 20 99 TZ M31 Black characters on clear mat adhesive 1 20 99 TZ S131 Industrial strong adhesive black characters on clear adhesive 1 23 99 TZ S231 Industrial strong adhesive black char...

Страница 120: ...adhesive 1 21 99 1 2 12 mm TZ N631 Black characters on yellow adhesive 1 17 99 TZ N531 Black characters on blue adhesive 1 17 99 TZ NF31 Black characters on purple adhesive 1 17 99 Stock No Description Qty Package Price 3 4 18 mm TZ IY41 Black characters 1 29 99 Stock No Description Qty Package Price 3 4 18 mm TZ SE4 Black characters on white adhesive 1 49 95 Stock No Description Qty Package Price...

Страница 121: ...ge stamp with black ink 1 49 95 SH MB Additional stamper for Medium stamp with black ink 1 24 95 Stock No Description Qty Package Price TZ CL6 Cleaning Tape 1 34 95 BA 9000 Rechargeable Battery PT 9600 only 1 CC 9000 Carrying Case 1 Stock No Description Qty Package Price AV2067 Address labels 3 4 2 5 8 20 mm 67 mm 1 19 99 AV1957 Return address labels 3 4 2 1 4 19 mm 57 mm 1 19 99 AV1789 File folde...

Страница 122: ...uct information and downloading the latest drivers http www brother ca or http www brother com Pour de l information sur les produits et pour télécharger les dernier pilotes http www brother ca ou http www brother com Accessories Supplies Accessoires et fournitures To order Brother Accessories or supplies by Visa or MasterCard you may call toll free 1 877 BROTHER 1 877 276 8437 or to order by mail...

Страница 123: ...elect the desired items 2 Complete the order form indicating the quantity of each item for your records 3 Enter the total on the Supply Accessory Total line below for your records 4 Add appropriate sales tax and shipping handling costs for your records 5 Have your Visa or MasterCard number and expiration date available G S T R100663764 P S T 100100117TQ0001 Prices subject to change without notice ...

Страница 124: ...t information and downloading the latest drivers http www brother ca or http www brother com Pour de l information sur les produits et pour télécharger les dernier pilotes http www brother ca ou http www brother com Accessories Supplies Accessoires et fournitures To order Brother Accessories or supplies by Visa or MasterCard you may call toll free 1 877 BROTHER 1 877 276 8437 or to order by mail c...

Страница 125: ...elect the desired items 2 Complete the order form indicating the quantity of each item for your records 3 Enter the total on the Supply Accessory Total line below for your records 4 Add appropriate sales tax and shipping handling costs for your records 5 Have your Visa or MasterCard number and expiration date available G S T R100663764 P S T 100100117TQ0001 Prices subject to change without notice ...

Страница 126: ......

Страница 127: ...Printed in China LA8770001 ...

Страница 128: ... Read this User s Guide before you start using your P touch Keep this User s Guide in a handy place for future reference ADVANCED FUNCTIONS ADVANCED FUNCTIONS ADVANCED FUNCTIONS 9600 9600 ...

Страница 129: ...ansfer mode d n Using a template transferred from a computer If a database is linked PF key m or g to select a record Continue with 7 or 8 Type in each line of text then n Continue with 1 2 3 4 5 or 6 If a database is not linked PF key Type in each line of text then n Continue with 1 2 3 or 4 1 Printing a label with a template transferred from a computer m or g to select PRINT n 2 Printing multi p...

Страница 130: ...ype in characters n 8 Searching the database for record number d space bar twice m or g to select or type number n Using the backlight and clock Lighting up the screen and display ing the clock Setting the clock d j or k to select the parameter m or g to select the set ting n Adding a time stamp d t j or k to select the parameter m or g to select the set ting n Using the macro functions Assigning ...

Страница 131: ...attery 2 Recharging the battery 2 Chapter 2 Advanced Functions 3 Performing advanced operations 4 Using data transferred to from a computer 6 Using Backup Manager 13 Printing from a computer RS 232C connection 15 ADVANCED FUNCTION ERROR MESSAGES 22 Appendix 23 INDEX 25 ...

Страница 132: ...ii ...

Страница 133: ...1 Ch 1 Getting Started Getting Started Chapter 1 Getting Started ...

Страница 134: ...ug on the wires into the connector in the battery compartment 4 Attach the battery compartment cover by inserting the three tabs on the cover into the matching slots at the edge of the compartment then pushing down firmly on the cover until it snaps into place Recharging the battery The Ni MH battery starts recharging as soon as the PT 9600 is plugged into an electrical outlet with the AC adaptor ...

Страница 135: ...3 Ch 2 Advanced Functions Advanced Functions Chapter 2 Advanced Functions ...

Страница 136: ...e label 1 Press j k m or g to position the cur sor at the point in the text where you want to add the time stamp 2 Hold down d and press t NOTE If the PT 9600 is plugged in using the AC adaptor the screen backlight remains on until is pressed again to turn it off If the PT 9600 is running on the rechargeable battery the screen backlight automat ically goes off if no key is pressed for 30 seconds L...

Страница 137: ...ion assigned to a PF key Press the PF key where the operation that you wish to perform is assigned NOTE If ON is selected the time stamp mark d is added to the text at the cursor s position NOTE No operation is recorded if or any other key that does not perform a function is pressed NOTE To return to the text without assigning an operation to a PF key press e OR press Length Margin Font Width Size...

Страница 138: ...eration from being performed press o To erase the operation assigned to a PF key start up P touch Backup Manager which was installed with P touch Editor 3 2 and then erase the macro While an operation assigned to a PF key is being performed the operation can be over written by pressing the keys of the new opera tion NOTE Data transfer between the computer and PT 9600 is through the USB connection ...

Страница 139: ...ou wish to assign the character image 4 Click the Start button to convert the charac ter image to the P touch image format and begin transferring it A dialog box appears indicating that the character image is being transferred NOTE Be sure not to turn off the PT 9600 while data is being sent to it otherwise the data will be lost Length Margin Font Width Size 1 23 4 5 6 7 8 9 A B C D EFKQ Q Q Q Q Q...

Страница 140: ...sh to assign the template NOTE Only the character image files that are selected will be transferred To transfer more than one character image at the same time hold down the keyboard s Ctrl key and then click the names of the desired character images To stop transferring the character image click the Cancel button in the dialog box that appears during transfer NOTE Since data saved with and transfe...

Страница 141: ...h the P touch Barcodes specified with settings not com patible with the P touch barcodes settings will not be printed correctly A template created with P touch Editor should have a fixed length with a maximum of 39 1 m The template and database should be cre ated so that no more than 1000 characters per label will be printed Fields that extend out of the print area will not be printed either parti...

Страница 142: ...after typing in the text for the last field the MENU screen appears in the display NOTE Before transferring data make sure that the P touch is in Transfer Mode Refer to Transfer mode on page 6 NOTE To select a different database that has already been converted to a csv file click the Modify Folder button In the Browse For Folder dialog box that appears select the folder containing the desired temp...

Страница 143: ...text in a template press e press m or g until moves beside CANCEL EDITING and then press r OR press n Accented characters Refer to the User s Guide symbols Refer to the User s Guide barcodes Refer to the User s Guide time stamps page 4 and user defined character images page 7 can be entered in the fields To select a different field press m or g until the desired field is displayed If a PF key with...

Страница 144: ...bers of the first and last records in the database appear NOTE To change the setting in steps of 5 hold down either m or g and then release the key when the desired setting is displayed Length Margin Font Width Size 1 23 4 5 6 7 8 9 A B C D E FKQ Q Q Q Q Q Q Q Q Q Q Q Q Q Q Q Q Q Q Q Q Q Q Q R R R R R R G H I J AUTO 0 4 HELSINKI A AUTO L M N O 06 06 NEXT RECORD MENU CONT PRINT Length Margin Font W...

Страница 145: ...ddi tion data backed up onto the computer can be transferred back restored onto the P touch Starting up Backup Manager To start up Backup Manager 1 Click the Start button in the taskbar to dis play the Start menu 2 Point to Programs 3 Point to P touch Editor 3 2 4 Click Backup Manager When Backup Manager is started up the follow ing window is displayed Backing up P touch data To back up P touch da...

Страница 146: ...the desired files To select all data click the Select All button NOTE To stop transferring the data click the Cancel but ton in the dialog box that appears during transfer NOTE Before transferring data make sure that the P touch is in Transfer Mode Refer to Transfer mode on page 6 NOTE Only the selected data will be transferred to the P touch To select more than one file to restore hold down the k...

Страница 147: ...rs allowing you to select whether the P touch will be con nected with a USB cable or an RS 232C cable select Serial cable and then click the OK button A dialog box appears allowing you to select whether to install or uninstall the printer driver 3 Select Install and then click the Next but ton 4 Skip to step 5 A dialog box appears allowing you to add a P touch PTCOM port NOTE The core reduces elec...

Страница 148: ... the COM2 port and then click the Next button On Windows Me 2000 and XP select the port added in step 4 A dialog box appears allowing you to check how the installation will be carried out 6 Check that the installation will be carried out as desired and then click the Next but ton A dialog box appears indicating that the printer driver has been installed 7 If the port where the PT 9600 is connected...

Страница 149: ...ble to communicate with the computer To enter exit Interface mode RS 232C connection Hold down d and press 0 NOTE Normally 9600 bps is selected however your computer may not be able to support a baud rate of 9600 bps If this is the case refer to the computer s instruction manual and select the maximum possi ble baud rate NOTE To change the settings click the Back button and return to step 9 NOTE I...

Страница 150: ...wn d and press 2 2 Press j or k until the desired parameter is displayed The current setting is shown NOTE To exit Interface mode and return to the text hold down d and press 0 To go offline press e To go back online press the space bar Before using the USB connection exit Interface mode hold down d and press 0 The baud rate of the PT 9600 does not change automatically If a baud rate of 9600 bps c...

Страница 151: ...v å û ª µ 7 7 G W g w ç ù º 8 8 H X h x ê ÿ 9 9 I Y i y ë Ö A J Z j z è Ü Ω B K k ï δ C L l î D M m ì ø 2 E N n Ä Pts F O o Å ƒ Parameter Settings 23 24 40 5B 5C 5D 5E 60 7B 7C 7D 7E USA France à ç é ù è Germany Ä Ö Ü ä ö ü ß UK Denmark I Æ Ø Å æ ø å Sweden É Ä Ö Å Ü é ä ö å ü Italy é ù à ò è ì Spain I Pts Ñ ñ Japan Norway É Æ Ø Å Ü é æ ø å ü Denmark II É Æ Ø Å Ü é æ ø å ü Spain II á Ñ é í ñ ó ú L...

Страница 152: ...ing any settings press e OR hold down dand press 1 Control code Command CR LF CR LF LF CR Interpreted as a Return or Print when data reaches the number of lines of the LINES OF TEXT setting FF Print start ESC 0 ESC 2 ESC 3 ESC A Line spacing commands ESC Absolute location control ESC Relative location control ESC Printer initialization ESC K ESC L ESC Y ESC Z ESC Bit Image data commands Please ref...

Страница 153: ...TER r0 OFF r1 ON u UNITS OF MEASUREMENT WILL BE IGNORED x HORIZONTAL POSITION WILL BE IGNORED Y VERTICAL OFFSET WILL BE IGNORED h HEIGHT OF BAR CODE WILL BE IGNORED B OR b HEAD CODE OF BAR CODE DATA BAR CODE DATA SERIES OF DATA CORRESPONDING TO EACH TYPE STANDARD A check digit will be generated if a is added at the end of the data string TERMINATOR FIXED NOTE Interface Setting Connect to an IBM PC...

Страница 154: ...n the text only contains a time stamp or a user defined character image Enter other text before trying to use the Number ing function NO DATABASE OR INCORRECT FORMAT This message appears if a data base is linked to the template but there is no database on the P touch or if the record fields in the database on the P touch are different from that used in the linked database Transfer the correct data...

Страница 155: ...23 Appendix Appendix Appendix ...

Страница 156: ... and AV label templates refer to the Appendix in the User s Guide No Template Name Tape Width Label Length Sample 32 CAUTION1 1 1 1 2 36 mm 4 0 102 mm 33 CAUTION1 2 1 1 2 36 mm 4 0 102 mm 34 CAUTION2 1 24 mm 4 0 102 mm 35 PIPE 1 3 4 18 mm AUTO 36 PIPE 2 1 24 mm AUTO 37 BIN BOX 3 4 18 mm 2 8 70 mm 38 NETWORK 1 1 2 12 mm 2 8 70 mm 39 NETWORK 2 3 4 18 mm 1 5 38 mm ...

Страница 157: ...Database search 12 Date time formats 4 Date Time function 4 Downloading data to PT 9600 6 E Editing Text in template 10 Entering Transfer mode 6 Error messages 22 F Frequently performed operations 5 Functions Clock Setting 4 Date Time 4 Macro 5 I Interface mode 17 INTERFACE MODE parameter 19 Interface parameters 18 L Lighting up screen 4 LINES OF TEXT parameter 18 M Macro function 5 Modes Interfac...

Страница 158: ...19 Template text Editing 10 11 Printing 11 Templates from computer 8 Time date formats 4 Time stamps 4 Transfer mode 6 Transferring Character image from computer 7 Data to from computer 6 U User defined character image 7 Using computer data 6 ...

Страница 159: ...Printed in China LA8784001 ...

Отзывы: