background image

Before Faxing

Telephone Line Interference/
VoIP

If you are having problems sending or
receiving a fax due to possible interference on
the telephone line or if you are using a VoIP
system, we recommend changing the modem
speed to minimise errors in fax operations.

1

Press 

[Settings]

 > 

[All

Settings]

 > 

[Initial Setup]

 >

[Compatibility]

.

2

Press the option you want.

[Basic(for VoIP)]

 reduces the

modem speed to 9,600 bps and turns
off colour fax receiving and Error
Correction Mode (ECM), except for
colour fax-sending. Unless
interference is a recurring problem on
your telephone line, you may prefer
to use it only when needed.

To improve compatibility with most
VoIP services, Brother recommends
changing the compatibility setting to

[Basic(for VoIP)]

.

[Normal]

 sets the modem speed at

14,400 bps.

[High]

 sets the modem speed at

33,600 bps.

3

Press 

.

• VoIP (Voice over IP) is a type of phone

system that uses an Internet
connection, rather than a traditional
phone line.

Send a Fax

1

Load your document in the ADF or place
it on the scanner glass.

2

Press 

[Fax]

.

If 

[Fax Preview]

 is set to 

[On]

, press

[Fax]

 > 

[Sending Faxes]

.

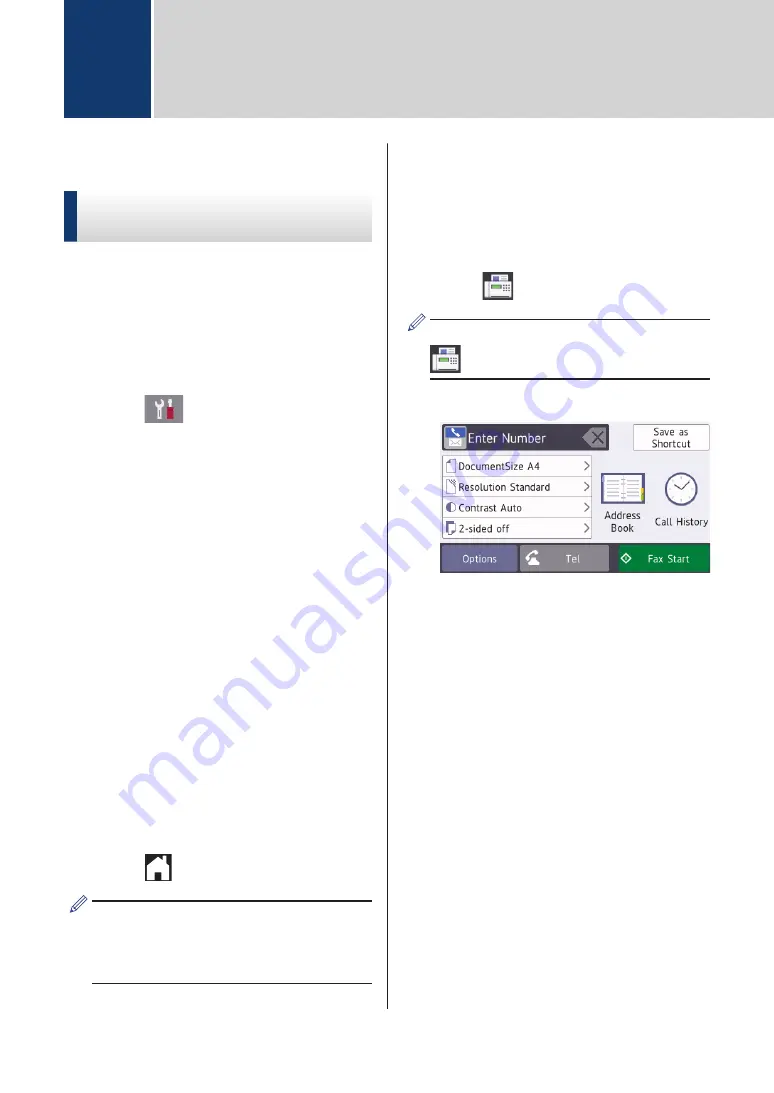
The touchscreen displays:

3

Enter the fax number in one of the
following ways:

• Dial Pad (Enter the fax number

manually.)

Press all digits of the number using
the dial pad.

[Redial]

 (Redial the last number

you dialled.)

Press 

[Call History]

 >

[Redial]

.

[Outgoing Call]

 (Select a

number from the Outgoing Call
history.)

Press 

[Call History]

 >

[Outgoing Call]

.

Select the number you want, and
then press 

[Apply]

.

[Caller ID History]

 (Select a

number from the Caller ID history.)

6

Fax

14

Содержание mfc-j945dw

Страница 1: ...MFC J6945DW MFC J6947DW Brother recommends keeping this guide next to your Brother machine for quick reference Online User s Guide For more advanced instructions information and product specifications see the Online User s Guide at support brother com manuals ...

Страница 2: ...sic machine maintenance See troubleshooting tips Printed or on Brother Installation Disc In the box Online User s Guide This guide includes the additional contents of the Reference Guide In addition to information about the PC Print Direct Print Scan Copy Fax Internet services Mobile functions and Brother ControlCenter operations useful information is included about using the machine on a network ...

Страница 3: ...ooting page on the Brother Solutions Center at support brother com Provides several ways to search Displays related questions for more information Receives regular updates based on customer feedback Important Note In this User s Guide the illustrations of the MFC J6945DW are used unless otherwise specified 2 ...

Страница 4: ...s to dial telephone or fax numbers and to enter the number of copies 5 LED Power Indicator The LED lights up depending on the machine s power status When the machine is in Sleep Mode the LED blinks 6 Power On Off Press to turn the machine on Press and hold down to turn the machine off The touchscreen will display Shutting Down and will stay on for a few seconds before turning itself off If you hav...

Страница 5: ...ree Shortcuts tabs are available with six Shortcuts on each tab Press displayed at the bottom of the screen to access the Home Screens 4 Wireless Status Each icon in the following table shows the wireless network status Your machine is not connected to the wireless access point router Press this button to configure wireless settings For more detailed information see the Quick Setup Guide The wirel...

Страница 6: ...ing icon 9 The warning icon appears when there is an error or maintenance message press to view the details and then press to return to the Home screen Navigate the Touchscreen Press your finger on the LCD to operate it To display and access all the options swipe left right up down or press d c or a b on the LCD to scroll through them IMPORTANT DO NOT press the LCD with a sharp object such as a pe...

Страница 7: ...ycled paper only Adjust the paper guides Landscape orientation A5 A6 Photo Photo L Photo 2L Index card Envelopes Adjust the paper guides Portrait orientation A3 Ledger Legal Folio Mexico Legal India Legal A3 Ledger Legal Folio Mexico Legal India Legal Plain paper and Recycled paper only Extend the tray using the green slider then adjust the paper guides Portrait orientation 1 Tray 3 is available o...

Страница 8: ...o Mexico Legal India Legal A5 A6 Photo Photo L Photo 2L Index card Envelopes 1 2 Adjust the MP tray paper guides Portrait orientation For more detailed information see the Online User s Guide Load Paper 2 Unfold the paper support flap 2 1 3 Change the paper size setting in the machine s menu if needed 2 Paper Handling 7 ...

Страница 9: ... 1 3 Place your document face up in the ADF as shown in the illustration until you feel the document touch the feed rollers and the machine beeps Load Documents on the Scanner Glass 1 Lift the document cover 2 Place the document face down in the upper left corner of the scanner glass as shown in the illustration 3 Close the document cover 8 ...

Страница 10: ...on Print a Document Mac 1 From an application such as Apple TextEdit click the File menu and then select Print 2 Select Brother MFC XXXX where XXXX is the name of your model 3 Click Print 4 Complete your print operation Various Printing To use the various printing features click the printing properties or preferences button to change the printer setting Print on Both Sides of the Paper Automatical...

Страница 11: ...enter the number of copies using the touchscreen keyboard Press OK You can also press or on the touchscreen or use the dial pad numbers 5 Press OK 6 Repeat the last three steps until you have selected all the photos you want to print 7 Press OK 8 Read and confirm the displayed list of options 9 To change the print settings press Print Settings When finished press OK 10 Press Start Print Settings O...

Страница 12: ...press a or b to display the PDF file you want to print and then press it 4 Press to display the keyboard on the touchscreen and then enter the number of copies using the touchscreen keyboard Press OK You can also press or on the touchscreen or use the dial pad numbers 5 Read and confirm the displayed list of options 6 To change the print settings press Print Settings When finished press OK 7 Press...

Страница 13: ...of copies using the touchscreen keyboard Press OK You can also press or on the touchscreen or use the dial pad numbers Options Press to change the copy settings for the next copy only When finished press OK After you have finished selecting new options you can save them by pressing the Save as Shortcut button 5 Press Mono Start or Colour Start To stop copying press Other Copy Options You can use v...

Страница 14: ...d over the network swipe up or down or press a or b to display the computer where you want to send the data and then press the computer name If the LCD prompts you to enter a PIN use the LCD to enter the four digit PIN for the computer and then press OK 7 Do one of the following To change the settings press Options or Set at Device Press Start to start scanning without changing additional settings...

Страница 15: ...er recommends changing the compatibility setting to Basic for VoIP Normal sets the modem speed at 14 400 bps High sets the modem speed at 33 600 bps 3 Press VoIP Voice over IP is a type of phone system that uses an Internet connection rather than a traditional phone line Send a Fax 1 Load your document in the ADF or place it on the scanner glass 2 Press Fax If Fax Preview is set to On press Fax Se...

Страница 16: ...ional settings press Options When finished press OK 6 Press Fax Start 7 Do one of the following If you are using the ADF the machine starts scanning and sending the document If you are using the scanner glass and selected Mono in the Colour Setting the machine starts scanning the first page Go to the next step If you are using the scanner glass and selected Colour in the Colour Setting the touchsc...

Страница 17: ...r an external telephone or external telephone answering device connected on the same line as the machine Yes Fax Only No No No Manual Yes External TAD Fax Tel Are you using the voice message function of an external telephone answering device Do you want the machine to answer fax and telephone calls automatically Yes 1 Press Settings All Settings Fax Setup Receive Receive Mode If the option to chan...

Страница 18: ...ity of each colour Press the number of the pattern 1 4 that most closely matches the printing result 6 Do one of the following If print head cleaning is needed press Start to start the cleaning procedure If print head cleaning is not needed the Maintenance screen reappears on the touchscreen Press 7 After the cleaning procedure is finished the touchscreen asks if you want to print the Print Qualit...

Страница 19: ...t 2 Press Next 3 Press Yes after a confirmation message if a print quality check has been completed appears on the LCD 4 Press Auto or Manual If you select the Auto mode the print alignment is automatically adjusted by scanning the alignment check sheet If you select the Manual mode you need to input information printed on the alignment check sheet manually 5 Select the paper size to print the ali...

Страница 20: ...nk cartridge is near the end of its life or having a problem one of the following icons appears The ink level is low The ink cartridge is at the end of its life There is a problem with the ink cartridge To check or print the ink cartridge model numbers press Back to return to the Ink menu screen Press Ink Cartridge Model and follow the instructions on the touchscreen 2 Press You can also check the...

Страница 21: ... machine and your computer For network models The access point for wireless router or hub is turned on and its link button is blinking To find the error and the solution check the LCD or the machine s status in Status Monitor on your computer Using the LCD Using the Status Monitor 1 Follow the messages on the LCD 2 See the instructions in the following Error and Maintenance Messages table 3 If you...

Страница 22: ...install a new ink cartridge in the following cases If you unplug the machine or remove the ink cartridge If you select the Slow Drying Paper option on the machine or in the printer driver BT Call Sign On BT Call Sign is set to On You cannot change the Receive Mode from Manual to another mode Set BT Call Sign to Off For more detailed information see the Online User s Guide Enable the Machine to Wor...

Страница 23: ...t in hub are not supported Unplug the device from the USB direct interface Ink Absorber NearFull The ink absorber box must be replaced soon Contact Brother customer service or your local Brother dealer The ink absorber box absorbs the small amount of ink emitted during print head cleaning Ink Absorber Pad Full The ink absorber box must be replaced Contact Brother customer service or your local Bro...

Страница 24: ...t contains fewer than 999 files Delete unused files and try again Delete unused files from your USB flash drive to make some free space and then try again No Caller ID There is no incoming call history You did not receive calls or you have not subscribed to the Caller ID service from your telephone company To use the Caller ID feature contact your telephone company For more detailed information se...

Страница 25: ...ed in the memory For more detailed information see the Online User s Guide Print a Fax Stored in the Machine s Memory Paper Low Tray 1 Paper Low Tray 2 Paper Low Tray 3 Refill the paper in the paper tray indicated on the LCD Paper Size Mismatch 1 Check that the paper size you selected on the machine s display matches the size of the paper in the tray For more detailed information see the Online Us...

Страница 26: ...ridges For more detailed information see the Online User s Guide Replace the Ink Cartridges You can still scan even if the ink is low or needs to be replaced Sending Error Wrong Document Size Settings Select the correct document size option and then press Fax Start again Touchscreen Initialisation Failed The touchscreen was pressed before the power on initialisation was completed Make sure nothing...

Страница 27: ...ed information see the Online User s Guide Transfer Your Faxes or Fax Journal Report Unusable Device Disconnect device from front connector turn machine off then on A broken device is connected to the USB direct interface Unplug the device from the USB direct interface then press to turn the machine off and then on again Unusable Device Please disconnect USB device A USB device or USB flash drive ...

Страница 28: ... Telephone Line Interference VoIP on page 14 Supply Specifications on page 28 Related Information B Troubleshooting 27 ...

Страница 29: ...nk delivery tubes for high quality printouts This process will only happen once After this process is complete the cartridges provided with your machine will have a lower yield than LC3237 cartridges approximately 75 for Black and 65 for colour 1 With all following ink cartridges you can print the specified number of pages Replacement Supplies Black LC3239XLBK Yellow LC3239XLY Cyan LC3239XLC Magen...

Страница 30: ...top to access our FREE website designed as a resource to help you easily create and print customised materials for business and home use with photos text and creativity Mac users can access Brother CreativeCenter at this web address www brother com creativecenter C Appendix 29 ...

Страница 31: ...Visit us on the World Wide Web www brother com UK Version 0 ...

Отзывы: