background image

Brocade MLX Series and Brocade NetIron XMR Installation Guide

145

53-1004195-02

Installing a NetIron XMR 8000 router

DRAFT: BROCADE CONFIDENTIAL

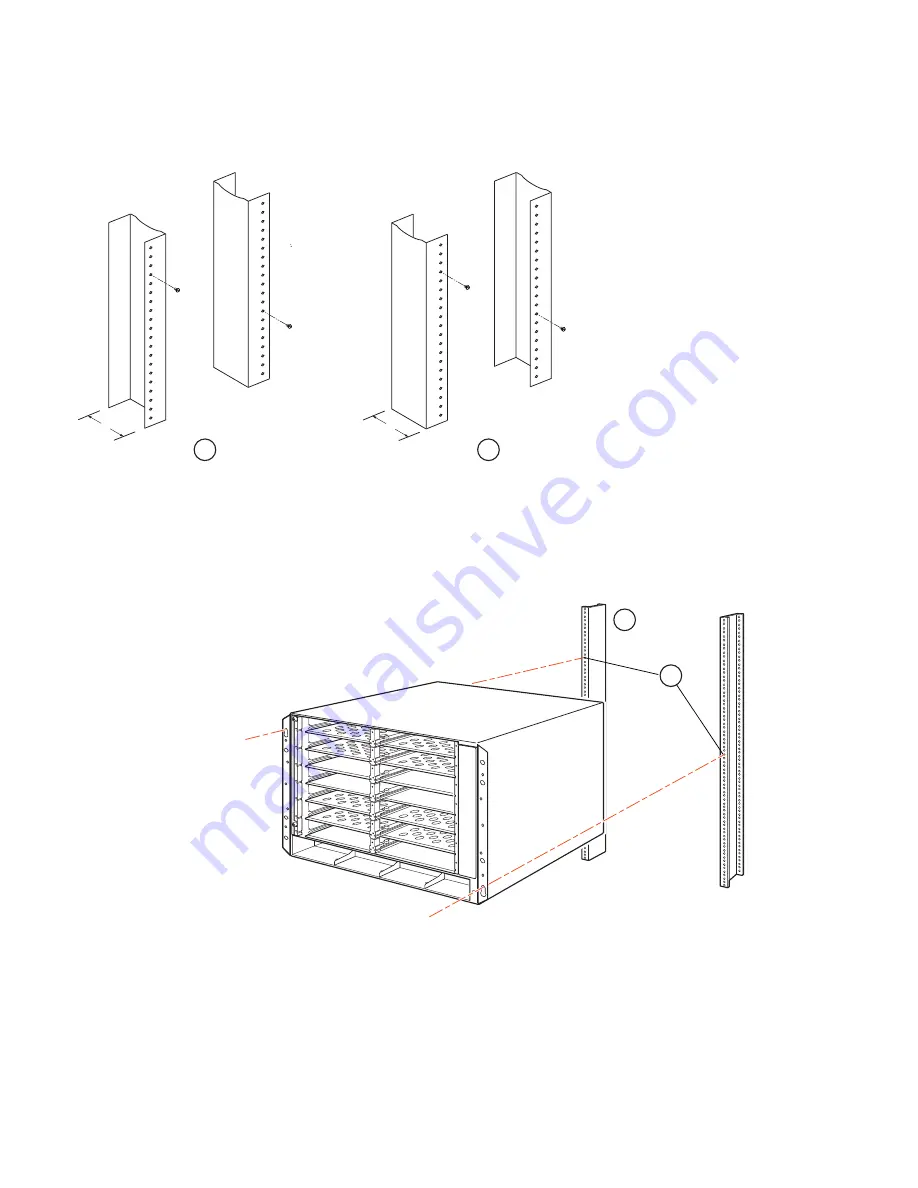
FIGURE 102

Positioning the screws in a rack

3.

Starting at the bottom of the rack, mount the router in the rack as shown in 

Figure 103

. Slip the wide portion of each keyhole slot 

over the corresponding screw in the rack.

FIGURE 103

Mounting the NetIron XMR 8000 router in a rack (front-mount configuration)

4.

Slide the router down so that the screw heads are in the narrow portion of the keyhole slots.

5.

Tighten the screws to secure the router.

1

Unequal flange equipment rack

2

Network equipment rack

1

Standard 19-inch rack

2

Mounting screws

5"

3"

1

2

1

2

Содержание MLX Series

Страница 1: ...53 1004195 02 29 April 2016 Brocade MLX Series and Brocade NetIron XMR Installation Guide Supporting NetIron OS 6 0 00 HARDWARE INSTALLATION GUIDE...

Страница 2: ...ibes features that may not be currently available Contact a Brocade sales office for information on feature and product availability Export of technical data contained in this document may require an...

Страница 3: ...er applications 1 Hardware features 1 Brocade MLX routers 1 NetIron XMR routers 6 Router modules 10 Management modules 10 Interface modules 13 Forward Error Correction FEC mode 29 Switch fabric module...

Страница 4: ...Brocade MLX 16 router in a rack 65 Installing Brocade MLX 16 router modules 67 Installing NIBI 16 FAN EXH A fan assemblies 72 Installing Brocade MLX 16 router power supplies 76 Connecting AC power 78...

Страница 5: ...44 Installing NetIron XMR 8000 modules 146 Installing NetIron XMR 8000 router power supplies 148 Final steps 152 Installing a NetIron XMR 16000 router 152 Preparing the installation site 152 Unpacking...

Страница 6: ...a Network Device Assigning permanent passwords 203 Configuring IP addresses 204 Support of subnet masks 204 Assigning an IP address to a management interface 204 Assigning IP addresses to an interfac...

Страница 7: ...e alarm history log 242 Disabling SNMP trap generation and logging 242 Displaying MR2 management module memory usage 242 Enabling and disabling management module CPU usage calculations 243 Displaying...

Страница 8: ...ent 280 Safety agency approvals 280 Electromagnetic approvals 280 Hardware specifications for NetIron XMR routers 280 Power specifications 280 Physical dimensions 282 Operating environment 283 Storage...

Страница 9: ...command syntax components Delimiters and operators define groupings of parameters and their logical relationships Format Description bold text Identifies command names Identifies keywords and operand...

Страница 10: ...under Product Downloads White papers online demonstrations and data sheets are available through the Brocade website Contacting Brocade Technical Support As a Brocade customer you can contact Brocade...

Страница 11: ...ment feedback To send feedback and report errors in the documentation you can use the feedback form posted with the document or you can e mail the documentation team Quality is our first concern at Br...

Страница 12: ...xii Brocade MLX Series and Brocade NetIron XMR Installation Guide 53 1004195 02 Document feedback...

Страница 13: ...32000 router In instances in which procedures or parts of procedures documented here apply to some devices but not to others this guide identifies exactly which devices are supported and which are not...

Страница 14: ...x Brocade MLX Series and Brocade NetIron XMR Installation Guide 53 1004195 02 What s new in this document DRAFT BROCADE CONFIDENTIAL...

Страница 15: ...al triple play and business services Comprehensive hardware based security and policies Advanced QoS for differentiated SLAs Router applications Brocade routers are commonly deployed in the following...

Страница 16: ...Guide Up to three switch fabric modules Up to four interface modules Up to three power supplies AC or DC Link Figure 1 displays the Brocade MLX 4 router FIGURE 1 Brocade MLX 4 router Brocade MLX 8 ro...

Страница 17: ...our switch fabric modules Up to 16 interface modules Up to eight power supplies AC or DC Link Figure 3 displays the Brocade MLX 16 router 1 Interface slot 1 6 Switch fabric slot 2 11 Interface slot 8...

Страница 18: ...ents in the router slots Two management modules Up to eight switch fabric modules Up to 32 interface modules Up to eight power supplies AC or DC Link Figure 4 displays the Brocade MLX 32 router 1 16 I...

Страница 19: ...slot 6 44 ESD connector 50 Power supply 6 33 Switch fabric slot 1 39 Switch fabric slot 7 45 Power supply 1 51 Power supply 7 34 Switch fabric slot 2 40 Switch fabric slot 8 46 Power supply 2 52 Powe...

Страница 20: ...llation section for each router NetIron XMR 4000 router components You can install the following components in the router slots Up to two management modules one active and one redundant Up to three sw...

Страница 21: ...two management modules one active and one redundant Up to four switch fabric modules Up to 16 interface modules Up to eight power supplies AC or DC Link Figure 7 displays the NetIron XMR 16000 router...

Страница 22: ...ing components in the router slots Up to two management modules one active and one redundant Up to eight switch fabric modules Up to 32 interface modules Up to eight power supplies AC or DC 1 16 Inter...

Страница 23: ...8 displays the NetIron XMR 32000 router FIGURE 8 NetIron XMR 32000 router r 1 3 2 Interface slots 1 32 3 8 Switch fabric slot 6 4 4 ESD connector 50 Power supply 6 33 Switch fabric slot 1 3 9 Switch f...

Страница 24: ...gement module 2 GB SDRAM dual auxiliary flash slots EIA or TIA 232 and 10 100 1000 Ethernet ports for out of band management NI XMR 32 MR MR NetIron XMR 32000 management module 2 GB SDRAM dual auxilia...

Страница 25: ...ment modules are hot swappable which means you can remove and replace them without powering down the system NOTE MR and MR2 management modules cannot be mixed in the same chassis NOTE Prior to install...

Страница 26: ...slot The internal compact flash provides greater storage space for image retention improving the upgrade process NOTE Do not use compact flash cards over 2GB they will render the system unstable The i...

Страница 27: ...ade MLX Series and NetIron XMR routers TABLE 2 Management module LEDs LED Position State Meaning Port 1 and Port 2 Each adjacent to the auxiliary flash slot that it represents On or blinking The softw...

Страница 28: ...s NI MLX 10GX8 D 8 Brocade MLX Series 8 port 10 GbE D module with IPv4 IPv6 hardware support requires SFPP optics Supports 256K IPv4 routes in FIB Doesn t support MPLS Requires high speed switch fabri...

Страница 29: ...number of the two occupied slots becomes the active slot NOTE Because of the possibility of overheating 2x100GbE interface modules must not be installed in the top slot of a Brocade MLX or XMR 4 slot...

Страница 30: ...boot in turbo mode if all modules in the chassis are Gen 2 modules You must insert CFP compliant fiber optic transceivers in each port you intend to use CFP compliant transceivers provide an optical o...

Страница 31: ...four 10G Ethernet ports Link Table 5 describes the LEDs for the BR MLX 10Gx24 DM interface modules Power supply requirements for BR MLX 10Gx24 DM modules For power supply requirements for BR MLX 10Gx2...

Страница 32: ...s Ethernet interface modules are available in the following formats NI MLX 10Gx2 2 port interface module for MLX devices NI XMR 10Gx2 2 port interface module for XMR devices NI MLX 10Gx4 4 port interf...

Страница 33: ...sert XFP compliant fiber optic transceivers in each port you intend to use XFP compliant transceivers provide an optical or physical medium dependent PMD interface for single or multi mode fiber that...

Страница 34: ...optics ports BR MLX 10GX4 X and BR MLX 10Gx4 X ML interface module LEDs The BR MLX 10GX4 X and BR MLX 10Gx4 X ML interface module LEDs indicate the status of each port as described in Link Table 8 BR...

Страница 35: ...le NOTE NI MLX 10Gx8 M and NI MLX 10Gx8 D modules are designed for use with Brocade MLX routers only They are not supported for NetIron XMR routers NOTE When installing NI MLX 10Gx8 M or NI MLX 10Gx8...

Страница 36: ...otes that shipped with the interface module NOTE NI MLX 10Gx8 D modules do not support Multiprotocol Label Switching MPLS If you try to configure MPLS on a device that has NI MLX 8x10G D modules insta...

Страница 37: ...ropriate software release For more information on the appropriate software release refer to the Hardware Installation Notes that shipped with the modules NOTE When you are replacing older modules with...

Страница 38: ...e information on the appropriate software release refer to the Hardware Installation Notes that shipped with the modules NOTE When you are replacing older modules with 24x1G modules you must first del...

Страница 39: ...y requirements for BR MLX 1GFx24 X and BR MLX 1GFx24 X ML interface modules For power supply requirements for BR MLX 1GFx24 and BR MLX 1GFx24 X ML 24 port 1 Gbps fiber interface modules refer to Link...

Страница 40: ...he 20 port 10 100 1000 Ethernet RJ45 module FIGURE 21 20 port 10 100 1000 copper Ethernet interface module front panel The front panel includes the following features LEDs Twenty 10 100 1000 copper Et...

Страница 41: ...cade com NOTE Before you install NI MLX 1Gx48 T A modules you must first upgrade the software on all interface modules and management modules to the appropriate software release For more information r...

Страница 42: ...om fan tray fan 4 Status OK Speed LOW 50 Bottom fan tray fan 5 Status OK Speed LOW 50 Bottom fan tray fan 6 Status OK Speed LOW 50 Rev A Back Fan A revision 0x09 Status OK Speed LOW 50 Rev A Back Fan...

Страница 43: ...y requirements are the same as MLX 24x10G Forward Error Correction FEC mode Using Forward Error Correction FEC mode enabled modules on a Brocade MLXe series chassis will reduce packet drops due to CRC...

Страница 44: ...ic modules You must purchase an additional switch fabric module to equip your router for redundancy 8 slot router Accommodates three switch fabric modules two required and one redundant for a fully lo...

Страница 45: ...erate in normal mode or turbo mode but will boot in turbo mode only if all active interface modules are Gen 2 and Gen 3modules TABLE 16 Switch fabric module LEDs LED Position State Meaning Pwr Above A...

Страница 46: ...er Can accommodate eight 1200W or 1800W AC and DC power supplies Because power is supplied over a common power bus any power supply installed in addition to the minimum required provides backup for an...

Страница 47: ...provide power to all router components share the workload equally and report status to the management module If the management module detects that a power supply has failed or overheated the managemen...

Страница 48: ...router Equipped with a fan assembly containing four 4 speed fans and four fan controllers to support redundancy 16 slot router Equipped with three fan assemblies The fan tray located in the lower fro...

Страница 49: ...tion Guide 35 53 1004195 02 Router modules DRAFT BROCADE CONFIDENTIAL FIGURE 27 Fan locations for Brocade MLX and NetIron XMR 8 slot routers FIGURE 28 Front fan location for Brocade MLX and NetIron XM...

Страница 50: ...36 Brocade MLX Series and Brocade NetIron XMR Installation Guide 53 1004195 02 Router modules FIGURE 29 Rear fan location for Brocade MLX and NetIron XMR 16 slot routers 1 Rear fan assemblies...

Страница 51: ...temperature reading Depending on the results the router will Leave the fan speed as is Increase the fan speed Decrease the fan speed Shut down a module to prevent damage If the temperature of a modul...

Страница 52: ...n instructions Rack mount kit Brocade MLX Series and NetIron XMR routers can be mounted in a standard 19 inch EIA310 D 2 post rack using the pre installed mounting brackets For flush mounting simply u...

Страница 53: ...86 Attaching a management station on page 118 Activating the power source on page 119 Verifying proper operation on page 120 The illustrations in this chapter display how to correctly insert the modu...

Страница 54: ...ow around the front sides and back of the device is not restricted If you do not install a module in a slot you must keep the slot blank in place If you run the device with an uncovered slot the syste...

Страница 55: ...ice make sure you use a power cord displaying the mark of the safety agency that defines the regulations for power cords in your country The mark is your assurance that the power cord can be used safe...

Страница 56: ...rcuit breaker minimum 48VDC double pole on the input lugs to the power supply The input wiring for connection to the product should be copper wire 4 AWG marked VW 1 and rated minimum 90 C For the NEBS...

Страница 57: ...dule is already configured for another type of module If the higher number slot even number is configured for another type of module you must reconfigure it by entering the no module command If there...

Страница 58: ...lane before it is fully removed from the chassis NOTE Do not discard the center slot guide as you will need it if you want to revert to a 2 slot configuration If you misplace your center slot guide yo...

Страница 59: ...y In 16 and 32 slot devices the modules are installed vertically Figure 33 and Figure 34 show how to install 2x100G modules in horizontal and vertical slots 4 slot and 16 slot devices are shown but th...

Страница 60: ...orated enclosure the perforations must cover at least 60 percent of the surface NOTE This equipment is suitable for installation in a Network Telecommunication facility and where NEC requirements appl...

Страница 61: ...ure 35 shows the location of these screws NOTE You will need a 2 Phillips screwdriver to remove these screws FIGURE 35 Removing the shipping screws Installing a Brocade MLX 4 router in a rack Because...

Страница 62: ...op hole in the mounting bracket On the other side of the rack the screw should align with the bottom hole of the mounting bracket When tightening these screws leave approximately 1 4 inch of clearance...

Страница 63: ...re enabling power to interface modules on page 211 The intra building ports of the equipment or subassembly is suitable for connection to intra building or unexposed wiring or cabling only The intra b...

Страница 64: ...t install a module in a slot you must leave the slot blank installed If you operate the router with an uncovered slot the system may overheat Although the slot blanks differ in size the procedure for...

Страница 65: ...module into the router slot and slide the card along the card guide until the ejectors on either side of the module move close to the module front panel Refer to Figure 38 NOTE When inserting the mod...

Страница 66: ...39 Installing a power supply in a Brocade MLX 4 router 4 Push the power supply front panel into the router until it engages the backplane connector 5 Rotate the ejector levers towards the front of the...

Страница 67: ...agency that defines the regulations for power cords in your country The mark is your assurance that the power cord can be used safely with the router For information about powering on the system refe...

Страница 68: ...For the NEBS compliant installation of Brocade MLX 4 8 and 16 slot routers with AC and DC systems use a ground wire of at least 6 American Wire Gauge AWG The ground wire should have an agency approve...

Страница 69: ...ation relative to other devices and equipment For cooling purposes allow a minimum of six inches of space between the sides front and the back of the router and walls or other obstructions If a router...

Страница 70: ...ving the shipping screws Lifting guidelines for Brocade MLX 8 routers Follow these guidelines for lifting and moving Brocade MLX 8 routers Before lifting or moving the router disconnect all external c...

Страница 71: ...shown in Figure 36 On one side of the rack the screw should align with the top hole in the mounting bracket On the other side of the rack the screw should align with the bottom hole of the mounting b...

Страница 72: ...see Disabling and re enabling power to interface modules on page 211 The intra building ports of the equipment or subassembly are suitable for connection to intra building or unexposed wiring or cabli...

Страница 73: ...he router You must remove the slot blank to install a module into a slot Although the slot blanks differ in size the procedure for removing them is identical You will need a flat blade screwdriver to...

Страница 74: ...on either side of the module move close to the module front panel Refer to Figure 46 NOTE When inserting the module into the router be sure that the faceplate does not overlap the faceplate of an adja...

Страница 75: ...ply into the slot and slide it along the guides on each side of the slot Refer to Figure 47 NOTE Empty power supply slots must be covered with slot blanks Carefully follow the mechanical guides on eac...

Страница 76: ...the associated installed power supply 2 Lift the cord retainer and connect an AC power cord to the associated power supply AC Inlet as shown in Figure 48 3 Snap the cord retainer over the power plug...

Страница 77: ...r the power supply lugs as shown in Figure 49 FIGURE 49 The Brocade MLX 8 DC power supply 2 Use a 2 Phillips screwdriver to remove the power lugs 3 Crimp 8 AWG power supply wire into the power lugs an...

Страница 78: ...the bare wire To ensure adequate bonding when attaching the ground lug a minimum of 20 PSI of torque is required to be applied to the mounting hardware used to attach the ground lug FIGURE 50 Crimping...

Страница 79: ...ber optic connectors If any of these items are missing contact the place of purchase Remove your Brocade MLXe 16 router from the shipping carton Save the shipping carton and packing materials in case...

Страница 80: ...Determine the position of each router in the rack For example place routers with the fewest modules near the top of the rack routers with more modules near the middle of the rack and fully populated r...

Страница 81: ...ure proper fit Always fill the bottom slots in the Brocade MLX 16 router first Begin by filling the slots from the left side of the router and work towards the right side Refer to Figure 3 on page 4 f...

Страница 82: ...lding interfaces only Type 2 or Type 4 ports as described in GR 1089 CORE Issue 5 and require isolation from the exposed OSP cabling The addition of Primary Protectors is not sufficient protection to...

Страница 83: ...lled Failed or Disconnected Power 8 30351200 AC 1200W Installed OK Total power budget for chassis 4800 W Total power used by system core 762 W Total power used by LPs 1040 W Total power available 2998...

Страница 84: ...and management modules to the appropriate software release before installing them For more information on the appropriate software release refer to the Hardware Installation Notes that shipped with t...

Страница 85: ...ng config command output use the no module slot number module type command to remove the configuration from slot 1 Brocade config no module 1 ni mlx 20 port 1g copper This command removes the configur...

Страница 86: ...NIBI 16 FAN EXH A modules when NI MLX 1Gx48 T A modules are installed the following syslog message is displayed SYSLOG Mar 26 14 19 53 12 R1 48X1G modules in slots 10 11 13 16 shouldn t be running wit...

Страница 87: ...is For safety reasons the ESD wrist strap should contain a 1 megohm series resistor Perform these steps to replace standard rear fan assemblies with high speed rear fan assemblies in a 16 slot router...

Страница 88: ...54 Removing a standard fan assembly from the Brocade MLX 16 slot router 4 Insert the high speed fan assembly into the fan slot and push the assembly in until the connection plate is flush with the de...

Страница 89: ...C 1200W Installed OK Power 8 32015000 AC 1200W Installed OK Total power budget for chassis 7200 W Total power used by system core 762 W Total power used by LPs 3788 W Total power available 2650 W Slot...

Страница 90: ...9 Status OK Speed HI 100 Rev A Back Fan B revision 0x09 Status OK Speed HI 100 TEMPERATURE READINGS Active Mgmt Module 40 250C 60 875C Standby Mgmt Module 34 500C 821384312 545015484C SNM1 FE1 50 0C F...

Страница 91: ...h slot blanks 2 Remove the power supply from the packaging 3 Insert the power supply into the slot using the guides on either side of the slot FIGURE 56 Installing a power supply in a Brocade MLX 16 r...

Страница 92: ...ing AC power AC power is supplied through a power cord connected to the power supply in the Brocade MLX 16 router Follow these steps to connect AC power NOTE For the NEBS compliant installation AC pow...

Страница 93: ...different power cord than the one supplied with the device make sure you use a power cord displaying the mark of the safety agency that defines the regulations for power cords in your country The mark...

Страница 94: ...e a 2 Phillips head screwdriver to remove the power lugs 3 Crimp 8 AWG power supply wire into the power lugs and reconnect the power lugs to the power supply unit Refer to Figure 59 For the NEBS compl...

Страница 95: ...t enclosed rack or cabinet Preparing the installation site Before installing the router plan the location and orientation relative to other devices and equipment For cooling purposes allow a minimum o...

Страница 96: ...n platform that rests on a pallet You will need the following tools to remove the router from the shipping crate A forklift or pallet jack with a minimum limit of 550 lbs to move the router crate on t...

Страница 97: ...e MLX 32 router in a rack Make sure the rack or cabinet housing the router is adequately secured to prevent it from becoming unstable or falling over Mount the routers you install in a rack or cabinet...

Страница 98: ...cuit such as a power strip Ensure that the rack is mechanically secured to support the router model Ensure that the airflow available at the inlet air vents does not exceed 40o Celsius 104o Fahrenheit...

Страница 99: ...kets from the front edges of the device and re attach them to the center sides of the device using the pre drilled holes Follow these initial steps to mount a 32 slot device in a standard 19 inch rack...

Страница 100: ...front and the back of the router and walls or other obstructions If a router is installed within a perforated enclosure the perforations must cover at least 60 percent of the surface You will need to...

Страница 101: ...l fit between the rack mount rails A strap to stabilize the router while you are moving it on the mechanical lift A power drill with the following attachments Large Phillips screwdriver Large flat bla...

Страница 102: ...or open cabinet The preferred installation is in a 4 post rack or open cabinet Refer to Installing your 32 slot router in a 4 post rack or open cabinet on page 95 for installation instructions NOTE I...

Страница 103: ...16 inch socket wrench attachment Large 3 8 inch flat blade screwdriver attachment Preparing the installation site Before installation plan the location and orientation of the device relative to other...

Страница 104: ...2 post rack or open cabinet in either a front mount configuration or a mid mount configuration using the factory installed mounting brackets For a mid mount configuration simply remove the factory ins...

Страница 105: ...pace in the rack plus 1U temporary space above for installation 3 Align the holes in the saddle with the holes on the mounting posts and attach the saddle using a minimum of eight standard pan head sc...

Страница 106: ...XMR Installation Guide 53 1004195 02 Installing a Brocade MLX 32 router DRAFT BROCADE CONFIDENTIAL FIGURE 64 Align the saddle in the rack FIGURE 65 Saddle installation 1 Saddle 2 Seat of saddle aligns...

Страница 107: ...on the rack mount bracket to attach the router to the rack mounting poles See Figure 67 5 Visually inspect the alignment of the router If the router is installed properly the mounting screws on both s...

Страница 108: ...in the device For a front mount use the brackets as they were installed at the factory 9 If you are installing the router in a standard rack install a mounting screw and a cage nut into each of the ho...

Страница 109: ...device while it is being moved on the mechanical lift Screws to attach the rails to your cabinet type These are usually provided with the cabinet or rack Four or more people are required to position t...

Страница 110: ...12 8 32 Phillips flat head screws provided Refer to Figure 68 FIGURE 68 Attach front right and left mounting brackets to the router chassis 3 Adjust the telescoping rails to fit your rack The rails c...

Страница 111: ...e MLX 32 router DRAFT BROCADE CONFIDENTIAL FIGURE 69 Attach the telescoping side rails to the rack 5 Use the mechanical lift to position the chassis as close to the rack as possible Slide the chassis...

Страница 112: ...ng a Brocade MLX 32 router DRAFT BROCADE CONFIDENTIAL FIGURE 70 Slide the chassis in the rack 6 Once the chassis is securely inserted in the rack fasten the mounting ears to the front rails of the rac...

Страница 113: ...When populating the router start with the middle slot and work towards the edge Always fill the bottom slots of the upper and lower card cage of the router first Refer to Figure 4 on page 5 for slot...

Страница 114: ...sert and remove the RJ45 and optical connectors especially when replacing an existing module An insertion and extraction tool has been provided in the Brocade MLX 32 accessory kit to make this task ea...

Страница 115: ...swappable you must upgrade the software on all interface modules and management modules to the appropriate software release before installing them For more information on the appropriate software rel...

Страница 116: ...ample removes the configuration from slot 1 leaving it ready for a new module 2 Put on the ESD wrist strap and ground yourself by inserting the plug into the ESD connector on the front of the router 3...

Страница 117: ...pplies Brocade MLX 32 cable management Brocade MLX 32 cable management is designed to allow access to the power supplies at the bottom of the router and to keep the air inlet clear in the center of th...

Страница 118: ...8 MRJ21 cables or 48 RJ45 cables For additional security use cable ties to secure cables to the cable management system hardware on the sides of the unit Refer to Figure 1 8 The cable routing slots a...

Страница 119: ...ONFIDENTIAL FIGURE 74 Brocade MLX 32 cable routing diagram Be sure not to exceed the minimum recommended bend radius for the cables 2 in for MRJ 21 cables and 1 5 in for Category 5 RJ45 and fiber opti...

Страница 120: ...r slots 1 and 2 directly to the left through the side comb Refer to Figure 75 FIGURE 75 Routing upper left quadrant cables FIGURE 76 Routing upper left quadrant cables up 1 Upper left quadrant 3 Cable...

Страница 121: ...and 6 up through comb B 4 Route cables from slots 7 and 8 up through comb C Cable routing for the upper right quadrant Route cables from slots in numerical order starting with the cables for slot 15...

Страница 122: ...IGURE 78 Routing upper right quadrant cables up 2 Route cables from slots 13 and 14 up through comb A Refer to Figure 78 3 Route cables from slots 11 and 12 up through comb B 4 Route cables from slots...

Страница 123: ...32 router DRAFT BROCADE CONFIDENTIAL Cable routing for the lower left quadrant 1 Route cables from slots 18 and 17 directly to the left through the side comb Refer to Figure 79 FIGURE 79 Routing lowe...

Страница 124: ...GURE 80 Routing lower left quadrant cables 2 Route cables from slots 20 and 19 down through comb A Refer to Figure 80 3 Route cables from slots 22 and 21 down through comb B 4 Route cables from slots...

Страница 125: ...router DRAFT BROCADE CONFIDENTIAL Cable routing for the lower right quadrant 1 Route cables from slots 32 and 31 directly to the right through the side comb Refer to Figure 81 FIGURE 81 Routing the lo...

Страница 126: ...access the modules for service Gently move the cable bundles to the side to access a module Use the appropriate Phillips or flat blade screwdriver with an extended shaft to disconnect the cables from...

Страница 127: ...ndles Installing power supplies in a Brocade MLX 32 router High Touch Current Earth connection is essential before connecting supply Follow these steps to install a power supply in a Brocade MLX 32 ro...

Страница 128: ...nserted in the guides Never insert the power supply upside down 4 Push the power supply front panel toward the back of the router to engage the backplane connector 5 Pull the release latch on the powe...

Страница 129: ...a Brocade MLX 32 router 1 Locate the power receptacle on the front panel of each installed power supply Refer to Figure 85 2 Lift the cord retainer and connect an AC power cord to the power supply 3...

Страница 130: ...as shown in Figure 86 Remove the safety cover FIGURE 86 Removing the safety cover 2 Use a 2 Phillips screwdriver to unscrew the power lugs Refer to Figure 87 FIGURE 87 Removing the power lugs 2400W p...

Страница 131: ...the device attached to one end with the other end attached to building ground The connector must be crimped with the proper tool allowing it to be connected to both ground screws on the enclosure Befo...

Страница 132: ...ation You can manage your router in the following ways Connect a PC or terminal to the console port on the management module From this port you can assign an IP address to the management module and es...

Страница 133: ...dy to activate the power source 1 Verify that all modules and power supplies are properly installed and all empty slots are covered by slot blanks If you do not install a module in a slot you must kee...

Страница 134: ...tive management module Off Neither of the management modules is managing the switch fabric and interface modules A problem may have occurred during initialization Check your attached PC or terminal fo...

Страница 135: ...e show module command at any level of the CLI Link On A link is established with the remote port Off This LED will remain off until you have cabled the interface module ports After cabling the ports i...

Страница 136: ...r supply is in normal operating condition Amber The power supply is malfunctioning DC power supplies DC IN Green steady The power supply is receiving power from the DC power source Off The power suppl...

Страница 137: ...ive S1 S2 S3 S4 Brocade router 4 Port 10Gig Module CARD_STATE_UP 4 000c db80 0000 S5 Brocade router 4 Port 10Gig Module CARD_STATE_UP 4 000c db80 0000 S6 Brocade router 4 Port 10Gig Module CARD_STATE_...

Страница 138: ...more information refer to Installing Brocade MLX 4 modules on page 49 Installing Brocade MLX 8 modules on page 58 Installing Brocade MLX 16 router modules on page 67 or Installing Brocade MLX 32 rout...

Страница 139: ...ude module module 1 br mlx 4 port 40g m module 2 ni mlx 8 port 10g d module 3 ni mlx 8 port 10g d module 4 ni mlx 8 port 10g m module 5 ni mlx 8 port 10g m module 6 ni mlx 20 port 1g copper module 7 n...

Страница 140: ...MLX 10Gx8 M 8 port 10GbE M Module CARD_STATE_UP 8 0024 3887 3f30 S3 NI MLX 10Gx8 D 8 port 10GbE D Module CARD_STATE_UP 8 0024 3887 3f60 S4 NI MLX 10Gx8 M 8 port 10GbE M Module CARD_STATE_UP 8 0024 388...

Страница 141: ...how to correctly insert the modules and routers For a complete router module description and slot number identification refer to NetIron XMR routers on page 6 of this guide NOTE Illustrations in this...

Страница 142: ...onment where the operating ambient temperature might exceed 40 C 104 F Make sure the air flow around the front sides and back of the router is not restricted If you do not install a module in a slot y...

Страница 143: ...he router make sure you use a power cord displaying the mark of the safety agency that defines the regulations for power cords in your country The mark is your assurance that the power cord can be use...

Страница 144: ...input circuit to the system of a NetIron XMR 32000 router 2400W supply make sure there is a 75 amp circuit breaker minimum 48Vdc double pole on the input lugs to the power supply The input wiring for...

Страница 145: ...st strap with a plug for connection to the ESD connector on the router chassis or other suitable ground For safety reasons the ESD wrist strap should contain a 1 megohm series resistor 1 Upgrade the s...

Страница 146: ...rt cover tabs to lift the module They are not designed to support the weight of the module which can fall and be damaged FIGURE 90 Port covers and connector covers 6 Insert the module into the slot un...

Страница 147: ...XMR 4000 router DRAFT BROCADE CONFIDENTIAL FIGURE 91 Installing 2x100G modules in a 4 or 8 slot device 4 slot shown FIGURE 92 Installing 2x100G modules in a 16 or 32 slot device 16 slot shown Installi...

Страница 148: ...connectors If any items are missing contact the place of purchase NOTE You must provide standard 12 24 pan head screws per device to mount the device in a rack Follow these steps to unpack your router...

Страница 149: ...ottom of the rack 2 Position two of the four mounting screws for each router according to the spacings of the keyhole slots on the mounting brackets as shown in Figure 94 When tightening the mounting...

Страница 150: ...r ships with the required switch fabric modules installed The installation procedure in this section applies to all modules The sequence for installing multiple modules is important to ensure proper f...

Страница 151: ...t management module refer to the Brocade MLX Series and Brocade NetIron Family Configuration Guide for information about how the redundant module works optional software configurations and how to mana...

Страница 152: ...panels or modules Follow these steps to remove a slot blank 1 Loosen the screws on each end of the slot blank by hand or with a flat blade screwdriver 2 Pull the slot blank out of the router and stor...

Страница 153: ...outer power supplies You will need a small Phillips or flat blade screwdriver to install power supplies Follow these steps to install a power supply 1 Remove the power supply slot blank 2 Remove the p...

Страница 154: ...nnecting power to the router refer to Connecting AC power on page 140 or Connecting DC power on page 141 Connecting AC power AC power is supplied through a power cord installed in the AC power supply...

Страница 155: ...lied at 48 V and 40 A The DC to DC supply provides the DC power to the router at 12 V and 100 A The procedure in this section is for qualified service personnel Follow these steps to connect DC power...

Страница 156: ...ire To ensure adequate bonding when attaching the ground lug a minimum of 20 PSI of torque is required to be applied to the mounting hardware used to attach the ground lug FIGURE 100 Crimping the powe...

Страница 157: ...router ships with the following items Router chassis with the appropriate number of switch fabric modules already installed in the slot marked SF and a slot blank installed in all other module slots...

Страница 158: ...all your devices in a front mount or mid mount configuration using the factory installed mounting brackets For a mid mount configuration simply remove the factory installed brackets from the front edg...

Страница 159: ...he rack as shown in Figure 103 Slip the wide portion of each keyhole slot over the corresponding screw in the rack FIGURE 103 Mounting the NetIron XMR 8000 router in a rack front mount configuration 4...

Страница 160: ...and require isolation from the exposed OSP cabling The addition of Primary Protectors is not sufficient protection in order to connect these interfaces metallically to OSP wiring NOTE NetIron XMR mod...

Страница 161: ...t module refer to Brocade MLX Series and Brocade NetIron Family Configuration Guide for information about how the redundant module works optional software configurations and how to manage redundancy B...

Страница 162: ...tion 5 Tighten the two screws at each end of the module faceplate by pushing them in and turning them clockwise Complete the tightening process using the flat blade screwdriver Installing NetIron XMR...

Страница 163: ...refer to Connecting AC power on page 149 or Connecting DC power on page 150 Connecting AC power AC power is supplied through an AC power cord that is installed at the back panel of the router NOTE For...

Страница 164: ...e 185 Connecting DC power You can supply DC power to your router using a DC to DC power supply DC power must be supplied at 48 V and 40A for 1200W power supplies and 48 V and 60A for 1800W power suppl...

Страница 165: ...e of at least 6 American Wire Gauge AWG The ground wire should have an agency approved crimped connector provided with the router attached to one end with the other end attached to building ground The...

Страница 166: ...etween the sides front and the back of the router and walls or other obstructions If a router is installed in a perforated enclosure the perforations must cover at least 60 percent of the surface Ensu...

Страница 167: ...DLING OR MOUNTING THESE DEVICES Do not use the handles on the power supply units to lift or carry routers Make sure the rack or cabinet housing the router is adequately secured to prevent it from beco...

Страница 168: ...according to the spacings of the keyhole slots the ones with the narrow portion pointing up on the mounting brackets as shown in Figure 109 When tightening the screws leave approximately 1 4 inch cle...

Страница 169: ...16000 router ships with the required switch fabric modules installed The procedure in this section applies to all modules The sequence for installing multiple modules is important to ensure proper fi...

Страница 170: ...all modules Identification markings are located at the base of each slot Removing slot blanks Although slot blanks differ in size the procedure for removing them is the same You will need a flat blade...

Страница 171: ...dule or power supply or fan tray has been removed before inserting a module in the same slot NOTE For 16 slot devices if you insert a module into a slot where the fan speed for a previous module was m...

Страница 172: ...Complete the tightening process using the flat blade screwdriver Installing power supplies in a NetIron XMR 16000 router This section describes how to install power supplies in the NetIron XMR 16000...

Страница 173: ...ide down 4 Push the power supply faceplate toward the back of the router until the power supply connector engages the backplane connector and the latch pin clicks into place For information about conn...

Страница 174: ...r supplies from damage due to excessive power line surges 1 Locate the power receptacles in the power supplies on the back panel 2 Lift the cord retainer and connect an AC power cord to each power sup...

Страница 175: ...and 100 A The procedure in this section is for qualified service personnel Follow these steps to connect a DC power source 1 Use a 1 Phillips screwdriver to remove the two screws that hold the transp...

Страница 176: ...round lug FIGURE 115 Crimping the power supply wire in the lug 5 Connect the 48V cable to the negative terminal and the 0V cable to the positive terminal as marked on the power supply NOTE DC return m...

Страница 177: ...for use with RJ 45 and fiber optic connectors If any items are missing contact the place of purchase Removing the NetIron XMR 32000 from the shipping crate The NetIron XMR 32000 router ships in a woo...

Страница 178: ...cluding the shipping panel in case the router needs to be shipped again Installing a NetIron XMR 32000 router in a rack This section describes how to install a NetIron XMR 32000 router in a rack Keep...

Страница 179: ...ner and four people are required to guide the router into place Follow these steps to install a NetIron XMR 32000 router in a rack NOTE For better grounding of the router to the rack attach the router...

Страница 180: ...he rack should align with the mounting screws on the opposite side and the router should be level Add all additional screws Installing NetIron XMR 32000 modules The NetIron XMR 32000 ships with empty...

Страница 181: ...appropriate software release before installing them For more information on the appropriate software release refer to the Hardware Installation Notes that shipped with the management module If you are...

Страница 182: ...module in the backplane Modules have a snug fit for maximum EMI protection FIGURE 118 Installing a module in the NetIron XMR 32000 router 6 Tighten the screws at each end of the module faceplate by p...

Страница 183: ...upper half of the router are routed up then outwards along the channels The modules in the lower half of the router are routed downwards above the power supplies Figure 120 shows the cable routing wit...

Страница 184: ...GURE 120 NetIron XMR 32000 cable routing scheme Be sure not to exceed the minimum recommended bend radius for the cables 2 in for MRJ 21 cables and 1 5 in for Category 5 RJ45 and fiber optic cables Ca...

Страница 185: ...ing a NetIron XMR 32000 router DRAFT BROCADE CONFIDENTIAL 1 Route cables for slots 1 and 2 directly to the left through the side comb Refer to Figure 121 FIGURE 121 Routing upper left quadrant cables...

Страница 186: ...outing upper left quadrant cables up 2 Route cables from slots 3 and 4 up through comb A Refer to Figure 122 3 Route cables from slots 5 and 6 up through comb B 4 Route cables from slots 7 and 8 up th...

Страница 187: ...for the upper right quadrant Route cables from slots in numerical order starting with the cables for slot 15 1 Route cables from slots 15 and 16 directly to the right through the side comb Refer to Fi...

Страница 188: ...upper right quadrant cables up 2 Route cables from slots 13 and 14 up through comb A Refer to Figure 124 3 Route cables from slots 11 and 12 up through comb B 4 Route cables from slots 9 and 10 up th...

Страница 189: ...router DRAFT BROCADE CONFIDENTIAL Cable routing for the lower left quadrant 1 Route cables from slots 18 and 17 directly to the left through the side comb Refer to Figure 125 FIGURE 125 Routing lower...

Страница 190: ...lower left quadrant cables 2 Route cables from slots 20 and 19 down through comb A Refer to Figure 126 3 Route cables from slots 22 and 21 down through comb B 4 Route cables from slots 24 and 23 down...

Страница 191: ...er DRAFT BROCADE CONFIDENTIAL Cable routing for the lower right quadrant 1 Route cables from slots 32 and 31 directly to the right through the side comb Refer to Figure 127 FIGURE 127 Routing the lowe...

Страница 192: ...ules for service Gently move the cable bundles to the side to access a module Use the appropriate Phillips or flat blade screwdriver with an extended shaft to disconnect the cables from the module and...

Страница 193: ...32000 router power supplies High Touch Current Earth connection essential before connecting supply Follow the steps to install a power supply in a NetIron XMR 32000 router You will need a 2 Phillips s...

Страница 194: ...ides Never insert the power supply upside down 4 After the power supply is fully inserted push the power supply front panel toward the back of the router This action causes the power supply connector...

Страница 195: ...installation AC power connections must use a surge protection router SPD to protect the AC power supplies from damage due to excessive power line surges Follow these steps to connect AC power 1 Locate...

Страница 196: ...Figure 132 FIGURE 132 Removing the safety cover 2400W power supply and 3000W power supply displayed 2 Use a 2 Phillips screwdriver to unscrew the power lugs Refer to Figure 133 FIGURE 133 Removing the...

Страница 197: ...the enclosure Before crimping the ground wire into the provided ground lug insure the bare copper wire has been cleaned and antioxidant is applied to the bare wire To ensure adequate bonding when att...

Страница 198: ...ps screwdriver to remove the screw that secures the safety cover as shown in Figure 132 on page 182 3 Pull down on the handle to remove the 3000W power supply Refer to Figure 130 on page 180 4 Use a 2...

Страница 199: ...tions a Category 5 UTP crossover cable which you must supply For information about the management port pin assignments refer to Management port pin assignments on page 285 Follow these steps to attach...

Страница 200: ...r you can observe the LEDs to verify that the router initialized successfully Table 28 describes the LEDs the desired state of each LED possible abnormal states of each LED and what to do if an LED in...

Страница 201: ...e using AC power supplies see the entry for the AC power supply LED in this table for more information Mgmt Act During initialization steady blinking After initialization occasional blinking The activ...

Страница 202: ...wer supply cables are connected securely to the power source and the power supply Make sure that the DC power source for MLX 4 8 and 16 is 48 VDC 30 A The DC power source for MLX 32 must be 48 VDC 60A...

Страница 203: ...e Active M2 lower F0 Brocade router Switch Fabric Module Active S1 S2 S3 S4 Brocade router 4 Port 10Gig Module CARD_STATE_UP 4 000c db80 0000 S5 Brocade router 4 Port 10Gig Module CARD_STATE_UP 4 000c...

Страница 204: ...modules interfaces to a text editor if desired for use in step 8 This configuration will be removed from the running configuration automatically after step 5 3 New module should come up in interactive...

Страница 205: ..._UP 8 0024 3887 3fc0 S6 NI MLX 1Gx20 GC 20 port 10 100 1000 Copper Module CARD_STATE_UP 20 0024 3887 3ff0 S7 NI MLX 10Gx8 M 8 port 10GbE M Module CARD_STATE_UP 8 0024 3887 4020 S8 BR MLX 40Gx4 M 4 por...

Страница 206: ...how running config include module module 1 br mlx 4 port 40g m module 2 ni mlx 8 port 10g m module 3 ni mlx 8 port 10g d module 4 ni mlx 8 port 10g m module 5 ni mlx 8 port 10g m module 6 ni mlx 20 po...

Страница 207: ...cinch overview mRJ21 procedures The following procedure demonstrates securing up to eight mRJ21 cables into the cable cinch When securing fewer than the maximum cables follow the procedure to secure...

Страница 208: ...h with two mRJ21 cables To secure two mRJ21 cables place the Velcro strap through slot one and use the front and rear left recesses as shown in Figure 137 FIGURE 137 Two mRJ21 cables T Cable cinch wit...

Страница 209: ...J21 procedures DRAFT BROCADE CONFIDENTIAL Cable cinch with four mRJ21 cables Four mRJ21 cables may be secured as shown in Figure 139 FIGURE 139 Four mRJ21 cables Cable cinch with five mRJ21 cables Fiv...

Страница 210: ...1004195 02 mRJ21 procedures Cable cinch with six mRJ21 cables Six mRJ21 cables may be secured as shown in Figure 141 FIGURE 141 Six mRJ21 cables Cable cinch with seven mRJ21 cables Seven mRJ21 cables...

Страница 211: ...e secured as shown in Figure 143 FIGURE 143 Eight mRJ21 cables RJ45 procedures Use the following guidelines when using the cable cinch clips with RJ45 cables Cable cinch with one group of RJ45 cables...

Страница 212: ...GURE 144 One group of RJ45 cables Cable cinch with two groups of RJ45 cables 12 RJ45 cables in two groups may be secured as shown in Figure 145 FIGURE 145 12 RJ45 cables in two groups Cable cinch with...

Страница 213: ...de 199 53 1004195 02 RJ45 procedures DRAFT BROCADE CONFIDENTIAL FIGURE 146 18 RJ45 cables in three groups Cable cinch with four groups of RJ45 cables 24 RJ45 cables in four groups may be secured as sh...

Страница 214: ...le cinch with five groups of RJ45 cables 30 RJ45 cables in five groups may be secured as shown in Figure 148 FIGURE 148 30 RJ45 cables in five groups Cable cinch with six groups of RJ45 cables 36 RJ45...

Страница 215: ...NTIAL Cable cinch with seven groups of RJ45 cables 42 RJ45 cables in seven groups may be secured as shown in Figure 150 FIGURE 150 42 RJ45 cables in seven groups Cable cinch with eight groups of RJ45...

Страница 216: ...202 Brocade MLX Series and Brocade NetIron XMR Installation Guide 53 1004195 02 RJ45 procedures...

Страница 217: ...t interface You can assign passwords using the Brocade Network Advisor software if an Enable password for a super user is already configured on the device You can set the following levels of Enable pa...

Страница 218: ...ment are forwarded Support of subnet masks Brocade routers support both classical IP network masks Class A B and C subnet masks and so on and Classless Interdomain Routing CIDR network prefix masks En...

Страница 219: ...inal Brocade config 4 Configure the IP address and mask for the management interface by entering these commands Brocade config interface management 1 Brocade config if mgmt 1 ip address 10 0 1 1 255 2...

Страница 220: ...Syntax enable password Syntax configure terminal Syntax no ip address ip addr ip mask secondary or Syntax no ip address ip addr mask bits secondary Use the secondary parameter if you have already con...

Страница 221: ...fiber SFP and SFP fiber and RJ45 copper interfaces Details regarding the SFP SFP and XFP fiber optic transceivers supported for these interface modules are also described To connect a router to anothe...

Страница 222: ...10 Gigabit Ethernet DWDM interfaces only configure full C band tunable optics as shown below To configure a physical port enter a command such as the following Brocade config if e10000 1 1 tunable opt...

Страница 223: ...ion Interface module Link On A link is established with the remote port Off A link is not established with the remote port Try the following Verify that the connection to the other network device has...

Страница 224: ...h another network device enter a command such as the following at any level of the CLI Brocade traceroute 192 33 4 7 Syntax traceroute host ip addr maxttl value minttl value numeric timeout value sour...

Страница 225: ...in the CLI as shown in the following example Brocade power off lp all Syntax power off lp all slot number all disables power to all interface modules slot number disables power to the interface module...

Страница 226: ...Syslog message is also sent to the SNMP log server When the GIEI is set to major the first Syslog message displayed is an Alert The following example shows an Alert Syslog message where the GIEI is s...

Страница 227: ...i2c recovered GIEI clear Severity Minor Mux index 0 Mux tap 4 ID 0x4 Addr 0x5 FANTRAY4 Dynamic Log Buffer 50 lines Apr 16 18 22 12 I System i2c recovered GIEI clear Severity Minor Mux index 0 Mux tap...

Страница 228: ...ture command with the GIEI set to major severity Brocade show temperature Note Global I2C Error Indicator is set severity Major All I2C access are skipped SLOT CARD TYPE SENSOR TEMPERATURE C 2 LP 1 34...

Страница 229: ...following Installed Shutdown The power supply has shut down A power supply will shut down due to flapping or if a shut down is enabled manually using the power off power supply command Refer to Enabli...

Страница 230: ...ity will likely lose power For information about using the lp slot priority command refer to Changing priority of slots for interface modules on page 235 Fans Fan number Information about fans in the...

Страница 231: ...04 I Interface ethernet3 2 state up Aug 27 12 19 04 I Interface ethernet6 1 state up Aug 27 12 19 00 N Module up in slot 6 Aug 27 12 19 00 N Module up in slot 3 Aug 27 12 18 43 I Warm start When you c...

Страница 232: ...P presence is toggled when you enter the ipc toggle mp presence command Active MP presence is displayed for the LP as shown in the following table TABLE 33 MP Presence Detection LP State on Bringing D...

Страница 233: ...cycles consume CPU resources power and result in unwanted IPC traffic to the MP When the system detects the continuous reboot of a line card that line card is placed into interactive or down state mod...

Страница 234: ...100G modules All other interface modules such as 4 port 10G 2 port 10G 20 port 1G 24 port 1G and 48 port 1G modules are classified by the system as G1 modules High speed switch fabric HSF modules can...

Страница 235: ...rocedure requires that you restart your router In a router with both standard G1 switch fabric modules and G2 HSF modules you can block the discovery of the G1 switch fabric modules by entering the sy...

Страница 236: ...hold for the high speed the router shuts down the modules to prevent damage The router also sends a warning message to the system log and an SNMP trap For information about viewing the warning message...

Страница 237: ...C 95 C Medium high 75 C 51 C 90 C 60 C Medium 67 C 46 C 80 C 55 C Low 1 70 C 50 C Interface modules Packet Processor High 95 C 70 C 113 C 113 C Medium high 85 C 60 C 100 C 75 C Medium 50 C 45 C 90 C 6...

Страница 238: ...fig fan threshold mp med 56 72 Syntax fan threshold module low high threshold med low threshold high threshold med hi low threshold high threshold high low threshold high threshold For the module para...

Страница 239: ...low temperature threshold for the high speed 83 C is higher than the high temperature threshold 82 C for the medium high speed Displaying temperature thresholds for modules and fan speeds To check the...

Страница 240: ...lay a change in fan speed you can identify which sensors triggered the change by checking show chassis and show fan threshold command output and looking for sensors with temperatures near threshold bo...

Страница 241: ...SFM FE1 reading THERMAL_SENSOR_TEST_RULE_SNM_G 2 fan threshold switch fabric g2 hSFM FE2 reading THERMAL_SENSOR_TEST_RULE_SNM_G 2 fan threshold switch fabric g2 hSFM FE3 reading THERMAL_SENSOR_TEST_RU...

Страница 242: ...mode Set fan speed to high to prevent over temp condition NOTE Setting a value other than auto or high disables auto fan control and will negatively affect the efficient cooling of blades and may cau...

Страница 243: ...W 50 Syntax show chassis For information about all output generated by the show chassis command refer to Displaying device status and temperature readings on page 214 Displaying temperature warnings I...

Страница 244: ...stem on page 221 Configuring temperature logging The temp log threshold command sets the temperature logging threshold to send a single message whenever any of the thresholds are crossed Brocade confi...

Страница 245: ...ynchronize the software images during the boot process You want to initiate an immediate synchronization for example you want an immediate update of the software images on one or all interface modules...

Страница 246: ...flash memory TFTP server You can also specify an interactive boot which allows you to enter a separate command after the interface module comes up The command specifies the source from which one or a...

Страница 247: ...mand at the Privileged EXEC level of the CLI Brocade lp boot system flash primary 1 Syntax lp boot system flash primary secondary slot number The primary and secondary keywords specify the primary or...

Страница 248: ...vices 1 16 for 16 slot devices or 1 32 for 32 slot devices Configuring an automatic boot from flash memory on the management module To configure an automatic boot from the primary image in flash memor...

Страница 249: ...boot system flash primary Changing priority of slots for interface modules You can prioritize the slots in which the interface modules are installed The priority range is 1 low 8 high You can set one...

Страница 250: ...ber all The slot number parameter indicates the slot number for which you are re enabling the power You can specify 1 4 for 4 slot routers 1 8 for 8 slot routers 1 16 for 16 slot routers or 1 32 for 3...

Страница 251: ...first matching line exclude exclude matching lines from the output include include only matching lines in the output A warning statement is sent if the number of operational links falls below the min...

Страница 252: ...f hardware alarms To change the levels of alarms sent to the alarm logs refer to Configuring Alarm History Buffer Size on page 238 The alarms are specific to hardware status whereas the syslog records...

Страница 253: ...alarm is set to log a minimum alarm level the show commands cannot display alarm levels of lower severity levels as the information is not logged Displaying alarms This section describes how to displa...

Страница 254: ...arm logs to record show alarm severity critical major minor Use to display all alarms in the alarm logs Use the history operand to display the alarm history log show alarm history all To display all a...

Страница 255: ...ices that support optical monitoring If optical monitoring is disabled then no alarms are generated If an optic is removed or not present a major alarm is reported and logged and any existing alarms a...

Страница 256: ...in the history log If you clear all alarms a single entry is added to the history that indicates all alarms have been cleared To clear all alarms from the alarm logs enter the following command Broca...

Страница 257: ...statistics using the show cpu command NOTE Typically these statistics are used for debugging purposes By default the performance of the calculations is disabled When disabled you can use the show cpu...

Страница 258: ...ow cpu Displaying management module CPU usage You can display the tasks handled by the management module and the amount of the management module CPU used by each task by entering the show tasks comman...

Страница 259: ...the idle task for a prolonged period If this situation occurs contact Brocade Technical Support for assistance Removing MAC address entries You can remove the following learned MAC address entries fro...

Страница 260: ...the beginning The manifest file will now have a version field for every specified image For example a line in a manifest file for XPP MRJ FPGA image may look something like this xppmrj_05600 bin 1 00...

Страница 261: ...ade single command must be performed before LP Auto Upgrade can be configured The later one uses the manifest file that the former one downloaded in the system flash Single Command Package Upgrade The...

Страница 262: ...248 Brocade MLX Series and Brocade NetIron XMR Installation Guide 53 1004195 02 Simplified Upgrade...

Страница 263: ...tenance for hardware components It is recommended that you perform the following regular maintenance tasks Clean the fiber optic connectors on a fiber optic transceiver port and the connected fiber ca...

Страница 264: ...NOTE MR and MR2 management modules should not be used together in the same chassis Please read the Hardware Installation Notes that came with your hardware before installing the MR2 management module...

Страница 265: ...application image on the interface module it may not be able to sync older FPGA images In this case the interface module may attempt to continuously reload Always upgrade or downgrade the FPGA images...

Страница 266: ...same card cage Simply move the cable bundles from the lower card cage to the side as shown in Figure 154 FIGURE 154 Accessing the interface modules on a fully loaded 32 slot chassis Replacing a switc...

Страница 267: ...the plug into the ESD connector located on the front of the router 2 Disconnect the two fiber cable connectors from the port connectors 3 Replace the protective cover on the port connectors 4 Pull do...

Страница 268: ...A Power Supply will be Shutdown if it fails 3 times within an Hour The power supply will flap three times within an hour after which the power supply will automatically shut down Syntax no power suppl...

Страница 269: ...r supply monitoring PS 1 PS 2 PS 3 PS 4 1 0 0 0 0 2 0 0 0 0 3 0 0 0 0 4 0 0 0 0 5 0 0 0 0 6 0 0 0 0 7 0 0 0 0 8 0 0 0 0 9 0 0 0 0 10 0 0 0 0 11 0 0 0 0 12 0 0 0 0 13 0 0 0 0 14 0 0 0 0 15 0 0 0 0 16 0...

Страница 270: ...st 32 recorded failure timestamps for a power supply The displayed failure timestamp is the number of seconds since the last system reboot The current configured power supply monitoring threshold valu...

Страница 271: ...ay between the power off lp command and the power on lp command Wait 10 seconds between commands Use the power on power supply command to turn on a power supply that has been shut down A power supply...

Страница 272: ...dle is a locking mechanism only and should not be used to lift and carry the power supply You may sustain physical injury or harm if you attempt to lift and carry a power supply using the locking hand...

Страница 273: ...nserted in the guides Never insert the power supply upside down 5 After you insert the power supply push gently on the power supply faceplate until the power supply is fully seated 6 Pull up on the ha...

Страница 274: ...swap procedure should be completed within five minutes so the device will continue to function correctly without any fans It is recommended that you disconnect the power supply from AC or DC power be...

Страница 275: ...nd ground yourself by inserting the plug into the ESD connector on the router 2 Using the screwdriver remove the screws that secure the fan assembly faceplate to the rear of the router 3 Remove the fa...

Страница 276: ...aceplate is flush with the router Pushing the fan assembly in seats the fan connector in the router connector 5 Secure the fan assembly to the router by replacing and tightening the four screws on the...

Страница 277: ...once To replace a fan assembly you need the following A new fan assembly which you can order from Brocade A small flat blade screwdriver An ESD wrist strap with a plug for connection to the ESD connec...

Страница 278: ...ommand to verify that both fans are operating normally Front fan assembly replacement steps Perform the following steps to replace a fan assembly 1 Put on the ESD wrist strap and ground yourself by in...

Страница 279: ...sible from the front of the device Fan tray assemblies for Brocade MLXe 4 slot and 8 slot routers are accessible from the back of the device You can remove and replace a fan tray assembly while the ro...

Страница 280: ...h down on the latch release with your thumb grasp the handle and pull it toward you as shown in Figure 159 Figure 160 Figure 161 and Figure 161 Pulling the assembly unseats the fan tray assembly conne...

Страница 281: ...e fan assembly in a Brocade MLXe 8 slot router 3 Insert the new fan assembly into the fan slot and push the enclosure in until the faceplate is flush with the router Pushing the enclosure in seats the...

Страница 282: ...u can order from Brocade Replacing the air filters in 32 slot routers The two air filters in 32 slot routers are located between the upper and lower card cages To replace an air filter perform these s...

Страница 283: ...e screws to secure the air filter to the router FIGURE 163 Air filter removal and replacement for 32 slot routers Replacing the air filter in Brocade MLX and NetIron XMR 16 slot routers Follow these s...

Страница 284: ...an arrow that indicates how the filter should be installed in relation to the direction of airflow in the router Because air is pulled through the device the arrow must point up towards the fan tray...

Страница 285: ...t of the router and discard it 4 Insert the replacement air filter by sliding it along the metal guides The filter is marked with an arrow that indicates how the filter should be installed for proper...

Страница 286: ...wrist strap should contain a 1 megohm series resistor Removing a fan assembly from the chassis To remove a fan assembly from the chassis that is receiving power complete the following steps 1 Put on t...

Страница 287: ...ews from each side of the fan assembly Refer to Figure 161 on page 267 2 If present remove and discard the tape that stabilizes louvers in some fan assembly models When present the tape is located on...

Страница 288: ...to Figure 169 4 Remove the fan assembly handle by detaching the two screws from the inside of the fan assembly faceplate using a Phillips screwdriver Refer to Figure 170 FIGURE 170 Handle removal 5 O...

Страница 289: ...cing the tape is not required Reinstalling the modified fan assembly in the chassis To reinstall the modified fan assembly complete the following steps 1 Insert the modified fan assembly into the fan...

Страница 290: ...276 Brocade MLX Series and Brocade NetIron XMR Installation Guide 53 1004195 02 Replacing fan assemblies...

Страница 291: ...ower supply frequency requirements apply to the Brocade MLX 32 routers AC Input Rating 200 240V 50 60 Hz 16 0 A maximum per power supply AC Operating Voltage Range 180 to 264V Inrush current 30A peak...

Страница 292: ...8 slot and 16 slot routers 30W MR management module Brocade MLX 32 slot routers 35W MR2 management module BR MLX MR2 M for Brocade MLX 4 slot 8 slot and 16 slot routers 40W MR2 management module BR ML...

Страница 293: ...rface 260W Fan assemblies Brocade MLX 4 fan tray 66W Brocade MLX 8 fan tray 132W Brocade MLX 16 front fan tray 202W Brocade MLX 16 rear fan modules 2 fans 288W Brocade MLX 32 fan modules 8 cooling Int...

Страница 294: ...y for Information Technology Equipment ICES 003 Canada Class A AS NZ 55022 Australia Class A VCCI Japan Class A EN 61000 3 2 EN 61000 3 3 EN 61000 6 1 Hardware specifications for NetIron XMR routers T...

Страница 295: ...r power consumption values Model 100 VAC 200 VAC 48 VDC Amps Watts BTU h r Amps Watts BTU h r Amps Watts BTU h r Maximum per XMR without 8x10G X module NetIron XMR 4000 14 1384 4724 7 1384 4724 29 138...

Страница 296: ...odule with fiber optic transceivers 245W 4 port 10 Gbps Ethernet Interface module X 240W 8 port 10 Gbps Ethernet interface module X 270W 20 port Gbps Ethernet fiber Interface with fiber optic transcei...

Страница 297: ...ety of Information Technology Equipment Electromagnetic approvals FCC Part 15 Subpart B Class A EN 55022 CE mark Class A EN 55024 CE mark Immunity for Information Technology Equipment ICES 003 Canada...

Страница 298: ...25 connector male or female Serial cable options between the router and a PC or terminal are shown in Figure 173 NOTE As shown in Figure 172 and Figure 173 some wires should not be connected If you c...

Страница 299: ...they are installed To order a power cord contact your Brocade supplier The following table describes power cord types TABLE 53 Management port pin assignments Pin number MDI X ports 1 TD 2 TD 3 RD 4 N...

Страница 300: ...Ireland North X Ireland South X Israel X Italy X Japan X X X Korea South X Malaysia Alternate Recommended Mexico X X X Monaco X Netherlands X New Zealand X Norway X Poland X Portugal X TABLE 54 Power...

Страница 301: ...technical support Regulatory compliance EMC FCC Part 15 Subpart B Class A EN 55022 CE mark Class A EN 55024 CE mark Immunity for Information Technology Equipment Puerto Rico X X X Russia X Saudi Arab...

Страница 302: ...ectronic equipment EU RoHS 2012 19 EU Waste electrical and electronic equipment EU WEEE 94 62 EC packaging and packaging waste EU 2006 66 EC batteries and accumulators and waste batteries and accumula...

Страница 303: ...Class A digital apparatus complies with Canadian ICES 003 Cet appareil num rique de la classe A est conforme la norme NMB 003 du Canada Europe and Australia This is a Class A product In a domestic en...

Страница 304: ...on of above statement This is Class A product based on the standard of the Voluntary Control Council For Interference by Information Technology Equipment VCCI If this equipment is used in a domestic e...

Страница 305: ...equate measures Taiwan English translation of above statement Warning This is Class A product In a domestic environment this product may cause radio interference in which case the user may be required...

Страница 306: ...MLX 32 NetIron XMR 4000 NetIron XMR 8000 NetIron XMR 16000 NetIron XMR 32000 All certificates can be found at the Anatel web site NOTE For regulatory purposes the Brocade MLX 4 and NetIron XMR 4000 a...

Страница 307: ...te mit Direktstromquellen NetIron XMR 4000 8000 16000 und 32000 Brocade MLX 4 8 16 und 32 und Brocade MLXe 16 und 32 sind nur zur Installation in Sperrbereichen bestimmt Ein Sperrbereich ist ein Ort...

Страница 308: ...hassis neben dem Erdungssymbol MISE EN GARDE Pour un syst me alimentation continue NetIron XMR 4000 8000 et 16000 Brocade MLX 4 8 et 16 et Brocade MLXe 16 utiliser un c ble de mise la terre de calibre...

Страница 309: ...en las terminales de entrada de la fuente de alimentaci n El cableado de entrada para la conexi n al producto deber ser de cable de cobre homologado de calibre AWG 6 con clasificaci n VW 1 para una te...

Страница 310: ...leado de entrada para la conexi n al producto deber ser de cable de cobre homologado de calibre AWG 8 con clasificaci n VW 1 para una temperatura m nima de 90 C CAUTION For the DC input circuit to the...

Страница 311: ...entrada para la conexi n al producto deber ser de cable de cobre catalogado 4 AWG marcado con VW 1 y tener una capacidad nominal m nima para 90 C CAUTION For the DC input circuit to the system of a N...

Страница 312: ...ls das ordnungegem in die F hrungen gesteckt werden muss Das Netzteil darf niemals umgedreht eingesteckt werden MISE EN GARDE Suivez attentivement les rep res m caniques de chaque c t du slot du bloc...

Страница 313: ...install s sur le m me circuit que le dispositif en question Comparez alors ce total avec la limite de charge du circuit L intensit nominale maximum en amp res est g n ralement imprim e sur chaque dis...

Страница 314: ...Systeme Wenn Sie diesen Befehl in ein bereits konfiguriertes System eingeben l scht der Befehl die Konfiguration Falls Sie aus Versehen die Konfiguration eines bereits konfigurierten Systems l schen g...

Страница 315: ...ICHT Falls kein Modul im Steckplatz installiert wird muss die Steckplatztafel angebracht werden Wenn ein Steckplatz nicht abgedeckt wird l uft das System hei MISE EN GARDE Si vous n installez pas de m...

Страница 316: ...erikanische Norm f r Drahtquerschnitte zu verwenden An einem Ende des Erdleiters sollte ein gepr fter gecrimpter Anschluss mit Chassis bereitgestellt angebracht sein Das andere Ende sollte an der Geb...

Страница 317: ...limentation CC doivent tre install s dans des zones acc s r glement uniquement Une zone acc s r glement est r serv e au personnel de maintenance qui peut y acc der uniquement l aide d un verrou d une...

Страница 318: ...fil de 13 29 mm doit tre reli une cosse homologu e sertie avec l outil appropri PRECAUCI N Para un sistema de CC n mero de pieza de fuente de alimentaci n CC RPS9 DC utilice un cable de conexi n a ti...

Страница 319: ...len dass Sie ein Stromkabel mit dem Siegel einer Sicherheitsbeh rde verwenden die f r die Zertifizierung von Stromkabeln in Ihrem Land zust ndig ist Das Siegel ist Ihre Garantie dass das Stromkabel si...

Страница 320: ...er te im Gestell oder Schrank so tief wie m glich Platzieren Sie das schwerste Ger t ganz unten w hrend leichtere Ger te je nach Gewicht je schwerer desto tiefer dar ber untergebracht werden DANGER Mo...

Страница 321: ...uando el chasis est activado y en funcionamiento No obstante Brocade recomienda que se desconecte el suministro de corriente alterna del tomacorriente antes de desmontar y reemplazar el suministro El...

Страница 322: ...IPEMENTS DEUX PERSONNES AU MINIMUM SONT N CESSAIRES PELIGRO Un chasis Brocade MLX Series 4 8 16 muy concurrido es muy pesado SE REQUIEREN DOS O M S PERSONAS CUANDO SE VAYA A ALZAR MANEJAR O MONTAR EST...

Страница 323: ...alwerkzeug Schloss und Schl ssel oder einer anderen Schutzvorrichtung Zugang hat DANGER Pour viter d endommager le ch ssis et les composants ne jamais tenter de soulever le ch ssis par les poign es du...

Страница 324: ...S AND INTERFACE MODULES FIRST management switch fabric and all line cards Use a mechanical lifting device to lift the chassis Four or more people are required to position the unpopulated chassis into...

Страница 325: ...es Ger ts bzw der Baugruppe D RFEN NICHT metallisch mit Schnittstellen verbunden werden die an Au enbereiche OSP oder deren Verdrahtung angeschlossen sind Diese Schnittstellen sind ausschlie lich zur...

Страница 326: ...312 Brocade MLX Series and Brocade NetIron XMR Installation Guide 53 1004195 02 Dangers...

Отзывы: