BRITEQ®
1
BTX-700SW
1. Safety Instruction
WARNING
Please keep this User Guide for future consultation. If you sell the unit to another user, be
sure that they also receive this instruction manual.
Important:
Damages caused by the disregard of this user manual are not subject to warranty.
The dealer will not accept liability for any resulting defects or problems
.
Unpack and check carefully that there is no transportation damage before using the
unit.
The unit is for indoor use only. Use only in a dry location.
Do install and operate by qualified operator.
Do not allow children to operate the fixture.
Use safety chain when fixing the unit. Handle the unit by carrying its base instead of
head only.
The unit must be installed in a location with adequate ventilation, at least 50cm from
adjacent surfaces.
Be sure that no ventilation slots are blocked, otherwise the unit will be overheated.
Before operating, ensure that the voltage and frequency of power supply match the
power requirements of the unit.
It’s important to ground the yellow/green conductor to earth in order to avoid electric
shock.
Maximum ambient temperature TA: 40°C. Don’t operate it when the temperature is
higher.
Don’t connect the device to any dimmer pack.
During initial start-up some smoke or smell may arise. This is a normal process and
does not necessarily mean that the device is defective, and it will decrease gradually
within 15 minutes.
Make sure there are no flammable materials close to the unit while operating to avoid
fire hazard.
Examine the power wires carefully, replace them immediately if there is any damage.
Unit’s surface temperature may reach up to 85
℃. Don’t touch the housing bare
-handed
during its operation, and allow about 15 minutes for cooling the unit down before
replacing bulb or maintenance as it could be very hot.
Avoid any inflammable liquids, water or metal objects entering the unit. Once it
happens, cut off the mains power immediately.
Do not operate in dirty or dusty environment, do clean fixtures regularly.
Do not touch any wire during operation as there might be a hazard of electric shock.
Avoid power wires together twist other cables.
The minimum distance between light output and the illuminated surface must be more
than 2.5 meters.
Disconnect mains power before fuse/lamp replacement or servicing.
Replace fuse/lamp only with the same type.
In the event of serious operating problem, stop using the unit immediately.
Never turn on and off the unit time after time.
The housing, the lenses, or the ultraviolet filter must be replaced if they are visibly
damaged.
Please read carefully the instruction manual, which includes
important information about the installation, usage and maintenance.
BRITEQ®
2
BTX-700SW
Do not open the unit as there are no user serviceable parts inside.
Never try to repair the unit by yourself. Repairs carried out by unskilled people can lead
to damage or malfunction. Please contact the nearest authorized technical assistance
center if needed.
Disconnect the mains power if the fixture is has not been used for a long time.
Do use the original packing materials before transporting it again.
Caution
To prevent or reduce the risk of electrical shock or fire, do not expose the unit to rain or
moisture.
Hot lamp explosion hazard. Do not open the unit within 15 minutes after switching off.
Do replace the bulb once it is damaged, deformed or life-expired.
Do not look directly at the light while the bulb is on.
Never touch bulb with bare fingers, as it is very hot after using.
Do not start on the unit without bulb enclosure or when housing is damaged.
Product Items
User manual
2 x Omega clamps
2. Installation
Unpacking the fixture
(for flight case pack only)
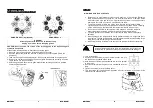
1.Stop the flight case via the brake sheet above the wheels.
2.Unlock the lock modules (1) and open the cover board.
3.Prop the cover board with lid bracket.
4.Take out the fixture.
5.Unlock the lock module (2) take out omega clamps.
Installation:
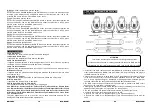
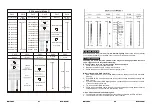
1. Bolt each clamp (1) to the Omega holder with screw and
lock nut through the hole in the holder.
2. Fasten the omega holders (2) on the bottom of the base by
inserting quick-lock fasteners (3) into the holes of the base
and tighten fully clockwise.
3. Hang the fixture to the support (4) through clamp and fasten the screws (5). Fasten the
safety cable (6) through the bottom of the base and over the support.
Fig.1
Fig.2
Attention:
Always ensure that the structure to which you are attaching the unit is secure and is
able to support a weight of 10 times of the unit’s weight.


