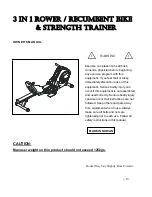
Boyles Fitness 3 IN 1 ROWER Скачать руководство пользователя страница 2


2


SAFETY INSTRUCTIONS 

WARNING:

    To reduce the risk of serious injury, read the following Safety Instructions before using 

the 3 IN 1 Rower / Recumbent Bike & Strength Trainer. 

1. 

  Read all warnings posted on this product. 

2. 

  Read this Owner’s Manual and follow it carefully before using this machine. Make sure that it is properly   

assembled and tightened before use. 

Keep children away from the 3 IN 1 Rower / Recumbent Bike & Strength Trainer. Do not allow children to use 

or play on the 3 IN 1 Rower / Recumbent Bike & Strength Trainer. Keep children and pets away from the   

3 IN 1 Rower / Recumbent Bike & Strength Trainer when it is in use. 

4. Set up and operate the 3 IN 1 Rower / Recumbent Bike & Strength Trainer on a solid level surface. Do not 

position on loose rugs or uneven surfaces. 

5. Inspect the 3 IN 1 Rower / Recumbent Bike & Strength Trainer for worn or loose components prior to use. 

6. Tighten / replace any loose or worn components prior to using this machine. 
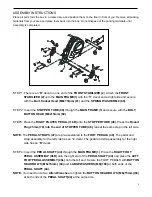
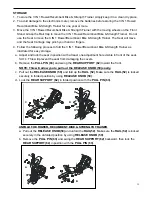
Make sure the 

Rear Support (62)

 is locked properly with the

 Pull Pin (63)

 before using 3 IN 1 Rower /   

Recumbent Bike & Strength Trainer. 

8. Make sure the 

Rail (52)

 is locked properly by the

 Release Knob (59)

 located on the 

Support Tube(56)

 when   

in storage. 

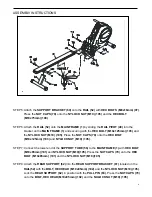
9. Keep fingers clear of all pinch points when folding and unfolding the 3 IN 1 Rower / Recumbent Bike & 

Strength Trainer. 

10. Lock seat in position with at least

 one adjustment hole

 visible in front of the seat before lifting rail to   

storage position. This will prevent the seat from damaging the covers. 

11. Consult a physician prior to commencing an exercise program. If, at any time during exercise, you feel faint,   

dizzy, or experience pain, stop and consult your physician. 

12. Follow your physician’s recommendations in developing your own personal fitness program. 

13. Always choose the workout which best fits your physical strength and flexibility level. Know your limits and   

train within them. Always use common sense when exercise. 

14. Do not wear loose or dangling clothing while using this 3 IN 1 Rower / Recumbent Bike & Strength Trainer. 

15. Never exercise in bare feet or socks; always wear correct footwear, such as running, walking, or   

cross-training shoes. Be sure that they fit well, provide foot support and feature non-skid rubber soles. 

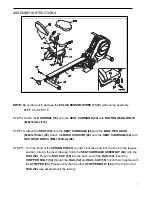
16. Be careful to maintain your balance while using, mounting, dismounting, or assembling the 3 IN 1 Rower /   

Recumbent Bike & Strength Trainer, loss of balance may result in a fall and serious bodily injury. 

17. 

The 3 IN 1 Rower / Recumbent Bike & Strength Trainer should not be used by persons weighing over 125kgs.


18. The 3 IN 1 Rower / Recumbent Bike & Strength Trainer should be used by only one person at a time. 

19. The 3 IN 1 Rower / Recumbent Bike & Strength Trainer is for domestic consumer use only. It is not for use in 

public or semipublic facilities. 

WARNING:

 Before starting any exercise or conditioning program you should consult with your personal 

physician to see if you require a complete physical exam. This is especially important if you are over the age of 

35, have never exercised before, are pregnant, or suffer from any illness. 

READ AND FOLLOW THE SAFETY 

PRECAUTIONS. FAILURE TO FOLLOW THESE INSTRUCTIONS CAN RESULT IN SERIOUS BODILY 

INJURY. 

Содержание 3 IN 1 ROWER

Страница 1: ...e program with this equipment If you feel faint or dizzy immediately discontinue use of this equipment Serious bodily injury can occur if this equipment is not assembled and used correctly Serious bod...

Страница 2: ...covers 11 Consult a physician prior to commencing an exercise program If at any time during exercise you feel faint dizzy or experience pain stop and consult your physician 12 Follow your physician s...

Страница 3: ...screws except those with flat heads is measured from below the head to the end of the bolt or screw Flat head bolts and screws are measured from the top of the head to the end of the bolt or screw Aft...

Страница 4: ...x 15mm 3 95 Bolt Hex Head M6x 1 x 15mm 4 96 Bolt Hex Head M6x1x30mm 4 97 Bolt Hex Head M8x1 25x16mm 4 101 Bolt Hex Head M10x1 5x85mm 1 102 Bolt Hex Head M10x1 5x95mm 1 103 Bolt Hex Head M10x1 5x125mm...

Страница 5: ...Place the RIGHT PILATES PEDAL 116R onto the STOPPER TUBE 48 Press the Round Plug 25mm 78 into the end of STOPPER TUBE 48 repeat the same step in the left side NOTE The PEDAL STRAPS 47 are pre assembl...

Страница 6: ...ess the NUT CAPS 79 onto the HEX BOLT M10x125mm 103 and NYLOCK NUT M10 105 STEP 7 Connect the lower end of the SUPPORT TUBE 56 to the MAIN FRAME 1 with HEX BOLT M10x85mm 101 and NYLOCK NUT M10 105 Pre...

Страница 7: ...K CUSHION 69 onto the SEAT CARRIAGE 64 with HEX HEAD BOLTS M6x1x30mm 96 STEP 11 Turn the knob of the SPRING PIN 67 counter clockwise and lock the knob in the release position refer to the inset drawin...

Страница 8: ...of PULSE CONNECTION WIRE 75 located on the bracket on the MAIN FRAME 1 STEP 14 a A bottle of silicone is packed together with user s manual b Gently apply the silicone to the rollers sliding path inne...

Страница 9: ...crease the setting value of the following functions TIME CAL PULSE DIST HOW TO INSTALL BATTERIES 1 Take off the top cover of meter 2 Place two pieces of SIZE AA or UM 3 batteries into the battery hous...

Страница 10: ...l SPEED displays on the screen Monitor will display the current speed values from 0 0 to 99 9 km or mile on the screen CALORIE Press MODE button until CAL display on the screen Monitor will display th...

Страница 11: ...the meter senses your pulse Your pulse will be displayed approximately five seconds after the heart icon is displayed If the heart icon does not appear relax your grip or change your grip on the pulse...

Страница 12: ...fixed FOOT PEDALS 46 and pull on the HANDLEBAR 25 NOTE If the FRONT STABILIZER 2 raises off the floor during use adjust the STAND 43 to a higher position CAUTION Always verify that the SPRING PIN 67...

Страница 13: ...BICEPS CURL EXERCISE ABDOMINAL EXERCISE ROWER EXERCISE SINGLE ARM BICEP CURL LEG EXTENSION EXERCISE LEG STRETCH EXERCISE Be sure to step on the Steel PEDAL Be sure to step on the Steel PEDAL Be sure...

Страница 14: ...the TENSION KNOB 27 and verify that the Magnetic System provides tension The Magnetic System should provide many years of use 2 Clean the roller tracks in the RAIL 52 with an absorbent cloth 3 It is...

Страница 15: ...as illustrated for easy storage a Adjust and lock the seat in position with at least one adjustment hole visible in front of the seat NOTE This will prevent the seat from damaging the covers b Remove...

Страница 16: ...re not damaged The Computer isn t receiving a signal from the Speed Sensor If all these Checks fail then replace the Sensor Replace the Computer by contacting your dealer The LCD Screen Partially Disp...

Страница 17: ...T receiving a Pulse Signal Check that the Hand Pulse Plugs are FIRMLY inserted into the Sockets The Computer is receiving a faint of Intermittent Pulse Signal 1 The Hand Pulse Sensors will NOT operate...

Страница 18: ...surface at least 3 feet from walls and furniture EXERCISE INTENSITY To maximize the benefits of exercising it is important to exercise with the proper intensity The proper intensity level can be found...

Страница 19: ...the legs as wide as possible Stretch the upper body toward the knee on the right leg by using your arms to pull your chest to your thighs Hold this stretch 10 to 30 seconds DO NOT BOUNCE Do this stret...

Страница 20: ...20...

Страница 21: ...Top Cover 1 32 Meter 1 33 Left Cover 1 34 Right Cover 1 35 Crank Cover 2 36 Left Crank 1 NO PART NAME QTY 37 Right Crank 1 38 Flange Bolt M8x1 25x25mm 3 39 Left Pedal 1 40 Left Pedal Strap 1 41 Right...

Страница 22: ...n Head M8x1 25x15mm 3 95 Bolt Hex Head M6x1x15mm 4 96 Bolt Hex Head M6x1x30mm 4 97 Bolt Hex Head M8x1 25x16mm 8 98 Bolt Hex Head M8x1 25x55mm 4 99 Bolt Hex Head M10x1 5x45mm 1 100 Bolt Hex Head M10x1...

Страница 23: ...Warranty is limited to replacing or repairing at BOYLES option the product or parts therein Any enquiries relating to warranties or spare parts must be directed to Service 07 3272 7010 For efficient p...

Страница 24: ...ylesfitness com au including your best contact details proof of purchase serial number and a brief explanation of what is wrong Emailing is the quickest and most reliable way to get your service reque...

Страница 25: ...l have the option to repair or replace any product which requires attention under the warranty NOTE Lifetime refers to the warranty coverage of the units expected service life NOT the lifetime of the...

Страница 26: ...for any other Reasonable foreseeable loss or damage You are also entitled to have goods repaired or replaced if the goods fail to be of an acceptable quality and the failure does not amount to a majo...

Отзывы: