background image

Section 08

ELECTRICAL SYSTEM

Subsection 05

(INSTRUMENTS AND ACCESSORIES)

08-05-8

Oil Sensor

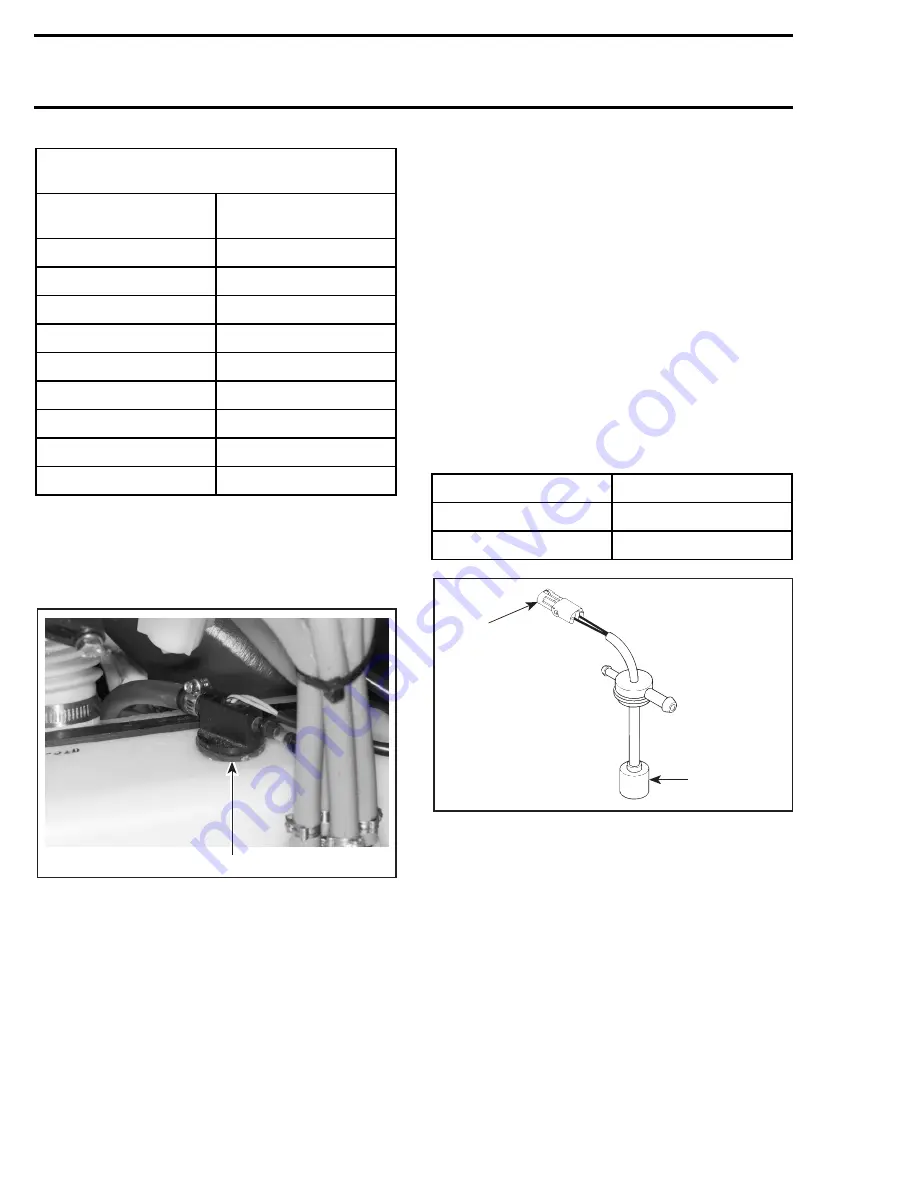
The sensor sends the signal to the low-oil level
light in the fuel gauge or the LED in the Info Cen-
ter.

1. Oil sensor

The bottom of the sensor has a small reservoir
with two small holes underneath to let the oil en-
ter inside and one at the top to let the air enter
allowing the oil to flow out.

When there is enough oil inside the oil tank (and
therefore in the sensor reservoir), the sensor de-
tects the liquid and the light DOES NOT turn on.

When the oil level goes at critical LOW level in-
side the oil tank (and therefore in sensor reser-
voir), the sensor detects the absence of liquid and
the light TURNS ON.

To check the oil sensor, unplug its connector and
pull sensor out of oil tank.

Using a multimeter, check the continuity between
the BLUE and BLUE/BLACK terminals.

When sensor is out of oil tank and its reservoir is
empty, resistance must be infinite (open circuit).

NOTE:

Wait about 15-20 seconds before taking

any reading to give the oil enough time to flow out
or inside sensor reservoir.

Soak sensor in oil so that its reservoir fills up.
Maximum resistance should be approximately
2

 (closed circuit).

1. Measure resistance here
2. Sensor reservoir

To Reinstall Sensor:

– Remove rubber seal from sensor.

– Install seal in oil tank hole.

– Push sensor in seal.

– Plug connector.

NOTE:

This sensor turns the LED to ON if the

connector has been forgotten unconnected even
when there is enough oil in tank.

FUEL LEVEL AND RESISTANCE

(XP Limited)

FUEL LEVEL

(mm)

RESISTANCE

(

)

From 325 ± 5 and more

0 + 2.2

From 294 to 325 ± 5

17.8 ± 2.2

From 263 to 294 ± 5

27.8 ± 2.2

From 225 to263 ± 5

37.8 ± 2.2

From 190 to 225 ± 5

47.8 ± 2.2

From 149 to 190 ± 5

57.8 ± 2.2

From 93 to 149 ± 5

67.8 ± 2.2

From 41 to 93 ± 5

77.8 ± 2.2

From 0 to 41 ± 5

89.8 ± 2.2

F00H0LA

1

TEST CONDITION

READING (

)

Sensor OUT of oil

∞ 

(open circuit)

Sensor soaked IN oil

Ω 

max. (closed circuit)

F03H0BA

1

2

Содержание SEA-DOO GS 5626 1998

Страница 1: ......

Страница 2: ...y be reproduced in any form without the prior written permission of Bombardier Inc Bombardier Inc 1998 Printed in Canada Registered trademarks of Bombardier Inc Loctite is a trademark of Loctite Corpo...

Страница 3: ...end 04 06 1 07 Rotary valve 04 07 1 08 Exhaust system 04 08 1 05 COOLING SYSTEM 01 Table of contents 05 01 1 02 Circuit components and care 05 02 1 06 FUEL SYSTEM 01 Table of contents 06 01 1 02 Fuel...

Страница 4: ...0 06 1 11 SUSPENSION 01 Table of contents 11 01 1 02 Direct action suspension 11 02 1 12 HULL BODY 01 Table of contents 12 01 1 02 Adjustment and repair 12 02 1 13 TECHNICAL DATA 01 SPX model 13 01 1...

Страница 5: ...or replaced with new ones where specified If the efficiency of a locking device is impaired it must be renewed This manual emphasizes particular information denoted by the wording and symbols NOTE In...

Страница 6: ...87 engine BOTTOM END 04 06 New service tools for PTO flywheel removal and installation on the 947 engine CARBURETOR 06 04 Carburetors on the 947 engine are rotated 180 There is a new calibration and t...

Страница 7: ...s It is located on floorboard at the rear of the water craft 1 Hull Identification Number H I N All Models The Hull Identification Number is composed of 9 digits ENGINE IDENTIFICATION NUMBER E I N 717...

Страница 8: ...MENT OF THIS MANUAL The manual is divided into 14 major sections 01 SERVICE TOOLS AND PRODUCTS 02 MAINTENANCE 03 TROUBLESHOOTING 04 ENGINE 05 COOLING SYSTEM 06 FUEL SYSTEM 07 LUBRICATION SYSTEM 08 ELE...

Страница 9: ...you in identifying parts and related positions TYPICAL PAGE F01A09S Illustration number for publishing process Subsection title indicates beginning of the subsection Dotted box contains parts of a par...

Страница 10: ...ving rotary valve cover pay attention that the rotary valve stay in place other wise it must be timed Remove carburetors from intake manifold Disconnect fuel bypass line between carburetors twin carbu...

Страница 11: ...ic model Parts Catalogs ILLUSTRATIONS AND PROCEDURES The illustrations show the typical construction of the different assemblies and in all cases may not reproduce the full detail or exact shape of t...

Страница 12: ...0 2 3 0 2 2 0 2 1 0 2 0 0 1 9 0 1 8 0 1 7 0 1 6 0 1 5 0 1 4 0 1 3 0 1 2 0 1 1 0 1 0 0 9 0 8 0 7 0 6 0 50 40 30 20 10 10 20 30 40 5 0 6 0 7 0 8 0 9 0 1 0 0 1 1 0 1 2 0 1 3 0 1 4 0 1 5 0 1 6 0 1 7 0 1 8...

Страница 13: ...200 554 555 556 557 558 559 560 Piston pin puller P N 529 035 503 F00B0T4 APPLICATION All engines Sleeve set A P N 529 035 542 20 mm sleeve B P N 529 035 543 21 mm sleeve F00B0U4 APPLICATION A 717 an...

Страница 14: ...lignment shaft P N 295 000 141 F00B0G4 APPLICATION All models Adapter P N 295 000 157 F00B054 APPLICATION XP Limited NEW MPEM programmer P N 529 035 502 A01B5B4 APPLICATION All models Digital multimet...

Страница 15: ...E TOOLS AND PRODUCTS Subsection 01 MANDATORY SERVICE TOOLS 01 01 4 Puller plate P N 529 035 533 F00B0S4 APPLICATION 947 engine Polygonal key P N 529 035 505 F00B0Y4 APPLICATION Exhaust system of the 9...

Страница 16: ...ION All models Gear holder P N 290 277 905 A00C164 APPLICATION 717 engine Pliers P N 295 000 070 Oetiker 1099 F01D174 APPLICATION All models 2 235 601 Pliers P N 295 000 054 Caillau F01B1T4 APPLICATIO...

Страница 17: ...Oetiker 1090 F01D184 APPLICATION All models Impeller shaft holder P N 295 000 082 F01B0W4 APPLICATION All models 553 602 603 Bearing seal installer P N 295 000 107 F01J4K4 APPLICATION All models Impel...

Страница 18: ...aligning tool P N 290 876 904 A00B084 APPLICATION 717 engine Handle P N 290 877 650 A00C3V4 APPLICATION Use with pushers P N290876609 and 290 877 740 751 209 220 758 Rotary valve shaft pusher P N 290...

Страница 19: ...ATION All models 225 763 755 230 Digital induction type tachometer P N 295 000 100 F01B1G4 APPLICATION All models Timing mark pointer P N 295 000 130 F01B2O4 APPLICATION 717 engine Timing mark pointer...

Страница 20: ...w P N 290 940 755 APPLICATION 947 engine 889 3 2 1 Crankshaft protector P N 420 876 552 F00B034 APPLICATION For use with pullers Gear bearing puller P N 290 877 665 F04B034 APPLICATION 787 engine Exha...

Страница 21: ...All models Hose pincher P N 529 032 500 F01B234 APPLICATION All models 826 35 4 3 25 2 15 1 5 6 0 50 40 30 20 10 773 Spring compressor P N 529 027 100 A01B4O4 APPLICATION XP Limited Suspension adjustm...

Страница 22: ...to re move rotary valve shaft bearing Hacksaw Not sold by Bombardier Snap on HS3 F01B1M4 APPLICATION All models 828 Machinist s square Not sold by Bombardier Snap on PMF 122 F02B064 APPLICATION GTS m...

Страница 23: ...P N 295 000 126 F01B014 Beach wheels set of 2 wheels P N 295 000 005 F01B074 APPLICATION Dolly Tie down with ratchet 3 60 m 12 ft long P N 295 100 011 APPLICATION All models 876 877 885 Lift kit P N...

Страница 24: ...th threadlocker P N 293 800 015 Loctite 242 blue 10 mL A00B324 High strength threadlocker P N 293 800 005 Loctite 271 red 10 mL A00B2U4 154 LOCTITE LOCTITE LOCTITE REMOVABLE THREADLOCKER 242 155 LOCTI...

Страница 25: ...ARDIER 157 Primer for gasket eliminator P N 293 800 041 Loctite 764 A00B3N4 Pipe sealant A P N 293 800 018 B P N 293 800 013 A Loctite 592 B Loctite 567 50 mL 250 mL A00B2W4 Hylomar sealant P N 293 80...

Страница 26: ...016 12 x 14 oz F01B0S4 932 Super Lube PERMATEX INDUSTRIAL R R Synthetic Lubricant Multi Purpose With Teflon Net Wt 14 5 Oz 411g R 362 913 BOMBARDIER LUBE 340 g DANGER BOMBARDIER INC Sea Doo Ski Doo Di...

Страница 27: ...e Two Stroke Oil SYNTHETIQUE FORMULA XP S 934 L A E S D A ADCHEM SCELLANT ADH SIF PREMI RE QUALIT PREMIUM SEALANT ADHESIVE Adhesive activator P N 293 530 036 250 mL F01B1Z4 Jet pump oil P N 293 600 01...

Страница 28: ...P N 293 500 115 D Amethyst 140 g P N 293 500 122 E Ice white 140 g P N 293 500 125 F Aztec red 140 g P N 293 500 126 F01B1Q4 APPLICATION A SPX body GTS body hull GTI body B GSX Limited body hull C GT...

Страница 29: ...ection 01 TABLE OF CONTENTS TABLE OF CONTENTS 0 PERIODIC INSPECTION CHART 02 02 1 FLUSHING AND LUBRICATION 02 03 1 GENERAL 02 03 1 PROCEDURE 02 03 1 WATER FLOODED ENGINE 02 04 1 GENERAL 02 04 1 PROCED...

Страница 30: ...gulator valve inspection 787 and 947 engines Oil injection pump adjustment Fuel filter and oil filter inspection Fuel filter and oil filter replacement Engine head bolts or nuts retorque Steering syst...

Страница 31: ...em Remove dust cap from fitting spigot and attach coupler hose P N 295 500 258 Make sure cou pler hose is properly locked to fitting spigot Install a hose pincher on water outlet hose SPX MODEL 1 Fitt...

Страница 32: ...Garden hose installed All Models Start the engine then immediately open the water tap Run the engine about 3 minutes at a fast idle around 3500 RPM Spray BOMBARDIER LUBE lubricant through air intake...

Страница 33: ...ve coupler hose Reinstall dust cap over fitting spigot Remove hose pincher from water outlet hose All Models Except SPX and GTS Models All Models Wipe up any residual water from the engine Remove spar...

Страница 34: ...BRICATION 02 03 4 GTS MODEL 1 Spark plug cables on grounding device SPX GS AND GTI MODELS 1 Spark plug cables on grounding device XP LIMITED 1 Grounding device GSX LIMITED 1 Spark plug cables on groun...

Страница 35: ...s to distribute the oil onto cylinder wall Apply anti seize lubricant on spark plug threads then reinstall them Reinstall plug on air intake silencer cover SPX GS GTS and GTI models NOTE Engine foggin...

Страница 36: ...en drain fuel filter bowl Refer to FUEL CIRCUIT 06 02 Drain bilge if water is present Remove spark plug cables and connect them on the grounding device GTS MODEL 1 Spark plug cables on grounding devic...

Страница 37: ...holes Crank engine again Reinstall spark plugs and spark plug cables 787 and 947 Engines Remove the filler plug of the counterbalance shaft on the engine crankcase 787 ENGINE 1 Remove filler plug 947...

Страница 38: ...check ignition system for spark occur rence Refer to IGNITION SYSTEM 08 02 Check crankshaft if needed it may be misaligned or deflected Refer to BOTTOM END 04 06 After engine has started spray BOMBARD...

Страница 39: ...o prevent salt sand or dirt accumulation which will clog water passages Engine must be lubricated to prevent corrosion on internal parts For proper procedure refer to FLUSHING AND LUBRICATION 02 03 Pr...

Страница 40: ...y use mild detergent Rinse thoroughly with fresh water Remove marine organisms from the hull Apply a nonabrasive wax If the watercraft is to be stored outside cover it with an opaque tarpaulin to prev...

Страница 41: ...hose to fitting spigot Install a hose pincher to engine water return hose beside fitting spigot 1 Coupler hose 2 Fitting Spigot 3 Hose pincher Pour the antifreeze slowly mixed with water in coupler ho...

Страница 42: ...tifreeze mixed with water in engine until the colored solution ap pears in the engine drain hose Remove temporary hose and reconnect engine water return hose Remove hose pinchers All Models Most of th...

Страница 43: ...ngine turns slowly Discharged weak battery Check charge replace Restriction in jet pump Check clean pump Seizure in jet pump Inspect refer to subsection 09 02 Partial engine hydrolock Check refer to s...

Страница 44: ...ce Loose carburetor Tighten carburetor s Rich fuel mixture Fouled spark plug Partially closed choke Check adjust choke cable Flame arrester dirty or restricted Check replace Carburetor adjustment Chec...

Страница 45: ...hange to correct range Defective ignition module or MPEM Check replace refer to subsection 08 02 Engine temperature Engine overheats Check see engine overheats Fuel of poor quality Use good quality fu...

Страница 46: ...utes to poor performance from start Trailing edge damage contributes to poor top performance and stator vanes erosion Sealing of ride plate jet pump support or jet pump Check reseal refer to subsectio...

Страница 47: ...04 03 4 MAGNETO SYSTEM 04 04 1 GENERAL 04 04 4 DISASSEMBLY 04 04 4 CLEANING 04 04 10 ASSEMBLY 04 04 10 TOP END 04 05 1 GENERAL 04 05 4 DISASSEMBLY 04 05 8 CLEANING 04 05 16 INSPECTION 04 05 16 ASSEMBL...

Страница 48: ...Section 04 ENGINE Subsection 01 TABLE OF CONTENTS 04 01 2 EXHAUST SYSTEM 04 08 1 REMOVAL 04 08 4 TUNED PIPE REPAIR 04 08 8 INSTALLATION 04 08 8 GTX RFI...

Страница 49: ...ents of the Engine Leak Test Kit are not leaking by spraying a solution of soapy water on all hoses connections fittings plates etc If there is a leak bubbles will indicate leak location Three areas o...

Страница 50: ...washers with exhaust manifold stud NOTE Water is not required for testing Activate pump and pressurize engine cooling sys tem to 34 kPa 5 PSI Wait 3 minutes and check if pressure drops if so verify a...

Страница 51: ...gs are installed and tight en Block pulse hose using a hose pincher NOTE Do not block the rotary valve shaft hoses Install pump to the exhaust plate fitting 717 ENGINE 1 Intake plates 2 Pulse hose blo...

Страница 52: ...ter seal If no leak is found on the PTO side outer seal re move magneto flywheel and verify crankshaft outer seals Proceed with the Rotary Valve Shaft testing if the crankshaft outer seals are not lea...

Страница 53: ...de spark plug If pressure drops it indicates a defective MAG side crankshaft inner seal If the above mentioned components are not leak ing and there is a pressure drops remove the ro tary valve cover...

Страница 54: ...VER CHECK SEAL OF ROTARY VALVE SHAFT IS SEAL LEAKING CAREFULLY INSPECT ENGINE CASTINGS PARTICULARLY THE THREADED HOLE AREAS YES YES NO PRESSURIZE ENGINE COOLING SYSTEM IS SYSTEM LEAKING CHECK TESTING...

Страница 55: ...rical Connections First remove BLACK negative cable from battery then RED positive cable GTS Model Remove battery holding straps and disconnect vent tube from battery Remove battery All Models Disconn...

Страница 56: ...URETOR 06 04 XP Limited Disconnect choke and throttle cables from carbu retor linkage Disconnect fuel supply and fuel return hoses Engine Support NOTE Be careful when removing engine sup port s or rub...

Страница 57: ...into holes of special tools Using a chain block a hoist or other suitable equipment slightly lift engine to ease the remain ing component removal 787 and 947 Engines Engine can be easily lifted by in...

Страница 58: ...gine so that it can be removed from the body opening TYPICAL CLEANING Wipe off any spillage in bilge Clean with a bilge cleaner Clean external parts of engine INSTALLATION Installation of engine in wa...

Страница 59: ...pletely lowering engine in bilge Positive Starter Cable Torque nut of positive starter cable to 6 N m 53 lbf in Apply dielectric grease on nut Engine Jet Pump Alignment Alignment is necessary to elimi...

Страница 60: ...o PTO flywheel NOTE Ensure the protective hose and carbon ring or seal carrier is removed to check engine alignment If the alignment is correct the shaft will slide easily without any deflection in PT...

Страница 61: ...and lubricate cable with BOMBARDIER LUBE lubricant After its installation properly adjust and bleed oil injection pump as specified in OIL INJECTION PUMP 07 03 Check hose condition and pressure test f...

Страница 62: ...5 N m 44 lbf in 9 9 N m 80 lbf in Loctite 242 10 11 12 Loctite 242 13 6 N m 53 lbf in Loctite 242 6 N m 53 lbf in 14 Loctite 242 15 6 N m 53 lbf in 4 16 Loctite 242 Loctite 648 5 6 145 N m 107 lbf ft...

Страница 63: ...42 Loctite 242 Loctite 648 Loctite 648 10 7 9 6 5 8 1 2 4 11 10 N m 88 lbf in 10 N m 88 lbf in Synthetic grease Lithium grease 105 N m 77 lbf ft 10 N m 88 lbf in 6 N m 53 lbf in 10 N m 88 lbf in 9 N m...

Страница 64: ...TEM 04 04 3 947 Engine F06D0IS Loctite 242 Loctite 242 Loctite 242 Loctite 648 Loctite 648 Anti seize lubricant 9 N m 80 lbf in 13 N m 115 lbf in 115 N m 85 lbf ft 9 N m 80 lbf in 6 4 5 1 7 12 13 11 8...

Страница 65: ...handle 3 Puller plate 4 Sleeve Using 3 M8 x 35 screws P N 290 841 591 install screws through puller plate and slide sleeves on screws then secure puller plate on magneto fly wheel so that sleeves are...

Страница 66: ...to Housing To remove magneto housing starter has to be re moved Refer to STARTING SYSTEM 08 04 Unscrew retaining screws no 9 then withdraw housing 4 5 Magneto Flywheel and Ring Gear Lay magneto flywhe...

Страница 67: ...imp and unsolder YELLOW and YELLOW BLACK wires Engine Crankcase Replacement 717 Engine Only Since replacement crankcases do not have timing mark for armature plate location indexing marks should be ma...

Страница 68: ...nd of crankcase 2 Align mark and lug end here Find manufacturer s mark on armature plate In line with this mark punch another mark on ad jacent crankcase lug TYPICAL 1 Manufacturer s mark on armature...

Страница 69: ...ar blocking tool with retaining plate If desired magneto rotor can be removed without the engine flywheel Remove the 6 screws no 11 1 Screw Using a suitable socket unscrew retaining nut of engine flyw...

Страница 70: ...shaft must be locked For procedure refer to BOTTOM END 04 06 If necessary the magneto rotor can be removed without the engine flywheel Remove the 6 screws no 7 1 Screw To remove the flywheel rotor as...

Страница 71: ...a solvent Clean crankshaft taper and threads ASSEMBLY 717 Engine 11 Generating Coil Strip end of old wire then crimp and solder on new coil Apply Loctite 242 blue to screws no 12 and in stall the new...

Страница 72: ...and degrease replacement part using a non oil base solvent 2 Apply coating in light thin coats using a spray gun NOTE Do not spray Gun Kote into magneto fly wheel threaded holes 3 Bake parts in oven...

Страница 73: ...stator in magneto housing cover no 1 and torque screws no 13 to 10 N m 88 lbf in Replace wiring harness bracket no 16 of stator and torque screws to 4 5 N m 40 lbf in 1 Stator screws 2 Bracket 14 Tri...

Страница 74: ...with lock washer and torque to 105 N m 77 lbf ft 1 Cover Before installation properly install O ring no 3 in engine magneto cover Apply Loctite 767 anti seize compound on screws no 2 Torque screws in...

Страница 75: ...Apply Loctite 242 blue on crankshaft taper 1 Loctite 242 blue on crankshaft taper Install flywheel and make sure to align keyway with the crankshaft Woodruff key Apply Loctite 242 blue on nut no 6 Ins...

Страница 76: ...OP END 0 717 Engine F00D0DT 24 N m 17 lbf ft 14 Loctite 242 Synthetic grease 11 1 12 2 13 Loctite 242 Synthetic grease 24 N m 17 lbf ft Loctite 518 9 10 Synthetic grease 6 5 34 rollers 4 3 8 7 7 8 3 4...

Страница 77: ...24 N m 17 lbf ft Loctite 242 Synthetic grease 1 12 2 Synthetic grease 21 19 20 18 17 16 26 25 24 23 22 6 34 rollers 5 4 Synthetic grease 3 4 5 Synthetic grease 6 34 rollers 10 Loctite 518 Loctite 518...

Страница 78: ...tite 242 Loctite 242 Synthetic grease 2 9 6 36 rollers 5 4 3 5 Synthetic grease 14 34 10 34 N m 25 lbf ft 5 N m 44 lbf in 34 N m 25 lbf ft 31 33 22 23 25 Loctite 242 26 16 18 20 30 Synthetic grease 15...

Страница 79: ...ystem is tuned for maximum power there is a large in crease of fresh charge losses As a result the torque decreases along with a dramatic increase of the specific fuel consumption Higher torque along...

Страница 80: ...engine speed RPM and its rate of acceleration To open the RAVE valves the MPEM activates a solenoid which directs the positive pressure from engine crankcase to the valves NOTE A check valve on the pr...

Страница 81: ...4 ENGINE Subsection 05 TOP END 04 05 6 RAVE VALVE OPENED 1 Pulse from crankcase 2 Check valve 3 Positive pressure to solenoid 4 Solenoid activated 5 Positive crankcase pressure to RAVE valves F06D16S...

Страница 82: ...GINE Subsection 05 TOP END 04 05 7 RAVE VALVE CLOSED 1 Pulse from crankcase 2 Check valve 3 Positive pressure blocked by the solenoid 4 Solenoid deactivated 5 RAVE valves are opened to atmosphere F06D...

Страница 83: ...t can be considered to be instantaneous at item 7 Gradual application of the throttle however will result in the RAVE valve opening much later MAINTENANCE There are no wear parts anywhere in the syste...

Страница 84: ...rews Remove bellow no 21 from valve piston no 20 Unscrew valve piston no 20 from sliding valve no 22 NOTE Hold the sliding valve to prevent it from turning 1 Unscrew piston 2 Hold sliding valve 947 En...

Страница 85: ...the compression spring no 19 1 Remove spring Remove spring no 30 retaining bellows no 21 to valve piston no 20 1 Spring Free bellows no 21 from valve piston no 20 1 Bellows removed from piston WARNIN...

Страница 86: ...g valve no 22 NOTE Hold the sliding valve to prevent it from turning 1 Unscrew piston 2 Hold sliding valve Remove compression spring no 29 1 Remove spring Remove supporting ring no 28 1 Remove support...

Страница 87: ...e cylinder head cover no 1 If shells sand salt or any other particles are present in cylinder head clean with a vacuum cleaner Remove cylinder head no 2 If shells sand salt water or any other particle...

Страница 88: ...e cylinder base gasket replacement 947 Engine Remove studs no 32 NOTE Studs must be removed prior cylinder block 1 Remove studs Remove cylinder block no 9 1 Remove cylinder block NOTE To ease removal...

Страница 89: ...e removed until it sits on pad 1 Rubber pad P N 290 877 032 All Engines To remove circlip no 5 insert a pointed tool in pis ton notch then pry it out and discard TYPICAL 1 Piston notch To extract pist...

Страница 90: ...ned to ward the bottom of the piston 1 Tool cutout toward bottom of piston Firmly hold puller and rotate handle to pull pis ton pin no 4 Rotate spindle until the shoulder sleeve is flushed with the pi...

Страница 91: ...ection of engine top end should include the following measurements N A Not Applicable NOTE Replacement cylinder sleeves are avail able if necessary Also oversize pistons of 0 25 mm 010 in are availabl...

Страница 92: ...cylinder should be rebored and honed or replaced 1 Measuring in piston pin axis 2 Measuring perpendicularly 90 to piston pin axis A 16 mm 5 8 in Piston Cylinder Wall Clearance To determine the piston...

Страница 93: ...Piston Groove Clearance 717 and 787 Engines Using a feeler gauge check clearance between rectangular ring and groove If clearance exceeds specified tolerance replace piston NOTE Ring piston groove cle...

Страница 94: ...e To determine gasket thickness refer to the identi fication holes on the gasket TYPICAL 1 Identification holes 717 Engine 787 Engine 947 Engine F01D0OA 1 2 F01D67A 1 GASKET THICKNESS IDENTIFICATION H...

Страница 95: ...no 23 onto rod of slid ing valve no 22 The TOP position of the sliding valve no 22 is in dicated on one side 1 Sliding valve 2 O ring 3 TOP Install a new gasket no 24 It must be installed at the same...

Страница 96: ...n pin use piston pin puller P N 529 035 503 with the appropriate set of sleeves as for disassembly Replacement bearings are held in place by a lo cating sleeve outside and 2 plastic cage halves inside...

Страница 97: ...as follows Align replacement roller bearing with connect ing rod bore Carefully push inner plastic sleeve into con necting rod bore outer plastic ring will release rollers 1 Outer ring removal after i...

Страница 98: ...p opening at 6 o clock at bottom 947 Engine Secure circlip in piston groove with its bent end in piston notch as shown 1 Circlip end in piston notch CAUTION Always use new circlips At installation tak...

Страница 99: ...irmly hold piston against tool and tap tool with a plastic tip hammer to insert circlip into its groove 9 Cylinder 717 and 787 Engines To easily slide cylinder over piston install on pis ton ring comp...

Страница 100: ...crankcase it is important to have them properly aligned so that exhaust flanges properly match up with exhaust manifold 717 Engine The aligning tool P N 290 876 902 or the exhaust manifold can be used...

Страница 101: ...ylinder block over pistons use ring compressor P N 290 876 965 1 Slide this edge NOTE For each ring make sure to align ring end gap with piston locating pin Install cylinder block Install O rings no 3...

Страница 102: ...Install cylinder head 947 Engine Apply Loctite 242 blue on the threads of the cyl inder block studs no 32 Apply Loctite 242 blue below head of cylinder head bolts no 14 Apply synthetic grease on thre...

Страница 103: ...fully tightened 1 Knob fully tightened This will ensure the correct preload on the return spring no 19 in order to open and close the RAVE valve at the proper RPM Combustion Chamber Volume Measuremen...

Страница 104: ...Top of spark plug hole NOTE The liquid level in cylinder must not drop for a few seconds after filling If so there is a leak between piston and cylinder The recorded vol ume would be false 5 Let bure...

Страница 105: ...grease 4 Anti seize lubricant 12 3 1 6 5 6 Anti seize lubricant Loctite 642 12 4 Anti seize lubricant Loctite 242 6 6 4 5 Lithium grease Loctite 518 2 24 N m 17 lbf ft 9 11 Synthetic grease 7 24 N m...

Страница 106: ...ricant Anti seize lubricant 4 Loctite 242 Loctite 642 Anti seize lubricant Lithium grease Loctite 518 Loctite 518 Synthetic grease 8 40 N m 30 lbf ft Loctite 518 Synthetic grease 7 24 N m 17 lbf ft Lo...

Страница 107: ...20 Loctite 648 Loctite 242 Synthetic grease 23 N m 17 lbf ft Loctite 242 21 4 2 Loctite 518 24 9 N m 80 lbf in Loctite 242 25 26 27 23 Synthetic grease Loctite 518 Synthetic grease Loctite 518 7 Synth...

Страница 108: ...el is loosen using PTO flywheel re mover P N 295 000 001 Insert special tool in PTO flywheel splines TYPICAL 1 PTO flywheel remover P N 295 000 001 Using a suitable wrench or socket with a breaker bar...

Страница 109: ...HEEL REMOVER TOOL Using a suitable socket with a breaker bar lock crankshaft Loosen Allen screws no 21 of coupler no 20 1 Loosen Allen screws 2 Breaker bar locking crankshaft Remove the coupler no 20...

Страница 110: ...tension handle 3 Loosen bolt with socket and breaker bar Remove the PTO flywheel using puller plate P N 529 035 533 puller P N 529 035 548 and bolt P N 529 035 549 1 Puller plate 2 Puller 3 Bolt 4 Ext...

Страница 111: ...17 engine magneto flywheel refer to MAGNETO SYS TEM 04 04 magneto housing except 947 engine starter rotary valve cover and valve except 947 en gine Starter drive assembly 947 engine Reed valves 947 en...

Страница 112: ...ring halves P N 290 977 475 7 Screw M8 x 40 P N 290 840 681 8 Screw M8 x 70 P N 290 841 201 NOTE To facilitate ring or distance ring installa tion lubricate their inside diameters 787 Engine To remov...

Страница 113: ...stance ring installa tion lubricate their inside diameters All Engines TYPICAL 1 Removing crankshaft bearing Or use a bearing extractor such as Proto no 4332 and a press to remove two bearings at a ti...

Страница 114: ...moved by using the fol lowing tools 1 Puller P N 290 876 298 2 Protective cap P N 290 876 557 3 Ring P N 290 977 480 4 Ring halves P N 290 876 330 5 Screw M8 x 40 P N 290 840 681 1 Tool installed To r...

Страница 115: ...110 INSPECTION Assembled Engine The following checks can be performed with en gine in watercraft without overhauling engine Crankshaft Alignment at Center Main Journal Since it is an assembled cranksh...

Страница 116: ...ank shaft Crankshaft Alignment at Connecting Rod Journal Counterweights can also be twisted on connect ing rod journal on any or both cylinder s 1 Connecting rod journal alignment here Such misalignme...

Страница 117: ...n exceeds the specified toler ance it can be either ball bearings wear bent or twisted crankshaft at connecting rod journal 1 Measuring PTO side deflection in crankcase 1 Measuring MAG side deflection...

Страница 118: ...eck reed valve petals no 29 for cracks or other defects The reed petals must lie completely flat against the reed valve body no 30 To check hold against light 1 No play In case of a play turn reed pet...

Страница 119: ...ition the outer bearing s a dis tance gauge must be temporarily installed against the inner bearing Slide the outer bearing until stopped by the distance gauge then remove it 1 Distance gauge TYPICAL...

Страница 120: ...inst the retaining shim 947 Engine Seals are positioned with the outer lip in the crank case recess 1 Seal lip in crankcase recess 6 Drive Pin Make sure drive pins of bearings are properly in stalled...

Страница 121: ...ngine Install bearing no 31 and washer no 32 When installing seals no 17 apply a light coat of synthetic grease on seal lips Prior to installation place bearings no 15 into a container filled with oil...

Страница 122: ...ble as single halves Prior to joining crankcase halves apply a light coat of Loctite 518 on mating surfaces Do not apply in excess as it will spread out inside crankcase NOTE On aluminum material it i...

Страница 123: ...w threads and synthetic grease below head screws Torque crankcase screws to 24 N m 17 lbf ft as per following illustrated sequence Torque 2 M10 crankcase screws to 40 N m 30 lbf ft 1 Torque to 40 N m...

Страница 124: ...ds Torque crankcase screws to 12 N m 9 lbf ft as per following sequence Repeat procedure re tightening all screws to 27 N m 20 lbf ft As a final step torque only the M10 x 73 5 bolts to 40 N m 30 lbf...

Страница 125: ...r drive assembly use pusher P N 290 876 502 and handle P N 290 877 650 1 Handle 2 Pusher 1 PTO Flywheel 787 Engine Install O ring onto crankshaft 1 O ring 717 and 787 Engine Apply Loctite anti seize l...

Страница 126: ...engine assembly is completed add 30 mL 1oz of motor oil SAE 30 to the counterbalance shaft gear through the crankcase filler plug 1 Remove plug and add SAE 30 motor oil 947 Engine When engine assembly...

Страница 127: ...Subsection 07 ROTARY VALVE 04 07 1 ROTARY VALVE 0 717 and 787 Engines F01D7SS 8 2 20 N m 15 lbf ft Lithium grease 1 7 10 6 9 5 11 3 4 13 12 14 15 1 787 Engine 717 Engine 2 13 12 1 20 N m 15 lbf ft 12...

Страница 128: ...th a 45 feeler gauge the other one with a solder 45 FEELER GAUGE METHOD Remove O ring from rotary valve cover Remove intake manifold from rotary valve cover except 787 engine Reinstall cover in place...

Страница 129: ...NG SURFACE AND O RING GROOVE BASE 1 Cover seating surface 2 O ring groove depth must be 1 0 0 03 mm 039 001 in Reverify the clearance At assembly the rotary valve timing must remain as per original se...

Страница 130: ...ce puller over rotary valve shaft end and screw on puller bolt into shaft While retaining bolt with a wrench turn puller nut CLOCKWISE until shaft comes out 1 Hold bolt 5 6 Circlip and Spring Seat If...

Страница 131: ...n end bearing Holding claws turn puller shaft clock wise so that claws open and become firmly tight against bearing Slide puller sleeve outwards and tap puller end Retighten claws as necessary to alwa...

Страница 132: ...aged Check for presence of brass filings in gear hous ing Rotary Valve Shaft Deflection Deflection is measured with a dial gauge Install rotary valve shaft in crankcase half without its gear NOTE End...

Страница 133: ...ring as illustrated 1 Seal 2 Ball bearing 3 Bearing extractor Snap on CJ 950 Install shim no 15 snap ring no 7 and slide dis tance sleeve no 14 on shaft 1 Seal 2 Ball bearing 3 Snap ring 4 Distance sl...

Страница 134: ...stops on bearing seat 717 and 787 Engines 4 Snap Ring Position snap ring so that its sharp edge faces out wards 13 Rotary Valve The rotary valve controls the opening and closing of the inlet ports Th...

Страница 135: ...olded in crankcase as a timing mark 360 350 340 330 320 3 1 0 3 0 0 2 9 0 2 8 0 2 7 0 2 6 0 2 5 0 2 4 0 2 3 0 2 2 0 2 1 0 2 0 0 1 9 0 1 8 0 1 7 0 1 6 0 1 5 0 1 4 0 1 3 0 1 2 0 1 1 0 1 0 0 9 0 8 0 7 0...

Страница 136: ...et port Then find 147 line on degree wheel and mark crankcase at this point OPENING MARK Step Bottom of MAG inlet port Align 360 line of degree wheel Step Find 147 on degree wheel and mark here NOTE D...

Страница 137: ...piston at TDC NOTE Rotary valve is asymmetrical Therefore try flipping it over then reinstall on splines to ob tain best installation position Apply BOMBARDIER ROTAX injection oil on rota ry valve bef...

Страница 138: ...ft Loctite 242 19 19 5 15 4 736 sealant 10 N m 88 lbf in 10 9 Loctite 242 8 40 N m 30 lbf ft 7 40 N m 30 lbf ft 9 Loctite 242 Loctite 648 17 13 14 Loctite 518 12 40 N m 30 lbf ft 12 40 N m 30 lbf ft...

Страница 139: ...16 14 12 13 19 18 Loctite 242 Loctite 242 9 7 10 5 4 15 19 6 25 N m 18 lbf ft 10 N m 88 lbf in 4 N m 35 lbf in 1 3 2 4 N m 35 lbf in 11 4 N m 35 lbf in 732 sealant 27 N m 20 lbf ft GS GTS GTI 4 N m 3...

Страница 140: ...8 lbf in 2 N m 18 lbf in 4 N m 35 lbf in 1 3 5 15 4 736 sealant 14 N m 10 lbf ft 40 N m 30 lbf ft Loctite 242 Loctite 242 10 9 7 8 9 16 14 12 13 Loctite 271 19 18 19 20 Loctite 242 25 N m 18 lbf ft 25...

Страница 141: ...om tuned pipe by pulling muffler Remove clamp no 4 from tuned pipe Remove tuned pipe cone no 5 Remove tuned pipe retaining screw no 6 from exhaust manifold side Remove screws no 7 nut no 8 and flat wa...

Страница 142: ...ngine Remove exhaust hose no 3 from tuned pipe cone no 5 Move tuned pipe cone no 5 in front of bilge be tween body and fuel tank Open storage cover and remove basket Then pull out tuned pipe cone no 5...

Страница 143: ...er flow regulator valve 1 Water supply hose for the regulator valve Disconnect the water injection hose at tuned pipe head no 10 1 Water injection hose Disconnect the water bleed hose 1 Water bleed ho...

Страница 144: ...remove clamp Loosen Allen screw of carburetor bracket 1 Loosen Allen screw Loosen Allen screws no 7 and nut no 8 at tuned pipe flange NOTE To loosen nut use polygonal key P N 529 035 505 1 Tuned pipe...

Страница 145: ...is procedure is given to repair tuned pipe cracks using T I G welding process Procedure Sand the cracked area to obtain bare metal Perform a 1 50 mm 1 16 in depth chamfer over crack Use pure argon gas...

Страница 146: ...screws Refer to the following il lustration for proper position of screws 1 Screw with Loctite 518 2 Screw with synthetic grease Torque exhaust manifold screws to 24 N m 17 lbf ft as per following ill...

Страница 147: ...Make sure that gasket no 16 is properly located on exhaust manifold prior to finalizing pipe instal lation Apply Loctite 242 blue on nut no 8 and screws no 6 and no 7 Hand tighten all fasteners before...

Страница 148: ...o 7 at tuned pipe head flange to 25 N m 18 lbf ft NOTE Torque nut no 8 only to 18 N m 13 lbf ft using the polygonal key P N 529 035 505 1 Torque Allen screws and nut to 25 N m 18 lbf ft Torque bolt of...

Страница 149: ...en screws at tuned pipe head flange to 40 N m 30 lbf ft NOTE Torque nut only to 28 N m 21 lbf ft using the polygonal key P N 529 035 505 The nut will be at the same torque as the screws 1 Torque Allen...

Страница 150: ...05 01 1 Section 05 COOLING SYSTEM Subsection 01 TABLE OF CONTENTS TABLE OF CONTENTS 0 CIRCUIT COMPONENTS AND CARE 05 02 1 CIRCUIT 05 02 5 COMPONENTS 05 02 9 CARE 05 02 13 GTX RFI...

Страница 151: ...System Indicator CSI 2 2 N m 18 lbf in Engine water return hose 1 2 N m 11 lbf in 1 2 N m 11 lbf in 1 Loctite 592 Regulator valve water supply hose Loctite 592 Water injection hose Engine drain hose...

Страница 152: ...3 Loctite 592 Bleed hose Loctite 592 Water injection hose 1 2 N m 11 lbf in Tuned pipe water inlet hose 1 2 N m 11 lbf in Engine water outlet hose Loctite 592 Engine drain hose 1 2 N m 11 lbf in 1 2...

Страница 153: ...tite 592 Loctite 592 1 2 N m 11 lbf in Loctite 592 Loctite 592 1 2 N m 11 lbf in 2 1 2 N m 18 lbf in 2 5 N m 22 lbf in Bleed hose Water injection hose Tuned pipe water inlet hose Engine water supply h...

Страница 154: ...e Cooling System Indicator CSI Loctite 592 1 2 N m 11 lbf in Engine drain hose Engine water return hose 1 2 N m 11 lbf in 1 2 N m 11 lbf in Loctite 592 1 1 2 N m 11 lbf in Loctite 592 Engine water sup...

Страница 155: ...re de signed with a double wall to allow water circula tion Water is pre heated by the exhaust system before entering the cylinder cooling jackets Water enters cylinder cooling jacket through pas sage...

Страница 156: ...et before entering the engine or cylinder head As with other models the water supply is provid ed by a pressurized area in the jet pump between the impeller and venturi Water is directed to the water...

Страница 157: ...the cooling system through a fit ting located in the jet pump support on the tran som of the watercraft Draining of the cooling system is accomplished by the drain hose connected to a fitting at the b...

Страница 158: ...ipe by a calibrated fitting 1 Injection fitting All Models 1 F06E09A F06E0CA 2 1 3 CAUTION Never modify cooling system arrangement otherwise serious engine damage could occur TECHNICAL DATA TYPE TLCS...

Страница 159: ...t sys tem The elbow fitting can be identified by using the number stamped onto the fitting or by measuring its inside diameter Refer to the following illustra tion and chart 1 Outlet diameter 4 6 mm 1...

Страница 160: ...w regulator valve has a calibrated spring and a tapered needle which regulate the injected water in the tuned pipe At low speed water pressure in the supply hose of the regulator valve is not sufficie...

Страница 161: ...s channel are also calibrated If the maximum engine speed cannot be attained or if the engine has poor performance the water flow regulator valve should be considered in the troubleshooting of the pro...

Страница 162: ...e Pull the valve slightly Using pliers release the clamp which retains the bellows no 10 Remove valve no 9 and bellows no 10 Loosen clamp to separate valve from bellows 1 Clamp Inspection Inspect part...

Страница 163: ...always rotate watercraft counterclockwise seen from the rear Rotating watercraft on the opposite side could allow resid ual water in tuned pipe to enter the engine and cause damage GSX Limited XP Limi...

Страница 164: ...e water sup ply hose as shown in the following illustrations GS GTS AND GTI MODELS 1 Hose pincher SPX MODEL 1 Hose pincher XP LIMITED 1 Hose pincher GSX LIMITED AND GTX LIMITED 1 Hose pincher CAUTION...

Страница 165: ...02 6 REMOVAL 06 02 6 INSPECTION 06 02 10 ASSEMBLY 06 02 11 FUEL SYSTEM PRESSURIZATION 06 02 11 AIR INTAKE 06 03 1 REMOVAL 06 03 3 ASSEMBLY 06 03 4 CARBURETOR 06 04 1 GENERAL 06 04 2 REMOVAL 06 04 2 CL...

Страница 166: ...EL CIRCUIT 06 02 1 FUEL CIRCUIT 0 SPX Model F01F2ZS 3 3 N m 27 lbf in 1 2 2 N m 18 lbf in 6 N m 53 lbf in 7 6 1 N m 9 lbf in 3 N m 27 lbf in 10 12 11 5 4 N m 35 lbf in 4 22 N m 16 lbf ft 4 N m 35 lbf...

Страница 167: ...3 N m 27 lbf in 3 1 2 1 2 N m 11 lbf in 2 N m 18 lbf in 6 N m 53 lbf in 1 2 N m 11 lbf in 7 6 22 N m 16 lbf ft 4 N m 35 lbf in 3 N m 27 lbf in 5 4 N m 35 lbf in Dielectric grease 4 9 8 10 11 12 4 N m...

Страница 168: ...11 lbf in 2 N m 18 lbf in 6 N m 53 lbf in 1 2 N m 11 lbf in 7 6 22 N m 16 lbf ft 4 N m 35 lbf in 3 N m 27 lbf in 5 4 N m 35 lbf in Dielectric grease 4 14 9 8 10 11 12 1 2 N m 11 lbf in 1 2 N m 11 lbf...

Страница 169: ...N m 35 lbf in 7 6 1 2 N m 11 lbf in 1 2 N m 11 lbf in 1 2 N m 11 lbf in 6 N m 53 lbf in Synthetic grease 22 N m 16 lbf ft 4 N m 35 lbf in 4 5 4 13 2 1 3 9 8 10 13 11 12 1 2 N m 11 lbf in Synthetic gre...

Страница 170: ...IRCUIT 06 02 5 GTS Model F02F1RS 3 N m 27 lbf in 2 N m 18 lbf in 6 N m 53 lbf in 1 2 3 7 6 1 2 N m 11 lbf in 1 2 N m 11 lbf in 1 2 N m 11 lbf in Engine Dielectric grease 14 4 N m 35 lbf in 9 8 10 11 1...

Страница 171: ...is will ensure continued proper and safe operation REMOVAL 1 Fuel Filter All Models Except the XP Limited Open storage compartment cover Remove basket XP Limited Open engine cover and remove basket GT...

Страница 172: ...he bottom TYPICAL 8 Fuel Baffle Pick Up NOTE The baffle pick up has an integrated fuel sender for the fuel gauge 1 Pick up tube 2 Fuel sensor 3 Baffle pick up Disconnect BLACK negative cable then RED...

Страница 173: ...ve fuel baf fle pick up 1 Remove fuel baffle pick up GTS Model Open storage compartment cover Remove storage basket from watercraft Siphon fuel tank Remove vent tube 1 Remove vent tube Disconnect fuel...

Страница 174: ...nect the strap retaining the oil injection reservoir and fuel tank NOTE It is not necessary to remove the oil injec tion reservoir Move fuel tank forward until the fuel baffle pick up can be removed f...

Страница 175: ...l Check filter bowl for water contamination 3 Gasket Inspect gasket condition Make sure gasket is well positioned into the filter bowl no 2 1 Gasket in bowl 5 Fuel Filler Hose Verify fuel filler hose...

Страница 176: ...eck It is a normal situation to have a molding seam and it should not be confused with a crack ASSEMBLY Assembly is essentially the reverse of disassem bly procedures However pay particular attention...

Страница 177: ...ak search spray a solution of soapy water on com ponents bubbles will indicate leak location NOTE The system must maintain a pressure of 34 kPa 5 PSI during 10 minutes Never pressur ize over 34 kPa 5...

Страница 178: ...INTAKE 06 03 1 AIR INTAKE 0 SPX GS GTS and GTI Models F00F0DS 1 9 4 8 10 N m 89 lbf in 8 Loctite 242 Loctite 242 6 Loctite 242 2 10 N m 89 lbf in 5 SPX 10 7 Loctite 518 3 GS GTS GTI Loctite 518 7 Loct...

Страница 179: ...SYSTEM Subsection 03 AIR INTAKE 06 03 2 GSX Limited XP Limited and GTX Limited F06F0DS 4 Loctite 242 10 N m 89 lbf in 10 N m 89 lbf in 2 Super Lube grease 24 N m 17 lbf ft Loctite 242 3 Loctite 242 F...

Страница 180: ...se no 4 1 Retaining plate 2 Remove screws 7 Flame Arrester Base Remove flame arrester no 5 Remove screws no 8 retaining support no 6 of flame arrester base to the cylinder head cover 717 engine or to...

Страница 181: ...octite 518 on mating surfaces of flame ar rester base Apply Loctite 242 blue on screws no 10 and torque to 10 N m 88 lbf in 5 Flame Arrester Inspect condition of flame arrester Replace or clean as nec...

Страница 182: ...RBURETOR 06 04 1 CARBURETOR 0 Mikuni BN 38I BN 40I and BN 46I F06F0ES Loctite 242 12 3 6 14 13 7 Loctite 242 15 4 19 5 18 17 16 20 21 Synthetic grease 2 13 1 8 9 11 Loctite 577 20 21 20 N m 15 lbf ft...

Страница 183: ...metering jet in the fuel inlet hose controls fuel flow to the pump A check valve no 21 on the fuel outlet hose helps to prime the system REMOVAL To remove carburetor s from engine proceed as follows...

Страница 184: ...nipple Pump tester until it reaches 28 kPa 4 PSI TYPICAL 1 Pump gauge tester 2 Install on pulse nipple Diaphragm must stand pressure for 10 seconds If pressure drops replace diaphragm 4 Pump Body Chec...

Страница 185: ...th compressed air low pressure Replace filter if damaged TYPICAL 1 Filter 20 Fuel Accelerator Pump Disconnect inlet and outlet hoses from accelera tor pump nipples TYPICAL 1 Fuel inlet hose 2 Fuel out...

Страница 186: ...king If it is too high less fuel will be delivered which may lead to engine hesitation un der acceleration ASSEMBLY When assembling pump ensure to properly posi tion components together Refer to previ...

Страница 187: ...f pressure specifications NOTE Pressure test should be performed three times to obtain a valid reading If pop off pressure is not within specification check control lever adjustment Replace spring as...

Страница 188: ...needed if a back pressure oc curs into carburetor It will prevent fuel from flow ing back into carburetor lower portion Inspect check valve it should be free of holes tears or imperfections Replace as...

Страница 189: ...2 Idle speed screw Loosen jam nuts on carburetor linkage and adjust linkage with adjustment nut Make sure threads length is the same on each side of linkage and flat surfaces of both ends are parallel...

Страница 190: ...n adjustment nut as necessary 717 ENGINE 1 Adjustment nut 2 Jam nut 3 Throttle lever stopper 787 ENGINE 1 Throttle lever stoppers behind levers 2 Adjustment nut 947 ENGINE 1 Throttle cable 2 Adjustmen...

Страница 191: ...ry readjust low speed screw 1 4 turn NOTE On twin carburetor engines both low speed screws must be adjusted exactly the same way Never adjust screws more than 1 4 turn at a time 14 High Speed Screw Th...

Страница 192: ...787 ENGINE 1 High speed screws 947 ENGINE 1 High speed screw PTO side shown 15 Idle Speed Screw Turning screw clockwise increases engine idle speed and turning screw counterclockwise de creases engine...

Страница 193: ...rn screw so that engine idles at 1500 RPM in water or 3000 RPM out of water 20 Fuel Accelerator Pump Ensure throttle cable is properly adjusted and idle speed is set at 1500 RPM in water With the engi...

Страница 194: ...E OF CONTENTS TABLE OF CONTENTS 0 OIL INJECTION SYSTEM 07 02 1 GENERAL 07 02 7 OIL SYSTEM PRESSURIZATION 07 02 7 OIL INJECTION PUMP 07 03 1 REMOVAL 07 03 4 DISASSEMBLY 07 03 4 CLEANING 07 03 4 ASSEMBL...

Страница 195: ...L INJECTION SYSTEM 07 02 1 OIL INJECTION SYSTEM 0 SPX and GTS Models F02G07S To electrical box 4 3 2 1 Dielectric grease 27 N m 20 lbf ft 3 5 N m 31 lbf in 1 2 N m 11 lbf in 1 2 N m 11 lbf in 1 2 N m...

Страница 196: ...ATION SYSTEM Subsection 02 OIL INJECTION SYSTEM 07 02 2 GS Model F06G03S Loctite 518 1 2 3 4 1 27 N m 20 lbf ft 3 5 N m 31 lbf in Dielectric grease 1 2 N m 11 lbf in 1 2 N m 11 lbf in 3 5 N m 31 lbf i...

Страница 197: ...Section 07 LUBRICATION SYSTEM Subsection 02 OIL INJECTION SYSTEM 07 02 3 GSX Limited F06G04S 1 Loctite 518 2 3 4 27 N m 20 lbf ft 3 5 N m 31 lbf in Dielectric grease FLAT RATE PARTS...

Страница 198: ...Section 07 LUBRICATION SYSTEM Subsection 02 OIL INJECTION SYSTEM 07 02 4 XP Limited F08G01S Dielectric grease 3 To oil injection pump 4 FLAT RATE PARTS...

Страница 199: ...SYSTEM 07 02 5 GTI Model FRONT AVANT F07G01S 1 3 5 N m 31 lbf in 27 N m 20 lbf ft 2 1 2 3 5 N m 31 lbf in 1 2 N m 11 lbf in 1 2 N m 11 lbf in 1 2 N m 11 lbf in 4 3 To engine crankcase supply To oil i...

Страница 200: ...Section 07 LUBRICATION SYSTEM Subsection 02 OIL INJECTION SYSTEM 07 02 6 GTX Limited F07G03S Dielectric grease 27 N m 20 lbf ft 3 5 N m 31 lbf in 3 5 N m 31 lbf in 1 3 2 1 2 4 FLAT RATE PARTS...

Страница 201: ...t oil return hose except the 947 engine Install a hose pincher to oil injection pump sup ply hose Connect pump gauge tester P N 529 021 800 to check valve of oil injection reservoir vent NOTE Use the...

Страница 202: ...ction 03 OIL INJECTION PUMP 07 03 1 OIL INJECTION PUMP 0 717 Engine F00G02S Loctite 242 4 5 N m 40 lbf in 8 N m 71 lbf in 10 N m 89 lbf in 5 1 6 Loctite 242 6 N m 53 lbf in 2 3 Loctite 242 Loctite 518...

Страница 203: ...n 07 LUBRICATION SYSTEM Subsection 03 OIL INJECTION PUMP 07 03 2 787 Engine F01G0TT 8 1 6 4 5 N m 40 lbf in 6 N m 53 lbf in 7 4 5 N m 40 lbf in 4 5 N m 40 lbf in Loctite 242 3 N m 27 lbf in FLAT RATE...

Страница 204: ...Section 07 LUBRICATION SYSTEM Subsection 03 OIL INJECTION PUMP 07 03 3 947 Engine F06G05S 4 5 N m 40 lbf in 4 5 N m 40 lbf in 7 Loctite 242 4 5 N m 40 lbf in 6 1 6 8 FLAT RATE PARTS...

Страница 205: ...787 and 947 Engines Disconnect oil injection pump cable no 7 Remove 2 Allen screws no 6 with flat washers retaining oil injection pump to magneto housing cover Pull pump Disconnect oil hoses from fitt...

Страница 206: ...enance see Final Synchronization Make sure idle speed of engine is properly adjust ed Ensure carburetor butterfly ies is are in closed position NOTE On a twin carburetor engine make sure carburetors a...

Страница 207: ...elt In this position marks on pump body and lever must align NOTE A mirror may be used to facilitate this ver ification If necessary turn cable adjustment nut to obtain pump mark alignment Refer to ab...

Страница 208: ...st pump as describes below NOTE Through normal use oil level must not drop in small tubes If oil drops verify check valve operation Replace as necessary Bench Test The oil pump must be removed out of...

Страница 209: ...the results with the chart below If oil pump is out of specification replace it NOTE Test can also be done at 3000 RPM Dou ble quantities in chart ENGINE OIL PUMP FLOW RATE AT 1500 RPM 30 SECONDS 717...

Страница 210: ...08 03 1 TESTING PROCEDURE 08 03 1 BATTERY 08 03 4 STARTING SYSTEM 08 04 1 GENERAL 08 04 4 STARTING SYSTEM TROUBLESHOOTING 08 04 5 STARTER REMOVAL 08 04 6 STARTER DISASSEMBLY 08 04 6 CLEANING 08 04 8...

Страница 211: ...o functions It has an integrated capacitor discharged ignition CDI module which controls the spark occur rence ignition timing curve Every half revolution of the flywheel a critical point occurs when...

Страница 212: ...models the MPEM is also used as a junction box eliminating the need of an electrical box All electrical components or accessories are di rectly linked to the MPEM Wire position are identified with a s...

Страница 213: ...ITED 1 Electrical box SPX Model The other components are located in the conven tional electrical box GSX Limited XP Limited and GTX Limited The other components are integrated to the Multi Purpose Ele...

Страница 214: ...e MPEM is directly powered by the battery It has a micro processor inside of its sealed case The MPEM is responsible of the following electri cal functions interpreting information distributing inform...

Страница 215: ...This might be the indication of a twisted crankshaft With this DC CDI system the ignition timing can be checked with either the engine hot or cold Al so the ignition timing is to be checked at 3500 RP...

Страница 216: ...on MAG side 6 Rotate PTO flywheel counterclockwise when facing it until piston is at Top Dead Center TYPICAL 1 Adjust gauge dial at zero 7 From this point rotate flywheel clockwise to reach proper sp...

Страница 217: ...opic timing light rated up to 6000 RPM Otherwise an inaccurate reading will be ob tained The ignition components are affected by temper ature variation therefore timing must be checked when engine is...

Страница 218: ...ming is prop erly set If mark does not align with tool slot re check PTO flywheel mark before adjusting igni tion timing to ensure PTO flywheel has not loosen 787 and 947 Engines 1 Connect an inductio...

Страница 219: ...Remove magneto housing cover and wire support For removal of magneto refer to MAGNETO SYS TEM 04 04 Timing is performed by moving armature plate clockwise to retard spark occurrence or counter clockw...

Страница 220: ...on on the programmer refer to its guide Through the MPEM programmer the ignition tim ing can be advanced up to 3 or retarded up to 4 The timing mark refer to the physical component position when the s...

Страница 221: ...ring to the chart number 4 returns a correction of 1 advanced and this is not enough in this case You estimate the correction should be set to 2 advanced to align flywheel mark Back in the chart look...

Страница 222: ...RAY wire and the other test probe to the switch terminal Measure resistance it must be close to 0 ohm Connect one test probe to the BLACK wire and the other test probe to the switch ring Measure resis...

Страница 223: ...sistance with a multimeter Refer to the following table for values and wire colors 1 Multimeter 2 Four pin magneto harness adapter 3 RED BLACK wire 4 BLACK wire METER LEAD METER VALUE RED ring termina...

Страница 224: ...295 000 136 3 Connect one of the multimeter probes to the WHITE wire of the 6 pin magneto harness adapter 4 Connect the other multimeter probe to the BLACK YELLOW wire of the 6 pin magneto harness ad...

Страница 225: ...n ignition coil tester available from after market tool equipment suppliers 1 With ignition coil removed from craft discon nect spark plug caps from high tension cables 2 Hook high tension leads from...

Страница 226: ...t in overheating and pre ignition etc A too cold plug will result in fouling or may cre ate carbon build up which can heat up red hot and cause pre ignition or detonation Fouling Fouling of the spark...

Страница 227: ...ode gap ac cording to the following chart 2 Apply anti seize lubricant over the spark plug threads to prevent possible seizure 3 Hand screw spark plug into cylinder head and tighten with a torque wren...

Страница 228: ...Cold 18 mm 14 mm 10 mm 12 mm 8 mm 12 mm x 19 mm Reach A B C D E J Special Design Single Ground Special Alloy Dual Ground Special Alloy Racing Type Racing Version of V Type Half Heat Range Standard Ce...

Страница 229: ...l A 15 A fuse protects the charging system All Models Except GTS and XP Limited Two 15 A fuses protect the charging system The first one is mounted on the MPEM and the other one is located in the rear...

Страница 230: ...e probe of a multimeter to the RED wire and the negative probe to the BLACK wire Set multimeter to Vdc scale Start and rev engine to 3500 RPM The obtained value should be between 12 and 25 Vdc NOTE If...

Страница 231: ...the 6 pin magneto har ness adapter 4 Ground the multimeter negative probe to the engine or the stator iron core and note the read ing 1 Multimeter 2 Magneto harness adapter 3 Positive probe to YELLOW...

Страница 232: ...d loaded An unloaded test is made on a battery without discharging current It is the simplest and commonly used A loaded test gives more accura cy of the battery condition SYMPTOM DISCHARGED OR WEAK B...

Страница 233: ...sting device that has an adjustable load Apply a load of 3 times the ampere hour rating of the battery At 14 seconds into the test check battery voltage if battery is in good condition it will have at...

Страница 234: ...y charged For storage purposes it is fitted with a temporary sealing tube NOTE In case of accidental premature removal of caps or sealing tube battery should be given a full charge Perform the followi...

Страница 235: ...harging for 1 to 2 hours to mix water with electrolyte 9 Reinstall caps and clean any electrolyte spillage using a solution of baking soda and water Charging a Used Battery For best results battery sh...

Страница 236: ...is below 10 volts the battery will accept current at very low rate in term of milliamperes because electrolyte is nearly pure water as explained above It could be some time before the charging rate in...

Страница 237: ...with out using a washer SPX MODEL 1 Negative battery cable on top of small ground wire 5 Apply dielectric grease on battery posts 6 Verify cable routing and attachment GTS Model Secure RED positive b...

Страница 238: ...ING SYSTEM 08 04 1 STARTING SYSTEM 0 717 Engine F00H0BT 6 5 N m 44 lbf in 7 8 9 10 11 5 3 2 1 12 13 22 N m 16 lbf ft Loctite 242 Dielectric grease 17 14 Loctite 271 Ground cable 15 16 Loctite 242 4 22...

Страница 239: ...ngine 25 N m 18 lbf ft F00H13S 6 5 N m 44 lbf in 7 8 9 10 11 5 3 2 1 12 13 22 N m 16 lbf ft Loctite 242 Dielectric grease 17 22 N m 16 lbf ft 14 Loctite 271 Ground cable 15 19 Loctite 242 4 16 22 N m...

Страница 240: ...STARTING SYSTEM 08 04 3 947 Engine F06H1XS 17 Loctite 242 Dielectric grease 10 Loctite 242 10 12 Loctite 271 Ground cable Synthetic grease 7 11 8 9 8 6 1 2 3 5 Synthetic grease 10 N m 89 lbf in 10 N m...

Страница 241: ...sing an ohmmeter Disconnect switch wires Safety Lanyard Removed Connect test probes to switch BLACK and BLACK YELLOW wires Measure resistance there should be no continuity open circuit Connect one tes...

Страница 242: ...ator and brush Burnt commutator Turn commutator in lathe Worn commutator segments Undercut mica Shorted armature Repair or replace armature Weak brush spring tension Replace brush holder or spring Wea...

Страница 243: ...04 and BOTTOM END 04 06 STARTER DISASSEMBLY 717 and 787 Engines Before disassembling trace index marks on yoke no 1 and clutch housing no 10 to ease further assembly TYPICAL 1 Trace indexing marks Re...

Страница 244: ...no 1 and end covers no 3 and no 6 1 Index marks Loosen through bolts no 5 1 Through bolts Remove end cover no 3 and gasket on armature shaft side Remove thrust washer no 7 from armature shaft 1 Thrust...

Страница 245: ...th soaked in solvent Brushes must be dried thor oughly with a clean cloth Blow brush holders clean using compressed air Remove dirt oil or grease from commutator using a clean cloth soaked in suitable...

Страница 246: ...ted brush holder and the other test probe on brush holder plate If continuity is found brush holder has to be repaired or replaced 4 Brush Measure brush length If less than 8 5 mm 335 in replace them...

Страница 247: ...ch Housing Align previously traced indexing marks TYPICAL 1 Align marks Open brushes no 4 and slide over commutator Align end frame locating notch with yoke locating protrusion and properly sit brush...

Страница 248: ...vers no 3 and no 6 to yoke align index marks Apply Loctite 271 red on through bolts no 5 and torque to 6 N m 53 lbf in STARTER INSTALLATION Installation is essentially the reverse of removal procedure...

Страница 249: ...ocking Collar Install the locking collar of the fuel hose Apply Loctite 242 blue on nut no 19 and torque to 25 N m 18 lbf ft 787 ENGINE 1 Locking collar 2 Nut 947 Engine 10 Screw Apply Loctite 242 blu...

Страница 250: ...NE 1 Torque nut to 6 N m 53 lbf in apply dielectric grease and install protection cover 2 Apply Loctite 271 to threads and torque screw to 10 N m 89 lbf in 3 Apply Loctite 242 to threads and torque sc...

Страница 251: ...pprox 2 kg 4 4 lb Performance specification at 20 C 68 F No load 11 5 V 20 A max 5500 RPM Load 8 5 V 170 A max 2200 RPM Stall 5 V 350 A max 0 RPM Battery 19 Ah Nominal output 0 8 kW Voltage 12 V Rated...

Страница 252: ...e gauge If not replace the temperature sensor Lake Temperature Sensor GSX Limited and GTX Limited The lake temperature sensor is integrated with the speed sensor located on the ride plate To check if...

Страница 253: ...ct the speed sensor connector housing from inside bilge Using an appropriate terminal remover Snap on TT600 4 remove the PURPLE YELLOW and BLACK ORANGE wires from the tab housing of the speed sensor R...

Страница 254: ...the SET button for 2 seconds DISPLAY PRIORITIES The clock and compass for the GTX Limited is the basic mode of the Info Center The chronometer tachometer and speedometer are the only other functions t...

Страница 255: ...econnect the connector housing Disconnect the 2 circuit connector housing which contains a PURPLE and BLACK wires Remove the BLACK wire from the receptacle housing Reconnect the connector housing Conn...

Страница 256: ...es Adjust potentiometer to the resistance values as per following chart to test the accuracy of the gauge NOTE The gauge must be activated to obtain a reading Fuel Gauge Low Oil Warning Light SPX GS G...

Страница 257: ...potenti ometer Disconnect 2 circuit connector housing of BROWN BLACK and BROWN WHITE wires of gauge Connect potentiometer test probes to BROWN BLACK and BROWN WHITE wires of gauge Adjust potentiometer...

Страница 258: ...5 1 to 162 5 37 8 2 2 From 108 1 to 135 5 47 8 2 2 From 81 1 to 108 5 57 8 2 2 From 54 1 to 81 5 67 8 2 2 From 40 1 to 54 5 77 8 2 2 From 0 to 40 5 89 8 2 2 F01F20A 1 2 3 FUEL LEVEL AND RESISTANCE GTS...

Страница 259: ...K terminals When sensor is out of oil tank and its reservoir is empty resistance must be infinite open circuit NOTE Wait about 15 20 seconds before taking any reading to give the oil enough time to fl...

Страница 260: ...nnect motor through a 15 A fuse directly to the battery Connect wires one way then reverse polarities to verify motor rotation in both ways If VTS actuating mechanism is correct and the motor turns fr...

Страница 261: ...herefore a safety lanyard must be programmed to start the engine NOTE Actually it is the memory of the MPEM which is programmed to recognize the digital code of the safety lanyard cap This is achieved...

Страница 262: ...g engine Bad connection between safety lanyard cap and switch Remove and reinstall safety lanyard on switch Remove and replace the safety lanyard on the switch until 2 short beeps are heard to indicat...

Страница 263: ...e resolved SIGNAL CAUSE REMEDY No beep Engine actually starts Everything is correct 1 long and 1 short beeps No safety lanyard has ever been programmed in watercraft MPEM Use programmer and program a...

Страница 264: ...ATION 09 02 19 DRIVE SYSTEM 09 03 1 GENERAL 09 03 5 REMOVAL 09 03 5 DISASSEMBLY 09 03 9 INSPECTION 09 03 9 ASSEMBLY 09 03 11 INSTALLATION 09 03 12 LUBRICATION 09 03 15 REVERSE SYSTEM 09 04 1 GENERAL 0...

Страница 265: ...18 19 11 14 13 12 Loctite 242 3 1 20 N m 15 lbf ft Loctite 242 4 2 3 2 4 1 20 N m 15 lbf ft Loctite 242 5 5 GS GTS GTI SPX GSX Limited XP Limited GTX Limited 23 22 21 Loctite 518 Synthetic grease 20 1...

Страница 266: ...ION ON WATERCRAFT To work on watercraft securely install it on a stand Thus if access is needed to water inlet area it will be easy to slide underneath watercraft A lift kit P N 295 100 044 can be use...

Страница 267: ...nce from venturi side remove venturi nozzle assembly as described in Oil In spection in this subsection Using a feeler gauge with 30 cm 12 in blades measure clearance between impeller blade tip and we...

Страница 268: ...ed to replace seal If everything is correct apply Loctite PST 592 on plug and reinstall it on cover Properly reinstall re moved parts Oil Replacement Remove venturi as described in Oil Inspection Remo...

Страница 269: ...link rod Loosen 2 screws each side of trim ring 1 Screws Remove nozzle 11 Venturi Remove nozzle no 5 prior removing venturi Remove 4 retaining screws and withdraw venturi 1 Remove screws 9 Jet Pump H...

Страница 270: ...ge such as corrosion crack split break porosity cavitation deformation distortion heat ing discoloration wear pattern missing plating missing or broken needles in needle bearing wa ter damage diagnose...

Страница 271: ...er Insert impeller shaft holder P N 295 000 082 on impeller shaft flat end Using 2 screws previously removed from venturi secure shaft holder to housing 1 Shaft holder Heat impeller center with a prop...

Страница 272: ...TYPICAL TYPICAL 1 Snap on HS3 After cutting ring insert a screwdriver blade be tween jet pump housing and ring outside diameter Push ring so that it can collapse internally Pull ring out 24 Impeller...

Страница 273: ...ive shaft splines with Loctite Safety solvent 755 P N 293 800 019 or equivalent Free threads and splines from any residue PARTS INSPECTION 20 Impeller Visually inspect impeller splines Check for wear...

Страница 274: ...in housing without impeller Retain housing in a soft jaw vise making sure not to damage housing lug Set a dial gauge and position its tip onto shaft end close to end of threads Move shaft end up and d...

Страница 275: ...ng either washer or bearing it is recommended to renew both 18 24 Cover and Impeller Shaft END PLAY End play of impeller shaft is checked with shaft in housing without impeller and with cover installe...

Страница 276: ...n into housing apply BOM BARDIER LUBE lubricant P N 293 600 016 onto outside circumference of wear ring To install ring in housing use a square steel plate of approximately 180 180 mm 6 mm thick 7 7 i...

Страница 277: ...located toward outside of hous ing Properly insert bearing on tool Using an arbor press only push tool until tool flange contacts housing Proceed the same way for both bearings 1 Stamped end this side...

Страница 278: ...housing toward impeller Apply Loctite 518 P N 293 800 038 to seal hous ing all around outer diameter and on seal seat Properly insert seal on tool NOTE It is important when installing seals to pack s...

Страница 279: ...ler shaft use impeller shaft guide P N 295 000 002 Insert tool onto shaft end then carefully install shaft in jet pump housing 1 Impeller shaft 2 Impeller shaft guide NOTE If jet pump housing rest ag...

Страница 280: ...so that it slides on impeller shaft threads Carefully engage threads making sure they are well aligned Install impeller remover installer tool into impeller splines and tighten 1 Impeller remover ins...

Страница 281: ...SUR IZATION in this subsection Place housing horizontally as in its operating posi tion so that filler plug is located on top Remove filler plug from cover Pour SEA DOO JET PUMP SYNTHETIC OIL P N 293...

Страница 282: ...hould be done to check for leakage Proceed as follows Remove drain plug from cover Apply Loctite PST 592 on threads of fitting tool P N 295 000 086 then secure on cover Connect pump gauge tester P N 2...

Страница 283: ...els Generously apply synthetic grease on drive shaft splines Make sure rubber damper is on drive shaft end Install jet pump If necessary wiggle jet pump to engage drive shaft splines in impeller Apply...

Страница 284: ...s no 1 and lock ing disks no 4 then torque to 20 N m 15 lbf ft TYPICAL 1 Locking disks 2 Torque screws to 20 N m 15 lbf ft SPX GSX Limited and XP Limited Install nozzle trim ring assembly Torque screw...

Страница 285: ...n 09 PROPULSION SYSTEM Subsection 03 DRIVE SYSTEM 09 03 1 DRIVE SYSTEM 0 SPX Model F01I0KS 2 N m 18 lbf in 2 N m 18 lbf in Synthetic grease 8 12 9 7 10 11 6 5 4 2 13 13 1 3 Synthetic grease FLAT RATE...

Страница 286: ...PROPULSION SYSTEM Subsection 03 DRIVE SYSTEM 09 03 2 GS GTS and GTI Models F02I05S Loctite 271 1 2 3 4 5 6 7 8 9 10 11 13 12 Synthetic grease 13 2 N m 18 lbf in 2 N m 18 lbf in Synthetic grease FLAT...

Страница 287: ...VE SYSTEM 09 03 3 GSX Limited and GTX Limited 1 F06I05S Synthetic grease 2 3 4 15 16 17 15 9 10 11 Loctite 518 14 2 N m 18 lbf in 2 N m 18 lbf in Loctite 518 13 Loctite 518 12 13 Synthetic grease Synt...

Страница 288: ...lbf ft Loctite 518 Loctite 518 Loctite 518 10 N m 88 lbf in 22 N m 16 lbf ft Synthetic grease 22 N m 16 lbf ft Loctite 271 Loctite 518 Loctite 518 2 N m 18 lbf in 2 N m 18 lbf in 24 23 1 20 18 24 23...

Страница 289: ...rt except GTS model Remove PTO flywheel guard XP Limited Open engine cover Remove storage basket Remove vent tubes from PTO flywheel guard Remove PTO flywheel guard 2 Large Clamp Unfasten large clamp...

Страница 290: ...P N 295 000 113 to withdraw drive shaft Raw Material 1 aluminum alloy square of 51 mm 2 in 305 mm 12 in 2 aluminum rods of 28 5 mm 1 1 8 in dia 30 mm 1 3 16 in 1 Use ball end mill for radius This sect...

Страница 291: ...upler no 19 is disen gage from splines 1 Pull drive shaft to disengage coupler from splines Remove rear drive shaft Remove coupler no 19 20 Front Drive Shaft Remove PTO flywheel guard no 1 Remove bolt...

Страница 292: ...sorber 1 Loosen gear clamp Tilt seat Remove front drive shaft 14 Seal Carrier of Mid Bearing To remove the seal carrier from support loosen the 6 nuts no 21 1 Nut 6 SPX GS GTS and GTI Models 10 Boot L...

Страница 293: ...Inspect condition of drive shaft and PTO flywheel splines Inspect condition of groove With your finger nail feel machined surface of drive shaft If any irregular surface is found renew drive shaft 1 S...

Страница 294: ...ing 2 Remove circlip Slide floating ring far enough forward in order to release it from carbon ring Measure boot free length Subtract the installed length measurement from the free length measurement...

Страница 295: ...o 15 with protector to ward jet pump On both seals no 15 raised edge of lip must be located outwards of seal carrier 1 Double lip seal toward engine 2 Double lip seal with protector toward jet pump 3...

Страница 296: ...35 507 for the 155 6 mm 6 1 8 in jet pump 1 Plate P N 529 035 507 2 Support P N 529 035 511 Alignment shaft P N 295 000 141 1 Alignment shaft PTO flywheel adapter P N 295 000 157 1 PTO flywheel adapte...

Страница 297: ...ring before in serting the drive shaft in the PTO flywheel GSX Limited and GTX Limited Insert drive shaft through seal carrier no 14 being careful not to damage seals All Models Except the XP Limited...

Страница 298: ...holding hook in large window This is a pre clamping position only PRE CLAMPING POSITION 1 Holding hook 2 Large window Insert pointed tips of pliers first in closing hooks TYPICAL 1 Closing hooks Squee...

Страница 299: ...BRICATION PTO Flywheel All Models Except the XP Limited Using a grease gun carefully lubricate PTO fly wheel with synthetic grease P N 293 550 010 until boot is just beginning to expand At this point...

Страница 300: ...tion 09 PROPULSION SYSTEM Subsection 03 DRIVE SYSTEM 09 03 16 XP Limited Using a grease gun lubricate seal carrier of mid bearing with synthetic grease P N 293 550 010 TYPICAL 1 Grease fitting F05I09A...

Страница 301: ...STEM 0 GTS Model F02J0NS 2 Synthetic grease 6 4 8 N m 71 lbf in 7 N m 62 lbf in 3 N m 27 lbf in 8 N m 71 lbf in 5 1 10 N m 88 lbf in 7 N m 62 lbf in 3 N m 27 lbf in 10 N m 88 lbf in 6 N m 53 lbf in 3...

Страница 302: ...shift lever unhook spring no 2 from sliding block no 5 and pull spring from shift lever stem TYPICAL 1 Sliding block 2 Spring Withdraw shift lever stem and locking lever no 1 from sliding block no 5...

Страница 303: ...g guide plate and support TYPICAL 1 Guide plate 2 Allen screw 3 Screw and washer 7 Reverse Gate Unhook reverse gate springs and remove ball joint fasteners to release reverse cable from reverse gate 1...

Страница 304: ...ers Torque cable screw to 7 N m 62 lbf in Torque triangular lever screw to 8 N m 71 lbf in Install sliding block to lever and torque nut to 8 N m 71 lbf in 1 5 Locking Lever and Sliding Block Insert l...

Страница 305: ...liding block 3 Support plate ADJUSTMENT 7 Reverse Gate Position handlebar in a straight ahead position nozzle should be parallel to rear of watercraft Using a square set it to 129 3 mm 5 5 64 7 64 in...

Страница 306: ...tain position NOTE If reverse gate adjustment is not done ad equately performance and steering control will be reduced at reverse position TYPICAL 1 Support 2 Adjustment nuts Tighten adjustment nuts a...

Страница 307: ...3 Synthetic grease 2 5 N m 22 lbf in Loctite 242 3 5 N m 31 lbf in 20 Sealant 732 23 12 18 17 6 N m 53 lbf in 3 N m 27 lbf in Loctite 242 4 N m 35 lbf in 14 2 21 5 3 7 N m 62 lbf in 10 N m 88 lbf in 2...

Страница 308: ...etains reverse gate support to venturi 1 Support 2 Bolt 11 Interior Lever Remove glove box Disconnect reverse cable by loosing bolt no 12 and lock nut no 13 1 Reverse cable 2 Interior lever Loosen bol...

Страница 309: ...ots 1 Shift lever 2 Interior lever tabs Make sure the shift lever action is smooth and precise Forward neutral and reverse positions should be easy to select with a detent position be tween each 8 Spr...

Страница 310: ...sition The pawl lock no 7 should be engaged in the an chor no 22 If not adjust reverse cable Loosen 2 bolts no 18 at reverse cable support no 16 Turn adjustment nut no 23 as required 1 Reverse cable s...

Страница 311: ...odel F01J5XS 1 Synthetic grease 2 3 4 5 6 7 8 9 10 Synthetic grease Loctite 242 Loctite 242 Loctite 242 2 5 N m 23 lbf in 10 N m 89 lbf in Loctite 242 Loctite 242 2 17 12 732 sealant 5 N m 44 lbf in 1...

Страница 312: ...XP Limited F06J03S 1 Synthetic grease 2 3 4 5 6 7 8 9 10 Loctite 242 Loctite 242 Loctite 242 2 5 N m 23 lbf in 10 N m 89 lbf in Loctite 242 Loctite 242 2 12 5 N m 44 lbf in 13 N m 10 lbf ft 13 N m 10...

Страница 313: ...rnesses Pull out VTS assembly no 6 from bilge DISASSEMBLY 7 Cover Remove VTS cover by pressing on tabs 1 Press tabs to remove cover 8 Motor Disconnect wires of motor Remove retaining nuts no 11 1 Remo...

Страница 314: ...orm spline to gear of motor Install motor worm and sliding shaft in VTS hous ing Apply Loctite 242 blue to nuts no 11 and tighten to 7 N m 62 Ibf in Connect wires of motor Install cover no 7 NOTE Make...

Страница 315: ...ot on sliding shaft before secur ing ball joint 1 Washers 2 Bolt 3 Nut GSX Limited and XP Limited Install ball joint on LEFT side of sliding shaft no 10 using bolt no 13 washers no 14 and nut no 15 To...

Страница 316: ...necessary loosen jam nut no 16 of link rod ball joint no 1 Turn adjustment nut of ball joint to obtain the desired gap between trim ring and venturi GSX LIMITED SHOWN 1 Turn adjustment nut of ball joi...

Страница 317: ...E OF CONTENTS 0 SPX MODEL 10 02 1 REMOVAL AND INSTALLATION 10 02 2 GTS MODEL 10 03 1 REMOVAL AND INSTALLATION 10 03 2 GS GSX LIMITED GTI AND GTX LIMITED 10 04 1 DISASSEMBLY 10 04 2 ASSEMBLY 10 04 4 XP...

Страница 318: ...0 5 N m 4 lbf in 1 N m 8 5 lbf in 26 N m 19 lbf ft 8 N m 72 lbf in 9 14 15 N m 11 lbf ft Synthetic grease 13 17 11 10 2 5 N m 22 lbf in 15 13 15 N m 11 lbf ft 6 N m 53 lbf in 16 6 N m 53 lbf in 2 5 N...

Страница 319: ...ure that its notch is properly inserted in the hole beneath the handlebar Install grip no 4 on handlebar no 12 matching it to the hex form on the grip insert Install flat washer no 7 and screw no 6 To...

Страница 320: ...thetic grease 2 Thrust ring shown removed for more clarity FRONT SUPPORT 1 Apply synthetic grease 2 Thrust ring NOTE Make sure thrust rings are properly in stalled Install support no 11 to steering st...

Страница 321: ...f in 5 Integrated flat key must be seated in keyway and steering stem arm locked in place NOTE Once steering stem arm is properly tight ened look between body and front support to make sure there is n...

Страница 322: ...steering cable Pull cable from rear of watercraft and remove half rings no 21 O ring no 22 and retaining ring no 23 Remove steering cable Installation is essentially the reverse of removal procedures...

Страница 323: ...3 5 N m 30 lbf in 15 N m 11 lbf ft Loctite 242 15 28 16 Anti seize lubricant 17 14 Loctite 242 15 N m 11 lbf ft 18 15 N m 11 lbf ft Loctite 242 28 19 20 13 40 N m 30 lbf ft Loctite 271 10 11 7 N m 63...

Страница 324: ...stall cap no 5 1 Grip insert 2 Grip 3 Flat washer 4 Screw Torque to 13 N m 10 lbf ft 5 Cap 17 29 Steering Stem and Handlebar Disconnect wiring harnesses leading out of dash board hole Disconnect throt...

Страница 325: ...enon 2 Steering stem arm 3 Mortise 4 Large flat washer with X 5 Lock washer 6 Screw apply Loctite 271 and torque to 40 N m 30 Ibf ft Position 8 mm flat washer no 12 on steering stopper screw then inst...

Страница 326: ...half rings no 25 rubber washer no 26 and retaining ring no 27 NOTE Move shift lever in reverse position to lower reverse gate It will ease parts removal Remove steering cable from tie block and clips...

Страница 327: ...4 7 7 12 13 14 8 18 16 15 17 9 10 11 10 N m 88 lbf in 10 N m 89 lbf in Loctite 242 4 N m 35 lbf in 14 N m 10 lbf ft Loctite 242 3 N m 26 lbf in Loctite 242 6 N m 53 lbf in 6 N m 53 lbf in Loctite 242...

Страница 328: ...handlebar no 22 4 Cover Remove grips no 1 Loosen set screws no 5 of handlebar housings no 6 1 Set screw Remove 4 screws no 7 TYPICAL 1 Cover 2 Screws Remove 2 screws no 20 and flat washers no 21 each...

Страница 329: ...wiring harness boot 1 Boot 2 Tie rap All Models Disconnect the throttle and choke cables from carburetor levers Disconnect the wiring harnesses leading out of steering stem and cut tie rap GS AND GSX...

Страница 330: ...ring stem arm and support 24 Steering Cable Disconnect steering cable from steering stem arm no 15 Remove retaining block no 10 Disconnect ball joint no 19 from jet pump nozzle Remove ball joint no 19...

Страница 331: ...ing stem arm and support onto steering stem 1 Keyways 2 Integrated flat key Replace lock nuts no 18 by new ones Torque bolts no 17 of steering stem arm to 6 N m 53 lbf in 19 Ball Joint Secure the stee...

Страница 332: ...section 04 GS GSX LIMITED GTI AND GTX LIMITED 10 04 6 GS and GTI Models TYPICAL 1 Bolt 2 Flat washers 3 Lock nut Torque to 2 N m 18 lbf in STEERING ALIGNMENT For steering alignment procedure refer to...

Страница 333: ...Loctite 242 19 20 6 N m 53 lbf in 6 N m 53 lbf in 25 26 27 11 24 23 22 21 2 5 N m 22 lbf in Synthetic grease 16 7 N m 62 lbf in 7 N m 62 lbf in 10 N m 89 lbf in 14 7 7 2 N m 17 lbf in 9 13 N m 10 lbf...

Страница 334: ...using 1 Set screws Remove 4 screws no 8 and washers no 9 TYPICAL 1 Cover 2 Screws Remove 2 screws no 9 and flat washers each side of cover 10 Lever Open engine cover Remove the top section of the engi...

Страница 335: ...rod Remove bolt no 13 and washer 1 Remove bolt and washer 15 16 Steering Stem Arm and Support Loosen bolts no 17 retaining steering stem arm no 15 and support no 16 1 Loosen bolts Loosen nuts and bol...

Страница 336: ...1 Disconnect steering cable Loosen cable support no 19 1 Loosen cable support Remove retaining block no 20 Disconnect ball joint no 21 of steering cable from jet pump nozzle Remove ball joint no 21 j...

Страница 337: ...o 4 and screw no 3 Torque screw to 13 N m 10 lbf ft 1 Grip insert 2 Grip 3 Flat washer 4 Torque screw to 13 N m 10 lbf ft 5 Cap 21 Ball Joint Secure the steering cable ball joint no 21 to the nozzle a...

Страница 338: ...re the distance on each side of the straight edge It must be equalled TYPICAL 1 Measure the distance on each side of the straight edge If necessary steering alignment adjustment should be performed at...

Страница 339: ...ment nut 3 Bolts GTS MODEL 1 Retaining block 2 Adjustment nut 3 Bolts After adjustment torque retaining block bolts to 6 N m 53 Ibf in F08K0BA 1 2 3 CAUTION Verify when the handlebar is turned com ple...

Страница 340: ...11 01 1 Section 11 SUSPENSION Subsection 01 TABLE OF CONTENTS TABLE OF CONTENTS 0 DIRECT ACTION SUSPENSION 11 02 1 REMOVAL 11 02 2 INSPECTION 11 02 3 ASSEMBLY 11 02 3...

Страница 341: ...2 DIRECT ACTION SUSPENSION 11 02 1 DIRECT ACTION SUSPENSION 0 XP Limited 10 11 3 13 12 5 8 6 9 4 7 F08Q02S 34 N m 25 lbf ft 2 1 10 N m 89 lbf in 10 N m 89 lbf in Loctite 242 Loctite 242 34 N m 25 lbf...

Страница 342: ...outer boot no 3 then pull outer boot downward 1 Loosen gear clamp Remove rear access panel from body Loosen lower gear clamp no 4 then push inner boot no 5 upward 1 Loosen gear clamp Remove bolt no 6...

Страница 343: ...orber Inspect shock absorber for wear Extend and com press the piston several times over its entire stroke it should move smoothly and with uniform resistance Pay attention to the following conditions...

Страница 344: ...INLET GRATE REMOVAL 12 02 20 RIDING PLATE 12 02 20 JET PUMP SUPPORT 12 02 21 DEFLECTOR 12 02 22 DRAIN PLUG INSTALLATION 12 02 22 SEAT REMOVAL 12 02 23 SEAT COVER REPLACEMENT 12 02 24 BUMPER REPLACEME...

Страница 345: ...JUSTMENT AND REPAIR 0 SPX Model F01L6HS 3 Loctite 271 5 N m 44 lbf in Loctite 271 Loctite 242 8 N m 71 lbf in 1 2 Loctite 271 5 N m 44 lbf in Sealant 732 5 N m 44 lbf in 10 Sealant 732 7 8 9 Loctite 2...

Страница 346: ...Subsection 02 ADJUSTMENT AND REPAIR 12 02 2 F01L6IS 12 13 Loctite 242 15 6 N m 53 lbf in 15 N m 11 lbf ft Loctite 271 Sealant 732 Loctite 271 Sealant 732 1 5 N m 13 lbf in Sealant 732 5 12 4 14 12 4...

Страница 347: ...D REPAIR 12 02 3 GTS Model F02L26S 3 Loctite 271 5 N m 44 lbf in 8 N m 71 lbf in Loctite 242 Loctite 271 1 2 Loctite 271 5 N m 44 lbf in Loctite 242 Sealant 732 8 7 9 10 5 N m 44 lbf in 6 11 Loctite 2...

Страница 348: ...12 HULL BODY Subsection 02 ADJUSTMENT AND REPAIR 12 02 4 F02L27S 7 N m 62 lbf in 12 Loctite 242 13 15 N m 11 lbf ft Loctite 271 Sealant 732 4 5 4 12 14 12 12 5 Sealant 732 15 1 5 N m 13 lbf in FLAT RA...

Страница 349: ...ted F06L01S Loctite 242 5 N m 44 lbf in 5 N m 44 lbf in Loctite 242 Loctite 242 5 N m 44 lbf in 5 N m 44 lbf in Loctite 271 5 N m 44 lbf in 5 N m 44 lbf in 3 5 N m 44 lbf in Loctite 271 8 N m 71 lbf i...

Страница 350: ...Subsection 02 ADJUSTMENT AND REPAIR 12 02 6 F06L02S Loctite 271 13 8 N m 71 lbf in Loctite 242 12 Sealant 732 15 Sealant 732 2 5 N m 22 lbf in Loctite 271 Sealant 732 15 N m 11 lbf ft 4 5 12 12 14 12...

Страница 351: ...03S Loctite 271 Loctite 242 8 N m 71 lbf in Loctite 271 5 N m 44 lbf in 5 N m 44 lbf in Loctite 271 8 N m 71 lbf in Loctite 271 Loctite 242 3 10 10 5 N m 44 lbf in Loctite 242 Sealant 732 Loctite 271...

Страница 352: ...ADJUSTMENT AND REPAIR 12 02 8 Loctite 271 Loctite 242 8 N m 71 lbf in Loctite 271 15 N m 11 lbf ft Loctite 271 Sealant 732 Sealant 732 1 5 N m 13 lbf ft Sealant 732 F07L04S 12 13 8 N m 71 lbf in 12 4...

Страница 353: ...ADJUSTMENT AND REPAIR 12 02 9 F07L05S 1 4 N m 12 lbf in 8 N m 71 lbf in 0 8 N m 7 lbf in Loctite 242 5 N m 44 lbf in Loctite 242 5 N m 44 lbf in 8 N m 71 lbf in Loctite 242 Loctite 242 5 N m 44 lbf i...

Страница 354: ...BODY Subsection 02 ADJUSTMENT AND REPAIR 12 02 10 4 N m 35 lbf in Loctite 242 4 N m 35 lbf in Loctite 242 5 N m 44 lbf in Loctite 242 5 N m 44 lbf in Loctite 242 5 N m 44 lbf in Loctite 242 F07L06S F...

Страница 355: ...Section 12 HULL BODY Subsection 02 ADJUSTMENT AND REPAIR 12 02 11 XP Limited F08L14S Loctite 242 732 sealant 10 9 8 7 5 N m 44 lbf in 732 sealant Loctite 242 15 N m 11 lbf ft Body 6 2 FLAT RATE PARTS...

Страница 356: ...02 ADJUSTMENT AND REPAIR 12 02 12 Loctite 271 732 sealant 3 5 N m 44 lbf in 15 N m 11 lbf ft Body 12 13 F08L15S Body 732 sealant Loctite 271 1 5 N m 13 lbf in 14 Loctite 271 3 5 N m 44 lbf in Body 15...

Страница 357: ...02 ADJUSTMENT AND REPAIR 12 02 13 F08L16S Loctite 242 15 N m 11 lbf ft 17 5 N m 44 lbf in Loctite 242 4 N m 35 lbf in Loctite 271 13 N m 10 lbf ft 3 N m 27 lbf in 23 22 21 20 19 18 3 N m 27 lbf in 24...

Страница 358: ...on 02 ADJUSTMENT AND REPAIR 12 02 14 Loctite 242 4 N m 35 lbf in F08L17S Loctite 242 8 N m 71 lbf in Loctite 242 4 N m 35 lbf in Loctite 242 8 N m 71 lbf in 4 N m 35 lbf in Loctite 242 Loctite 648 3 N...

Страница 359: ...Section 12 HULL BODY Subsection 02 ADJUSTMENT AND REPAIR 12 02 15 Loctite 271 3 N m 27 lbf in F08L18S 2 N m 18 lbf in Engine cover FLAT RATE PARTS...

Страница 360: ...Section 12 HULL BODY Subsection 02 ADJUSTMENT AND REPAIR 12 02 16 Loctite 242 4 N m 35 lbf in F08L19S 22 N m 16 lbf ft 4 N m 35 lbf in Loctite 242 Loctite 242 FLAT RATE PARTS...

Страница 361: ...in GS AND GSX LIMITED 1 Seat retainer 2 Adjustment nut apply Loctite 271 3 Nut apply Loctite 242 and torque to 8 N m 71 lbf in A 21 1 mm 53 64 3 64 in GTS MODEL 1 Front hook 2 Adjustment nut Loctite 2...

Страница 362: ...ODEL 1 Lock pin 2 Adjustment nut Loctite 271 3 Lock nut Torque to 5 N m 44 lbf in A 38 1 mm 1 1 2 3 64 in GTI AND GTX LIMITED FRONT SEAT 1 Lock pin 2 Adjustment nut Loctite 271 A 39 1 mm 1 35 64 3 64...

Страница 363: ...pply Loctite 271 2 Adjustment nut A 34 1 mm 1 11 32 3 64 in GTI AND GTX LIMITED 1 Lock pin apply Loctite 242 2 Rubber washer 3 Flat washers A 39 2 1 mm 1 35 64 3 64 in NOTE The GTI and GTX Limited hav...

Страница 364: ...loosen tight screws RIDING PLATE Removal Remove inlet grate Remove jet pump Refer to JET PUMP 09 02 Remove the speed sensor from the riding plate if applicable Loosen riding plate screws NOTE An impac...

Страница 365: ...rom steering cable TYPICAL 1 Unscrew nut Remove ball joint boot nut half rings and O rings from reverse cable GTI and GTX Limited Remove boot and nut from VTS sliding shaft GSX Limited and XP Limited...

Страница 366: ...same illustrations GS GSX LIMITED GTI AND GTX LIMITED XP LIMITED DEFLECTOR GS GSX Limited GTI and GTX Limited Removal Using a heat gun heat deflector and pry it using a piece of wood Installation Appl...

Страница 367: ...ve bottom cover no 17 of seat 1 Remove cover Loosen gear clamp of outer boot then pull outer boot downward 1 Loosen gear clamp Loosen gear clamp of inner boot then pull boot downward 1 Gear clamp Remo...

Страница 368: ...n for proper torque specifications and service products to be used SEAT COVER REPLACEMENT Install staples with an electric tacker such as Ar row tacker no ETN 50 or with a manual tacker such as Arrow...

Страница 369: ...ket with an extension Remove sponsons no 6 Clean any residues of sealant adhesive on hull Install gaskets no 7 on new sponsons no 6 Apply 732 sealant P N 293 800 006 or sealant ad hesive P N 293 800 0...

Страница 370: ...f of the decal back protective film and align decal with marks Start sticking it from cen ter and remove the other half of the film to stick it completely Carefully squeegee decal beginning at center...

Страница 371: ...ubbles in the mixture With a putty knife fill the repair area and cover with plastic film Curing time may depend on tempera ture amount of putty and percentage of catalyst After 2 hours press lightly...

Страница 372: ...with water De pending on the size of the area repaired you can either block sand as per previous procedure or you may use an air sander Sand the surface down with progressively finer grits of sandpap...

Страница 373: ...ard that fits flush to the interior surface and has a plastic layer on the re pair side It is held in place by tape or a support Inside Wipe down the area with acetone on a cloth Ap ply the same proce...

Страница 374: ...e on aluminum insert P N 292 000 075 knurled surface and on plastic insert in ner bore 1 Knurled surface 2 Inner bore Install aluminum insert into plastic hull insert NOTE Align aluminum insert as muc...

Страница 375: ...chamber volume 36 3 1 6 cc Cylinder head warpage maximum 0 05 mm 002 in Piston ring type and quantity 1 Semi trapez 1 Rectangular Ring end gap New 0 40 0 55 mm 016 022 in Wear limit 1 00 mm 039 in Ri...

Страница 376: ...se Starting system 5 A Charging system 2 x 15 A VTS system 7 5 A ADDITIONAL INFORMATION CARBURETION SPX 5838 5839 Carburetor Type Mikuni BN 40I diaphragm Fuel accelerator pump Quantity 2 Main jet 140...

Страница 377: ...r limit 1 00 mm 040 in Impeller shaft end play new 0 12 0 54 mm 005 021 in Impeller shaft radial play 0 05 mm 002 in Impeller pitch material Progressive pitch 16 23 stainless steel ADDITIONAL INFORMAT...

Страница 378: ...RD EQUIPMENT SPX 5838 5839 Safety lanyard Standard Digitally Encoded Security System Standard Fuel tank reserve Standard Monitoring beeper Standard Speedometer Optional Fuel oil gauge analog Standard...

Страница 379: ...lbf ft 1 Spark plugs 24 N m 17 lbf ft 5 JET PUMP Impeller 70 N m 52 lbf ft 2 Pump hull nuts 33 N m 24 lbf ft 1 Venturi pump housing screws 21 N m 16 lbf ft 1 VTS ring screws 13 N m 10 lbf ft 1 Pump h...

Страница 380: ...ratio 6 2 1 6 0 1 Combustion chamber volume 32 6 1 4 cc 45 3 2 0 cc Cylinder head warpage maximum 0 05 mm 002 in Not applicable Piston ring type and quantity 1 Semi trapez 1 Rectangular 2 Semi trapez...

Страница 381: ...e Fuse Starting system 5 A Charging system 2 x 15 A VTS system Not applicable 7 5 A ADDITIONAL INFORMATION Engine cold 6000 RPM CARBURETION GS 5626 5844 GSX Limited 5629 5845 Carburetor Type Mikuni BN...

Страница 382: ...aft end play new 0 12 0 54 mm 005 021 in Impeller shaft radial play 0 05 mm 002 in Impeller pitch material Progressive pitch 11 22 stainless steel Progressive pitch 16 25 stainless steel ADDITIONAL IN...

Страница 383: ...nitoring beeper Standard Speedometer Optional Standard Fuel oil gauge analog Standard Not applicable Info Center Not applicable Standard Variable trim system VTS Optional Standard Reverse Not applicab...

Страница 384: ...ter screws 10 N m 89 lbf in 1 Not applicable Magneto housing cover screws 9 N m 80 lbf in 5 Starter mounting screws 22 N m 16 lbf ft 1 10 N m 89 lbf in 1 Spark plugs 24 N m 17 lbf ft 5 JET PUMP Impell...

Страница 385: ...Combustion chamber volume 45 3 2 0 cc Cylinder head warpage maximum Not applicable Piston ring type and quantity 2 Semi trapez Ring end gap New 0 40 0 55 mm 016 022 in Wear limit 1 00 mm 039 in Ring p...

Страница 386: ...e Fuse Starting system 5 A Charging system 2 x 15 A VTS system 7 5 A ADDITIONAL INFORMATION CARBURETION XP Limited 5665 5667 Carburetor Type Mikuni BN 46I diaphragm Fuel accelerator pump Quantity 2 Ma...

Страница 387: ...imit 1 00 mm 040 in Impeller shaft end play new 0 12 0 54 mm 005 021 in Impeller shaft radial play 0 05 mm 002 in Impeller pitch material Progressive pitch 16 25 stainless steel ADDITIONAL INFORMATION...

Страница 388: ...NDARD EQUIPMENT XP Limited 5665 5667 Safety lanyard Standard Digitally Encoded Security System Standard Fuel tank reserve Standard Monitoring beeper Standard Speedometer Standard Fuel oil gauge analog...

Страница 389: ...plugs 24 N m 17 lbf ft 5 JET PUMP Impeller 70 N m 52 lbf ft 2 Pump hull nuts 31 N m 23 lbf ft 1 Venturi pump housing screws 21 N m 16 lbf ft 1 VTS ring screws 13 N m 10 lbf ft 1 Pump housing cover sc...

Страница 390: ...m 002 in Piston ring type and quantity 1 Semi Trapez 1 Rectangular Ring end gap New 0 40 0 55 mm 016 022 in Wear limit 1 00 mm 039 in Ring piston groove clearance New 0 025 0 070 mm 001 003 in Wear li...

Страница 391: ...sa Exide Fuse Starting system 5 A Charging system 15 A ADDITIONAL INFORMATION Engine cold 6000 RPM CARBURETION GTS 5819 Carburetor Type Mikuni BN 40I diaphragm Fuel accelerator pump Quantity 1 Main je...

Страница 392: ...r limit 1 00 mm 040 in Impeller shaft end play new 0 12 0 54 mm 005 021 in Impeller shaft radial play 0 05 mm 002 in Impeller pitch material Progressive pitch 11 22 stainless steel ADDITIONAL INFORMAT...

Страница 393: ...NDARD EQUIPMENT GTS 5819 Safety lanyard Standard Digitally Encoded Security System Standard Fuel tank reserve Standard Monitoring beeper Standard Fuel gauge low oil warning light Standard Tachometer O...

Страница 394: ...16 lbf ft 1 Spark plugs 24 N m 17 lbf ft 5 JET PUMP Impeller 70 N m 52 lbf ft 2 Pump hull nuts 31 N m 23 lbf ft 1 Venturi pump housing screws 21 N m 16 lbf ft 1 Nozzle venturi screws 20 N m 15 lbf ft...

Страница 395: ...ratio 6 2 1 6 0 1 Combustion chamber volume 32 6 1 4 cc 45 3 2 0 cc Cylinder head warpage maximum 0 05 mm 002 in Not applicable Piston ring type and quantity 1 Semi trapez 1 Rectangular 2 Semi trapez...

Страница 396: ...xide Fuse Starting system 5 A Charging system 2 x 15 A VTS system Not applicable ADDITIONAL INFORMATION Engine cold 6000 RPM CARBURETION GTI 5836 5841 GTX Limited 5837 5842 Carburetor Type Mikuni BN 4...

Страница 397: ...aft end play new 0 12 0 54 mm 005 021 in Impeller shaft side play 0 05 mm 002 in Impeller pitch material Progressive pitch 11 22 stainless steel Progressive pitch 14 21 stainless steel ADDITIONAL INFO...

Страница 398: ...oring beeper Standard Speedometer Standard Fuel oil gauge analog Standard Not applicable Tachometer Not applicable Standard Info Center Not applicable Standard Reverse Standard Storage compartment Sta...

Страница 399: ...N m 18 lbf ft 1 Flame arrester screws 10 N m 89 lbf in 1 Not applicable Magneto housing cover screws 9 N m 80 lbf in 5 Starter mounting screws 22 N m 16 lbf ft 1 10 N m 89 lbf in 1 Spark plugs 24 N m...

Страница 400: ...nnector no 2 of the MPEM The second number indicates that the wire is po sitioned in the terminal no 18 The letter g indicates a common circuit with an other wire s bearing the same letter g in the ci...

Страница 401: ...cal mechanical keyed header on the MPEM 1 Mechanically keyed Contact Removal SIGNAL WIRE Insert a screwdriver blade between the connector and the wedge lock tab Release the locking tab and at the same...

Страница 402: ...n 1 4 turn in each direction gently pull the wire until the contact is removed 1 Rotate wire back and forth 2 Pull wire POWER WIRE CONTACT NOTE The wedge lock must be removed to ex tract power contact...

Страница 403: ...akage may result Insulation sur face within 25 mm 1 in from the tip of the con tact must be smooth All contacts in AMP plug connectors must be crimped using the crimping tool P N 295 100 164 CRIMPING...

Страница 404: ...ppropriate circuit cavity and push as far as it will go Pull back on the contact wire to be sure the reten tion fingers in the housing are holding the contact properly After all required contacts have...

Страница 405: ......

Страница 406: ......

Страница 407: ......

Страница 408: ......

Страница 409: ......

Страница 410: ......

Страница 411: ......

Страница 412: ......

Страница 413: ......

Страница 414: ......

Страница 415: ......

Страница 416: ......

Страница 417: ......

Страница 418: ......

Страница 419: ......

Страница 420: ......

Страница 421: ......

Страница 422: ......

Страница 423: ......

Страница 424: ......

Страница 425: ......

Страница 426: ......

Отзывы: