16
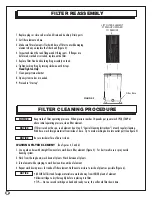
FILTER REASSEMBLY
1. Replace plugs or close valves in Tank Drain and Auxiliary Drain ports.
2. Set filter element on base.
3. Make sure filter element is flush with base of filter to avoid damaging
element when you replace the filter head (Figure 3).
4. Inspect and clean the tank flanges and O-Ring seats. If flanges are
deformed, cracked or corroded, replace entire filter.
5. Replace Filter Head and Locking Ring assembly on tank.
6. Tighten Locking Ring by turning clockwise until it stops.
Hand Tighten Only
.
7. Clean pump strainer basket.
8. Open system valves as needed.
9. Proceed to “Startup”.
Filter Base
LIFT FILTER ELEMENT
STRAIGHT UPWARD
TO REMOVE
FIGURE 3
FILTER CLEANING PROCEDURE
NOTICE
Keep track of filter operating pressure. When pressure reaches 10 pounds per square inch (PSI) (70kPa)
above initial operating pressure, clean filter element.
NOTICE
If filter is used with a spa, soak element (see Step 2, “Special Cleaning Instructions”) at each regular cleaning.
With hose, wash foreign material from inside of base. Try to avoid washing debris into outlet port (See figure 4)
NOTICE
Be sure inside surface of base is clean.
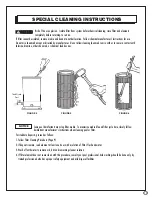
1. Use a garden hose with straight flow nozzle to wash down filter element (Figure 4). For best results use a spray nozzle
cleaning system.
2. Work from the top down; wash down all pleats. Wash between all pleats.
3. Turn element while spraying to wash down entire outside of element.
4. Repeat wash down process for inside of filter element. Hold nozzle as close to inside of pleats as possible (Figure 6).
WASHING FILTER ELEMENT
(See Figures 4, 5 and 6)
NOTICE
• BE SURE all dirt and foreign materials are washed away from INSIDE pleats of element.
• Allow cartridge to dry thoroughly before replacing it in filter
• TIP — Have a second cartridge on hand and ready to use; this will avoid filter down time.

