6
Service Procedures
24
Blue Seal Evolution Series GT45 / GT46 / GT60
©
Moffat Ltd, January 2007
Revision 1/
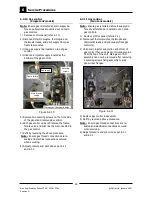
6.2.8 Main
burners
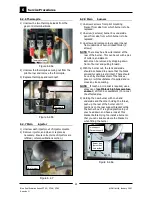
6.2.6 Thermopile
Figure 6.2.6a
Figure 6.2.6b
Figure 6.2.8a
1) Unscrew the two thermopile leads from the
gas control terminal block.
1) Unscrew 2 screws from pilot mounting
bracket from side from which burner is to be
replaced.
2) Unscrew (2 screws) burner box underside
panel from side from which burner is to be
replaced.
3) Unscrew and remove corner support panel
from underside of burner intake throat (2
screws)
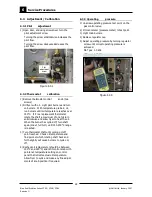
NOTE:
There may be a tie wire located at the
rear of the burner. This can be cut with a pair
of cutters, and discard.
Burner can be removed by dropping down
front of burner and pulling forward.
4) With the burner out, the tank underside
should be checked to ensure that the black
emissivity coating is still intact. There should
be no shiny stainless steel of the tank ex-
posed, or white substance if required and re-
move any loose coating.
NOTE:
If touch up or recoat is required, use a
spray can of
matt black high temperature
enamel
( VHT1200 or equivalent ) to re-coat
the affected area.
5) Holding the new burner with one hand
underside and the other holding the throat,
push up the rear of the burner until it
positions on the rear support bracket within
the burner box. It is a good practice to put
your head down and have a look at this
bracket before trying too install a burner so
that you can visualise where the bracket is
when fitting the burner.
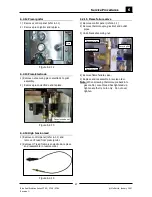
1) Unscrew each injector out of injector mounts.
2) Remove injector, and clean or replace as
necessary. Ensure correct size of injectors are
refitted ( refer specifications section )
2) Unscrew the thermopile securing nut from the
pilot burner and remove the thermopile.
3) Replace thermopile and reconnect.
6.2.7 Main
injector
Thermopile leads
Thermopile
Two support
(Corner support)
Burner box
(burner box
Underside)
Figure 6.2.7
Main Injector


