ProxySG 900 Series Maintenance & Upgrade Guide
97
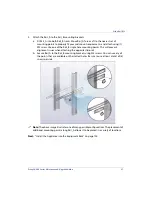
2.
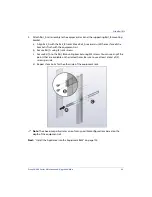
Attach the Rail_A to the Rail_B mounting brackets.
a.
Fit Rail_A into both Rail_B tracks. Move Rail_A fore or aft to the nearest set of
mounting points to properly fit your mid mount requirements and attach using (1)
M3 screw. Use one of the Rail_B single hole mounting points. This will prevent
alignment issues when attaching the opposite slide-rail.
b.
Secure Rail_A to the Rail_B mounting brackets using M3 screws. You can use any of
the points that are available on the slotted holes. Be sure to use at least a total of (4)
screws per side.
Note:
The above image illustrates one of many possible configurations. The placement of
additional mounting points along Rail_A allows it to be placed in a variety of locations.
Next:
Содержание ProxySG SG900-10
Страница 6: ...6 ProxySG 900 Series Maintenance Upgrade Guide...
Страница 28: ...About This Guide 28 ProxySG 900 Series Maintenance Upgrade Guide...
Страница 34: ...34 ProxySG 900 Series Maintenance Upgrade Guide Fan Assembly...
Страница 56: ...56 ProxySG 900 Series Maintenance Upgrade Guide Memory Module...
Страница 86: ...86 ProxySG 900 Series Maintenance Upgrade Guide BIOS Battery...
Страница 103: ......
Страница 104: ...www bluecoat com...


