14
Clearview 4:2
User Manual
5.3 “Time” Screen (continued)
Click to apply and save the system configuration changes.
8
Figure 5.3d - “Save Settings”
8
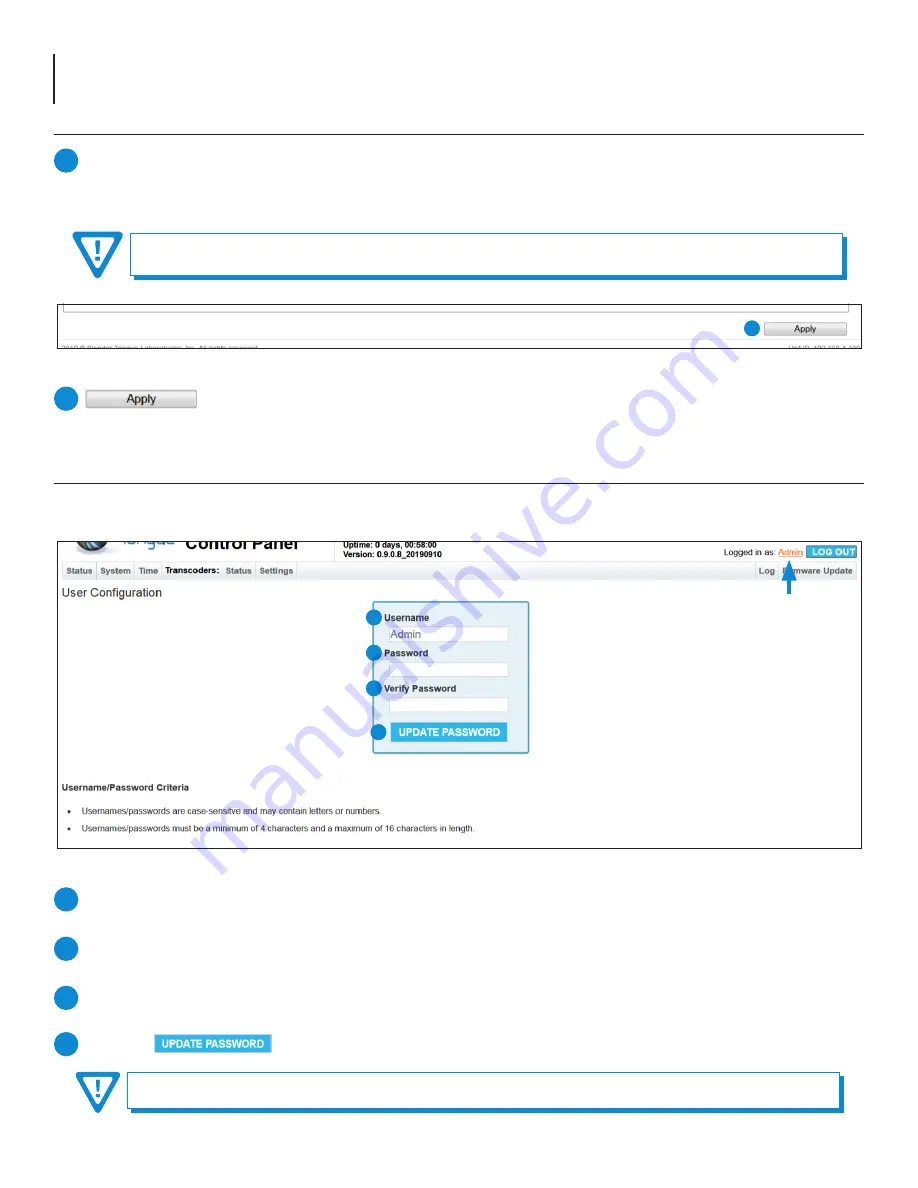
5.4 “Admin” Screen
The “
Admin
” (Figure 5.4) settings allow a user to change or modify the Username and Password values for the unit while
logged in. To access this screen, click the "Admin" link at the top right corner as shown below.
NOTE: Login and Password are both case-sensitive.
Username:
is the Administrator’s login (16 characters maximum). This login allows the user to make changes to any
area of the unit. (Factory Default: “
Admin
”)
Password:
is only used when changing the current Administrator’s password (16 characters maximum). The password
will not be displayed. (Factory Default: “
pass
”)
Verify Password:
is required when changing the current Administrator's password. It
MUST
match the “Password” field
and will not be displayed.
Click the button to apply changes to the User Configuration.
1
2
3
4
Figure 5.4 - “User Configuration”
1
2
3
4
Custom NTP Server IP (#1, #2, #3):
Enter the custom NTP server IP addresses within these fields. The time servers
specified must support the Network Time Protocol (NTP) in order for automated time acquisition to work properly.
NOTE
: Default NTP Servers are “
0.pool.ntp.org
”, “
1.pool.ntp.org
”, “
2.pool.ntp.org
”, and “
3.pool.ntp.org
”.
7
REMINDER: Internet access must be present in order to access the default NTP Servers.
Содержание Clearview 4:2
Страница 21: ...21 Clearview 4 2 User Manual ...
Страница 22: ...22 Clearview 4 2 User Manual NOTES ...


