background image


28 


6.10   The chain drive 

 
A  chain  drive  needs  relatively  little  maintenance  when  the  correct  chain  is  selected,  when  it  is  mounted 
correctly and, in this case of application, is not lubricated. The drive chain is protected by a chain guard. The 
chain guard prevents excessive contamination and prevents accidents.  
 
The chain drive should be cleaned every three months. On these occasions check the aligning of the chain 
wheels and the chain tension. 


Cleaning 

In order to clean thoroughly first remove the dirt adhering to the outside of the chain drive using a hard or 
wire brush. Then wash the chain in petroleum ether or similar. 
After that clean the dirt from the internal parts of the chain. 


Alignment of the chain wheels 

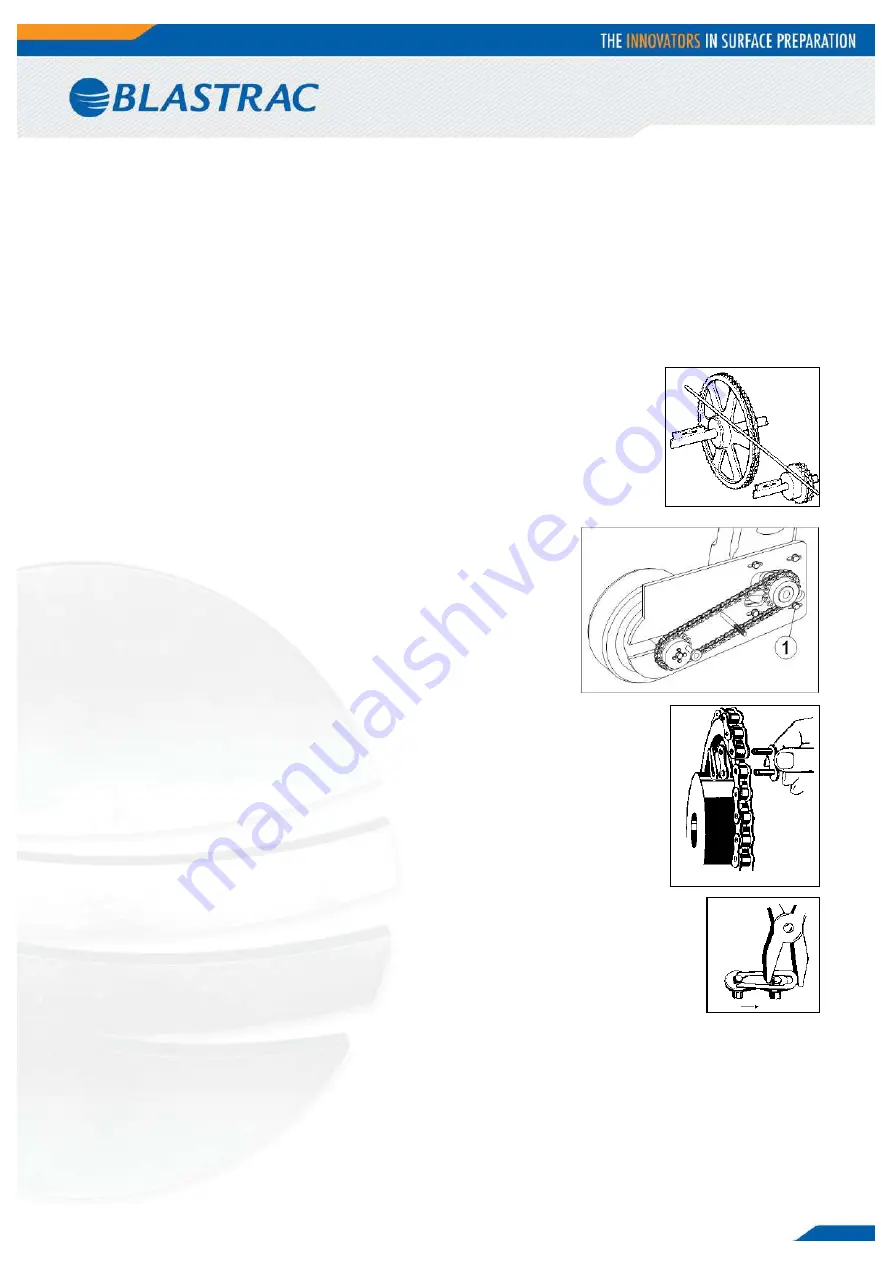
Check the mounting precision by means of a ruler to be put to the chain wheels. 
 
Incorrect mounting makes the internal link plates press against the external link 
plates and, thus, accelerates the chain wear or even causes the chain wheels to lock 
up. 


Chain tension 

The travel drive motor is mounted on a receiver plate with slotted holes. 
When it is necessary to re-tense the chain, this can be carried out by 
shifting the motor in the slotted holes (1). The correct chain tension is 
achieved when the chain allows to be pressed for about 5 mm between the 
chain wheels. 


Fitting the chain 

Before mounting the chain it must be degreased to prevent any abrasive or abrasive 
particles from adhering. 
 
The chain is supplied as a chain string and has to be prepared during mounting. This 
is done as follows: Place the chain on the chain wheels so that the links lie in tow 
adjacent gaps between the teeth. Now close the chain using the coupling link. With 
heavy chains or big distances between the shafts use a pre-stressing tool in order  to 
bring the two end links so close together that the coupling link can be inserted 
without being deformed. 
 
On mounting coupling links with springs, their closed sides should point to the running 
direction of the chain (see figure). Put the spring onto the link plate and press it over the 
pin into the ring groove by means of a pair of tongs. Demount the spring in the opposite 
order. 


Re-lubrication of the traction wheel bearings 

The bearing units of the traction wheel are equipped with a grease fitting which allows the bearings to be re-
lubricated in service. Re-lubricating the bearings once every 2 years should be more than sufficient. 
 
When lubricating, care must be taken to use greases that are compatible with the original grease. We suggest 
a medium temperature, lithium calcium bace, NLGI Grade No. 2 grease having an oil with a viscosity of 

200mm

²

/s at 40°C. When a unit is being re-lubricated, avoid excessive pressure which may cause damage to 

the bearing seals. 
 

Содержание 2-48DC

Страница 1: ...Original instructions in English language OPERATING INSTRUCTIONS 2 48DC VERSION 1 4...

Страница 2: ...s Repairs Cleaning Test on By Inspection before initial operation on __________________________________________ By __________________________________________ Date of initial operation ________________...

Страница 3: ...the machine 11 4 3 Transport 11 4 4 Drive control 12 4 5 Driving 13 5 Operation 14 5 1 Before operation 14 5 2 Starting stopping the machine 15 5 3 Work with the machine 15 5 4 Interrupting work 15 5...

Страница 4: ...ac 2 48DS blast cleaning machine It is equipped with 20 pieces of specially designed high quality Blastrac cartridge filters The rotating valves transport all generated debris directly into BigBags fo...

Страница 5: ...separator to the pulse system The conditioned air then passes a control valve which regulates the system pressure and then builds up pressure in the pulse tank The pressurized air is used to generate...

Страница 6: ...the surrounding area of at least 5 meter from the machine h Never use the machine when the surface is not clear and if there is a risk of stumbling or tripping i Remove electrical cables and dust hose...

Страница 7: ...otection Safety glasses with lateral protection Protecting gloves Safety shoes b Dress properly Do not wear loose clothing or jewellery Keep your hair clothing and gloves away from moving parts c Pers...

Страница 8: ...enter the machine s If dust leaves the filter unit instead of clean air this is a sign that the filter cartridges are damaged or not fixed correctly inside the chamber t When a filter is leaking it ha...

Страница 9: ...d and put away properly before transport g Be aware of your surroundings and machine operating level Do not side hill do not run on steep incline this could cause machine to tip over h The weight of t...

Страница 10: ...fety shoes obliged Consult the manual before operating the machine Name address and CE mark The machine type The net weight of the machine in kilogram The year of manufacture The serial number of the...

Страница 11: ...d other fasteners for tightness No loose bolts and or nuts are permitted Check the electrical components cables and connections for wear and or damages Dust hose connection must be reliable use hose c...

Страница 12: ...approximately 0 5 Open the wheel guard Insert the quick release pin inside the hole WARNING Use only 1 finger to press the button of the quick release pin and keep applying pressure Push the green bu...

Страница 13: ...tton makes it possible to drive at maximum speed without having to adjust the speed control knob To do so press and hold the OVERDRIVE button while driving WARNING Mind your surroundings at maximum sp...

Страница 14: ...must be followed closely Before switching on the machine make sure that no one can be endangered when the machine starts up 5 1 Before operation 1 Close both silencers 2 Fasten both dusthoses 3 Place...

Страница 15: ...r of the dust collector can be adjusted with the air flow pressure regulators on the silencer Slide the hoods open for more power and close them for less power 5 4 Interrupting work This machine is bu...

Страница 16: ...p 5 Turn the rotating valves on by pushing the green button on the control box 5 7 Silencers The silencers on top of the dust extractor reduce the noise emission The 1st silencer will close automatica...

Страница 17: ...if you have doubts about the cause or when a repair without a technician seems not possible without damages Only use genuine Blastrac spare parts Our specialists will be happy to assist you with more...

Страница 18: ...Protect the electrical motors from moisture heat dust and shocks All repair work must to be done by qualified Blastrac personnel this to guarantee a safe and reliable machine Any guarantee on the mac...

Страница 19: ...turn on the compressor and keep the fan unit turned off Let the machine pulse for about a half an hour This action will clean the filters from the inside When the Pressure Diff gauge keeps indicating...

Страница 20: ...s Remove the filter house door Loosen the nut washer 2 Remove the locking bar 1 The filter bracket will now be tilted downwards so the filters can be taken out easily Slide out the filters 3 and put i...

Страница 21: ...suction contaminants in the clean part and consequently blow they backwards in the outer air If the silencer blows out dust stop the machine immediately This means probably that a filter is damaged or...

Страница 22: ...lve the pressure in the pulse tank remains within safe limits If the pressure of 7 bar is not reached it is possible that either the filter of the water separator or the air filter of the compressor i...

Страница 23: ...g 31 Filter element 36 Louver This spitter type drain operates momentarily when a rapid change in air flow occurs or when the supply pressure is reduced The separated water will be drained in the Drai...

Страница 24: ...ty Blastrac Compressor oil Part nr E00498 Prior to draining off the oil the compressor unit should have operating temperature Check oil level 2 or 3 minutes after stopping The compressor is factory fi...

Страница 25: ...at will damage the gland seal Replace rotating valve seals Replace the rotating valve seals when they are damaged or worn out 1 Remove the two big bag adapters by removing the 8 bolts 2 Remove the two...

Страница 26: ...nd bolts Apply Loctite 243 on the bolts First tighten the two outside bolts than tighten the two inside bolts Make sure that the seal is in one line with the valve housing and check that the seal has...

Страница 27: ...drives have to be checked every 3 months 6 8 V belt mounting Reduce the distance between the driving motor and the bearing to release the tension of the V belt drive Carefully put the V belt in the gr...

Страница 28: ...m between the chain wheels Fitting the chain Before mounting the chain it must be degreased to prevent any abrasive or abrasive particles from adhering The chain is supplied as a chain string and has...

Страница 29: ...aring Silencer assembly defective Check the alignment and adjustment of the rotating parts Check screws and all parts for tight seat Lubricate the bearing Check and replace if needed Too low or no pre...

Страница 30: ...robox Note If a motor protection switch has been triggered by overload it can be switched on again after a short cooling down period Old equipment contains valuable materials which are valuable for re...

Страница 31: ...erential filter surface MAX 50 150 mm WS 2 6 inch WG Noise level at 1 mtr distance Up to 83 dB A The electrical diagrams of the electrical system are placed inside of the control panel Design and spec...

Страница 32: ...alues at all time and could increase the exposure level over the total working period The values may be measurements from a representative sample of technically comparable machinery The values may be...

Страница 33: ...info blastrac de WWW BLASTRAC DE BLASTRAC UKRAINE SALES SERVICE CENTRE Nezalezhnosti 14 of 21 07400 Brovary Tel 38 0 44 222 51 28 Fax 38 0 44 277 98 29 Email info blastrac com ua WWW BLASTRAC COM UA B...

Отзывы: