


3
PutIn may not be able to detect these. You are on the safe side with all standard VESA video
modes. Please refer to Appendix
on page
for a list of all known modes.
Initial IP configuration
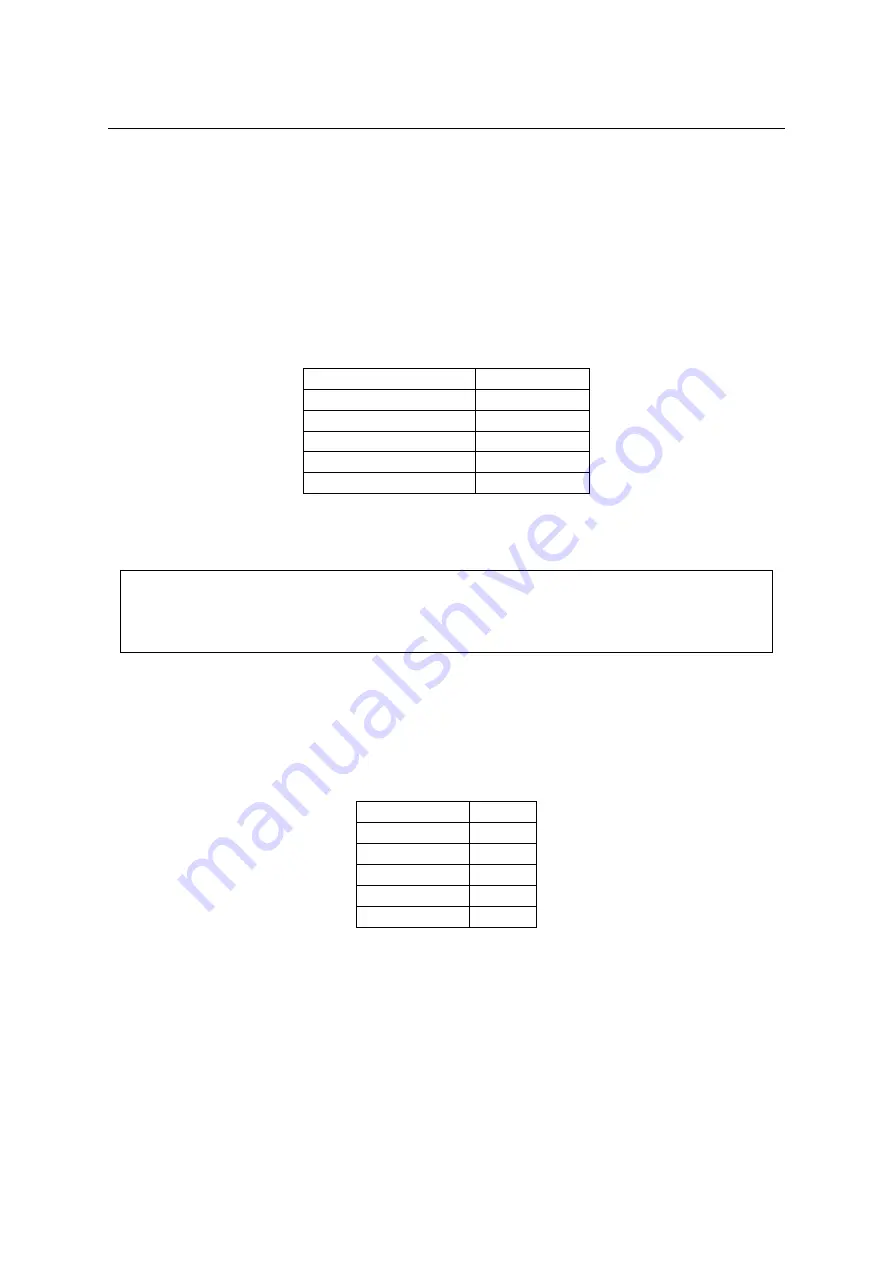
Initially the RAS-PutIn network interface is configured with the parameters shown in Table
Table 1.1: Initial configuration
parameter
value
IP auto configuration
DHCP
IP address
-
Netmask
255.255.255.0
Gateway
none
IP access control
disabled
If this initial configuration doesn’t meet your local requirements, you need to do the initial IP
configuration.
Note:
If the DHCP connection fails on boot up, RAS-PutIn will not have an IPv4 address. If
IP auto configuration is set to ”None” the standard IP address 192.168.1.22 is assigned to
RAS-PutIn.
Use one of the following ways:
1. Connect the enclosed NULL modem cable to the serial interface on the rear side .
The serial interface needs to be adjusted with the parameters shown in table Table
Table 1.2: Serial parameters
parameter
value
Bits/second
115200
Data bits
8
Parity
No
Stop bits
1
Flow Control
None
Use a terminal software (e.g. hyperterm or minicom) to connect to RAS-PutIn. Reset
RAS-PutIn and immediately press
< ESC >
. You will see some device information and
a ’=
>
’ prompt. Enter the command ’config’ and press
< Enter >
. After waiting a
few moments you may configure IP auto configuration, IP address, net mask and default
gateway. Pressing
< Enter >
without entering values does not change settings. The
gateway value must be set to 0.0.0.0 (for no gateway) or any other value. You will be
asked if the values are correct and get a chance to correct them. After confirming, RAS-
PutIn performs a reset.
2. Use an Ethernet cable to connect RAS-PutIn to a subnet where a DHCP server is available.
After the DHCP server has assigned an IP address to RAS-PutIn you can use the web
interface to configurate the device (see Section
on page
for details).
Содержание RAS-PutIn
Страница 1: ...RAS PutIn Installation and User Guide Based on Firmware 03 02 07 ...
Страница 4: ...iv ...
Страница 8: ...viii Contents ...
Страница 12: ...xii List of Tables ...
Страница 30: ...18 CHAPTER 4 CONFIGURATION ...
Страница 76: ...64 CHAPTER 5 USAGE ...
Страница 80: ...68 APPENDIX A GLOSSARY ...
Страница 82: ...70 APPENDIX B RAS PUTIN VIDEO MODES ...
Страница 88: ...76 APPENDIX D PIN ASSIGNMENTS ...
Страница 92: ...80 APPENDIX F SPECIFICATIONS ...


