background image

CHAPTER 4: Configuration

35

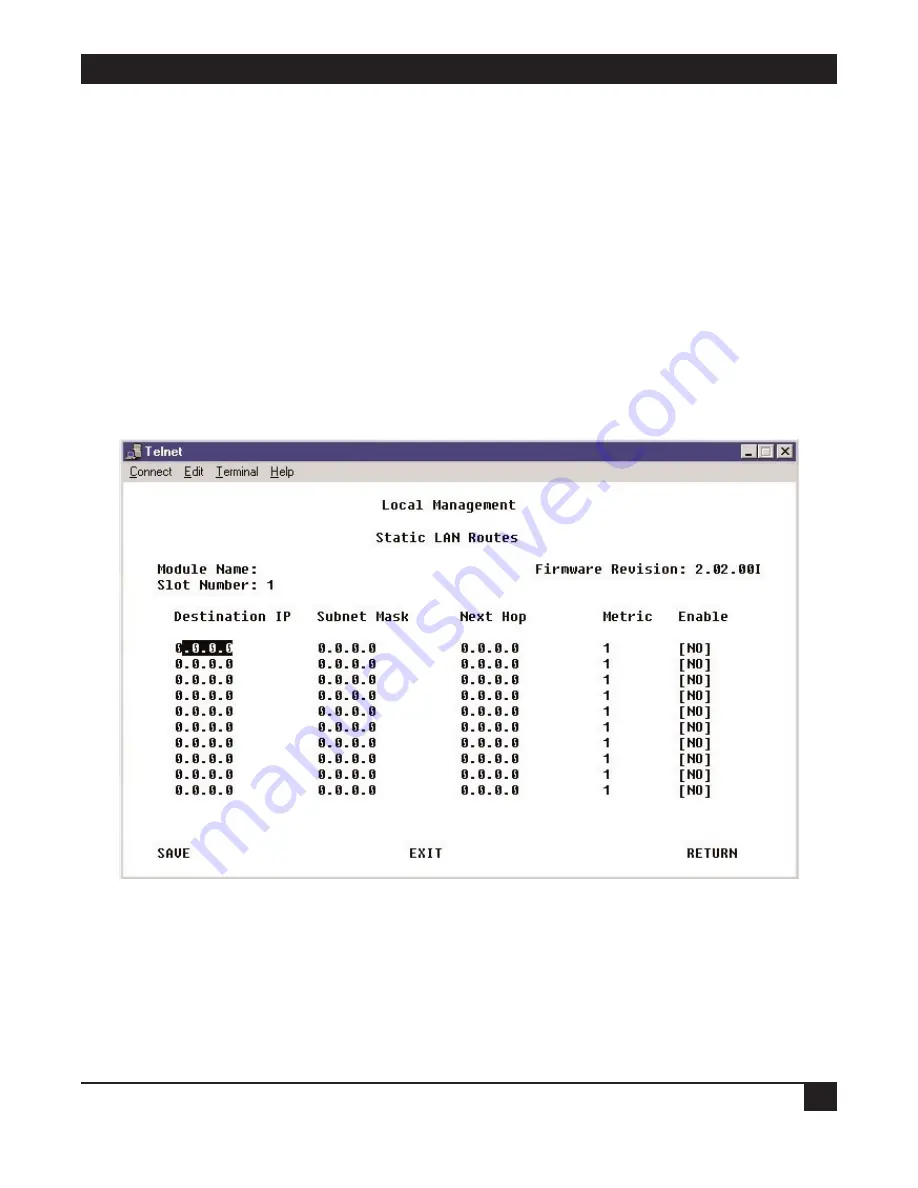
4.3.1.C Static LAN Routes

The LAN routes that the Remote Access Concentrator uses to get to subnets reachable through a WAN device
are configured using CSM or RADIUS. Routes behind LAN-attached routers are discovered with RIP. And the
Concentrator’s LAN-interface configuration specifies its LAN subnet. Although all of these routes are
automatically entered in the Concentrator’s routing table, there are cases where it is necessary to manually
enter routes. For example, manually entered static routes are required if:

• There are routers on the LAN that do not support RIP.

• The Concentrator’s LAN has more than one subnet. In this case, a route for a subnet that is not the same

as that of the LAN interface needs to be manually entered with the LAN interface as the Next Hop and a
metric of 0 (direct delivery).

A maximum of 10 static LAN routes may be defined.

To define the Concentrator’s static LAN routes:

1. Select Static LAN Routes from the IP Configuration Menu. This screen will appear:

2. Enter the route’s Destination IP Address. This address specifies the destination subnet or host.

3. Enter the Subnet Mask associated with the Destination IP Address. The mask bits start at the most

significant bit of the IP address and proceed to the least significant bit. The mask identifies the static
route’s subnet. A subnet mask of 255.255.255.255 implies that this static route entry is for a host rather
than a subnet.

Содержание LRA3000A

Страница 1: ... Mailing address Black Box Corporation 1000 Park Drive Lawrence PA 15055 1018 Web site www blackbox com E mail info blackbox com CUSTOMER SUPPORT INFORMATION MAY 2000 LRA3000A LRA3001A LRA3002A LRA3003A T1 and E1 Remote Access Concentrators WIDE AREA 1 LNK STS ASYNC LNK STS ENET STS CPU PWR PINOUT RESET WIDE AREA 2 LNK STS TELCO Dual T1 Remote Access Concentrator ...

Страница 2: ... Industry Canada Le présent appareil numérique n émet pas de bruits radioélectriques dépassant les limites applicables aux appareils numériques de la classe A prescrites dans le Règlement sur le brouillage radioélectrique publié par Industrie Canada EUROPEAN UNION DECLARATION OF CONFORMITY This equipment has been tested and found to comply with the limits for a class A computing device in accordan...

Страница 3: ...l flujo de aire por los orificios de ventilación 10 El equipo eléctrico deber ser situado fuera del alcance de fuentes de calor como radiadores registros de calor estufas u otros aparatos incluyendo amplificadores que producen calor 11 El aparato eléctrico deberá ser connectado a una fuente de poder sólo del tipo descrito en el instructivo de operación o como se indique en el aparato 12 Precaución...

Страница 4: ... may make changes in its technical operations and procedures If any such changes affect the compatibility or use of this device the telephone company is required to give adequate notice of the changes You ll also be advised of your right to file an FCC complaint 5 If the telephone company requests information on what equipment is connected to their lines inform them of a The telephone number that ...

Страница 5: ...uations Repairs to certified equipment should be made by an authorized maintenance facility in this case Black Box Any equipment malfunctions or any repairs or alterations you make to this equipment may give the telecommunications company cause to ask you to disconnect the equipment You should ensure for your own protection that the electrical ground connections of the power utility telephone line...

Страница 6: ...ng protection is factory set and is not under the control of the customer I attest that the operator s maintainer s of the digital CPE responsible for the establishment maintenance and adjustment of the encoded analog content and billing information has have been trained to perform these functions by successfully completing at least one of the following check all that apply a A training course pro...

Страница 7: ...n the duration or limitation of implied warranties in some instances the above limitations and exclusions might not apply to you TRADEMARKS USED IN THIS MANUAL BLACK BOX and the logo are registered trademarks of Black Box Corporation AT T is a registered trademark and Definity is a trademark of AT T VT100 is a trademark of Compaq Computer Corporation K56flex is a trademark of Rockwell Telecommunic...

Страница 8: ...efault LAN Route 33 4 3 1 C Static LAN Routes 35 4 3 2 SNMP Community Names 37 4 3 3 Authentication Settings 38 4 3 4 PPP Settings 40 4 3 5 Using a RADIUS Server as a Device Database 42 4 3 5 A RADIUS Authentication Servers 43 4 3 5 B RADIUS Accounting Servers 45 4 3 5 C RADIUS Client Support 47 4 3 6 CAS Configuration 50 4 3 6 A R2 for E1 50 4 3 6 B RBS for T1 54 4 3 7 General Configuration 58 4 ...

Страница 9: ...s Dial up Networking 84 6 1 2 CSM Configuration for Windows Dial up Networking CSM Only 85 6 1 3 Remote Device Configuration for Windows Dial up Networking 87 6 2 ISDN Router Running NAT 89 6 2 1 Concentrator Configuration for NAT 91 6 2 2 CSM Configuration for NAT CSM Only 92 6 2 3 Remote Router Configuration for NAT 94 6 3 Standard ISDN IP Router 95 6 3 1 Concentrator Configuration for Standard ...

Страница 10: ... II UDP DS0 SNMP 1321 MD5 Message Digest 1332 IPCP 1406 DSX1 MIB 1638 BCP 1650 Ethernet 1661 PPP 1676 PPP HDLC framing 1696 modem MIB 1757 RMON 1877 DNS and NBNS address negotiation 1990 MLP 1994 PPP authentication PPP CHAP 2011 SNMP v2 MIB for IP using SMI v2 2013 SNMP v2 MIB for UDP using SMI v2 2021 RMON v2 for SMI v2 2127 ISDN 2138 RADIUS authentication 2139 RADIUS accounting 2233 interfaces M...

Страница 11: ... CHAP CLID PPP Call Back CBCP basic IP address pooling with proprietary CSM software also supports proxy to NT domains and proxy to RADIUS Authorization All authorization options require CSM IP Layer 4 policy controls per TCP UDP port based on remote user and or device time of day bandwidth and maximum connect time restrictions priority port reservation policy violation logging and dynamic profile...

Страница 12: ...and software based Connectors All front mounted 1 RJ 45 female console port labeled ASYNC 1 RJ 45 female LAN port labeled ENET 1 RJ 48C female WAN port labeled WIDE AREA 1 LRA3000A LRA3003A only 1 RJ 48C female WAN port labeled WIDE AREA 2 MTBF 50 000 hours calculated estimate Temperature Tolerance Operating 32 to 104 F 0 to 40 C Storage 22 to 194 F 30 to 90 C Humidity Tolerance 5 to 95 noncondens...

Страница 13: ...ion of dial up traffic in a compact rack mountable form factor The Concentrators architecture supports universal dial access ISDN or modem on every port yielding excellent price performance in a slender design that s only 1U 1 8 4 4 cm high Both T1 and E1 versions are available supporting two ISDN Primary Rate Interfaces PRIs and either 48 T1 or 60 E1 DS0 connections the DS0s can be any combinatio...

Страница 14: ...most of its connectors and indicators are The connectors are discussed in more detail in the next chapter of this manual and the LED indicators are discussed in the Concentrator s HTML documentation WIDE AREA 1 LNK STS ASYNC LNK STS ENET STS CPU PWR PINOUT RESET WIDE AREA 2 LNK STS TELCO ...

Страница 15: ... rubber feet for placing the Concentrator on a desk counter etc A rackmount kit for mounting the Concentrator in a 19 rack 2 Power cords 1 CD of HTML documentation This manual If anything is missing or arrives damaged please call Black Box right away 3 2 Arranging ISDN Service Before you install your Remote Access Concentrator we recommend that you contact your telco or service provider and arrang...

Страница 16: ...ng WAN connector pinout settings Switch set to the left for use in North America pin number 1 2 4 5 polarity direction receive receive transmit transmit Switch set to the right for use in Japan pin number 3 4 5 6 polarity direction transmit receive receive transmit NOTE As stated above the PINOUT switch adjusts the pinout setting for the WIDE AREA 1 port only The default pinout for both ports WIDE...

Страница 17: ...age might result Do not use screws other than those included with the Concentrator s Rackmount Kit to attach the Kit s rackmount brackets to the Concentrator s chassis Wrong sized screws can cause electrical shorts and can physically damage the Concentrator To mount a Remote Access Concentrator in a 19 rack you ll need to attach the brackets from its included rackmount kit to the Concentrator then...

Страница 18: ...nges in these slots and swing the front back in If after you do this the front of a bracket doesn t line up with the Concentrator s faceplate or the screwholes along the top of the side a bracket don t line up with the screwholes on the side of the Concentrator s chassis swing the bracket back out and adjust how the flanges are seated in the slots 4 Using the four included 6 32 x 1 4 inch flathead...

Страница 19: ...ESS CONCENTRATORS 18 5 Fasten the bracketed Concentrator assembly to the vertical frame of a 19 rack using your own mounting screws bolts cage nuts etc as shown below Concentrator in 19 rack Mounting screws Mounting screws ...

Страница 20: ... Refer to the Concentrator s HTML documentation for complete information about this port and its two associated LEDs To attach a console to this port use the included RJ 45 male to male console cable to make the following connection 1 Plug one end of the cable into the Concentrator s console ASYNC port 2 Plug the other end of the cable into the RJ 45 to DB9 adapter that s included with the Concent...

Страница 21: ...TS 7 20 DTR The modem must be configured as follows 9600 bps 8 data bits 1 stop bit no parity Auto answer enabled Drop CD Carrier Detect when calls drop This setting helps prevent security breaches Ignore DTR and RTS NOTES CD DTR and RTS settings may be changed by sending your modem AT commands or sometimes by setting DIP switches Refer to its manual When the modem is connected to the Concentrator...

Страница 22: ...ED When connecting the Concentrator to another hub a common scenario you ll need a crossover cable A standard length RJ 45 crossover cable is included with your Concentrator pinout illustrated below Using this included cable make a LAN connection this way 1 Plug one end of the cable into the Concentrator s LAN ENET port 2 Plug the other end of the cable into the hub or other LAN device Hub Router ...

Страница 23: ...hange those settings To connect the Concentrator s WIDE AREA 1 or WIDE AREA 2 WAN port to a WAN line plug one end of the included RJ 48C RJ 45 style WAN cable into the Concentrator s WAN port then plug the other end of the cable into the WAN line s wall jack as shown below Refer to the Concentrator s HTML documentation for complete information about these ports and their two associated LEDs NOTES ...

Страница 24: ...ound loop from one circuit to the other could pass through the Concentrator and damage it In general we recommend that you plug the two transformers into the same circuit and use uninterruptible power supplies UPSes to guard against failures of site power To connect the Concentrator to AC power take these steps 1 Plug the outlet end of one of the included detachable power cords into one of the Con...

Страница 25: ...pool name and a range of IP addresses for these remote devices Determine the telephone number for the Concentrator network Determine telephone numbers for remote devices if you re configuring the Concentrator for outbound calling For security purposes we advise you to change the Concentrator s default passwords which control access to its Local Management and SNMP as soon as possible Establish new...

Страница 26: ...5 IP address pool name _________________________________ Range of IP addresses in pool ______________________ 6 SNMP community names Read only default public _________________________ Read write default public _________________________ Superuser default public _________________________ Device information 1 Remote device name __________________________________ 2 IP Address _________________________...

Страница 27: ...space bar to toggle between choices If you do not need to save any changes once you are done viewing a menu you may find it quicker to press your keyboard s Esc escape key twice to return to the previous menu instead of tabbing through the entire menu to get to the RETURN option When you access the utility through a the local console port just plug in the cable as directed in Section 3 6 1 and att...

Страница 28: ... which you can enter a number of commands to control the Concentrator s configuration and operation You can also select Fault Records here it s not really a configuration option but it can provide valuable troubleshooting information for Customer Support personnel If you re continually experiencing system problems specific log messages may point you to the Fault Records log please get screen captu...

Страница 29: ...CESS CONCENTRATORS 28 4 3 Module Configuration When you select Module Configuration from the main Local Management menu see Section 4 2 you ll see this screen if the Remote Access Concentrator is set to its default values ...

Страница 30: ...guration Configure an IP LAN interface a default LAN route and up to 10 static LAN routes Configuring these elements allows the Concentrator to function more efficiently in a network containing routers See Section 4 3 1 Optional SNMP Community Names Change your Concentrator s initial default passwords for increased security See Section 4 3 2 Required Authentication Settings Select the device datab...

Страница 31: ... Remote Access Concentrator allows it to function efficiently in a network that includes routers To enter the Concentrator s IP configuration information select IP Configuration from the Module Configuration menu This screen will appear From this menu you can define these parameters for the Concentrator IP LAN Interface Configuring the LAN interface allows the Concentrator to route IP data See Sec...

Страница 32: ...d that if you change the address here the change will also be reflected in the General Configuration menu see Section 4 3 7 3 Enter the Subnet Mask associated with the IP Address The mask bits start at the most significant bit of the IP address and proceed to the least significant bit The mask identifies the LAN subnet to which the Concentrator is directly connected Note that this mask can also be...

Страница 33: ...P updates Choices are RIP2 Only accepts RIP V2 updates compliant with RFC 1723 DO NOT RECEIVE No RIP packets are received 7 Select the RIP Authentication Type This determines the type of authentication the Concentrator uses on the interface Choices are NO AUTH Unauthenticated RIP updates are accepted RIP advertisements are sent without passwords SIMPLE PASSWORD RIP updates that pass an authenticat...

Страница 34: ...tus from DISABLED to one of the following SET TO NEXT HOP With this setting you will need to specify a Next Hop IP address for your default route you ll do this in step 3 SET TO SELF With this setting the Concentrator will ARP directly for all IP addresses for which it does not have a route This requires routers on the Concentrator s LAN segment to have proxy ARP enabled in order for the Concentra...

Страница 35: ...en the Concentrator and the destination The range of metric values for static routes is from 0 to 15 5 Select SAVE and then RETURN to return to the IP Configuration menu You can configure both a default route as described above and static routes see Section 4 3 1 C through the Concentrator itself and you can configure routes on a per device basis through CSM see the CSM documentation or RADIUS A r...

Страница 36: ...LAN has more than one subnet In this case a route for a subnet that is not the same as that of the LAN interface needs to be manually entered with the LAN interface as the Next Hop and a metric of 0 direct delivery A maximum of 10 static LAN routes may be defined To define the Concentrator s static LAN routes 1 Select Static LAN Routes from the IP Configuration Menu This screen will appear 2 Enter...

Страница 37: ...n The range of metric values for static routes is from 0 to 15 6 Select to either enable or disable the static route Use the space bar to toggle between selections If you disable the route the other fields on the screen will remain unchanged allowing you to easily reactivate the route later 7 Repeat steps 2 through 6 for each static LAN route up to 10 routes 8 Select SAVE and then RETURN to return...

Страница 38: ...Module Menu select Module Configuration 2 From the Module Configuration menu select SNMP Community Names This screen will appear The community names correspond to the passwords you enter to access the Concentrator s local management utility and SNMP Note that there are three levels of access read only read write and super user 3 Replace the default password public with your own secure selection Pr...

Страница 39: ...on Note that CSM not only performs traditional authentication tasks it also allows for more advanced policy management and flow accounting Steps 4 through 7 concern CSM and call out functions only if you ve chosen RADIUS as your device database skip to step 8 You ll use the Local Management utility s RADIUS menu to configure the authentication information a shared secret required for the Concentra...

Страница 40: ...ation Protocols to be used for authenticating remote devices By default the Concentrator will authenticate remote devices using CHAP first and PAP second as shown in the example screen You may change the defaults to meet your network s requirements For example if the Concentrator s remote devices only use PAP you will need to change the priority to PAP first and either CHAP or NONE second Choices ...

Страница 41: ...Cs the server addresses are automatically configured when they dial in to the Concentrator Define an IP address pool This allows you to define a simple IP address pool which allows the Concentrator to dynamically allocate IP addresses to remote devices as they dial in The pool is mainly used when the Concentrator s authentication database is a RADIUS server If you re using CSM instead we recommend...

Страница 42: ...41 4 To complete the IP Address Pool Configuration enter a Beginning and Ending address for the IP Address Pool Range and toggle the Enable value to YES 5 Select SAVE and then RETURN to return to the Module Configuration menu ...

Страница 43: ...o the Concentrator by issuing a route command at the device s command prompt For information regarding RADIUS Client features supported by the Concentrator s software see Section 4 3 5 C To configure RADIUS information on the Concentrator 1 Select Module Configuration from the Local Management utility s Module Menu 2 Select RADIUS from the Module Configuration menu This screen will appear 3 If you...

Страница 44: ...mation for RADIUS authentication servers take these steps 1 Select Authentication Servers from the RADIUS menu This menu will appear 2 Use the space bar to toggle the Primary Server s Status to ENABLED 3 Enter the IP Address of the primary server 4 Enter the Shared Secret between the Concentrator and the primary server 5 Enter the UDP Port Number used by the server The UDP port number defaults to ...

Страница 45: ...s request retry if the server does not respond Once the configured number of access request retries has been reached the Concentrator will request authentication information from the secondary server if one is configured If there is no secondary server configured or if the secondary server also fails to respond to the access requests the connection will be released 8 Specify the Seconds between Re...

Страница 46: ...IUS accounting servers take these steps 1 Select Accounting Servers from the RADIUS menu This screen will appear 2 Use the space bar to toggle the Primary Server s Status to ENABLED 3 Enter the IP Address of the primary server 4 Enter the Shared Secret between the Concentrator and the primary server 5 Enter the UDP Port Number used by the server The UDP port number defaults to 1813 because this is...

Страница 47: ...y if the server does not respond Once the configured number of accounting request retries has been reached the Concentrator will start sending accounting requests to the secondary server if one is configured If there is no secondary server configured or if the secondary server also fails to respond to the accounting requests no accounting data will be logged 8 Specify the Seconds between Retries T...

Страница 48: ...y described in RFC 2138 and RFC 2139 Table 4 2 Supported RADIUS Packet Attributes ID Attribute Name Comments 1 User Name In Access Request and Accounting Request Currently this is always the device name 2 User Password In Access Request 3 CHAP Password In Access Request 4 NAS IP Address In Access Request and Accounting Request 5 NAS Port In Access Request and Accounting Request The NAS Port attrib...

Страница 49: ...er 22 Framed Route Up to five routes can be specified for a remote device This attribute contains a destination prefix in dotted quad form optionally followed by a slash and a decimal length specifier stating how many high order bits of the prefix should be used That is followed by a space a gateway address in dotted quad form another space and a metric An example of this full form would be 192 16...

Страница 50: ...on Time This attribute indicates how many seconds the user has received service for and can only be present in Accounting Request records where the Acct Status Type ID 40 is set to Stop 47 Acct Input Packets In Accounting Request packet Number of packets received on the port 48 Acct Output Packets In Accounting Request packet Number of packets sent on port 49 Acct Terminate Case May be sent in Acc...

Страница 51: ... data in the E1 multiframe to perform line signaling line seizure and clearing then uses in band signaling forward and backward compelled tones to exchange call setup information To activate R2 signaling you must enable Channel Associated Signaling CAS through the Concentrator s Network Tools interface see Section 4 4 and then configure CAS through the Module Configuration menu Take these steps 1 ...

Страница 52: ...CHAPTER 4 Configuration 51 4 Select Module Configuration from the Local Management utility s Module Menu The screen below will appear ...

Страница 53: ...enabled in Network Tools and the system has been rebooted Select CAS Configuration This screen will appear Note that the Number of CAS Lines is not changeable through this menu Its value is equal to the number of lines you set for bit oriented signaling in step 2 6 Press the space bar as necessary to toggle Protocol to your desired R2 setting R2 ITU for example 7 Save any changes before proceeding...

Страница 54: ...t Count appears as ENABLED in this menu you may change the count s value If it appears as DISABLED digit counting is not enforced for the protocol you ve selected other mechanisms are used to know when the phone number is complete 9 Save any changes you have made and return to the previous menu Note that a channel associated signaling resource does not have an ISDN Layer 2 so you will not see a Da...

Страница 55: ...ee Section 4 4 and then configure CAS through the Module Configuration menu Take these steps 1 From Local Management s Module Menu select Network Tools The Network Tools command prompt appears Network Tools is command line driven 2 At the Network Tools prompt set the line s signal mode to robbed bit by typing in the command wanl1p signalmode robbedBit port replacing the variable port with the actu...

Страница 56: ...CHAPTER 4 Configuration 55 4 Select Module Configuration from the Local Management utility s Module Menu The screen below will appear ...

Страница 57: ...enabled in Network Tools and the system has been rebooted Select CAS Configuration This screen will appear Note that the Number of CAS Lines is not changeable through this menu Its value is equal to the number of lines you set for bit oriented signaling in step 2 6 Press the space bar as necessary to toggle Protocol to your desired RBS setting RBSUS for example 7 Save any changes before proceeding...

Страница 58: ...expect calls to carry so it affects how every call is connected on this line As it s shipped from the factory the Concentrator s Default Info Type is SPEECH We don t recommend selecting anything other than SPEECH unless you know that your configuration requires a different selection if every single one of your calls will be data calls for example 10 Save any changes you have made and return to the...

Страница 59: ... the Local Management utility s Module Menu 2 Select General Configuration from the Module Configuration menu This screen will appear 3 Enter Module Date and Time information 4 Enter the Concentrator s IP Address if you re using CSM you ll need to enter this in CSM as well see Section 5 2 2 Note that you can also set the address in the Concentrator s IP LAN Interface screen see Section 4 3 1 A if ...

Страница 60: ... enter its IP address in the TFTP Gateway IP field Note that you can also set this address in the Concentrator s Flash Download screen see Section 4 3 8 if you change this address here the change will be automatically reflected in that screen and vice versa 7 Verify the entered information then select SAVE The Concentrator will automatically reboot so that the changes take effect immediately ...

Страница 61: ...rator and the TFTP server are on different logical subnets even if they re on the same physical subnet In this case a gateway router is required and you ll have to configure a TFTP Gateway Server IP address refer to step 5e Note that you can also set this address in the Concentrator s General Configuration screen see Section 4 3 6 if you change the address here the change will be automatically ref...

Страница 62: ... TFTP server is not on the same LAN as your Concentrator you will need to provide its gateway IP address in the TFTP Gateway Server field 11 After verifying the information you ve provided click Execute The Concentrator will immediately reboot and perform an off line upgrade This will take about four minutes The exact time might vary due to differences in network speed 12 When the process is compl...

Страница 63: ...d in the table to configure your Concentrator for the line You must make any necessary changes to these settings before plugging the Concentrator s WAN cable into the WAN line Table 4 3 Line Specifications and Their Network Tools Commands Line Specification T1 Default E1 Default Corresponding Value Value Network Tools Command Encoding B8ZS HDB3 wanl1p linecode Framing ESF E1 CRC wanl1p linetype Li...

Страница 64: ...e Fault Records screen will display a message stating No Records Stored NO ENTRIES ARE CONTAINED IN THE MESSAGE QUEUE If problems exist however the No Records message may be replaced with a screen display like this There are several things to note about this screen Each fault record is identified by an index number In our example the index number is zero Index 0 The latest fault is always displaye...

Страница 65: ...blems arise with the Concentrator take these steps 1 Get screen captures of both the main screen Fault Records and the Frame Logs Register Set Log for each entry 2 Get screen captures of the results of the initial log in screen and inv command output 3 Forward this information to Black Box Tech Support When you no longer need the current set of Fault Records use the CLEAR LOG screen option to empt...

Страница 66: ...is not a concern with PCs and other types of devices that use Windows Dialup to connect to the Concentrator because unlike routers they don t request the Concentrator s authentication information for outbound communication For instructions on and illustrated examples of specific applications Refer to Section 4 6 1 for instructions on using static routes for connecting to subnets reachable through ...

Страница 67: ...ng that you re using CSM configure the static route in CSM under Router 2 s IP information Note that this static route does not include a next hop because CSM s static routes assume that the remote device is the next hop The Concentrator advertises routes locally so unless Router 1 does not support RIP or has RIP disabled no static routes should be needed for Router 1 to reach the 3 3 3 x subnet A...

Страница 68: ...ddress from one of the authentication application s IP address pools Remote host 2 2 2 10 to device behind local router 3 3 3 1 1 Configure the remote host as a device in the authentication database 2 Enable RIP on the Concentrator and on Router 1 on the 2 2 2 x interface Remote host 2 2 2 10 to Internet through locally attached router 1 Configure the remote host as a device in the authentication ...

Страница 69: ...et with the Concentrator listed as the next hop device Device 4 4 4 1 behind remote router to device 3 3 3 1 behind local router 1 Configure Router 3 as a device in the authentication database 2 Configure a static route to subnet 4 4 4 x through Router 3 in the authentication database 3 Configure Router 3 with a WAN Unnumbered interface to the Concentrator 4 On Router 3 configure a static route to...

Страница 70: ...a static route to subnet 0 0 0 0 through Router 3 in the authentication database This will act as the default route for the Concentrator when Router 3 is connected 3 Configure Router 3 with a WAN Unnumbered interface to the Concentrator 4 On Router 3 configure a static route to the 2 2 2 x subnet with the Concentrator listed as the next hop device 5 Configure remote host 2 2 2 10 as a device in th...

Страница 71: ...IUS 1 Configure the Concentrator with an IP address of 1 1 1 3 and a subnet mask of 255 0 0 0 2 Configure remote hosts 1 1 1 2 2 2 2 2 and 3 3 3 2 as devices in the authentication database 3 Configure a static LAN route with a destination IP address of 2 0 0 0 a subnet mask of 255 0 0 0 a next hop address of 1 1 1 3 and a metric of 0 4 Configure a static LAN route with a destination IP address of ...

Страница 72: ...tabase specifically designed for use with the Remote Access Concentrator To install it you ll need to do these things Install Microsoft SQL Server software If you re using Windows 95 Install DCOM95 The function of this software is already built into Windows 98 2000 and NT Set up the ODBC driver Install the CSM software Install the CSM database If you re using Windows NT 4 0 or higher Install the N...

Страница 73: ...oncentrator s Worksheet see Section 4 1 3 Determine whether or not you will use the Concentrator to initiate calls If the Concentrator will initiate calls you must assign permanent IP addresses to all remote devices receiving calls If the Concentrator does not need to initiate calls you may use an IP address pool for remote devices When these things are ready decided you can configure CSM for your...

Страница 74: ...vices instead Skip ahead to Section 5 2 2 To establish a pool in CSM take these steps 1 From the CSM Connection Manager select Configure on the menu bar 2 Select IP Information 3 Enter a unique user defined IP Pool Name 4 Enter a Start IP Address The Start IP Address field designates the beginning of a range of IP addresses used by this Access Server the Concentrator The Concentrator in turn will ...

Страница 75: ...e field select LRA3000 7 Provide authentication information Supply both a CSM Secret which applies to CSM only and a System Secret unique to the Concentrator These values must be the same as those you ve configured through the Concentrator s Local Management utility see Section 4 3 3 8 Select the Access tab and change these settings as necessary or desired If you plan to use an IP address pool pro...

Страница 76: ...ack phone numbers for these devices These values should be readily available if you recorded them on a copy of the Concentrator s Worksheet see Section 4 1 Take these steps to perform remote device configuration in CSM 1 From the CSM Connection Manager select Configure on the menu bar 2 Select Devices 3 Select Add to add a device 4 Under the Address tab specify a name for the remote device 5 Under...

Страница 77: ...ddress pooling for this device You may configure multiple telephone numbers for a remote device the Concentrator will call these numbers in the order they were configured 9 Return to the Protocols tab and enable Callable You may check the Callable box only after you ve provided the telephone number for the device in step 8 10 Click Update Refer to the CSM User Documentation if you need more detail...

Страница 78: ...to upgrade the firmware using CSM 1 With a TFTP server This upgrade method requires the least amount of configuration and should be used under normal circumstances although to protect against the rare occurrence of the Concentrator going down you may want to leave a TFTP BootP server running in the background see 2 below for complete reliability This method is described in Section 5 3 1 2 With a T...

Страница 79: ...rade archive file onto the TFTP server If this file is zipped unzip it if it s a self extracting executable that is if it has a EXE file extension run it to extract the firmware file s it contains Make sure that all of the unzipped extracted files are in the same folder or directory 5 On the CSM Connection Manager click the Configure menu then select Access Server 6 Double click the entry for the ...

Страница 80: ...eck the entry in the Currently Running box to see if the release number for the new firmware upgrade is displayed If the new release is not what is currently running check the information you entered for correctness Make sure the new firmware upgrade was indeed copied successfully to the TFTP server 13 Verify the process by checking the TFTP log to see if all files were downloaded properly You may...

Страница 81: ...py the firmware upgrade archive file onto the TFTP BootP server If this file is zipped unzip it if it s a self extracting executable that is if it has a EXE file extension run it to extract the firmware file s it contains Make sure that all of the unzipped extracted files are in the same folder or directory 5 Get the Concentrator s MAC address from the General Configuration menu of the Concentrato...

Страница 82: ...download After waiting several minutes click Refresh then check the entry in the Currently Running box to see if the release number for the new firmware upgrade is displayed If the new release is not what is currently running check the information you entered for correctness Make sure the new firmware upgrade was indeed copied successfully to the TFTP server 16 Verify the process by checking the T...

Страница 83: ...ork using IP protocol through an analog modem or an ISDN terminal adapter a remote device This configuration is commonly used by telecommuters with a Windows Dial up Networking client and is often referred to as IP Host mode The remote device has no Layer 2 address Rather it is a Layer 3 only device connected to the end station typically through a serial port The Remote Access Concentrator and the...

Страница 84: ...ws 2000 or Windows NT Dial Up Networking connections through its digital modems This particular example illustrates Win95 Dial Up Networking however the same setup principles apply to Windows 98 Windows 2000 and Windows NT as well If you re using Windows 95 Dial Up Networking it must be release 1 2 or higher For best results we recommend using V 90 compatible modems with the latest modem drivers f...

Страница 85: ...et CSM_sec for the CSM service 3 Provide the Concentrator s System Name Conc_LRA3 System Secret LRA3_sec and System Password LRA3_pw These values correspond to the values we will enter on the CSM 4 Select Save and then Return to go back to the Module Configuration menu 5 Next select PPP Settings 6 Provide primary and secondary DNS and NBNS addresses This will allow the Concentrator to supply the W...

Страница 86: ...efined IP pool name LRA3_ip_pool 3 Enter a Start IP Address of 2 2 2 11 4 Enter an End IP Address of 2 2 2 25 Note that this range of addresses is limited to the same subnet and that the number of addresses 15 does not exceed the number of available ISDN connections 23 5 Click Create New Pool 6 From Configure on the menu bar select Access Servers 7 Click Add to configure CSM for the Concentrator T...

Страница 87: ...T1 AND E1 REMOTE ACCESS CONCENTRATORS 86 14 Under the Access tab Authentication a Select PPP as Layer 2 Protocol b Enable Authentication c Enter the CHAP secret secret1 15 Click Add to add the device ...

Страница 88: ...ay remain at their default values Also under the Connection tab the Call Preferences may remain at their default values The Options tab should remain at its default values for PPP connections 4 Click OK to accept these values and return you to the modem name type screen Click Next 5 Provide the area code and phone number of the Concentrator s network along with any other prefixes needed to obtain ...

Страница 89: ...TE ACCESS CONCENTRATORS 88 12 Optional If necessary change the settings of any dialing properties for this connection by clicking the box labeled Dialing Properties 13 Double click Connect This should place the call ...

Страница 90: ... 6 1 NAT is an IP address conversion feature managed by the remote router that allows one to many one or more end stations to share a single IP address to the Internet thus reducing connection costs and address management hassles NAT effectively allows an entire subnet to connect to the Internet as a single remote user PSTN Local Network Remote Network local addresses from DHCP server Internet Int...

Страница 91: ...e requires proper setup of The Concentrator see Section 6 2 1 CSM see Section 6 2 2 and The IP Router Router2_nat see Section 6 2 3 Standard PAP CHAP CLID authentication options are supported The remote router Router2_nat will use an IP address pool to obtain an IP address for its connection The remote end stations will have local IP addresses on the subnet assigned by Router2 s DHCP server The Co...

Страница 92: ...0dB 1 wanl1p linebuildout 15 0dB 2 where 1 at the end of the first command represents the WIDE AREA 1 port and the 2 at the end of the second command represents the WIDE AREA 2 port Both commands must be entered in order to make the change on both interfaces 4 Because the Concentrator s defaults for the other line information values are acceptable for this application we can enter the exit command...

Страница 93: ...r a Start IP Address of 2 2 2 11 4 Enter an End IP Address of 2 2 2 25 Note that this range of addresses is limited to the same subnet and that the number of addresses 15 does not exceed the number of available ISDN connections 23 5 Click Create New Pool 6 From Configure on the menu bar select Access Servers 7 Click Add to configure CSM for the Concentrator This will place you in the Properties wi...

Страница 94: ...CHAPTER 6 Applications 93 14 Under the Access tab Authentication a Select PPP as Layer 2 Protocol b Enable Authentication c Enter the CHAP secret secret1 15 Click Add to add the device ...

Страница 95: ...ing outbound authentication enabled creates a security gap Someone could assume the identity of the Concentrator by using information captured during outbound authentication Defining a remote connection to the Concentrator The last item defining a remote connection consists of these separate tasks Adding a remote connection Provide the Concentrator s name Conc_LRA3 and password LRA3_pw Entering th...

Страница 96: ...es you will have fixed IP addresses assigned to the remote end station and the remote device router In this configuration the Concentrator will have dial out capabilities DHCP relay and proxy are not supported PSTN Remote Network Local Network Internet Intranet Concentrator Router1 Router2 2 2 2 6 Server Running CSM 2 2 2 5 1 1 1 1 1 1 1 2 2 2 2 3 2 2 2 1 unnumbered 2 2 2 2 2 2 2 4 unnumbered ...

Страница 97: ...ecret2 secret3 IP address for Device 2 2 2 2 1 1 1 1 Phone Number for Device N A 888 555 4321 This example requires proper setup of The Concentrator see Section 6 3 1 CSM see Section 6 3 2 and The remote IP Router Router2 see Section 6 3 3 The Concentrator must have a static IP address The remote router Router2 must have a static IP address and a static route configured to the Concentrator Its def...

Страница 98: ...hypothetical network 1 From the Module Menu select Module Configuration 2 From the Module Configuration menu first select Authentication Settings 3 Provide the CSM Secret CSM_sec for the CSM service 4 Provide the Concentrator s System Name Conc_LRA3 System Secret LRA3_sec and System Password LRA3_pw These values correspond to the values we will enter on the CSM 5 Select Save and then Return to go ...

Страница 99: ...ace you in the Properties window a Under Name enter Conc_LRA3 b Provide the Concentrator s IP address 2 2 2 1 c In the Access Server Type field select LRA3000 d Provide authentication information the CSM Secret CSM_sec and System Secret LRA3_sec These values correspond to the values we already entered on the Concentrator see Section 6 1 1 3 Select the Demand Access tab Skip the IP Pool section bec...

Страница 100: ... 12 Under the Telephone tab specify ISDN as the Connect Type 13 Provide Router2 s telephone number Click Add and then enter the number 9 1 888 555 4321 14 Return to the Protocols tab and enable Callable We may check the Callable box only after we ve provided the telephone number for the device in the previous step 15 Click Update and then Close to exit ...

Страница 101: ...n Leaving outbound authentication enabled creates a security gap Someone could assume the identity of the Concentrator by using information captured during outbound authentication Defining a remote connection to the Concentrator The last item defining a remote connection consists of these separate tasks Adding a remote connection Provide the Concentrator s name Conc_LRA3 and password LRA3_pw Enter...

Страница 102: ...ple PC end stations on a remote subnet need to connect to the local network using an ISDN bridge PSTN Remote Subnet Local Network Internet Intranet Concentrator Router1 Bridge 2 2 2 9 Server Running CSM 2 2 2 8 2 2 2 7 2 2 2 5 2 2 2 6 2 2 2 3 2 2 2 1 2 2 2 2 2 2 2 4 ...

Страница 103: ...ator password LRA3_pw Remote Device Name RBridge Secret password for Device secretbr IP Address for Device N A Phone Number for Device N A This example requires proper setup of The Concentrator see Section 6 4 1 CSM see Section 6 4 2 and The ISDN bridge This part is very simple Configure the device as a simple bridge and provide the Concentrator network s phone number 555 555 1234 Standard PAP CHA...

Страница 104: ...ur hypothetical network 1 From the Module Menu select Module Configuration 2 From the Module Configuration menu first select Authentication Settings 3 Provide the CSM Secret CSM_sec for the CSM service 4 Provide the Concentrator s System Name Conc_LRA3 System Secret LRA3_sec and System Password LRA3_pw These values correspond to the values we will enter on the CSM 5 Select Save and then Return to ...

Страница 105: ...llowing steps 1 From Configure on the CSM Connection Manager menu bar select Access Servers 2 Click Add to configure CSM for the Concentrator This will place you in the Properties window a Under Name enter Conc_LRA3 b Provide the Concentrator s IP address 2 2 2 1 c In the Access Server Type field select LRA3000 d Provide authentication information the CSM Secret CSM_sec and System Secret LRA3_sec ...

Страница 106: ...empt to alter or repair the unit It contains no user serviceable parts Contact Black Box Technical Support at 724 746 5500 Before you do make a record of the history of the problem We will be able to provide more efficient and accurate assistance if you have a complete description including the nature and duration of the problem when the problem occurs the components involved in the problem any pa...

Страница 107: ...NOTES ...

Страница 108: ...NOTES ...

Страница 109: ...NOTES ...

Страница 110: ...1000 Park Drive Lawrence PA 15055 1018 724 746 5500 Fax 724 746 0746 Copyright 2000 Black Box Corporation All rights reserved ...

Отзывы: