background image

21

CHAPTER 4: Configuring Your PC

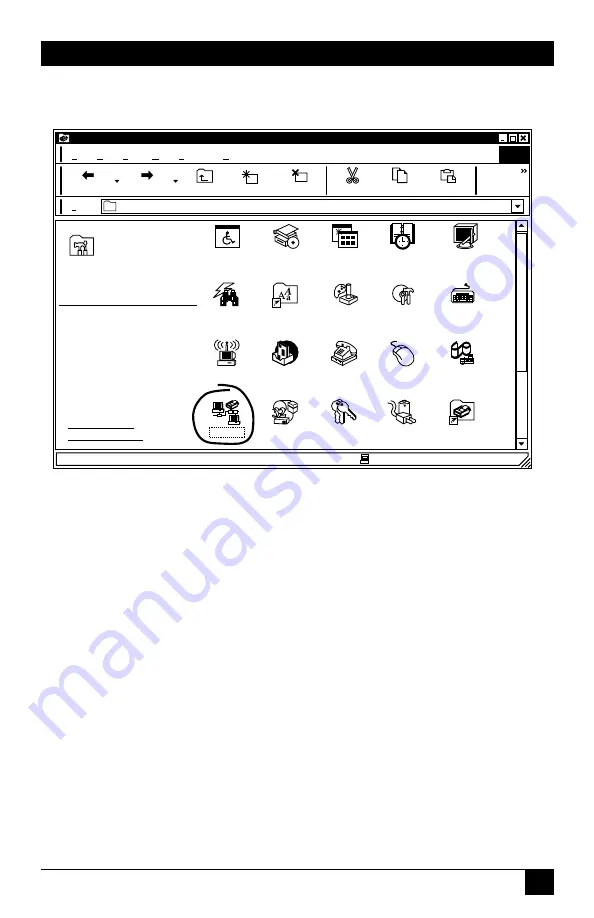
2. From Control Panel, double-click the Network icon.

Figure 4-2. Control Panel, Network icon.

Control Panel

Control Panel

File  Edit  View  Go  Favorites  Help

Address

Back

Forward

Up

Map Drive

Disconnect

Cut

Copy

Control
Panels

My Computer

Paste

Back

Forward

Find Fast

LiveUpdate

MailMul

timedia

ODBC Date

Sources (32bit)

Passwords

26 Object(s)

Use the settings in
Control Panel to
personalize your
computer.

Select an ditem to view its
description.

Microsoft Home
Technical Support

Accessibility

Options

Add New

Hardware

Add/Remove

Programs

Date/Time

1 2

Display

Fonts

Keyboard

Internet
Options

Game

Controllers

Mouse

Network

Modems

Power

Management

Printers

Содержание LR9501A

Страница 1: ...1000 Park Drive Lawrence PA 15055 1018 724 746 5500 Fax 724 746 0746 Copyright 2002 Black Box Corporation All rights reserved...

Страница 2: ...6 5500 FREE technical support 24 hours a day 7 days a week Call 724 746 5500 or fax 724 746 0746 Mailing address Black Box Corporation 1000 Park Drive Lawrence PA 15055 1018 Web site www blackbox com...

Страница 3: ......

Страница 4: ...is operated in a commercial environment Operation of this equipment in a residential area is likely to cause interference in which case the user at his own expense will be required to take whatever m...

Страница 5: ...rato el ctrico debe ser montado a la pared o al techo s lo como sea recomendado por el fabricante 8 Servicio El usuario no debe intentar dar servicio al equipo el ctrico m s all a lo descrito en las i...

Страница 6: ...r una antena externa deber ser localizada lejos de las lineas de energia 16 El cable de corriente deber ser desconectado del cuando el equipo no sea usado por un largo periodo de tiempo 17 Cuidado deb...

Страница 7: ...ies Linux is a registered trademark of Linus Torvalds Mac and Macintosh are registered trademarks of Apple Computer Inc Netscape and Netscape Navigator are registered trademarks of Netscape Communicat...

Страница 8: ...y Server 36 4 2 3 Step 3 Obtain IP Settings from Your Broadband Router 39 4 3 Configuring Your PC with Windows NT 4 0 41 4 3 1 Step 1 Configure TCP IP Settings 41 4 3 2 Step 2 Disable Proxy Server 46...

Страница 9: ...Server for Windows 95 98 Me 2000 and Windows NT 79 7 1 1 Step 1 Installing the Broadband Router s Print Server Monitor 79 7 1 2 Step 2 Configuring the Broadband Router s Print Server Monitor 82 7 2 Co...

Страница 10: ...manual If anything is missing or damaged return the package to its place of purchase SYSTEM REQUIREMENTS A broadband modem PC s with the TCP IP protocol installed Category 5 Ethernet cables with RJ 45...

Страница 11: ...cable NOTE An ISDN terminal adapter TA or dial up modem may be connected to the Broadband Router as an alternate method of Internet access Please refer to Section 6 4 for directions on using configuri...

Страница 12: ...guration 1 Perform TCP IP Setup for each PC as described in the PC Setup section on page 13 Remember to restart each PC when finished 2 Start your Web browser In the Address box enter the following ht...

Страница 13: ...ting CONNECTION CONFIGURATION FOR DSL SERVICE USERS Most DSL service providers supply users with a dynamic IP address but require that a valid username and password be entered first This method is kno...

Страница 14: ...status says Connected If it says Connected you have successfully obtained an IP address from your DSL service provider You may proceed with using the router and Internet service as desired If it says...

Страница 15: ...de menu and choose WAN from the expanded menu 9 Select Dynamic IP Address and press Enter 10 Press the Clone MAC Address button 11 Press Enter 12 Wait approximately ten seconds then click the Status l...

Страница 16: ...ide an IP address for the PC 4 Press OK twice then restart your PC even if no changes were made INTERNET ACCESS 1 Select Start Menu Settings Control Panel Internet Options 2 Select the Connections tab...

Страница 17: ...a secondary WAN port Print Server Internet Standards ARP RFC 826 IP RFC 791 ICMP RFC 792 USP RFC 768 TCP RFC 793 Telnet RFC 854 859 MD5 RFC 1321 BOOTP Extension RFC 1497 PPP LCP Extension RFC 1570 PPP...

Страница 18: ...ers The Broadband Router provides the following wide array of advanced features Instant Internet sharing Firewall security Simultaneous Web access for up to 253 PCs Built in 10 100 Mbps switch Integra...

Страница 19: ...u have the following A computer with an Ethernet network card installed Your Windows CD if your computer is running Windows 95 98 or Me An Internet connection through a cable or DSL modem or an extern...

Страница 20: ...to that device Figure 3 1 The front panel The ports on the Router support automatic MDI MDI X This means that you can use standard straight through Ethernet cables to connect these ports to PCs or ser...

Страница 21: ...front panel provides indicator LEDs for easy monitoring Table 3 1 describes the function of each LED Table 3 1 LED functions LED Condition Status Power Steadily on Green The Router is receiving power...

Страница 22: ...ws Millennium Edition are very similar but not identical to Windows 98 4 1 1 STEP 1 CONFIGURE TCP IP SETTINGS After you have completed the hardware setup see Chapter 3 you need to configure your compu...

Страница 23: ...20 BROADBAND ROUTER Follow these steps 1 From the Windows desktop select the Start button Choose Settings then Control Panel Figure 4 1 Settings Control Panel tab...

Страница 24: ...ntrol Panels My Computer Paste Back Forward Find Fast LiveUpdate Mail Multimedia ODBC Date Sources 32bit Passwords 26 Object s Use the settings in Control Panel to personalize your computer Select an...

Страница 25: ...22 BROADBAND ROUTER 3 In the Network window under the Configuration tab double click the TCP IP entry that is listed with your network card Figure 4 3 Network window Configuration tab TCP IP entry...

Страница 26: ...eady configured for DHCP Record the IP address and subnet mask in the spaces provided on page 26 under TCP IP Configuration Setting Press Cancel to close each window and skip to Section 4 1 2 If Speci...

Страница 27: ...24 BROADBAND ROUTER 5 Select the Gateway tab and record the numbers listed under Installed gateways Then press OK Figure 4 5 TCP IP Properties menu Gateway tab...

Страница 28: ...n Setting Figure 4 6 TCP IP Properties menu DNS Configuration tab 7 After writing down your settings re check all addresses to make sure you have recorded them correctly Select the IP Address tab and...

Страница 29: ...Mask ____ ____ ____ ____ Primary DNS Server ____ ____ ____ ____ Secondary DNS Server ____ ____ ____ ____ Default Gateway ____ ____ ____ ____ Host Name ____________________ 4 1 2 STEP 2 DISABLE PROXY...

Страница 30: ...lorer and press the Stop button Select Tools then Internet Options Figure 4 8 Microsoft Internet Explorer screen Internet Options tab 2 In the Internet Options window select the Connections tab Press...

Страница 31: ...boxes Figure 4 10 Clearing the check boxes 4 Click OK and then click OK again to close the Internet Options window Netscape Navigator 1 Open Netscape and press the Stop button Select Edit then Prefere...

Страница 32: ...ow under Category double click Advanced then click on Proxies Select Direct connection to the Internet Press OK Figure 4 12 Selecting Direct Connection to the Internet 3 Repeat these steps for each Wi...

Страница 33: ...new network settings By releasing any old IP settings and renewing them with settings from your Broadband Router you will also verify that you have configured your computer correctly 1 From the Window...

Страница 34: ...d Router please go to Chapter 6 4 2 Configuring Your PC with Windows 2000 4 2 1 STEP 1 CONFIGURE TCP IP SETTINGS After you have completed the hardware setup see Chapter 3 you need to configure your co...

Страница 35: ...32 BROADBAND ROUTER Follow these steps 1 From the Windows desktop select the Start button Choose Settings then Control Panel Figure 4 16 Control panel...

Страница 36: ...Use the settings in Control Panel to personalize yourcomputer Select an ditem to view its description Windows Update Windows 2000 Support Accessibility Options Add Remove Hardware Display Fonts Keybo...

Страница 37: ...34 BROADBAND ROUTER 4 Select Properties Figure 4 19 Properties 5 Double click Internet Protocol TCP IP Figure 4 20 Internet Protocol TCP IP...

Страница 38: ...erties box Obtain an IP address automatically and Obtain DNS server address automatically are already selected by default Your computer is already configured for DHCP Press Cancel to close each window...

Страница 39: ...ill enable your Web browser to view the configuration pages inside your Broadband Router Determine whether you re using Internet Explorer or Netscape Navigator and follow the appropriate steps Interne...

Страница 40: ...37 CHAPTER 4 Configuring Your PC 2 In the Internet Options window select the Connections tab Press the LAN Settings button Figure 4 23 Connections tab LAN Settings button...

Страница 41: ...boxes Figure 4 24 Clearing the check boxes 4 Click OK and then click OK again to close the Internet Options window Netscape Navigator 1 Open Netscape and press the Stop button Select Edit then Prefere...

Страница 42: ...3 Repeat these steps for each Windows 2000 computer connected to your Broadband Router 4 2 3 STEP 3 OBTAIN IP SETTINGS FROM YOUR BROADBAND ROUTER Now that you have configured your computer to connect...

Страница 43: ...om the Windows desktop press the Start button then Programs then Accessories then Command Prompt Figure 4 27 Command Prompt 2 In the Command Prompt window type IPCONFIG RELEASE Press Enter Figure 4 28...

Страница 44: ...Chapter 6 4 3 Configuring Your PC with Windows NT 4 0 4 3 1 STEP 1 CONFIGURE TCP IP SETTINGS After you have completed the hardware setup see Chapter 3 you need to configure your computer to connect t...

Страница 45: ...el Figure 4 30 Settings Control Panel tab 2 From the Control Panel double click the Network icon Figure 4 31 Control panel Network icon File Edit View Help Control Panel Date Time 1 2 Add Remove Progr...

Страница 46: ...43 CHAPTER 4 Configuring Your PC 3 Select the Protocols tab Figure 4 32 Protocols tab 4 Double click TCP IP Protocol...

Страница 47: ...dy be selected Your computer is already configured for DHCP Record these values in the space provided on page 46 under TCP IP Configuration Setting Press Cancel to close each window and skip to Sectio...

Страница 48: ...re 4 34 TCP IP Properties screen DNS tab 9 After writing down your IP settings re check them Click the IP Address tab Make sure Obtain an IP address from a DHCP server is selected and press OK Press O...

Страница 49: ...SERVER You will need to verify that the proxy feature of your Web browser also known as HTTP Proxy is disabled This will enable your Web browser to view the configuration pages inside your Broadband R...

Страница 50: ...47 CHAPTER 4 Configuring Your PC 2 In the Internet Options window select the Connections tab Press the LAN Settings button Figure 4 36 Connections tab LAN Settings button...

Страница 51: ...boxes Figure 4 37 Clearing the check boxes 4 Click OK and then click OK again to close the Internet Options window Netscape Navigator 1 Open Netscape and press the Stop button Select Edit then Prefere...

Страница 52: ...3 Repeat these steps for each Windows NT computer connected to your Broadband Router 4 3 3 STEP 3 OBTAIN IP SETTINGS FROM YOUR BROADBAND ROUTER Now that you have configured your computer to connect t...

Страница 53: ...TER 1 From the Windows desktop press the Start button then Programs then Command Prompt Figure 4 40 Command Prompt 2 In the Command Prompt window type IPCONFIG RELEASE Press Enter Figure 4 41 IPCONFIG...

Страница 54: ...192 168 2 xxx your subnet mask is 255 255 255 0 and your default gateway is 192 168 2 1 These values confirm that your Broadband Router is functioning 4 Type EXIT Press Enter to close the Command Prom...

Страница 55: ...our computer to connect to your Broadband Router You ll need to determine how your Internet Service Provider ISP issues your IP address Many ISPs issue these numbers automatically using a networking t...

Страница 56: ...en Using DHCP Server should already be selected in the Configure field If it s not select it now Your computer is already configured for DHCP All the information that you need to record is on the TCP...

Страница 57: ..._ ____ ____ Router Address ____ ____ ____ ____ Name Server Address ____ ____ ____ ____ 5 2 Step 2 Disable Proxy Server You will need to verify that the proxy feature of your Web browser also known as...

Страница 58: ...er 1 Open Internet Explorer and press the Stop button Select Edit then Preferences Figure 5 4 Edit Preferences 2 In the Internet Explorer Preferences window under Network select Proxies Figure 5 5 Pre...

Страница 59: ...elect Edit then Preferences Figure 5 6 Edit menu Preferences option 2 In the Preferences dialog box in the left hand column labeled Category select Advanced Under the Advanced category select Proxies...

Страница 60: ...er to connect to your Broadband Router it needs to obtain new network settings By releasing any old IP settings and renewing them with settings from your Broadband Router you will also verify that you...

Страница 61: ...is now 192 168 2 xxx your subnet mask is 255 255 255 0 and your Router Address is 192 168 2 1 These values confirm that your Broadband Router is functioning Figure 5 9 TCP IP screen 3 Close the TCP IP...

Страница 62: ...uter and retrieved your new network settings from your Broadband Router you are ready to configure the Router s settings for your LAN 1 Open your Web browser Internet Explorer or Netscape Navigator an...

Страница 63: ...ield empty and press Login There is no password by default For security reasons you should assign a password as soon as possible Note that the password login is case sensitive Figure 6 2 Login screen...

Страница 64: ...start the process Figure 6 4 Setup screen Using a password can protect your Broadband Router from unauthorized changes Not using a password can easily leave your Router and your network open to secur...

Страница 65: ...rd in the Current Password field If you have not yet set a password leave it blank Choose a password for your Broadband Router and enter it in the next two fields New Password and Re Enter Password fo...

Страница 66: ...your time zone from the list and press Enter Figure 6 6 Time Zone screen 9 The LAN screen is where you configure the LAN Local Area Network settings of your Broadband Router These settings will only b...

Страница 67: ...address screen By using the Broadband Router s built in DHCP Dynamic Host Control Protocol server you are allowing the Router to handle all the IP addressing on your Local Area Network LAN This can sa...

Страница 68: ...e sure the first three octets match the Broadband Router s IP address that is 192 168 2 xxx through 192 168 2 yyy A Domain Name Server DNS is like an index of names and Web addresses If you type a Web...

Страница 69: ...a cable modem your ISP probably uses DHCP to issue an IP address to you If you use a cable modem or you know you use a dynamic IP address please go to Section 6 1 If you connect to the Internet using...

Страница 70: ...6 Configuring Your Broadband Router 6 1 Configuring Your Broadband Router for a Dynamic IP Address 1 Select Dynamic IP Address and press More Configuration Figure 6 9 Dynamic IP Address More Configura...

Страница 71: ...gister the MAC Address of your network card A MAC Media Access Control Address is a unique identification number in hexadecimal digits given to each networking device Once registered the ISP s server...

Страница 72: ...ver for speed and convenience Since you are connecting to the Internet with dynamic IP settings it is likely that your DNS servers are also provided dynamically 6 Press Enter when finished 7 Restart y...

Страница 73: ...70 BROADBAND ROUTER 6 2 Configuring Your Broadband Router for a Static IP Address 1 Select Static IP Address and press More Configuration Figure 6 12 Static IP Address More Configuration...

Страница 74: ...dress subnet mask and gateway address provided to you by your ISP in the appropriate fields You recorded these numbers earlier when you configured your computer to connect to the Broadband Router Figu...

Страница 75: ...ttings it is likely that your ISP also provided DNS server addresses 5 Press Enter when finished 6 Restart your DSL modem by removing the power waiting a few seconds and then reconnecting it Many ISPs...

Страница 76: ...73 CHAPTER 6 Configuring Your Broadband Router 6 3 Configuring Your Broadband Router for PPPoE 1 Select PPP over Ethernet and press More Configuration Figure 6 15 PPP over Ethernet option...

Страница 77: ...appropriate fields Enter the password again for verification in the Please retype your password field Figure 6 16 Enter user name and password 3 If your ISP has provided you with a service name enter...

Страница 78: ...erver for speed and convenience Since you are connecting to the Internet with dynamic IP settings it is likely that your DNS servers are also provided dynamically 6 Press Enter when finished 7 Restart...

Страница 79: ...76 BROADBAND ROUTER 6 4 Configuring Your Broadband Router for Dial Up on Demand 1 Select Dial up on Demand and press More Configuration Figure 6 18 Dial up on Demand More Configuration...

Страница 80: ...for backup access if the primary WAN link fails Figure 6 19 Check If You Only Use a Dial Up Modem to Connect to the Internet option 3 Enter your ISP account user name and password in the Dial Up Accou...

Страница 81: ...IP address every time you dial up select NO for Has your Internet Service Provider given you an IP address However if your ISP has assigned a fixed IP address for you to use select YES for this item...

Страница 82: ...ch computer needs to have a client installed that will communicate with the Router s print server UNIX and Linux operating systems have a print client already installed If you are running Windows 95 9...

Страница 83: ...80 BROADBAND ROUTER 2 Press Start and Run Figure 7 1 Start Run option 3 Type D PrintSvr Setup and press OK Figure 7 2 Run screen...

Страница 84: ...ter for Broadband Router Print Server 4 InstallShield will guide you through the installation process Press Next for each window Figure 7 3 InstallShield Welcome screen 5 Press Finish when complete Fi...

Страница 85: ...want to reboot now select Yes and press OK Figure 7 5 Reboot screen 7 1 2 STEP 2 CONFIGURING THE BROADBAND ROUTER S PRINT SERVER MONITOR Now that the software is installed it must be configured to wo...

Страница 86: ...83 CHAPTER 7 Configuring Your Computer for Broadband Router Print Server 2 Double click Add Printer Figure 7 7 Printers screen Add Printers option...

Страница 87: ...to add your printer as a Local printer for Windows 95 98 Me 2000 see Figure 7 8 or as a printer managed by My Computer for Windows NT see Figure 7 9 Figure 7 8 Add Printer Wizard Local Printer option...

Страница 88: ...urers and printers in the next window select the printer you have attached to the Broadband Router Figure 7 10 Add Printer Wizard Select the Printer Port option CHAPTER 7 Configuring Your Computer for...

Страница 89: ...86 BROADBAND ROUTER 5 Select the Broadband Router s Print Server Monitor the default port name is BLACKBOX100 and press Configure Port Figure 7 11 Configure Port option...

Страница 90: ...test page Select Yes to make sure that your printer is configured correctly 8 Your printer will now appear in the Printers window Your computer is configured to print via the Broadband Router Print S...

Страница 91: ...stname in the Videotron SCV MaxOnline Router s DHCP page exactly as it appears in your documentation PPPoE Usually special software Bell Century Tel Citizens DSL installed on PC MacPOET Primus Prodigy...

Страница 92: ...oint the Router s Fixed IP Flashcom GTE WhirlWind section Heavenet HSA Corp I 55 InterAccess LinkLine Mission Nauticom NAS Omitel Onterra Phatpipe Rhythms Speakeasy Sterling XO Zyan Static Cable modem...

Страница 93: ...have a complete description including The nature and duration of the problem When the problem occurs The components involved in the problem Any particular application that when used appears to create...

Отзывы: