


3
63
M
O
TO
R C
H
EC
k
S AN
d
ASS
EM
B
LY
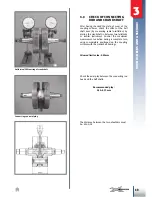
ExplODED vIEW OF cOMplETE kIckSTART SHAFT:
2) kickstart gear;
3) kickstart shaft;
8) kickstart return spring;
9) kickstart spacer;
10) circlip 20E;
11) Washer thickness 20x28x1 DIN 988;
12) Roller bearing k20x24x10;
14) kickstart sleeve;
16) Spring.
positioning of sleeve on small shaft.
Remove the kickstart spacer 9, expand the cir-
clip
10
, allowing removal of washer
11
, of kick-
start gear
2
together with roller bearing
12
and
washer
11
. This frees the kickstart shaft
3
from all
other elements.
Make sure that the side of the kickstart gear
teeth
2
have no signs of meshing or superficial
wear. Make sure that the front teeth (sleeve side
14)
are not chipped. Replace any element that
has the aforementioned defects.
Make sure that the front teeth of the sleeve
14
are not chipped and that the spring
16
is capable
of putting enough pressure on the sleeve
14
so
that it can to pull the gear
2
.
Also check to make sure that the washers have
no abnormal or excessive wear. If so, have them
replaced. Make sure that the spring
8
has no
cracks or abnormal deformation. Have it replaced
if it is not able to bring the external kickstart lever
back to the rest position.
For reassembly, proceed inversely compared
to the previously-described disassembly proce-
dures.
Pay attention to the correct positioning of the
sleeve
14
respect to the shaft
3
. The front of the
shaft has a reference sign, just as the sleeve does
14
: the two references must match.
positioning of sleeve on small shaft.
14
3
Содержание X Trainer 300 2T 2015
Страница 1: ...CODE 036440030 000...
Страница 19: ...2 17 Engine disassembly Remove the four collar nuts 9 9 Extract the cylinder and base gaskets...
Страница 116: ...114 NOTES...
Страница 117: ......