background image

ES

NL

PT

DE

preferiblemente  en  el  lado

opuesto  a  la  pared  en  la

cual  se  encuentra  la  salida

de gases quemados;

c) han  de  estar  en  una

posición  en  la  cual  no

puedan  quedar  obstruidas

y, si se realizan en paredes

exteriores, 

han 

de

protegerse  con  rejillas,

redes metálicas, etc. por el

lado  exterior  con  una

sección neta.

Si en el local hay un ventilador

eléctrico  para  evacuar  el  aire

viciado,  las  aberturas  para

recambiar  el  aire  han  de

asegurar un paso de aire de al

menos 35 m

3

/h para cada kW

de potencia instalada.

CONEXIÓN DEL GAS

El  horno  puede  funcionar  con

gas natural (metano) o con gas

líquido (GPL). El cambio de un

gas a otro es fácil de realizar y

se  describe  en  los  capítulos

siguientes.  La  conexión  a  la

red  de  distribución  tiene  que

ser realizada por profesionales

cualificados según las normas.

Si  el  aparato  se  alimenta  con

gas 

líquido 

(GPL) 

en

bombona, se ha de emplear un

regulador de presión conforme

con la norma.

CONEXIÓN  DEL  TUBO

METÁLICO

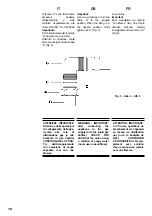
La  conexión  del  gas  puede

realizarse  mediante  un  tubo

metálico  rígido  firmemente

fijado al empalme “G” (fig. 3) o

bien mediante un tubo flexible

de  acero  inoxidable  de  pared

continua  con  una  longitud

máxima de 2 metros.

El  empalme  “G”  y  la  junta  de

retén “C” se suministran como

accesorios  con  el  aparato  y

Schlitzes  zwischen  Tür  und

Fußboden erhalten werden);

b) sie  müssen  sich  im  unteren

Abschnitt  einer  Außenwand

befinden,  die  vorzugsweise

gegenüber der Wand, an der

die  Verbrennungsprodukte

abgeführt werden, liegt;

c) sie  müssen  so  platziert

werden,  dass  sie  nicht  verlegt

werden können, und wenn sie

sich  in  einer  Außenmauer

befinden,  müssen  sie  durch

klar 

abgegrenzte 

Gitter,

Metallnetze o. ä. Vorrichtungen

an  der  Außenseite  der  Mauer

geschützt sein.

Sollte 

im 

Raum 

ein

Elektroventilator  zur  Abführung

der schlechten Luft installiert sein,

müssen  die  Öffnungen  für  den

Luftaustausch einen Luftdurchsatz

von mindestens 35 m

3

/h pro  kW

im  Raum  installierter  Leistung

ermöglichen.

GASANSCHLUSS

Der  Ofen  kann  mit  Erdgas

(Methan)  oder  Flüssiggas

betrieben  und  ganz  einfach

von  einem  Gastyp  auf  den

anderen  umgestellt  werden

(siehe  folgende  Abschnitte).

Der Anschluss an das Gasnetz

muss  von  einem  Fachmann

gemäß  ausgeführt  werden.

Wird das Gerät mit Flüssiggas

aus einer Gasflasche gespeist,

muss  ein  Druckregler  gemäß

benutzt werden.

ANSCHLUSS DES

METALLSCHLAUCHES

Der  Gasanschluss  kann  mit

Hilfe 

eines 

steifen

Metallschlauches  hergestellt

werden,  der  fest  mit  den

Anschluss  “G”  (Abb.  3)

verbunden sein muss, oder mit

einem 

rostfreiem

Stahlschlauch 

mit

durchgehender Wand mit einer

maximalen Länge von 2 m.

Der  Anschluss  “G”  und  die

b) estarem  situadas  na  parte

baixa  de  uma  parede

externa,  de  preferência  no

lado oposto àquela em que

se  encontra  a  evacuação

dos gases de combustão;

c) a  sua  posição  deve  ser

escolhida  de  forma  a  evitar

que  possam  ficar  obstruídas

e, se efectuadas nas paredes

externas, 

devem 

ser

protegidas com grelhas, redes

metálicas,  etc.,  colocadas  no

lado  externo  da  parede  com

uma secção limpa.

Caso esteja instalado no local

um  electroventilador  para  a

evacuação  do  ar  viciado,  as

aberturas para a renovação do

ar  devem  garantir  uma

passagem  de  ar  de  pelo

menos  35  m

3

/h  por  cada  kW

de potência instalada no local.

LIGAÇÃO DO GÁS

O forno pode funcionar com gás

natural (metano) ou gás líquido

(GPL),  e  pode  ser  facilmente

efectuada uma conversão para

outro  tipo  de  gás,  tal  como

descrito 

nos 

capítulos

seguintes. A ligação à rede de

distribuição deve ser efectuada

por pessoal especializado e de

acordo  com  as  indicações

relativas  às  normas.  Caso  o

aparelho  seja  alimentado  por

gás  líquido  (GPL)  de  botija,

deve utilizar-se um regulador de

pressão em conformidade com

a norma.

LIGAÇÃO 

DO 

TUBO

METÁLICO

A  ligação  de  gás  pode  ser

efectuada através de um tubo

metálico rígido, fixo por solda à

união  “G”  (Fig.  3),  ou  então,

através de um tubo flexível em

aço  inoxidável  de  parede

contínua, 

com 

um

comprimento  máximo  de  2

metros.

A  união  “G”  e  a  junta  de

vedação  “C”  são  fornecidas

vloer te vergroten);

b) de  openingen  moeten  zich

onderaan  een  buitenwand

bevinden, 

bij 

voorkeur

tegenover  de  afvoer  van  de

verbrande gassen;

c) de positie van de openingen

moet 

zodanig 

worden

gekozen  dat  verstoppingen

worden voorkomen en als ze

zich  in  de  buitenmuren

bevinden, moeten ze worden

beschermd  met  roosters,

metalen  netwerken,  enz.  op

de  buitenkant  van  de  muur

met een schone doorlaat.

Indien  in  het  vertrek  een

elektrische 

ventilator 

is

geïnstalleerd voor de afvoer van

afgewerkte  lucht,  moeten  de

openingen 

voor 

de

luchtverversing een luchtdoorlaat

van minstens 35 m

3

/h voor elke

kW geïnstalleerd vermogen in de

ruimte garanderen.

GASAANSLUITING

De  oven  kan  op  aardgas

(methaan)  en  op  vloeibaar  gas

(LPG)  werken  en  kan  eenvoudig

van  de  ene  naar  de  andere

gassoort  worden  omgebouwd,

zoals in de volgende hoofdstukken

is  beschreven.  De  aansluiting  op

het  distributienet  moet  door

gespecialiseerd personeel worden

verricht  volgens  de  bepalingen

van  de  normen.  Indien  het

apparaat  wordt  gevoed  met

vloeibaar  gas  (LPG)  uit  een

gasfles,  moet  gebruik  worden

gemaakt van een drukregelaar die

aan de norm.

AANSLUITING  VAN  DE

METALEN LEIDING

De gasaansluiting kan worden

verricht met een starre metalen

leiding  die  voldoet  aan  en  die

stevig aan het verbindingsstuk

“G” (Afb. 3) is bevestigd, of met

een  doorlopende  buigzame

leiding  van  roestvrij  staal  met

een  maximale  lengte  van  2

meter.

Het verbindingsstuk “G” en de

afdichting  “C”  worden  als

9

Содержание LA GERMANIA F670

Страница 1: ...OVENS Installation Use Maintenance FOURS AU GAZ Installation Emploi Entretien GASÖFEN Installation Gebrauch Wartung HORNOS DE GAS Instalación Uso Mantenimiento GASOVENS Installatie Gebruik Onderhoud FORNOS A GÁS Instalação Uso Manutenção F670 F680 ...

Страница 2: ...ISSANCES REQUISES SI CE N EST SOUS LASURVEILLANCE D UNE PERSONNE RESPONSABLE DE LEUR SÉCURITÉ OU APRÈS AVOIR REÇU DE CELLE CI LESINSTRUCTIONSRELATIVESÀL UTILISATION DE L APPAREIL LES ENFANTS DOIVENT ÊTRE SURVEILLÉS AFIN DE S ASSURER QU ILS NE JOUENT PAS AVEC L APPAREIL 2 L apparecchio deve essere allacciato da personale p r o f e s s i o n a l m e n t e qualificato e in conformità alla norme vigen...

Страница 3: ...INDERN MIT EINGESCHRÄNKTER KÖRPERLICHER ODER GEISTLICHER KAPAZITÄT ODER PERSONEN OHNE ERFAHRUNG UND DIE NOTWENDIGEN KENNTNISSEBENUTZTWERDEN ESSEIDENN DIES GESCHIEHT UNTER DER AUFSICHT ODER NACH UNTERWEISUNG IM GEBRAUCH DES GERÄTSDURCHEINERFÜRDERENSICHERHEIT VERANTWORTLICHEN PERSON KINDER SIND ZU BEAUFSICHTIGEN UM SICHERZUSTELLEN DASS SIE NICHT MIT DEM GERÄT SPIELEN 3 Das Gerät muss von einem Fachm...

Страница 4: ...H ELECTRIC GRILL 28 OVEN TEMPERATURE CONTROL ELECTRIC GRILL 30 MECHANICAL MINUTE TIMER 30 DESCRIPTION OF THE FRONT CONTROL PANEL GAS OVEN WITH GAS GRILL 34 OVEN TEMPERATURE CONTROL 34 GAS GRILL 36 OVEN LIGHT SPIT ROASTER 36 COOKING IN THE OVEN 42 REMOVAL OF THE BURNER COVER PLATE 48 REPLACING THE OVEN LIGHT 50 REMOVING THE OVEN DOOR 52 RESPECT FOR THE ENVIRONMENT 54 INDEX INSTRUCTIONS POUR L INSTA...

Страница 5: ...ASAANSLUITING 9 AANSLUITING VAN DE METALEN LEIDING 9 OMBOUWEN NAAR EEN ANDERE GASSOORT 13 TABEL VAN DE INSPUITERS 15 AFSTELLING VAN HET MINIMUM BIJ HET OMBOUWEN NAAR EEN ANDERE GASSOORT 17 INBOUW VAN DE OVEN 21 ELEKTRISCHE AANSLUITING 23 GEBRUIKSAANWIJZINGEN PAG 27 EERSTE GEBRUIK PAG 27 BESCHRIJVING VAN HET FRONTBEDIENINGSPANEEL GASOVEN MET ELEKTRISCHE GRILL 29 OVENTHERMOSTAAT 29 ELEKTRISCHE GRILL...

Страница 6: ... connected to a chimney flue or vented directly to outside the building In situations where it is not possible to install an extractor hood an electric extractor fan installed in a window or external wall may be used provided that all requirements of the ventilation regulations are satisfied the fan should switch on whenever the appliance is in operation VENTILATION Fig 2 it is essential that the ...

Страница 7: ...n gegebenenfalls auch durch Erweiterung des INSTRUÇÕESPARA O INSTALADOR NORMAS PARA A INSTALAÇÃO DO APARELHO localização e ventilação local As normas que regulam a instalação a manutenção e o funcionamento dos aparelhos a gás para uso doméstico são as normas en vigor Apresentamos de seguida um extracto dessas normas Para todas as indicações não apresentadas é necessário consultar as normas citadas...

Страница 8: ...oval of foul air is installed in the room the apertures provided for air changes must allow a ventilation rate of at least 35 m 3 h per kW of power installed GAS CONNECTION The oven is designed to operate with both natural gas methane and liquid gas LPG and can be easily converted from one type to another following the instructions given in the relative section of this booklet Connection to the ga...

Страница 9: ...tarem situadas na parte baixa de uma parede externa de preferência no lado oposto àquela em que se encontra a evacuação dos gases de combustão c a sua posição deve ser escolhida de forma a evitar que possam ficar obstruídas e se efectuadas nas paredes externas devem ser protegidas com grelhas redes metálicas etc colocadas no lado externo da parede com uma secção limpa Caso esteja instalado no loca...

Страница 10: ...a recchio alla rete di distribuzione gas o alla bombola di gas liquido CONTROLLARE LA TENU TA dell accoppiamento con soluzione di acqua saponata mai con una fiamma WARNING IMPORTANT after connecting the appliance to the gas supply or to the liquid gas bottles CHECK FOR LEAKS at the union using a solution of soapy water never use a naked flame aux normes Important Pour l orientation du raccord G ut...

Страница 11: ...wasser auf keinen Fall jedoch mit einem Feuerzeug einem Zündholz oder einer offenen Flamme KONTROLLIEREN ob der Anschluss DICHT ist oder Gas austritt como acessórios do aparelho e estão em conformidade com as normas Importante Para a orientação da união G trabalhe com duas chaves Obtida a direcção pretendida aperte com força a porca A Fig 3 ATENÇÃO IMPORTANTE No final das operações de ligação do a...

Страница 12: ...ble in this booklet Disconnect the electrical power supply to the appliance 1 Remove the burner cover Replacing the lower burner nozzle plate see REMOVAL OF THE BURNER COVER PLATE page 42 2 Remove the screw securing the oven burner and withdraw the burner from the support together with the heat sensor and the ignition spark plug Figure 5 3 Remove the nozzle using a 7 mm box wrench Figure 6 4 Screw...

Страница 13: ...ual o aparelho está regulado etiqueta adesiva Figura 1 aplicada no aparelho Para conhecer o diâmetro dos bicos consulte a tabela dos bicos Desligue a tensão do aparelho 1 Extraia a cobertura do queimador consultar EXTRACÇÃO DA COBERTURA página 42 2 Desaperte o parafuso de fixação do queimador do forno e extraia do suporte juntamente com o elemento térmico e a vela de ignição Figura 5 3 Retire o bi...

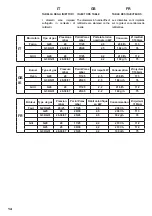
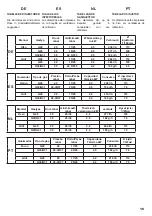
Страница 14: ...7 25 45 2 2 160 g h 75 GB IE Burner Type of gas Pressure mbar P min P max mbar Eat Imput kW Consumption Ø injectors 1 100mm Oven G20 20 17 25 2 5 238 l h 113 G30 G31 28 30 37 25 45 2 5 182 g h 76 Grill G20 20 17 25 2 2 210 l h 112 G30 G31 28 30 37 25 45 2 2 160 g h 75 FR Brûleur Type de gaz Pression mbar P min P max mbar Débit calorifique en kW Consommation Ø injecteurs 1 100mm Four G20 G25 20 25 ...

Страница 15: ...gas Presión mbar P mín P máx mbar Capacidad térmica kW Consumo Ø inyectores 1 100mm Horno G20 20 17 25 2 5 238 l h 113 G30 G31 28 30 37 25 45 2 5 182 g h 76 Grill G20 20 17 25 2 2 210 l h 112 G30 G31 28 30 37 25 45 2 2 160 g h 75 NL Brander Gastype Druk mbar minD maxD mbar Thermisch vermogen in kW verbruik Ø gasinjector 1 100mm Oven G25 25 20 30 2 5 277 l h 120 G30 G31 30 25 35 2 5 182 g h 76 Gril...

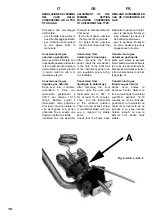
Страница 16: ...rsion from natural gas to liquid gas After removing the front panel insert the screwdriver in the hole in the front wall of the instrument panel and turn regulation screw A fig A clockwise Conversion from liquid gas to natural gas After removing the front panel light the over with thermostat set to 250 C for at least 10 15 minutes Then turn the thermostat to the minimum position Then turn the bypas...

Страница 17: ... 250 C durante por lo menos 10 15 minutos Girar luego el termostato en la posición de mínimo Luego girar el tornillo del bypass A en el sentido contrario a las agujas del reloj hasta que se vea una llama Overgaan tot de demontage van de voorkant voor de voorkant in inox de twee achterste bevestigingsschroeven losdraaien voor de voorkanten in glas de twee ringen onder de knop losschroeven Omzetting...

Страница 18: ...ella di pag 14 page 14 tableau de la page 14 4 Avvitare a fondo il nuovo 4 Fully tighten the new nozzle 4 Visser à fond le nouveau bruciatore assieme ai suoi with its heat elements siège avec l ensemble des elementi termici éléments thermiques 2 Estrarre dalla sua sede il 2 Remove the burner together 2 Extraire le brûleur de son sua sede e fissarlo con la it with the screw son siège et le fixer av...

Страница 19: ...iner Aufnahme entfernen van zijn plaats 2 Den Brenner zusammen mit 2 Sacar de su alojamiento el 2 Neem de brander samen met Aufnahme einsetzen und mt en su alojamiento y fijarlo con el tornillo zijn plaats aan en bevestig der Befestigungsschraube befestigen hem met de schroef 5 Den Brenner wieder in seine 5 Volver a introducir el quemador 5 Breng de brander weer op die Düsen entfernen de tubo de 7...

Страница 20: ... given in figure 7 Make sure that surrounding materials are heat resistant Align the oven centrally with respect to the side walls of the units surrounding it and fix it in place with the screws and Allen screws provided If a gas hob is to installed in combination with the oven refer to the instructions supplied with the hob figure 8 INCASSO DEL FORNO Il forno può essere installato sotto un piano ...

Страница 21: ...n de oven met polyvalente gaskookplaten afbeelding 8 de bij de kookplaat geleverde instructies ENCASTRE DEL HORNO El horno puede ser instalado debajo de la encimera o en una columna Las medidas del hueco han de serlas ilustradas en la figura 7 El material del mueble debe ser capaz de resistir al calor El horno debe ser centrado respecto de las paredes del mueble y fijado con los tor nillos y casqu...

Страница 22: ... with all applicable laws and re gulations Correct earthing grounding is a legal re quirement The power cable should never reach a temperature 50 C above ambient tem perature at any point along its length If a fixed appliance is not provided with a power cable and plug or some other device permitting it to be disconnected from the mains electricity supply with a gap between the contacts big enough...

Страница 23: ...ctrica cerciorarse de que las características de la in stalación se correspondan con las indicadas en la placa situada en la parte frontal del horno la instalación esté provista de una eficaz conexión a tierra según las normas y las disposiciones de la ley en vigor La conexión a tierra es obligatoria según la ley El cable en ningún punto deberá alcanzar una temperatura superior de 50 C a temperatu...

Страница 24: ... dispositivi di disconnessione devono essere previsti nella rete di alimentazione conformemente alle regole di installazione La presa o l interruttore onnipolare devono essere facilmente raggiungibili con l apparecchiatura in stallata device must be fitted to the power supply in compliance with the regulations governing electrical installations The socket or switch must be easily reachable with th...

Страница 25: ...emäß den Installationsvorschriften im Versorgungsnetz vorgesehen sein Die Steckdose bzw der allpolige Schalter müssen bei installiertem Gerät problemlos zugänglich sein desconexión completa en las condiciones estipuladas para la categoría de sobretensión III La toma o el interruptor omnipolar deben ser de fácil acceso una vez insta lado el aparato maakt dan moeten deze stroomverbrekers in het elek...

Страница 26: ...es of grease which might otherwise create unpleasant smells when cooking Important A titre de précaution avant d effectuer toute opération de nettoyage du four quelle qu elle soit débrancher toujours la fiche de la prise de courant ou couper la ligne d alimentation de l appareil Veiller à ne pas utiliser de substances acides ou alcalines jus de citron vinaigre sel tomate etc Ne pas utiliser de pro...

Страница 27: ...ncias ácidas ou alcalinas sumos de limão vinagre etc Evitar a utilização de produtos à base de cloro ácidos ou abrasivos espe cialmente para a limpeza das paredes envernizadas Belangrijk als veiligheidmaatregel moet altijd de stekker uit het stopcontact worden gehaald of moet de voeding van het apparaat worden afgekoppeld alvorens de oven te gaan schoonmaken Gebruik bovendien geen zure of alkaline...

Страница 28: ...pped with a safety valve When the oven is in operation the green light is illuminated The minimum position corresponds to an oven temperature of 130 C The control knob has stop in the minimum position The max position corresponds to an oven temperature of 250 C and is obtained when the knob is turned fully anticlockwise To light the burner push in the temperature control knob and turn it anticlock...

Страница 29: ...eizelement wird aufgeheizt und macht so die Versorgung des Brenners mit Gas möglich Die Zündung nicht länger als 15 DESCRIÇÃO FRONTAL DOS COMANDOS FORNO A GÁS COM GRILL ELÉCTRICO F670 COMANDOS Fig 12 1 Termóstato do forno a gás 2 Manípulo do grill espeto e luz do forno 3 Luz piloto do forno a gás 4 Conta minutos mecânico 5 Luz piloto do grill TERMÓSTATO DO FORNO O termóstato serve para programar a...

Страница 30: ...l est insérée le voyant s allume et simultanément l éclairage interne du four Pour faire fonctionner le moteur de la broche tourner la manette jusqu au symbole on entend un déclic Porter la manette à la puissance voulue de 0 à 8 ATTENTION le gril ne fonctionne pas quand est insérée la fonction gaz du four MINUTERIE MÉCANIQUE La minuterie est un avertisseur acoustique temporisé indépendant du fonct...

Страница 31: ...oven is voorzien van een energieregelaar De stralingssterkte van de grillweerstand kan met de knop worden ingesteld van 1 tot MAX Afb 14 Als de grillfunctie is ingeschakeld gaat het controlelampje branden en tegelijkertijd de binnenverlichting van de oven Om het motortje van het draaispit te laten werken moet de knop tot het symbool worden gedraaid U hoort een klik Zet de knop vervolgens op het ge...

Страница 32: ...t être tournée en sens horaire jusqu à la position 60 minutes et en sens inverse jusqu au temps voulu A la fin du temps fixé une sonnerie se déclenche et cesse automatiquement 32 aria fredda favorendo così un rapido scongelamento dei cibi congelati COTTURAGAS VENTILATA Durante l utilizzazione della funzione gas del forno spia verde accesa è possibile utilizzare la funzionalità Ventilato ruotando l...

Страница 33: ...De regelknop Afb 15 moet met de klok worden meegedraaid tot de stand 60 minuten en vervolgens tegen de klok in worden gedraaid om de wijzer met de gewenste tijd samen te laten vallen Na de vastgestelde tijd klinkt een geluidssignaal dat automatisch stopt 33 favoreciendo de esta forma una descongelación rápida de los alimentos congelados COCCIÓN GAS VENTILADA Durante la utilización de la función ga...

Страница 34: ...emperature and is equipped with a safety valve When the oven is in operation the green light is illuminated To turn on the bottom burner push in the temperature control knob and turn it anticlockwise to the desired temperature The minimum position corresponds to an oven temperature of 130 C The control knob has stop in the minimum position The maximum position corresponds to an oven temperature of...

Страница 35: ...r Brenner elektrisch gezündet das Heizelement wird aufgeheizt und macht so die Versorgung des Brenners mit Gas möglich DESCRIÇÃO FRONTAL DOS COMANDOS FORNO A GÁS COM GRILL A GÁS F680 COMANDOS Fig 16 1 Termóstato e grill a gás 2 Manípulo da luz do forno e espeto 3 Luz piloto do forno a gás 4 Conta minutos mecânico 5 Luz piloto de funcionamento eléctrico TERMÓSTATO DO FORNO O termóstato serve para p...

Страница 36: ...rn the knob clockwise to the position and hold it pressed in for 5 10 seconds GRIL GAZ E GRIL GAZ 4 FONCTIONNER AVEC LA PORTE ENTR OUVERTE ET L ÏCRANDEPROTECTIONTHERMIQUE FOURNI INSÏRÏ DANS LES FENTES SOUS LE BANDEAU DE COMMANDE L allumage s effectue en tournant la manette en sens horaire dans la position en la tenant appuyée pendant 5 10 secondes 36 ATTENZIONE quando si usa il grill le parti acce...

Страница 37: ...URAS POR BAIXODOPAINELDECOMANDOS A ignição efectua se rodando o manípulo para a direita até à posição e mantendo o premido durante 5 10 segundos GASGRILL EGASGRILL 4ALTIJDMETHALF GEOPENDE DEUR WERKEN EN MET DE BIJGELEVERDE BESCHERMPLAAT IN DE GLEUVEN ONDER HET FRONTBEDIENINGSPANEEL De grill wordt ingeschakeld door de knop met de klok mee op de stand te draaien en hem gedurende 5 10 seconden ingedr...

Страница 38: ... heating is not needed with this function but for cakes it is in any case preferable VERSION VENTILEE ventilateur seulement fera circuler de l air froid ambiant à l intérieur du four ce qui favorisera ainsi une décongélation plus rapide des aliments congelés La fonction ventilateur insérée avec le réchauffement fort provenant du brûleur de sole permet la cuisson des aliments de la façon la plus dé...

Страница 39: ...m is geschikt voor het koken op meerdere niveaus en ook voor andere soorten gerechten vis vlees etc Met deze functie is voorverwarming niet noodzakelijk maar het verdient hoe dan ook de voorkeur deze in te schakelen voor gebakjes VERSÃO VENTILADA A função ventilador activada junto com o aquecimento forte proveniente do queimador inferior permite a cozedura dos alimentos de maneira mais delicada e ...

Страница 40: ...tops working after approx 30 min Le ventilateur est place sur la partie superieure du four et cree une circulation d air de refroidissement a l interieur du meuble et a travers la porte du four luimeme Il se met en marche quand la partie externe du four atteint environ 60 C En allumant le four et en programmant le thermostat sur 200 C le ventilateur se met en marche apres 10 minutes environ L exti...

Страница 41: ...f 200 C nach etwa 30 Min aus El ventilador esta situado en la parte superior del horno y crea una circulacion de aire de enfriamiento dentro del mueble y a traves de la puerta del propio horno Se pone en marcha cuando la parte exterior del horno alcanza los 60 C aprox Encendiendo el horno y llevando el termostato a 200 C el ventilador se pone en marcha al cabo de unos 10 minutos El ventilador se a...

Страница 42: ... 35 40 55 60 160 180 35 40 90 120 100 120 20 25 50 60 30 40 60 70 CUOCERE AL FORNO Scegliendo questa forma di riscaldamento potete usare il forno come al solito e ricorrere alle ricette dei libri di cucina Il piatto da cuocere deve essere posto preferibilmente nel piano centrale del forno COOKING IN THE OVEN With this cooking method you can operate the oven in the normal way and follow the instruc...

Страница 43: ...PERATUUR oC TEMPERATURA oC 210 200 200 190 180 190 180 180 160 200 200 200 200 180 170 190 200 KOCHZEIT min TIEMPO DE COCCIÓN min BEREIDINGSTIJD min TEMPO DE COZEDURA mín 15 20 10 12 25 30 20 25 40 50 20 30 35 40 55 60 160 180 35 40 90 120 100 120 20 25 50 60 30 40 60 70 IM OFEN BRATEN BACKEN BeidieserHeizartkannmanden Ofen wie üblich benutzen und dieRezepteindenKochbüchern verwenden Das zu kochen...

Страница 44: ... FRUTTA FRUIT PIE TARTE AUX FRUITS PASTA PER BIGNÉ CHOUX PASTRY PÂTE À BEIGNETS ARROSTO DI MANZO CIRCA 1 5 KG ROAST BEEF APPROX 1 5 KG RÔTI DE BOEUF ENV 1 5 KG PIZZA PIZZA PIZZA SFORMATO DI PESCE BAKED FISH QUICHE DE POISSON SFORMATO DI VERDURE BAKED VEGETABLES GÂTEAU DE LÉGUMES POLLAME POULTRY VOLAILLE PRERISCALDARE PREHEAT PRÉCHAUFFER si Yes OUI si Yes OUI si Yes OUI si Yes OUI si Yes OUI si Yes...

Страница 45: ...T TORTA DE FRUTA BEIGNETTEIG PASTA PARA LIONESAS DEEG VOOR SOESJES MASSA PARA CHOUX RINDSBRATEN CA 1 5 KG ASADO DE VACA APROX 1 5 kg GEBRADEN RUNDVLEES ONGEVEER 1 5 KG CARNE DE VACA CERCA DE 1 5 KG SCHWEINSBRATEN CA 1 5 KG ASADO DE CERDO APROX 1 5 kg GEBRADEN VARKENSVLEES ONGEVEER 1 5 KG CARNE DE PORCO CERCA DE 1 5 KG PIZZA PIZZA PIZZA PIZZA FISCHAUFLAUF PUDÍN DE PESCADO VISSCHOTEL GALANTINA DE PE...

Страница 46: ...ENTS BISTECCA STEAKS STEACK COTOLETTA CUTLET CÔTELETTE PRERISCALDARE PREHEAT PRÉCHAUFFER POSIZIONE POSITION POSITION 10 10 TEMPO DI COTTURA min COOKING TIME min TEMPS DE CUISSON min 10 15 15 25 Guideline values for cooking with the grill Valeurs de référence pour cuire au gril 46 ...

Страница 47: ... CHULETA SCHNITZEL COSTELETA VORHEIZEN PRECALENTAMIENTO VOORVERWARMEN PRÉ AQUECER POSITION POSICIÓN STAND POSIÇÃO 10 10 KOCHZEIT min TIEMPO DE COCCIÓN min BEREIDINGSTIJD min TEMPO DE COZEDURA mín 10 15 15 25 Hinweise zum Grillen Valores de referência para cozinhar na grelha Referentiewaarden voor het bakken op het rooster 47 ...

Страница 48: ...EMOVAL OF THE BURNER COVER PLATE see fig 20 The burner cover plate is secured at the front by two tabs inserted in two slots to remove the cover plate raise the rear of the plate so that it pivots at the front and withdraw the tabs form the slots EXTRACTION DE LA SOLE voir fig 20 La sole cache brûleur est bloquée dans la partie avant par 2 ailettes enfilées dans 2 fentes pour extraire la sole soul...

Страница 49: ...cken zum HerausziehendenBodenhinten anheben vorne niederdrücken und aus den zwei Schlitzen herausziehen RETIRAR A COBERTURA consultar a fig 20 A cobertura do queimador está fixa na parte da frente através de2alhetasqueestãoinseridas em duas ranhuras para extrair a cobertura levante a parte de trás fazendo alavanca à frente e retire a das 2 ranhuras VERWIJDEREN VAN DE BODEM zie afb 20 Debodemdiedeb...

Страница 50: ...e c power 25W d E 14 connection Before proceeding dis connect the appliance from the main electricity supply to prevent damage place a tea cloth in the oven unscrew the glass cover of the light unscrew the old light bulb and replace it with the new one put back the glass cover and remove the tea cloth connect the appliance to the main electricity supply REMPLACEMENT DE LA LAMPE DU FOUR IMPORTANT L...

Страница 51: ...e nuevo la pro tección en vidrio y quitar el trapo para vajillas enchufar de nuevo el apa rato a la línea de alimen tación HET VERVANGEN VAN HET LAMPJE VAN DE OVEN BELANGRIJK Het lampje van de oven dient de volgende ken merken te bezitten a een structuur die ge schikt is voor hoge tem peraturen tot 300 C b voeding zie de waarde V Hz die wordt vermeld op de typeplaat c vermogen 25 W d aanhechting v...

Страница 52: ...ows Open the door fully Lift the two levers shown in fig 21 Close the door as far as the first stop caused by the raised levers Lift the door upwards and outwards to remove it from its mountings To replace fit the door fit the hinges in their mountings and lower the two levers SMONTAGGIO DELLA PORTA FORNO Lo smontaggio della porta forno può essere facilmente effettuato operando come segue aprire t...

Страница 53: ...en de scharnieren in hun behuizingen worden geplaatst en moeten de twee hendeltjes weer worden teruggezet in de sluitende positie DESMONTAJE DE LA PUERTA DEL HORNO El desmontaje de la puerta del horno puuede ser fácil mente efectuado obrando como sigue abrir totalmente la puerta alzar las dos palanquitas indicas en fig 21 volver a cerrar la puerta después de la primera pa rada consecuencia de la s...

Страница 54: ...e free bleached paper or recycled paper to show respect for the environment The packaging has also been designed to avoid en vironmental impact Pack aging material is ecological and can be re used or recycled By recycling the packaging you will help save raw ma terials as well as reducing the bulk of domestic and industrial waste RISPETTO DELL AMBIENTE La documentazione del pre sente apparecchio u...

Страница 55: ...ordt een bijdrage geleverd aan de besparing van grondstoffen en aan de beperking van het volume industrieel en huisvuil RESPETO POR EL MEDIO AMBIENTE La documentación de este aparato utiliza papel blanqueado sin cloro o papel reciclado con el fin de contribuir a la protección del medio ambiente Los embalajes están conce bidos para no dañar el medio ambiente pueden ser recu perados o reciclados sie...

Страница 56: ...er Broschüre enthaltene Ungenauigkeiten die auf Druckfehler zurückzuführen sind und behält sich das Recht vor an ihren Produkten alle für notwendig erachteten Änderungen anzubringen ohne die wesentlichen Eigenschaften zu beeinflussen El fabricante declina toda responsabilidad por las posibles inexactitudes contenidas en el presente documento imputables a errores de impresión o relacionadas El fabr...

Отзывы: