background image

30 

How to adjust your monitor

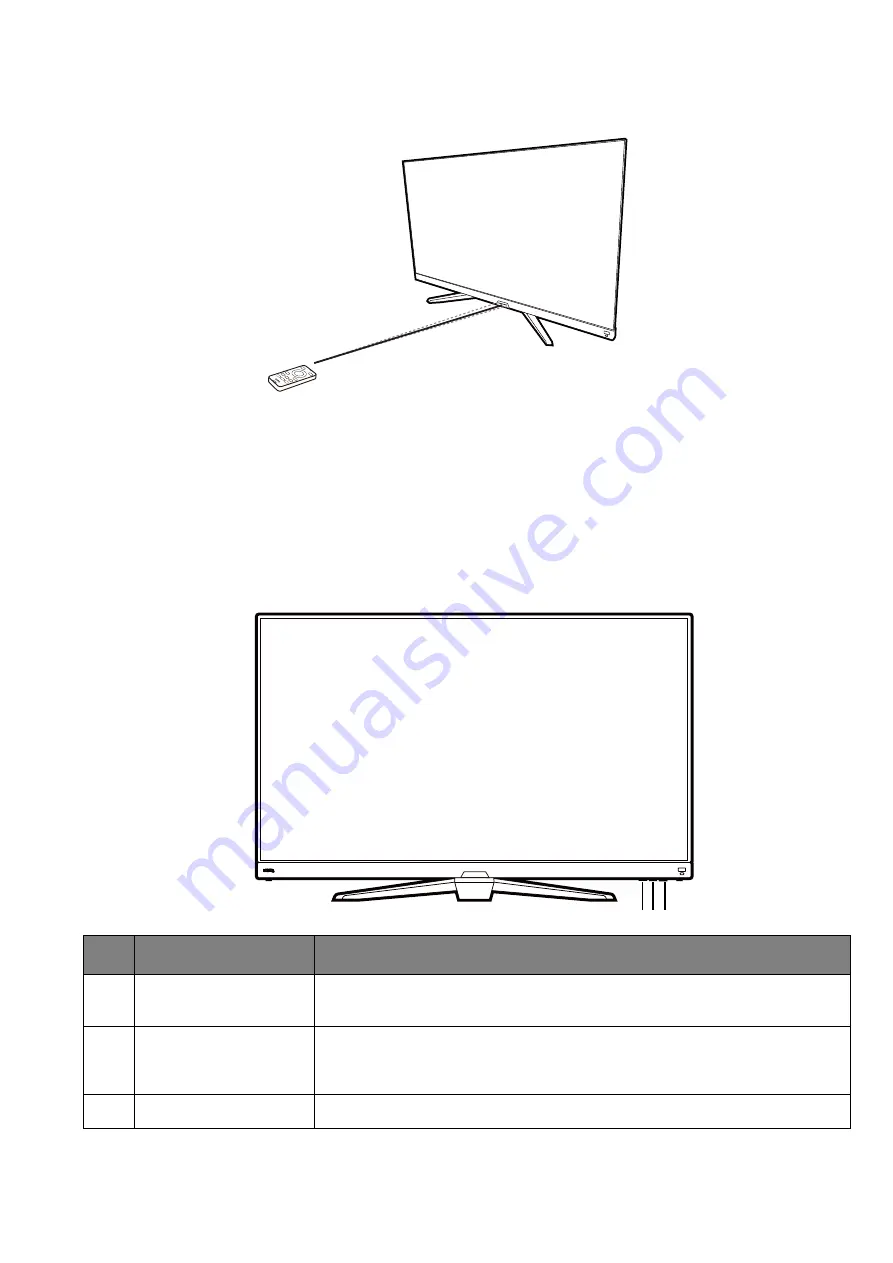
The remote control and its effective range

1.  Follow the instructions in 

Installing the battery on page 18

 to get the remote control ready.

2.  Aim the remote control at the monitor. The IR remote control sensor is located at the front of 

the monitor with a range of 6 meters approximately at an angle of 30 degrees (left and right) 

and 30 degrees (up and down). Make sure that there are not obstacles between the remote 

control and the IR sensor on the monitor.

3.  To operate with the remote control, see 

Getting to know your remote control on page 17

 for 

more information.

The control panel

1 2 3

No.

Name

Description

1.  Looping 

key

Accesses 

video 

source selection menu. See 

Switching the inputs 

quickly on page 33

 for more information.

2.  

5-way controller

Accesses the functions or menu items as instructed by the 

on-screen icons. See 

5-way controller and basic menu operations 

on page 31

 for more information.

3.  

Power key

Turns the power on or off.

Содержание MOBIUZ EX Series

Страница 1: ...OLED Monitor User Manual EX Series...

Страница 2: ...f monitor flicker making it easier on the eyes The performance of flicker free may be affected by external factors such as poor cable quality unstable power supply signal interference or poor groundin...

Страница 3: ...elated document Drivers and applications EU only Dismantled information Available on the user manual download page This document is provided based on Regulation EU 2019 2021 to repair or recycle your...

Страница 4: ...ings for better gameplay experience Choosing a game mode quickly 39 Choosing an audio scenario 39 Are there any settings for car racing games Racing game Color Mode 50 Racing game Audio Mode 56 How to...

Страница 5: ...5 How to keep the monitor not in use for a long time How to detach the stand and the base 27 Care and cleaning 8 I need more support Product support 3 Servicing 9...

Страница 6: ...e weight of the product is less than or equal to 3 kg An approved power cord greater or equal to H03VV F 3G 0 75mm2 must be used If the weight of the product is more than 3 kg An approved power cord g...

Страница 7: ...sharp objects Excessively frequent plug and unplug of video connectors may cause damage to the monitor This monitor is designed mainly for personal use If you want to use the monitor in a public plac...

Страница 8: ...ns in just 2 hours and can lead to death Keep new and used batteries away from children If the battery compartment does not close securely stop using the product and keep it away from children If you...

Страница 9: ...fire Reception problems occurred due to external signals such as antenna Cable TV outside the monitor Defects caused by abuse or misuse of the monitor Before using the monitor it is the sole responsib...

Страница 10: ...Front view 17 Installing the battery 18 How to assemble your monitor hardware 20 How to detach the stand and the base 27 Using the monitor wall mounting kit purchased separately 29 How to adjust your...

Страница 11: ...nc function 41 Working with Video Format Support technology 42 Initial setup for playing games at 120 Hz 42 Preventing image retention 43 Working with two or more video sources with one set of keyboar...

Страница 12: ...sing or damaged please contact the place of purchase for a replacement BenQ OLED Monitor Monitor Stand Monitor Base Quick Start Guide Safety Instructions Regulatory Statements Power Cord Supplied item...

Страница 13: ...ge contents may subject to change without prior notice For cables that are not supplied with your product you can purchase them separately Consider keeping the box and packaging in storage for use in...

Страница 14: ...1 port x 2 downstream connecting to USB devices 14 USB 3 1 port upstream connecting to the PC 15 USB C port for video data transfer and power delivery up to 90W 16 DisplayPort socket 17 HDMI socket x...

Страница 15: ...livery is up to 90W If the connected device requires more than the delivered power for operation or for boot up when the battery is drained use the original power adapter that came with the device The...

Страница 16: ...tions are for your reference only For cables that are not supplied with your product you can purchase them separately For detailed connection methods see page 24 24 PC Notebook Gaming console Headphon...

Страница 17: ...ns Press repeatedly to cycle through these options See Working with the HDRi hot key on page 37 for more information 5 Multiple Input key Accesses a list of Multiple Input options See Displaying two o...

Страница 18: ...page 56 for more information 12 Volume up key Increases the volume OSD On Screen Display No Name Key Description 1 Turn over the remote control Use a cross pointed screwdriver to release the screw th...

Страница 19: ...trol is ready to use now Keep the remote control and the battery out of reach of children The remote control supplied with this product contains a coin button cell battery If the coin button cell batt...

Страница 20: ...mmed OLED panel and should be handled carefully Never touch the upper part of the panel under any circumstances Pressure or excessive force on the screen surface is prohibited as well Be careful when...

Страница 21: ...ach the monitor stand to the monitor base as illustrated Raise the thumbscrew lid and tighten the thumbscrew as illustrated Then push the lid back Push out the bottom of the VESA plate so the stand co...

Страница 22: ...by the provided screws and Hex Key Slide the VESA cover down from the top of the monitor stand until it locks into place Lift the monitor and the cushion carefully by holding them together as illustra...

Страница 23: ...d to transport or mount the monitor The fitted foam packing is ideal for protecting the monitor during transport or mounting bracket installation Move the monitor carefully to the desired location Rem...

Страница 24: ...her end of the video cable to an appropriate port of a digital output source e g a computer or a gaming console 5 Connect the audio cable You may connect headphones to the headphone jack found on the...

Страница 25: ...s prohibited as well 8 Connect to and turn on the power Connect the power cord to the power adapter Plug the other end of the power cord into a power outlet and turn it on Picture may differ from prod...

Страница 26: ...or certain scenarios You are prompted to set the monitor to work in specified scenarios when powering on the monitor for the first time See Setting up your monitor for different scenarios on page 32 t...

Страница 27: ...n ultra slimmed OLED panel and should be handled carefully Never touch the upper part of the panel under any circumstances Pressure or excessive force on the screen surface is prohibited as well Consi...

Страница 28: ...backward away from the monitor 5 Remove the monitor base Release the screw on the bottom of the monitor base and detach the monitor base as illustrated In case you intend to use your monitor on the st...

Страница 29: ...nformation Turn off the monitor and the power before disconnecting the cables from the monitor 1 Remove the monitor stand Remove the monitor stand as instructed in How to detach the stand and the base...

Страница 30: ...wn Make sure that there are not obstacles between the remote control and the IR sensor on the monitor 3 To operate with the remote control see Getting to know your remote control on page 17 for more i...

Страница 31: ...esired input source When the Quick Menu has been activated Move up down Goes to the previous next menu setting Move to the right left Goes to the next previous menu item When Menu is highlighted Move...

Страница 32: ...ed there are several input ports on your monitor and you can preset a scenario for each input respectively If possible complete the connections Move down Goes to the next menu item For down decrease a...

Страница 33: ...e key on the remote control to bring up the input source selection menu Each source is preset for a scenario as described in Setting up your monitor for different scenarios on page 32 The scenario cha...

Страница 34: ...ding resolution refresh rate HDR status and Adaptive Sync status See Activating the FreeSync function on page 41 for more information on Adaptive Sync status 2 Input source and the preset scenario Dis...

Страница 35: ...default setting menus vary by scenario and may not be adjustable on certain color modes See Available menu options to each Color Mode on page 36 for available options on each color mode To customize...

Страница 36: ...RPG Racing game sRGB M book Display P3 Custom Options Black eQualizer X X X V X X X X X X Light Tuner V V X X V V X X X V Bri eQualizer V V V V V V V V V V Color Vibrance X X X V V V X X X V Brightne...

Страница 37: ...e information Adjusting screen brightness automatically Bright Intelligence Plus The built in light sensor works with Bright Intelligence Plus technology to detect the ambient light image brightness c...

Страница 38: ...ent are HDR compatible and the HDR function is properly enabled The monitor is following the ST2084 standard to process the HDR content In this case the monitor is set to Game HDRi by default You can...

Страница 39: ...more information Non HDR content If a non HDR color mode is selected HDR OFF Game HDRi Cinema HDRi HDR HDR Emulated Alternatively press on the remote control to bring up a list of Game Mode options A...

Страница 40: ...vides various picture modes that are suitable for different types of images Display settings can be saved by color mode See Color Mode on page 49 for all the available picture modes 1 Press to bring u...

Страница 41: ...settings either from the Quick Menu or the main menu The color mode of the sub screen however cannot be changed 8 Turn on the HDR function if it was turned off in step 2 9 If you have audio input fro...

Страница 42: ...rt with the following steps 1 Set the screen refresh rate to 120 Hertz 120 Hz Right click the desktop and select Screen resolution Click Advanced settings Under the Monitor tab change the screen refre...

Страница 43: ...image quality Required operations vary by the time the monitor is used After 4 hours of monitor use you will be asked to perform Off RS Select YES to proceed It takes about 10 minutes and the power LE...

Страница 44: ...nt I O ports on one monitor you can work with one set of keyboard and mouse only With appropriate connections the display is switched to the available input while the keyboard and mouse control is swi...

Страница 45: ...d keys that are not available will be disabled and the corresponding OSD icons will disappear For models without certain functions their settings and related items will not appear on the menu For more...

Страница 46: ...and then use or to select a menu item 5 Use or to make adjustments or use to make selection 6 To return to the previous menu select 7 To exit the menu select Item Function Range Input Use this to chan...

Страница 47: ...e adjustments or use to make selection 6 To return to the previous menu select 7 To exit the menu select Color Mode Custom Audio mode Racing game HDR OFF FreeSync Premium 3840 x 2160 120 Hz Confirm Mo...

Страница 48: ...cenario cannot be changed Color Mode cannot be changed Light Tuner Black eQualizer Bri eQualizer Color Vibrance Brightness Contrast Sharpness Audio mode Volume Low Blue Light Game For gaming Cinema Fo...

Страница 49: ...menu item 5 Use or to make adjustments or use to make selection 6 To return to the previous menu select 7 To exit the menu select Color Mode Custom Audio mode Racing game HDR OFF FreeSync Premium 384...

Страница 50: ...ined by users Item Function Range Item Function Range Black eQualizer Brings out the dark shades by increasing the brightness without changing those of the light shades If the image is too bright or b...

Страница 51: ...lies a cool tint to the image and is factory pre set to the PC industry standard white color Reddish Applies a warm tint to the image and is factory pre set to the news print standard white color User...

Страница 52: ...o exit the menu select Color Mode Custom Audio mode Racing game HDR OFF FreeSync Premium 3840 x 2160 120 Hz Confirm Move Back Input Quick Menu Color Mode Multiple Input Eye Care Audio Lighting System...

Страница 53: ...e Large Small Screen Swap Swaps the screens Audio Select Switches the audio input from one source to the other If you have audio input from both sources the monitor s speakers output the audio signals...

Страница 54: ...udio mode Racing game HDR OFF FreeSync Premium 3840 x 2160 120 Hz Adjust Back Input Quick Menu Color Mode Multiple Input Eye Care Audio Lighting System B I Low Blue Light Color Weakness Adjust by dura...

Страница 55: ...produced by the red filter A stronger effect is produced as the value increases 0 20 Green Filter Decides the effect produced by the green filter A stronger effect is produced as the value increases...

Страница 56: ...gs are not available for 32kHz sample rate If you cannot adjust the audio settings try with other sample rates To keep the speakers from making noises do the following always select an appropriate aud...

Страница 57: ...57 Cinema Enhances the bass while keeps the vocal clear Pop Live Keeps the music and the vocal in harmony as if in live Mute Mutes the audio input ON OFF Item Function Range...

Страница 58: ...make adjustments or use to make selection 6 To return to the previous menu select 7 To exit the menu select Color Mode Custom Audio mode Racing game HDR OFF FreeSync Premium 3840 x 2160 120 Hz Adjust...

Страница 59: ...e Morse Code Sets to light up in certain patterns Win Go Love Peace SOS Scenario Sets the light effect to go with the monitor scenario previously set in Input See Setting up your monitor for different...

Страница 60: ...ect Color Mode Custom Audio mode Racing game HDR OFF FreeSync Premium 3840 x 2160 120 Hz Confirm Move Back Input Quick Menu Color Mode Multiple Input Eye Care Audio Lighting System OLED Settings OSD S...

Страница 61: ...displayed on your OSD may differ from those shown on the right depending on the product supplied in your region English Fran ais Deutsch Italiano Espa ol Polski esky Magyar Rom n Nederlands Svenska Po...

Страница 62: ...n a 24 wide screen monitor 27 W Displays the input image as if on a 27 wide screen monitor 32 W Displays the input image as if on a 32 wide screen monitor Overscan Slightly enlarges the input image Us...

Страница 63: ...x One Xbox Series X S Switch Turn ON Turn OFF Turns HDMI CEC function on or off Once the function is enabled you can turn on or off your monitor and the connected devices at the same time and vise ver...

Страница 64: ...color settings to the factory defaults If the image is still not correct and the OSD also has faulty coloration this means one of the three primary colors is missing in the signal input Now check the...

Страница 65: ...any button on the computer keyboard or move the mouse If that does not help check the signal cable connectors If any pin is bent or broken off please contact your dealer to get necessary support If th...

Страница 66: ...sor is located at the front bottom of the monitor Please check If you have removed the sensor protection sticker If the Bright Intelligence Bright Intelligence Plus function has been turned on Check C...

Отзывы: