background image

1  Safety

1.1 

Safety

Danger

This appliance can be used by children aged from 

8 years and above and persons with reduced 

physical, sensory or mental capabilities or lack of 

experience and knowledge if they have been 

given supervision or instruction concerning use of 

the appliance in a safe way and understand the 

hazards involved. Children shall not play with the 

appliance. Cleaning and user maintenance shall 

not be made by children without supervision.

Caution

Draining the domestic hot water tank:

1. Shut off the domestic cold water inlet.

2. Open a hot water tap in the installation.

3. Open a valve on the safety unit.

4. When the water stops flowing, the domestic 

hot water tank has been drained.

Warning

Pressure limiter device

The pressure limiter device (safety valve or 

safety unit) must be regularly operated in order 

to remove limescale deposits and ensure that it 

is not blocked.

A pressure limiter device must be fitted to a 

discharge pipe.

As water may flow out of the discharge pipe, the 

pipe must be kept open to the open air, in a 

frost-free environment, and at a continuous 

downward gradient.

To ascertain the type, specifications and 

connection of the pressure limiter device, refer 

to the chapter "Connecting the domestic hot 

water tank to the drinking water mains" in the 

domestic hot water tank Installation and Service 

Manual.

Important

The installation, user and maintenance manual 

can also be found on our internet site.

1  Safety

7724479 - v03 - 07102019

AS 300–2E BC

5

Содержание AS 300-2E BC

Страница 1: ...MW 2000848 02 Spain Portugal en Installation User and Service Manual Solar domestic hot water tank AS 300 2E BC ...

Страница 2: ...using the product and keep it in a safe place for later reference In order to ensure continued safe and efficient operation we recommend that the product is serviced regularly Our service and customer service organisation can assist with this We hope you enjoy years of problem free operation with the product ...

Страница 3: ...immersion heater optional 16 4 9 Hydraulic connections 16 4 9 1 Primary heating circuit 16 4 9 2 Connecting the tank to the domestic water circuit secondary circuit 17 4 10 Filling the domestic hot water tank 18 4 10 1 Domestic water quality 18 4 11 Filling the primary solar circuit 19 4 12 Filling the heating circuit 19 5 Commissioning 20 5 1 Checklist before commissioning 20 5 1 1 Domestic hot w...

Страница 4: ... Maintenance form 24 7 Disposal and Recycling 26 8 Appendix 27 8 1 Information on the ecodesign and energy labelling directives 27 8 1 1 Specific information 27 Contents 4 AS 300 2E BC 7724479 v03 07102019 ...

Страница 5: ...stops flowing the domestic hot water tank has been drained Warning Pressure limiter device The pressure limiter device safety valve or safety unit must be regularly operated in order to remove limescale deposits and ensure that it is not blocked A pressure limiter device must be fitted to a discharge pipe As water may flow out of the discharge pipe the pipe must be kept open to the open air in a f...

Страница 6: ... not neglect to service the appliance Service the appliance regularly to ensure that it operates correctly Warning Only qualified persons are authorised to assemble install and maintain the installation Warning The heating water and the water propylene glycol mixture must not come into contact with the domestic hot water The domestic hot water must not circulate through an exchanger Solar installa...

Страница 7: ...liance with the requirements of the various Directives applicable They are therefore delivered with the marking and any documents necessary In the interests of the quality of our products we strive constantly to improve them We therefore reserve the right to modify the specifications given in this document Our liability as manufacturer may not be invoked in the following cases Failure to abide by ...

Страница 8: ...ptimum operation of the system you must abide by the following instructions Read and follow the instructions given in the manuals provided with the appliance Call on a qualified professional to carry out installation and initial commissioning Get your installer to explain your installation to you Have the required inspections and maintenance carried out by a qualified installer Keep the instructio...

Страница 9: ...ages in this manual 2 1 2 Symbols used on the equipment 1 Before installing and commissioning the appliance carefully read the instruction manuals provided 2 Dispose of used products in an appropriate recovery and recycling structure 2 2 Abbreviations CFC Chlorofluorocarbon DHW Domestic Hot Water 2 3 Homologations 2 3 1 Directives This product complies with the requirements of the following Europe...

Страница 10: ...n to the legal requirements and guidelines the supplementary guidelines in this manual must also be followed Supplements or subsequent regulations and guidelines that are valid at the time of installation shall apply to all regulations and guidelines specified in this manual 2 About this manual 10 AS 300 2E BC 7724479 v03 07102019 ...

Страница 11: ...face that comes into contact with the drinking water The appliance is insulated by chlorofluorocarbon free CFC polyurethane foam which helps to reduce heat losses to a minimum The external casing is made of ABS The tanks are protected against corrosion by one or more magnesium anodes An anode tester allows the wear of the magnesium anodes to be checked 3 2 Main components 1 Top inspection hatch 2 ...

Страница 12: ...y circuit domestic water Maximum operating temperature C 110 Maximum operating pressure MPa bar 1 0 10 Water capacity litres 300 Weight Shipping weight Tank package kg 140 Primary circuit performances Back up exchanger Output exchange 1 kW 25 5 Performance Hourly flow rate ΔT 35 C 1 litres h 626 Standby heat loss ΔT 45K kWh 24h 2 10 1 Primary temperature 55 C Domestic cold water inlet 10 C Domesti...

Страница 13: ... Caution The system must satisfy each point in the rules that govern works and interventions in individual homes blocks of flats or other buildings 4 2 Package list 4 2 1 Standard delivery The delivery includes One domestic hot water tank One installation user and service manual 4 2 2 Accessories options A detailed list of accessories and options can be found in our catalogue 4 3 Choice of the loc...

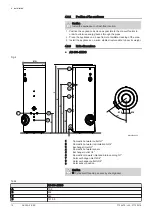
Страница 14: ...ear its weight 4 3 3 Main dimensions AS 300 2E BC Fig 4 B C D A E F ØG 55 K 83 5 83 5 7 1 4 3 6 9 MW 5000825 2 8 5 2 1 Domestic hot water outlet G1 2 Domestic hot water recirculation G3 4 3 Exchanger inlet G1 4 Domestic hot water sensor 5 Exchanger outlet G1 6 Domestic cold water inlet and drain opening G1 7 Solar exchanger inlet G3 4 8 Solar exchanger outlet G3 4 9 Solar sensor position Caution G...

Страница 15: ... domestic hot water tank 1 Screw the three adjustable feet to the bottom of the domestic hot water tank 2 Level the appliance using the adjustable feet Adjustment range 10 mm Use metal blocks under the feet of the tank if necessary Caution Do not place the blocks on the exterior sides of the domestic hot water tank 4 6 Fitting the temperature sensors 1 Position the probe in the sensor tube using t...

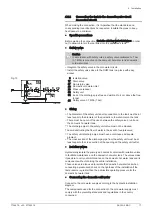
Страница 16: ...ng with a new gasket 3 Connect the immersion heater by following the instructions in the manual 4 9 Hydraulic connections 4 9 1 Primary heating circuit Before connection flush the primary circuit to remove any particles that may damage certain devices safety valve pumps valves etc 1 Hydraulically isolate the primary and domestic circuits with stop valves to facilitate maintenance on the tank The v...

Страница 17: ...en the safety valve or unit and the domestic hot water tank The discharge pipe in the safety unit valve must not be blocked To avoid obstructing the flow of water in the event of overpressure The safety unit discharge pipe must have a continuous adequate gradient The cross section of the discharge pipe from the safety unit must be at least equal to the cross section of the opening on the safety un...

Страница 18: ...inlet pipe 2 Open a hot water tap 3 Completely fill the domestic hot water tank via the cold water inlet pipe leaving the hot water tap open 4 Close the hot water tap when the water flow is regular without any noises in the pipes 5 Carefully vent all of the domestic hot water pipes by repeating steps 2 to 4 for each hot water tap Venting the domestic hot water tank and the mains network helps to p...

Страница 19: ...ar circuit See Installation and commissioning instructions for the solar station 4 12 Filling the heating circuit See Installation and service manual for the boiler or heat pump 4 Installation 7724479 v03 07102019 AS 300 2E BC 19 ...

Страница 20: ...lar circuit See Installation and commissioning instructions for the solar station 5 1 3 Primary heating circuit See Installation and service manual for the boiler or heat pump 5 1 4 Electrical connection 1 Check the electrical connection particularly the earthing 5 2 Commissioning procedure Warning Initial commissioning must be performed by a qualified professional During the heating process water...

Страница 21: ...estic hot water tank and void its warranty 6 3 Cleaning the casing 1 Clean the outside of appliances using a damp cloth and a mild detergent 6 4 Checking the magnesium anode Regularly check the condition of the anodes After the first check and in light of the wear of the anodes determine the frequency of future checks 6 4 1 Check with anode tester Check all the testers on the calorifier The calori...

Страница 22: ... and improves the insulation of the domestic hot water tank 4 Remove limescale deposits from the exchanger to guarantee its performance 5 Remount the unit For more information see Remove the inspection hatches page 22 Checking the magnesium anode page 21 Putting the inspection hatches back in place page 23 6 6 Removing and remounting the inspection hatches Caution To guarantee tightness the gasket...

Страница 23: ... lip gasket outside the domestic hot water tank 2 Replace the sheet gasket Tab 4 A Side inspection hatch with anode 3 Carefully refit the connections on the anode tester Important Connect the beige wire to the anode Connect the black wire to the inspection hatch Fig 13 MW 5000827 1 6x 1 Fig 14 2 L000611 A A Fig 15 L000403 A 3 6 Maintenance 7724479 v03 07102019 AS 300 2E BC 23 ...

Страница 24: ...ately 6 N m is obtained by manipulating the box spanner with the small lever and 15 N m by manipulating it with the large lever 5 After reassembly check the tightness of the lateral flange 6 Proceed with commissioning 6 7 Inspection and maintenance of the solar circuit See Solar station installation and service manual 6 8 Maintenance form Tab 6 No Date Checks made Remarks By Signature 6 Maintenanc...

Страница 25: ...No Date Checks made Remarks By Signature 6 Maintenance 7724479 v03 07102019 AS 300 2E BC 25 ...

Страница 26: ...o the domestic hot water tank 2 Disconnect the cables on the electrical components 3 Close the domestic water inlet valve 4 Drain the installation 5 Dismantle all water connections fitted to the domestic hot water tank outlet 6 Scrap and recycle the domestic hot water tank in accordance with local and national regulations Fig 16 MW 3000179 03 7 Disposal and Recycling 26 AS 300 2E BC 7724479 v03 07...

Страница 27: ...t fiche Solar devices Tab 7 Product fiche for solar devices Brand name Product name Unit AS 300 2E BC Solar hot water storage tank Energy efficiency class C Solar hot water storage tank Standing loss W 88 Solar hot water storage tank Storage volume l m3 300 0 300 8 Appendix 7724479 v03 07102019 AS 300 2E BC 27 ...

Страница 28: ...8 Appendix 28 AS 300 2E BC 7724479 v03 07102019 ...

Страница 29: ...8 Appendix 7724479 v03 07102019 AS 300 2E BC 29 ...

Страница 30: ...8 Appendix 30 AS 300 2E BC 7724479 v03 07102019 ...

Страница 31: ...chnological information contained in these technical instructions as well as any drawings and technical descriptions supplied remain our property and shall not be multiplied without our prior consent in writing Subject to alterations ...

Страница 32: ...7724479 v03 07102019 7724479 001 03 ...

Отзывы: