B-2
BE1-79A Terminal Communication
9310200990 Rev G
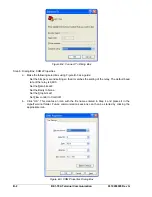
Figure B-2. Connect To Dialog Box
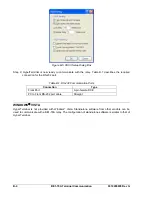
Step 6: Dialog Box: COMx Properties
a. Make the following selections using Figure B-3 as a guide:
Set the bits per second setting so that it matches the setting of the relay. The default baud
rate of the relay is 9,600.
Set the Data bits at 8.
Set the Parity to None.
Set the Stop bits at 1.
Set Flow control to Xon/Xoff.
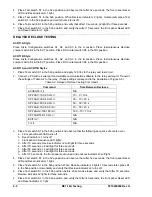
b. Click “OK”. This creates an icon with the file name entered in Step 4 and places it in the
HyperTerminal folder. Future communication sessions can then be started by clicking the
appropriate icon.
Figure B-3. COM Properties Dialog Box
Содержание BE1-79A
Страница 1: ...INSTRUCTION MANUAL FOR RECLOSING RELAY BE1 79A Publication 9310200990 Revision G 02 08...
Страница 2: ......
Страница 8: ...vi BE1 79A Introduction 9310200990 Rev G This page intentionally left blank...
Страница 10: ...ii BE1 79A General Information 9310200990 Rev G This page intentionally left blank...
Страница 16: ...ii BE1 79A Controls and Indicators 9310200990 Rev G This page intentionally left blank...
Страница 20: ...2 4 BE1 79A Controls and Indicators 9310200990 Rev G This page intentionally left blank...
Страница 22: ...ii BE1 79A Functional Description 9310200990 Rev G This page intentionally left blank...
Страница 34: ...ii BE1 79A Communication Commands 9310200990 Rev G This page intentionally left blank...
Страница 40: ...ii BE1 79A Installation and Configuration 9310200990 Rev G This page intentionally left blank...
Страница 43: ...9310200990 Rev G BE1 79A Installation and Configuration 5 3 Figure 5 2 Panel Cutout Dimensions S1 Case...
Страница 52: ...ii BE1 79A Testing 9310200990 Rev G This page intentionally left blank...
Страница 58: ...6 6 BE1 79A Testing 9310200990 Rev G This page intentionally left blank...
Страница 60: ...ii BE1 79A RS Contact Application 9310200990 Rev G This page intentionally left blank...
Страница 66: ...ii BE1 79A Terminal Communication 9310200990 Rev G This page intentionally left blank...

