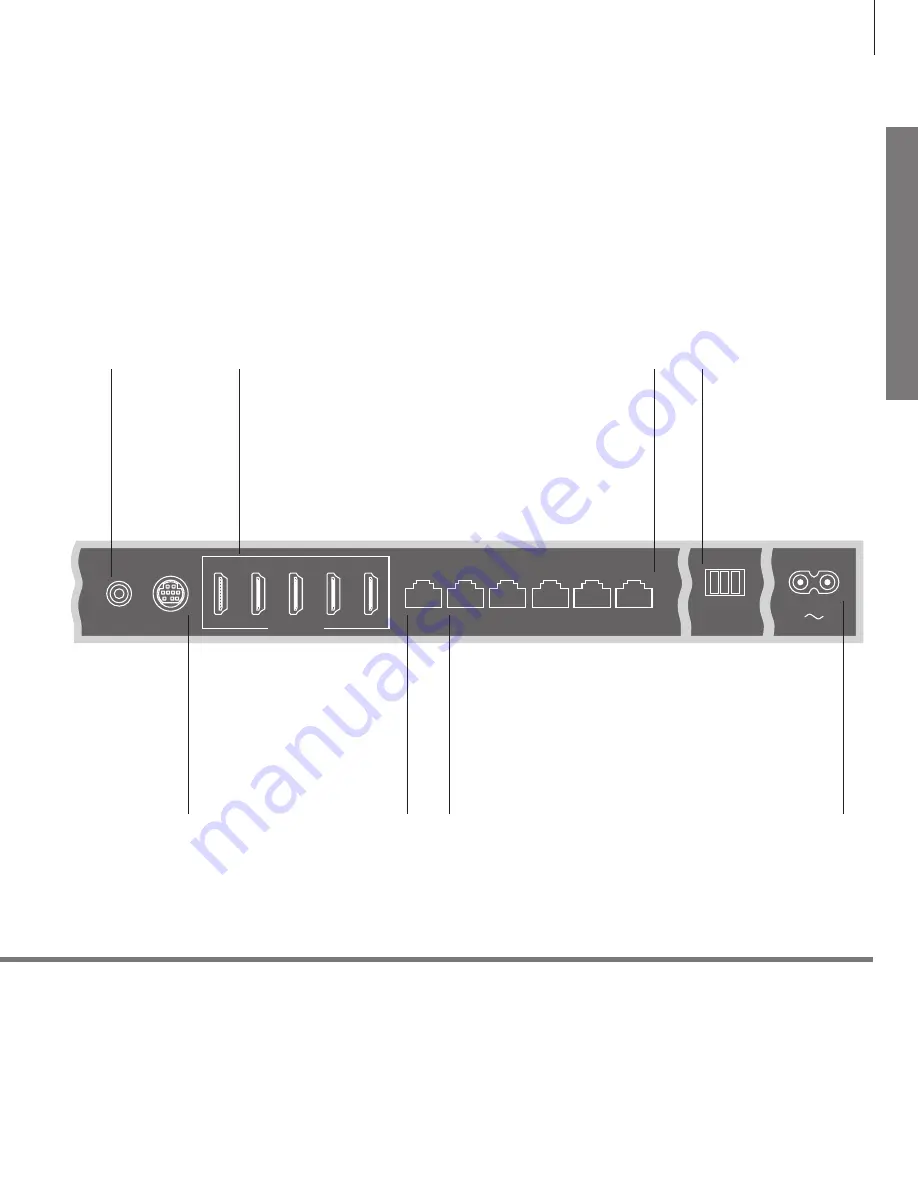
manualshive.com logo in svg
background image

Set

ting

 up

 Mains supply 

Connection to the 

mains supply 

ANTENNA WLAN

For connection of wireless 
network antenna (optional)

PL 1–3 (Power Link) 

For connection of external 

speakers in a surround sound 

setup. See the online guide for 

more information*

2

HDMI IN (1–5) 

The High Definition Multimedia 

Interface allows you to connect many 

different video sources, such as set-top 
boxes, game consoles, multimedia 
players, Blu-ray players, or a computer

S/P-DIF IN 

Digital audio input 

socket

PUC 1 A+B (CTRL 2)/PUC 2 A+B (CTRL 3) 

For IR control signals to external equipment 
connected to an HDMI IN or AV IN socket. Allows 
you to control non-Bang & Olufsen equipment 
with a Beo4 remote control with navigation 

button*

2

CTRL 1 

Not in use

AV IN 

For connection of 

analogue video 

equipment. Special 

adaptor needed

Cables and adaptors

Ethernet connection

2

*Online guide

Depending on the type of equipment you connect to the television, different cables and maybe also 
adaptors are needed. Cables and adaptors are available from your Bang & Olufsen retailer. 
Connect your television to the Internet to receive software updates and download Peripheral Unit 
Controller (PUC) tables. It is recommended that you set the television to update software automatically.

The online guide includes more information about setup and connection of external equipment.

We recommend that you connect the television to the Internet to be able to 

receive software updates and to download Peripheral Unit Controller (PUC) tables. 
PUC tables enable you to operate connected non-Bang & Olufsen products with 

the Beo4 remote control with navigation button.

WLAN

ANTENNA

5

4

3

2

1

CTRL 1

S/P-DIF

IN

HDMI IN

AV

IN

CTRL 2

PUC 2 A+B

CTRL 3

PUC 1 A+B

PL 1

PL 2

PL 3

11

Содержание BeoPlay V1-32

Страница 1: ...BEOPLAY V1 BeoPlay V1 32 BeoPlay V1 40...

Страница 2: ......

Страница 3: ...uide or in the help texts in the television menus The guides are found on www beoplay com v1 support The guides and the on screen help texts are also kept up to date if new software introduces new or...

Страница 4: ...or direct artificial light such as a spotlight as this may reduce the sensitivity of the remote control receiver Also if the screen is overheated black spots may appear in the picture These spots disa...

Страница 5: ...evision 8 Connection panel BeoPlay V1 32 10 Connection panel BeoPlay V1 40 Daily use 12 How to use your remote control 13 How to navigate in menus 15 Watch television 16 Media browser 17 Change pictur...

Страница 6: ...ions are found on www beoplay com v1 support To remove the speaker cover gently push it out using one of the four pins removed from the television If the television is mounted on the table stand or wa...

Страница 7: ...the television see next pages you are prompted to configure the source Follow on screen instructions For information on other setup options PUC tables and IR transmitters see the online guide availab...

Страница 8: ...deo or music files from for example a NAS device SATELLITE 14 18V 0 4A Aerial input socket for a digital satellite signal Depending on your tuner options you may have either one or no satellite socket...

Страница 9: ...tors Ethernet connection 2 Online guide Depending on the type of equipment you connect to the television different cables and maybe also adaptors are needed Cables and adaptors are available from your...

Страница 10: ...TV network or for an analogue signal 2 x COMMON INTERFACE CA Module For insertion of a CA module and smart card for access to coded digital channels For more information about compatible smart card a...

Страница 11: ...eo equipment Special adaptor needed Cables and adaptors Ethernet connection 2 Online guide Depending on the type of equipment you connect to the television different cables and maybe also adaptors are...

Страница 12: ...press to exit menus completely Switch on teletext Display extra buttons for functions or sources in the Beo4 display Use or to step in the list Some buttons can be reconfigured during the setup proces...

Страница 13: ...e setting Enter data Bring up sub menu store setting Select option Move backwards through menus or Press and hold to exit menus Some menus take up more space than available on the television screen Th...

Страница 14: ...n menu Select option You can select a source just by pressing the dedicated button on the remote control or you can select a source via the menu Select source Select source Bring up main menu Select S...

Страница 15: ...mute sound Bring up and use the menu overlay You can bring up the main menu including functions for the active source Press Activate the desired function 1 or Select a channel Select Select channel o...

Страница 16: ...MEDIA in your Beo4 display 1 Select storage device with music Select storage device with photos Step between previous and next photo Browse files and folders and press to start slideshow Browse in fi...

Страница 17: ...atio the picture will be stretched horizontally SOURCE FORMAT select 3 AUTO WIDE select 2 AUTO select 1 Select between picture formats 1 3 if you remember the number of the format you want Select pict...

Страница 18: ...st remove the sides on the stand or wall bracket to remove the speaker cover See guide enclosed with the stand or wall bracket Wipe dust off the screen using a dry soft cloth To remove stains or dirt...

Страница 19: ...ttons Press the centre button to add and place the button on its preset position in the list or press 1 9 to insert the button at a specific position in the list ADDED appears indicating that the butt...

Страница 20: ...mal household wastage all electrical and electronic equipment parts and batteries must be collected and disposed of separately When disposing of electrical and electronic equipment and batteries by us...

Страница 21: ...21...

Страница 22: ......

Страница 23: ......

Страница 24: ......

Отзывы: