H-SEM
Operation
Instruction 3015-4584
5
3 Operation
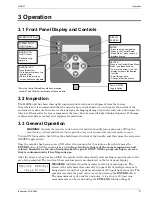
3.1 Front Panel Display and Controls
* Enter the Control/Setup Menu Mode by pressing
the LEFT and RIGHT arrow buttons at the same time.
3.2 Inspection
The H-SEM unit has been thoroughly inspected and tested prior to shipment from the factory.
Nevertheless, it is recommended that the monitor be re-checked prior to use. Inspect the outside of the
enclosure to make sure there are no obvious signs of shipping damage. Open the enclosure and inspect the
interior of the monitor for loose components that may have become dislodged during shipment. If damage
is discovered, please contact your supplier for assistance.
3.3 General Operation
WARNING:
Operate the monitor in its horizontal position (handle facing upwards). Tilting the
monitor to a vertical position while in operation may cause inaccurate measurements to occur.
To turn ON the monitor, first lift up the shield located in front of the handle, and then press the red power
ON/OFF toggle switch.
Once the monitor has been powered ON, allow it to warm up for 15 minutes; after which, press the
ENTER
button to fill the purge-air bag with
clean, fresh air that is of the same temperature and
relative humidity as the area being checked for gas. DO NOT fill the purge-air bag in an area
that is contaminated with refrigerant gas.
After the purge-air bag has been filled, the monitor will automatically start making measurements in the
area being sampled. The results of those measurements are displayed on the front panel display.
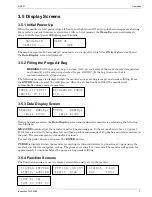
MEASURE
indicates when the monitor is actively measuring gas. The
screen to the left shows that currently 10 ppm of R-134A refrigerant gas is
being detected, and that a peak measurement of 20 ppm has been made. The
operator can reset the peak value to zero by pressing the
ENTER
button.
The measurement cycle runs for 4 minutes. A log of up to 200 previous
measurements can be viewed using the
PPM LOG
function (Page 8).
MEASURE 00020pk
10ppm R134A
DISPLAY
SCREEN
ENTER
• Press to zero peak reading
• When in the Control/Setup
Menu Mode*, press to save a
displayed value
KEYPAD
When in the Control/Setup Menu
Mode*, use these buttons:
• To move the arrow (>) on the
display screen to the desired
function
• Scroll through data
• Change a function’s value
MONITOR ON
LIGHT (Green)
Flashes during
warm-up
SYSTEM FAULT
LIGHT (Yellow)
ALARM LIGHT (Red)
SILENCE / ESC
Press this button:
• To temporarily silence the
audible alarm
• Return to the previous
screen without saving data
Power ON/OFF
Toggle Switch


