WARNING
38
Copyright © 2022, Baby Trend Inc., All Rights Reserved. Todos los derechos reservados.
37
ASSEMBLY MONTAJE
Copyright © 2022, Baby Trend Inc., All Rights Reserved. Todos los derechos reservados.
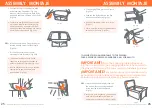
Fig. 25
25)
• To attach the napper in the playard, slide
the napper into the bassinet. Push the
napper into the playard until it locks (Fig.
25).
NOTE: DO NOT use napper on playard
without the bassinet (See To Assemble
Bassinet section, page 21) and securing the
clips to playard.
• Para sujetar la camita al corralito, deslice
el camita en el corralito. Empuje el camita
en el corral de juego hasta que se bloquee
(Fig. 25).
NOTA: NO
use la camita sobre el corralito
sin la cuna (Consulte la sección Cómo
montar el la cuna, página 21) y sujetar los
ganchos al corralito.
26)
• To remove the napper from playard, push
both pins on the napper support tubes to
release from the playard. Pull both bars out
simultaneously (Fig. 26).
• Para quitar la camita del corralito, presione
el botón de liberación del tubo de soporte
y tire de ambos tubos de soporte cabo
(Fig. 26).
Fig. 26
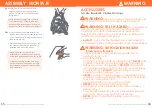
ACCESSORIES
Warnings for Toy Accessories including Toy bar/Mobile
Canopy with toys
WARNING:
•Possible entanglement injury.
•Keep out of baby’s reach.
•Remove Toy bar/Mobile/Canopy with toys when
baby begins to push up on hands and knees.
Recommended use from birth to 5 months.
•Toys are not intended to be mouthed by the baby and
should be positioned clearly out of reach of the baby's
face and mouth.
•
ALWAYS
attach all provided fasteners (strings, straps,
clamps, etc.) tightly to playard according to these
instructions. Check frequently.
•Do not add additional strings or straps to attach to any
other crib or playpen.
•The Toy bar/Mobile/Canopy with toys is intended for
visual stimulation and not to be grasped by the child.


