background image

4

A short power supply cord is provided to reduce the hazards resulting from 

entanglement or tripping over a longer cord.  Longer detachable power-supply cords 

or extension cords are available and may be used if care is exercised in their use.  If a 

longer detachable power-supply cord or extension cord is used:

1) The marked electrical rating of the cord set or extension cord should be at least as 

great as the electrical rating of the appliance, and 

2) The cord should be arranged so that it will not drape over the countertop or tabletop 

where it can be pulled on by children or tripped over unintentionally.

DO NOT OPERATE APPLIANCE IF THE LINE CORD SHOWS ANY DAMAGE, OR IF

APPLIANCE WORKS INTERMITTENTLY OR STOPS WORKING ENTIRELY.

IMPORTANT

During the first few minutes of initial use, you may notice smoke and/or a slight odor.  This is 

normal and should quickly disappear.  It will not recur after appliance has been used a few 

more times.

BEFORE USING

1.  Carefully unpack the pancake maker and all parts.  Remove all packaging materials, 

including any stickers or labels.

2.  Clean the interior and exterior surfaces of the pancake maker with a damp cloth or 

sponge.  Wipe dry with a soft cloth.  

NEVER IMMERSE THE PANCAKE MAKER OR 

CORD IN WATER OR ANY OTHER LIQUID.


3.  Position the pancake maker on a dry, level, heat-resistant surface.

4.  It is recommended to operate this appliance on a separate outlet and circuit from other 

appliances to avoid overloading the circuit.

HOW TO USE

1.  Position the pancake maker on a dry, level, heat-resistant surface.

2.  To maintain the quality of the nonstick, it is recommended to periodically coat the nonstick 

surface with a small amount of vegetable oil.  This can be done with a paper towel or with 

a nonstick oil spray.  Wipe off any excess oil.

3.  Plug the power cord into a 120V outlet, preferably on a separate outlet from other 

appliances to prevent the circuit from being overloaded.  

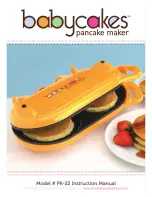
4.  Lower the lid to the closed position and allow the pancake maker to preheat for a minimum 

of 4-5 minutes.  The red POWER light will be illuminated.

TIP:  Prepare ingredients before the pancake maker is preheated.

5.  Lift cover latch and open the pancake maker using a pot holder to avoid making contact 

with hot surfaces.

CAUTION:  Surfaces of the pancake maker are hot.  To avoid accidental burns 

or contact with the hot surfaces or steam being released while cooking, always 

open and close the lid of the pancake maker using an oven mitt or pot holder.

6.  Use the plastic scoop provided to slowly pour batter into the dished cooking plate.  

CAUTION:  Do not overfill the cooking plate.  1 to 1 

½ scoops is the recommended 

amount of pancake batter.


7.  Before closing the pancake maker, allow the batter to begin to bubble.  This will vary 

based on the recipe.  By allowing the batter to bubble, you can be sure that the pancake 

has begun to solidify and batter will not leak onto the counter or tabletop.

8.  Close the lid, holding both sides of the handle, rotate the pancake maker around the 

hinged base.  

Содержание PK-22

Страница 1: ......

Страница 2: ... before cleaning Allow to cool before cleaning and putting on or taking off parts 7 Do not operate any appliance with a damaged cord or plug or after the appliance malfunctions or has been damaged in any manner Return appliance to the nearest authorized service facility for examination repair or adjustment 8 The use of accessory attachments not recommended by the appliance manufacturer may result ...

Страница 3: ...s not fit into the outlet reverse the plug and try again If it still does not fit contact a qualified electrician Do not attempt to modify the plug in any way LINE CORD SAFETY TIPS 1 Never pull or yank on cord or the appliance 2 To insert plug grasp it firmly and guide it into outlet 3 To disconnect appliance grasp plug and remove it from outlet 4 Before each use inspect the line cord for cuts and...

Страница 4: ...nd circuit from other appliances to avoid overloading the circuit HOW TO USE 1 Position the pancake maker on a dry level heat resistant surface 2 To maintain the quality of the nonstick it is recommended to periodically coat the nonstick surface with a small amount of vegetable oil This can be done with a paper towel or with a nonstick oil spray Wipe off any excess oil 3 Plug the power cord into a...

Страница 5: ...erviceable parts Do not try to repair it yourself 1 Before cleaning unplug from outlet and allow to cool 2 Clean the interior and exterior surfaces of the pancake maker with a damp cloth or sponge Wipe dry with a soft cloth NEVER IMMERSE THE PANCAKE MAKER OR CORD IN WATER OR ANY OTHER LIQUID 3 To remove batter baked onto the cooking surface pour a small amount of cooking oil onto the hardened batt...

Страница 6: ...eed some water or milk added to the mixture as cold batter can thicken Cold batter may also require a longer cooking time to reach the desired doneness For best results it is recommended to use room temperature batter If batter sticks to nonstick cooking surface lightly coat the surface with butter or margarine ...

Страница 7: ...a cinnamon sugar mix or chocolate chips instead of fruit Sour Cream Blintzes Ingredients 4 eggs 1 cup sour cream cup flour 1 tablespoon sugar teaspoon salt teaspoon baking soda 1 can of your favorite fruit pie filling blueberry raspberry cherry etc Powedered Sugar Directions 1 Preheat Pancake Maker 2 Whisk eggs and sour cream 3 Add the dry ingredients and mix thoroughly 4 Using provided scoop fill...

Страница 8: ...d for 35 more seconds 8 Open the Pancake Maker and finish cooking until golden brown As those pancakes finish browning start your next batch Makes 6 Pancakes Amaretto Pancakes Ingredients 2 eggs 1 cup milk 1 tablespoon lemon juice 1 tablespoons imitation almond extract 2 tablespoons baking powder 2 cups all purpose pancake and waffle mix 1 tablespoon sugar Directions 1 Preheat Pancake Maker 2 Mix ...

Страница 9: ...ons 1 Preheat Pancake Maker 2 In separate pan lightly cook vegetables in oil 3 Blend eggs 4 Pour of the egg mixture into dished cooking plates 5 Close the lid and allow eggs to cook 2 3 minutes 6 Flip the Pancake Maker quickly and allow the eggs to cook another 20 30 seconds 7 Open the Pancake Maker and add cooked vegetables and feta cheese fold each omelet in half and serve Makes 2 Omelets Eggs O...

Страница 10: ...period the authorized service dealer at its option will repair or replace any part that upon examination is found to be defective under normal use and service NORMAL WEAR This warranty does not cover normal wear of parts or damage resulting from any of the following Negligent use or misuse of the product Improper voltage or current Use contrary to the operation instructions Deviation from instruct...

Страница 11: ...11 ...

Страница 12: ...12 ...

Отзывы: