background image

 Copyright © 2015, Baby Trend Inc., All Rights Reserved. Todos los derechos reservados. Tous droits réservés.

 Copyright © 2015, Baby Trend Inc., All Rights Reserved. Todos los derechos reservados. Tous droits réservés.

28

27

OPERATION  FUNCIONAMIENTO  UTILISATION

NOTE: 

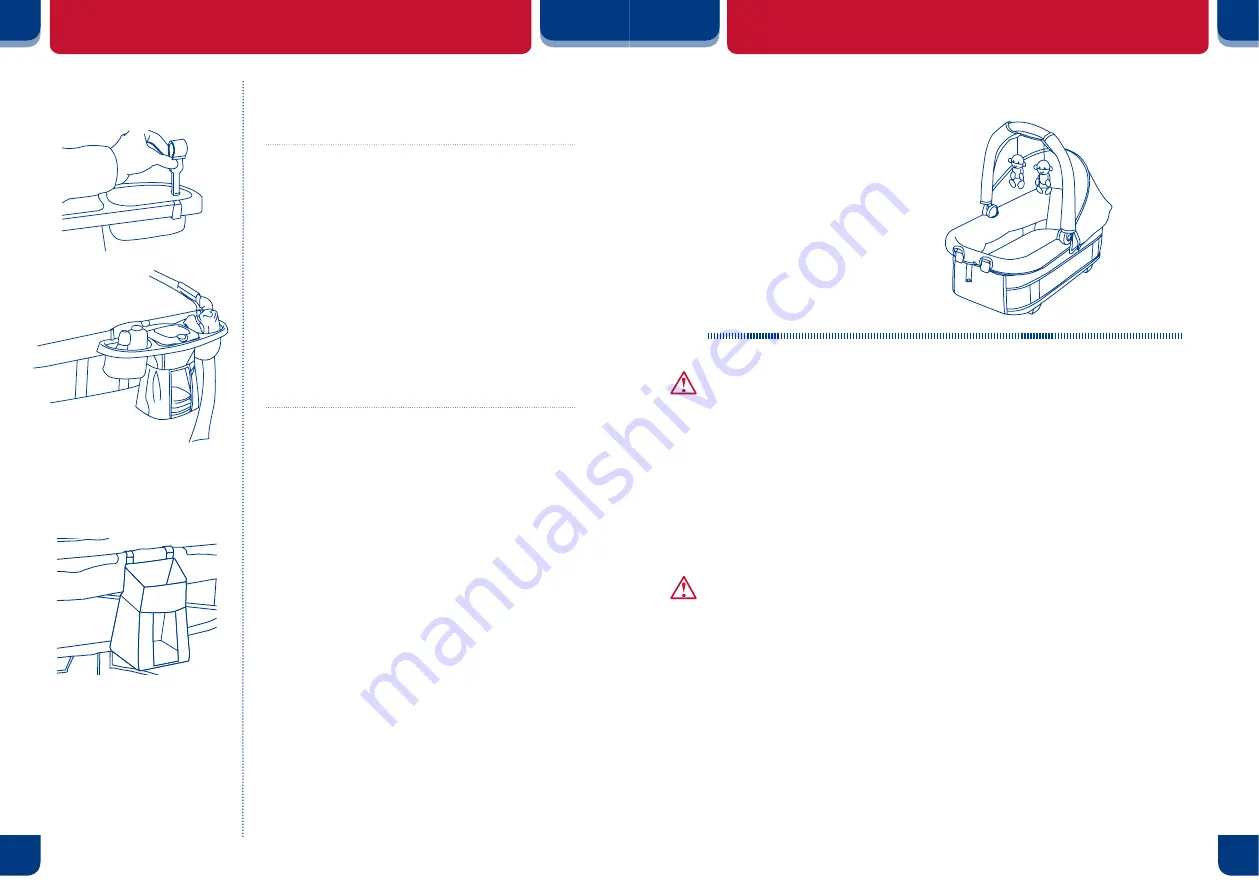
 The Parent Organizer/Diaper Stacker 

can only be installed on open sides of the 

Playard where the connecting clips can easily be 

attached without interfering with other features.

• Organizador para los padres: Ponga  

cada gancho en posición cual este alado de 

la parte posterior del organizador. Precione 

firmamente el gancho asia abajo dentro de la 

renura asta que se encaje en su lugar. (Fig. 

21a) Portapañales: pase al segundo paso.

• Conecte el organizador para padres/

portapañales al corralito deslizando los 

dos (2) ganchos de conexión sobre una parte 

abierta de la baranda superior del corralito. (Fig. 

21b) 

NOTA:

  El organizador para padres/

portapañales solamente puede instalarse sobre 

lados abiertos del Corralito donde se  

pueden colocar fácilmente los ganchos de 

conexión sin interferir con otras funciones.

• Organisateur pour parent: Chaque position de 

sorte que le crochet accroché fin est confrontée 

à l’arrière de l’organisateur. Appuyez sur le 

crochet fermement dans la fente jusqu’à 

ce qu’elle s’enclenche en place. (Fig. 21a) 

Pouchette de diaper : Passer à l’étape 2.

• Connectez l’organisateur pour parent / pouchette 

de diaper au parc en fixant les deux (2) attaches 

en plastique surles barres d’une partie du 

dessus du parc. (Fig. 21b) 

REMARQUE : 

L’organisateur pour parent 

/ pouchette de diaper ne doit être installé 

que sur les côtés ouverts du parc où il 

peut facilement être attaché sans interférer 

avec les autres éléments du parc.

Parent Organizer

Organizador para padres

Organisateur pour parent

Diaper Stacker

Portapañales

Pochette de diaper

Fig. 21b

Fig. 21b

Fig. 21a

ASSEMBLY  MONTAJE  ASSEMBLEE

TO ASSEMBLE NAPPER

ARMADO DEL CAMITA

ASSEMBLAGE DE MOÏSE

Napper

Camita  

Moïse

WARNING:

 Never leave child unattended.

SUFFOCATION HAZARD:

 Infant carrier can 

roll over on soft surfaces and suffocate child. NEVER place 

carrier on beds, sofas, or other soft surfaces.

FALL HAZARD:

 Child’s activity can move carrier. 

NEVER place carrier on counter tops, tables, or any other 

elevated surface.

NEVER use this carrier as a means to transport an infant in 

a motor vehicle.

ADVERTENCIA: 

NUNCA deje al niño solo.

PELIGRO DE ASFIXIA: 

Portador puede 

volcarse en superficies blandas y asfixiarse. NUNCA 

colocar portador en camas, sofás, o en otras superficies 

blandas.

PELIGRO DE CAÍDA: 

Actividad del niño 

puede mover portador. NUNCA colocar portador en la 

parte superior de los mostradores, mesas, o cualquier otra 

superficie elevada.

NUNCA utilice este portador como medio de transporte un 

bebé en un vehículo de motor.

Содержание Nurcery Center PY47777

Страница 1: ...installation is the sole responsibility of the end user Cualquier producto que haya sido sometido a uso indebido abuso uso anormal desgaste excesivo montaje incorrecto negligencia exposici n ambiental...

Страница 2: ...sh fabric Check before assembly and periodically during use Contact Baby Trend Customer Service at 1 800 328 7363 for replacement parts repair or instructions NEVER substitute parts NEVER leave child...

Страница 3: ...ou assemblage inspecter le parc le berceau roulettes et la table langer pour v rifier s il y a de bris des joints l ches des pi ces manquantes ou des bords pointus NE PAS utiliser le parc ou le bercea...

Страница 4: ...la silla con piezas ausentes o rotas IMPORTANTE Se requiere el montaje por parte de un adulto IMPORTANT Afin d assurer l utilisation s curitaire de votre parc de b b suivre ces instructions soigneusem...

Страница 5: ...bloqu es avant d abaisser le centre du parc Tirez sur une seule barri re la fois placez une main sur chaque tube formant la barri re et tirez fermement vers le haut vitez de tirer en tenant la barri r...

Страница 6: ...erside of the Playard floor to prevent the Mattress from moving Fig 5b IMPORTANT The handle located in the center of the Playard floor MUST remain raised Approx 45 7 cm or 18 inches while locking the...

Страница 7: ...t d abord tre relev avant de pouvoir d bloquer les barri res Saisissez la poign e situ e au centre du plancher du parc et relevez le centre la hauteur de la barri re sup rieure Fig 7 Ramenez les monta...

Страница 8: ...sup rieure les deux tubes doivent tre lib r s Gather four 4 corners and center all together tightly Fig 9 Wrap Mattress around Playard frame with padded side facing inward Junte las cuatro 4 esquinas...

Страница 9: ...de the playard and to avoid overheating your child when using the bassinet NEVER use an outdoor canopy Accesorios ADVERTENCIA La inobservancia de las advertencias e instrucciones podr a causar lesione...

Страница 10: ...couchant les p diatres recommandent que les enfants en bonne sant soient plac s sur leur dos pour dormir sauf avis contraire du m decin RISQUE DE CHUTE V rifiez toujours que le berceau est bien verro...

Страница 11: ...appuyant fermement sur chaque attache en plastique jusqu ce que toutes soient bien enclench e Fig 12 Place the Mattress into the Bassinet with the padded side facing upward Fig 13 NOTE Fasten tabs und...

Страница 12: ...of the Playard Fig 15a Turn the Connector Knobs counter clockwise to lock into place Fig 15b Flip Changing Table over onto Playard Fig 15c Snap the two 2 buttons on the flap down onto the Playard Fig...

Страница 13: ...IADOR POUR UTILISER LE SYST ME DE RETENUE DE LA TABLE LANGER Place child on changing table make sure hand and arms are clear of the restraint Bring the restraint around the child s waist and clip the...

Страница 14: ...sta que est ce ida alrededor de la cintura del ni o NO AJUSTE DE M S Fig 19b Para retirarlo desabroche la hebilla ATENCI N Nunca use el cambiador si est da ado o roto Placez l enfant sur la table assu...

Страница 15: ...lace Fig 21a Pouchette de diaper Passer l tape 2 Connectez l organisateur pour parent pouchette de diaper au parc en fixant les deux 2 attaches en plastique surles barres d une partie du dessus du par...

Страница 16: ...sure the handle clicks into position before using Fig 25a 30 29 ASSEMBLY MONTAJE ASSEMBLEE ASSEMBLY MONTAJE ASSEMBLEE ATTENTION Playard must be fully assembled and securely locked before installing or...

Страница 17: ...o playard Para usar la Camita en el Corralito baje la Camita hacia la cuna Fig 26a Empuje hacia abajo en la parte delantera y trasera de la Camita para asegurar los Ganchos en la barranda del Corralit...

Страница 18: ...uton pour changer de chanson To listen to NATURE sounds press the NATURE button Press the button to change the sound Para escuchar sonidos de la NATURALEZA oprima el bot n NATURE NATURALEZA Puede usar...

Страница 19: ...orient or relocate the receiving antenna Increase the separation between the equipment and receiver Connect the equipment into an outlet on a circuit different from that to which the receiver is conne...

Страница 20: ...est sujeto a las siguientes dos condiciones 1 este dispositivo no puede producir interferencias perjudiciales y 2 este dispositivo debe aceptar cualquier interferencia que reciba incluyendo las que pu...

Отзывы: