Pg. 29
Step 5: LCD Installation
Parts Needed:
1- LCD Display
1- LCD Bracket
1- Plastic Knob
NOTE:
Before you proceed, disconnect the
ribbon cable that connects the handle bar to the
machine.
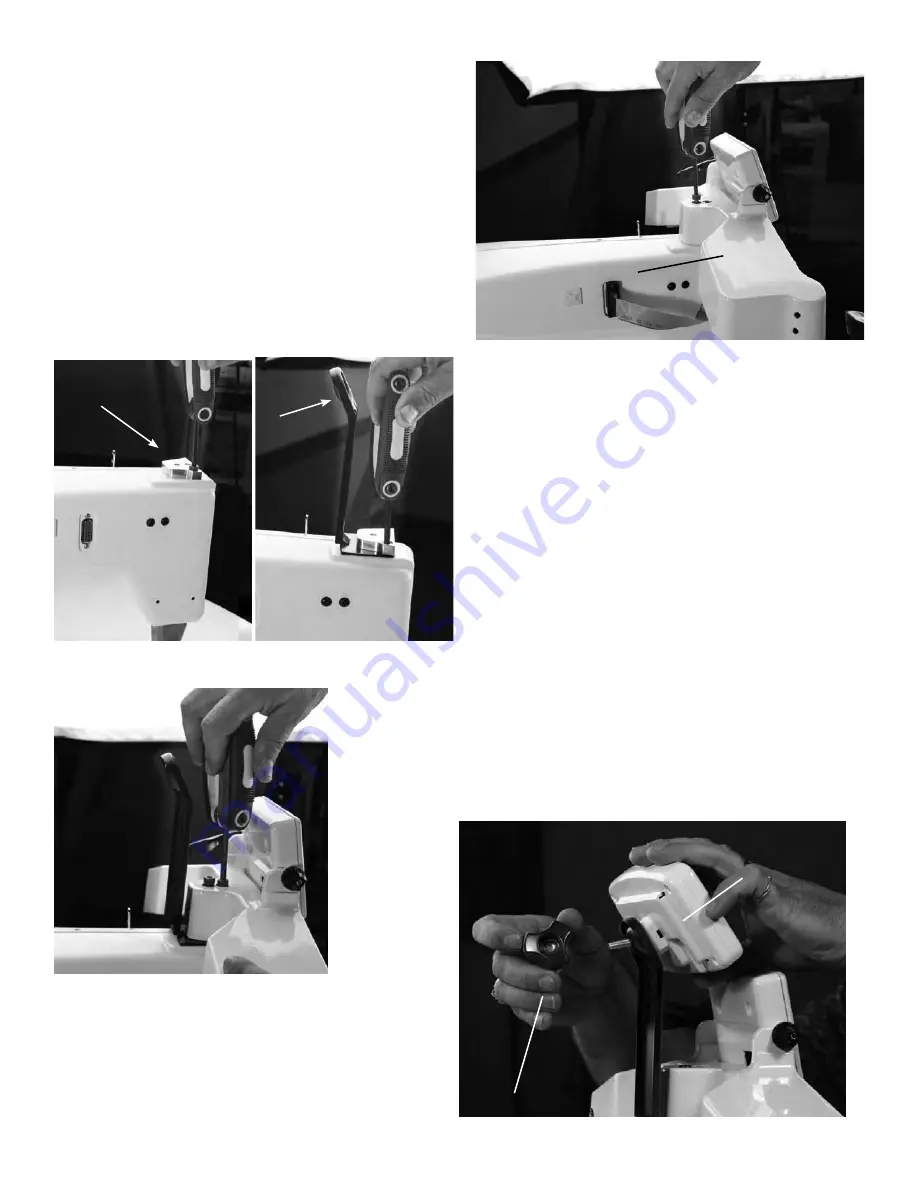
5-1 .
Using a 5mm Allen Wrench you will remove
the Jewel Handle Bar, by removing the two (2)
screw shown in Fig. 5-A.
5-2 .
Using the same 5mm Allen Wrench you
will remove the Jewel Handle Bar Key Block, by
removing the screw shown in Fig. 5-B.
5-3 .
Now, place your LCD Bracket on the
machine and then replace the Jewel Handle Bar
Key Block, being sure all three holes line up, as
shown in Fig. 5-C, using the same screw you
removed from the machine in step 3.
5-4 .
Reattach the Jewel Handle Bar, as shown
in Fig. 5-D, using the same screws you removed
from the machine in step 2.
5-5
. Slip the bolt on the back of the LCD through
the hole in your LCD Bracket and then secure it
using the plastic knob, as shown in Fig. 5-E.
5-6 .
Next, reconnect the handle bar ribbon cable
you disconnected at the beginning of this step.
Fig. 5-B
Fig. 6-A
Jewel Handle Bar
Jewel Handle
Bar Key
LCD Bracket
Fig. 5-C
Fig. 5-D
Fig. 5-E
LCD Display
Plastic Knob
Содержание BL J18-QM
Страница 1: ...Model BLJ18 QM www babylock com Consumer Helpline 800 264 0644 Installation Guide And...
Страница 3: ...Section 1 The Crown Jewel on the Majestic frame Installation Guide For the On the Majestic frame...
Страница 21: ...Section 2 The Crown Jewel on the Pinnacle frame Installation Guide For the On the Pinnacle frame...
Страница 39: ...Section 3 The Jewel on the Pinnacle frame Installation Guide For the On the Pinnacle frame...
Страница 65: ...Pg 64 20 Now that the program has been registered it will now launch to the QuiltCAD main screen...
Страница 66: ......


