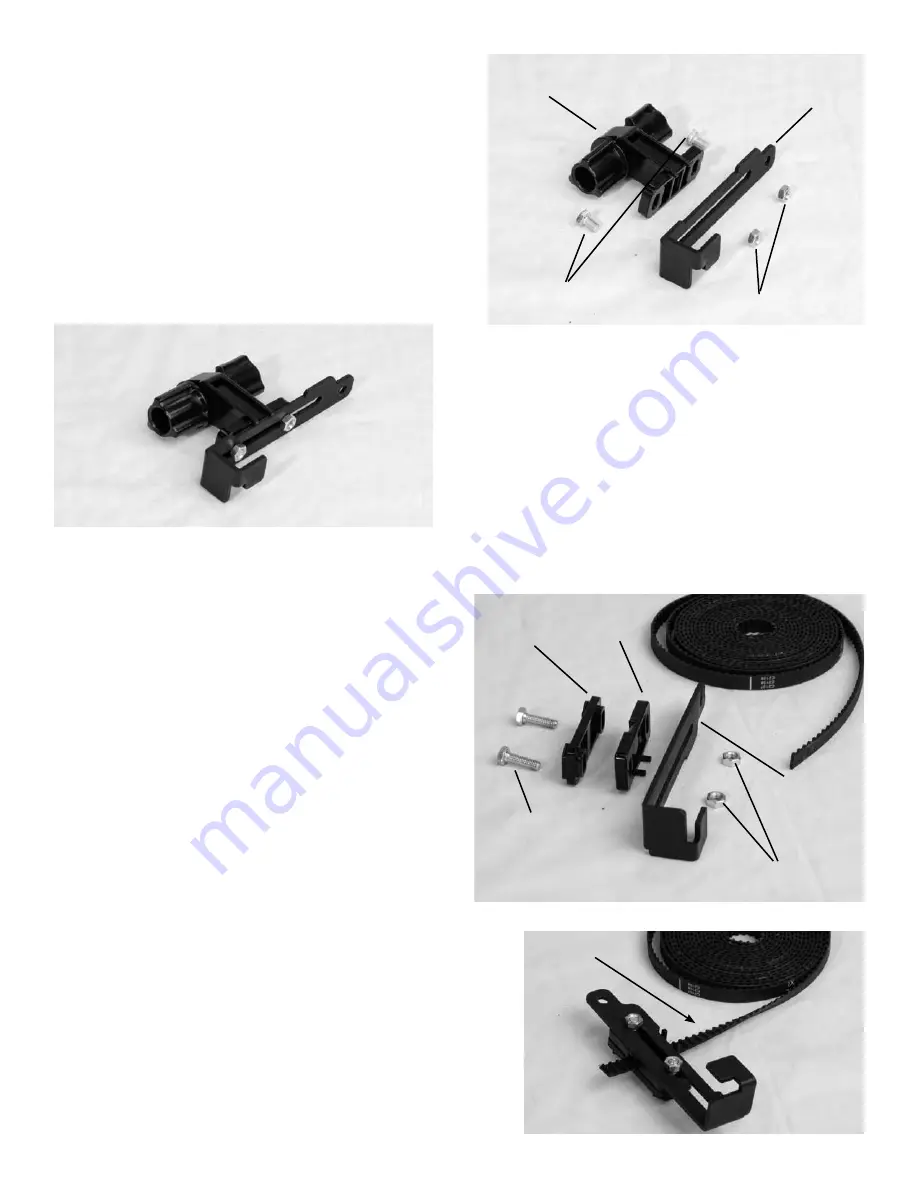
background image

Pg. 9

Fig. 3-A

Fig. 3-B

3-1 .

 Attach one (1) Belt Tensioner Housing to one 

(1) Mounting Clamp using two (2) M6 x 12mm Hex 

Head Bolts and two (2) M6 Hex Nuts, as shown in 

Fig. 3-A and 3-B.

Step 3: Mounting Clamp Assembly

Parts Needed:


2- Mounting Clamp


1- Belt Clamp Front


1- Belt Clamp Back


1- Belt Tensioner Housing


1- Short Belt


2- M6 x 12mm Hex Bolt


2- M6 x 24mm Hex Bolt


4- M6 Hex Nut

Fig. 3-C

Fig. 3-D

3-2 .

 Attach one (1)  Belt Clamp Front and one (1) 

Belt Clamp Back to one (1)  Mounting Clamp using 

two (2) M6 x 24mm Hex Bolts and two (2) M6 Hex 

Nuts, as shown in Fig. 3-C. Thread the bolts into 

the nuts only until they grab the first thread, so 

that the front and back clamps remain loose. 

3-3 .

 Slide the belt between the back and front 

Belt Clamps, as show in Fig. 3-D (make careful 

note of the direction of the belt teeth), and then 

tighten the hex bolts.

Belt Tensioner 

Housing

M6 x 12mm 

Hex Bolt

M6 Hex Nut

Mounting 

Clamp

M6 x 24mm 

Hex Bolt

M6 Hex Nut

Mounting 

Clamp

Short Belt

Belt Clamp 

Back

Belt Clamp 

Front

Belt Teeth

Содержание BL J18-QM

Страница 1: ...Model BLJ18 QM www babylock com Consumer Helpline 800 264 0644 Installation Guide And...

Страница 2: ...p 3 Mounting Clamp Assembly 27 Step 4 Belt Bracket to Sewing Machine 28 Step 5 LCD Installation 29 Step 7 Carriage to Frame Assembly 31 Step 8 Sewing Machine to Bottom Carriage Assembly 33 Step 9 LCD...

Страница 3: ...Section 1 The Crown Jewel on the Majestic frame Installation Guide For the On the Majestic frame...

Страница 4: ...Motion Plate Installation 5 Step 2 Belt Bracket Assembly 8 Step 3 Mounting Clamp Assembly 9 Step 4 Belt Bracket to Sewing Machine 10 Step 5 LCD Installation 11 Step 6 Mounting Clamp to Frame Assembly...

Страница 5: ...lips Head Screws 8 LCD Display 1 Power Strip Assembly 1 4mm Allen Wrench 1 QuiltMotion Plate 1 Length Adaptor 2 Power Strip Bracket Left 1 Power Strip Bracket Right 1 Mounting Clamp 2 Left and Right L...

Страница 6: ...r to fit it in place in the bottom carriage see Fig 1 C Step 1 QuiltMotion Plate Installation Parts Needed 1 QuiltMotion Plate 4 Motor Plate Brackets 2 Power Strip Brackets 2 Length Adaptors 1 Power S...

Страница 7: ...cable into the Power Strip Bracket as shown in Fig 1 G 1 6 Take the short ribbon cable that came in the QuiltMotion package plug one end of this cable into encoder lever and the other end into the Pow...

Страница 8: ...Fig 1 J and 1 K Fig 1 K 1 9 Next you will install the Power Strip to the Power Strip Bracket on your carriage as shown in Fig 1 L and 1 M Turn your carriage upside down again and return to the end of...

Страница 9: ...ront 1 Belt Clamp Back 1 Belt Tensioner Housing 2 M6 x 12mm Hex Bolt 2 M6 x 24mm Hex Bolt 4 M6 Hex Nut Fig 2 A Fig 2 B 2 2 Now you will assemble one 1 Belt Tensioner Housing to Belt Bracket B Do this...

Страница 10: ...ne 1 Belt Clamp Front and one 1 Belt Clamp Back to one 1 Mounting Clamp using two 2 M6 x 24mm Hex Bolts and two 2 M6 Hex Nuts as shown in Fig 3 C Thread the bolts into the nuts only until they grab th...

Страница 11: ...4 C Use one 1 10 x 1 2 Hex Screw by placing it through the other hole of the Belt Bracket B as pictured and tighten the screw Do not over tighten the screw 4 6 Using the included Allen wrench tighten...

Страница 12: ...on the machine and then replace the Jewel Handle Bar Key Block being sure all three holes line up as shown in Fig 5 C using the same screw you removed from the machine in step 3 5 4 Reattach the Jewe...

Страница 13: ...of the Belt Tensioner Clamp assembled in step 3 over the M6x40mm Hex Bolt and clip the other end to the frame as shown in Fig 6 C 6 3 Place a 18mm Plastic Spacer over the Hex Bolt as shown in Fig 6 D...

Страница 14: ...ng belt sitting on the table 7 2 Feed the end of your belt into the gearbox in the carriage as shown in Fig 7 A 7 3 Push the belt back down and keep feeding the it through until you can see it come ou...

Страница 15: ...your carriage from one side of the frame to the other to verify the alignment If necessary you can adjust your Mount Clamps at the Frame Ends by sliding them back or forth as shown in Fig 7 E and 7 F...

Страница 16: ...8 A 8 3 Pull about half of the belt through the gearbox across the top half of the Motor Plate 8 4 Now carefully place the Jewel Sewing Machine onto the carriage aligning the wheels with the carriage...

Страница 17: ...ps line up with the belt in the carriage This is easily accomplished by pushing your carriage forward and back to verify the alignment If necessary you may need to loosen the hex nuts that attach your...

Страница 18: ...the LCD USB Cable back underneath the plastic casing leaving most of the slack to the back of the machine Next plug the LCD cord into the QuiltMotion Plate as shown in Fig 9 G 9 7 Gather the slack fo...

Страница 19: ...sewing machine all the way forward and all the way back Make sure that the USB Cable does not drag on the table or interfere with the wheels as shown in Fig 9 L 9 11 There is a ribbon cable that comes...

Страница 20: ...end of the ribbon cable into the box on the Power Strip Bracket located under the rear of the carriage as shown in Fig 9 P 9 15 Replace the cover to the Cable Box on the Power Strip Bracket as show i...

Страница 21: ...Section 2 The Crown Jewel on the Pinnacle frame Installation Guide For the On the Pinnacle frame...

Страница 22: ...otion Crown Jewel For Pinnacle Table of Contents A B C D Step 1 QuiltMotion Plate Installation 23 Step 2 Belt Bracket Assembly 26 Step 3 Mounting Clamp Assembly 27 Step 4 Belt Bracket to Sewing Machin...

Страница 23: ...ead Screws 8 LCD Display 1 Power Strip Assembly 1 4mm Allen Wrench 1 QuiltMotion Plate 1 Length Adaptor 2 Power Strip Bracket Left 1 Power Strip Bracket Right 1 Mounting Clamp 2 LCD Bracket 1 Belt Bra...

Страница 24: ...the power cord and cables go underneath Step 1 QuiltMotion Plate Installation Parts Needed 1 QuiltMotion Plate 4 Motor Plate Brackets 2 Power Strip Brackets 2 Length Adaptors 1 Power Strip 7 M4 x 14m...

Страница 25: ...able into the Power Strip Bracket as shown in Fig 1 F 1 6 Take the short ribbon cable that came in the QuiltMotion package plug one end of this cable into encoder lever and the other end into the Powe...

Страница 26: ...4mm Phillips Head Screw Motor Plate Brackets top side 1 9 Next you will install the Power Strip to the Power Strip Bracket on your carriage as shown in Fig 1 K and 1 L Turn your carriage upside down a...

Страница 27: ...ront 1 Belt Clamp Back 1 Belt Tensioner Housing 2 M6 x 12mm Hex Bolt 2 M6 x 24mm Hex Bolt 4 M6 Hex Nut Fig 2 A Fig 2 B 2 2 Now you will assemble one 1 Belt Tensioner Housing to Belt Bracket B Do this...

Страница 28: ...amp using two 2 M6 x 24mm Hex Bolts and two 2 M6 Hex Nuts as shown in Fig 3 C Thread the bolts into the nuts only until they grab the first thread so that the front and back clamps remain loose 3 4 Pa...

Страница 29: ...ig 4 C Use one 1 10 x 1 2 Hex Screw by placing it through the other hole of the Belt Bracket B as pictured and tighten the screw Do not over tighten the screw 4 6 Using the included Allen wrench tight...

Страница 30: ...t on the machine and then replace the Jewel Handle Bar Key Block being sure all three holes line up as shown in Fig 5 C using the same screw you removed from the machine in step 3 5 4 Reattach the Jew...

Страница 31: ...your carriage is on the frame See Fig 6 A and 6 B 6 2 Slide the Belt Tension Clamp with the Belt Tension Housing on it over the other Frame Side Again finger tighten the M6 x 25mm Socket Button Head...

Страница 32: ...tting on the table 7 2 Feed the end of your belt into the gearbox in the carriage as shown in Fig 7 A 7 3 Push the belt back down and keep feeding the it through until you can see it come out just bel...

Страница 33: ...your carriage to one side of the frame and then to the other to verify the alignment If necessary you can adjust your Mount Clamps along the Frame End 7 8 As a final check measure how far the belt is...

Страница 34: ...A 8 3 Pull about half of the belt through the gearbox across the top half of the Motor Plate 8 4 Now carefully place the Jewel Sewing Machine onto the carriage aligning the wheels with the carriage t...

Страница 35: ...ps line up with the belt in the carriage This is easily accomplished by pushing your carriage forward and back to verify the alignment If necessary you may need to loosen the hex nuts that attach your...

Страница 36: ...the LCD USB Cable back underneath the plastic casing leaving most of the slack to the back of the machine Next plug the LCD cord into the QuiltMotion Plate as shown in Fig 9 G 9 7 Gather the slack fo...

Страница 37: ...sewing machine all the way forward and all the way back Make sure that the USB Cable does not drag on the table or interfere with the wheels as shown in Fig 9 L 9 11 There is a ribbon cable that comes...

Страница 38: ...end of the ribbon cable into the box on the Power Strip Bracket located under the rear of the carriage as shown in Fig 9 P 9 15 Replace the cover to the Cable Box on the Power Strip Bracket as show i...

Страница 39: ...Section 3 The Jewel on the Pinnacle frame Installation Guide For the On the Pinnacle frame...

Страница 40: ...QuiltMotion Plate Installation 42 Step 2 Ribbon Cable Installation 45 Step 3 Belt Bracket Assembly 46 Step 4 Mounting Clamp Assembly 47 Step 5 Mounting Clamp to Sewing Machine 48 Step 6 LCD Installati...

Страница 41: ...ead Screws 8 LCD Display 1 Power Strip Assembly 1 4mm Allen Wrench 1 QuiltMotion Plate 1 Length Adaptor 2 Power Strip Bracket Left 1 Power Strip Bracket Right 1 Mounting Clamp 2 LCD Bracket 1 Belt Bra...

Страница 42: ...e out the Crown Jewel Slider Board designated with a CJ from the control box Slide the Jewel Slider Board designated with a J into the control box as shown in Fig C and Fig D IV Replace the cover of t...

Страница 43: ...e sure the power cord and cables go underneath Step 1 QuiltMotion Plate Installation Parts Needed 1 QuiltMotion Motor Plate 4 Motor Plate Brackets 2 Power Strip Brackets 2 Length Adaptors 1 Power Stri...

Страница 44: ...g 1 F 1 6 There is another ribbon cable already installed on the QuiltMotion plate This is the Encoder Cable Plug one end of this cable into the Adapter Box on the Power Strip Bracket also as shown in...

Страница 45: ...4mm Phillips Head Screw Motor Plate Brackets top side 1 9 Next you will install the Power Strip to the Power Strip Bracket on your carriage as shown in Fig 1 L and 1 M Turn your carriage upside down a...

Страница 46: ...n the last step into the encoder lever of the carriage as shown in Fig 2 A 2 2 Place the Cable Clip on the end of the cable plug as shown in Fig 2 B When in place it will look like Fig 2 C Step 2 Ribb...

Страница 47: ...ront 1 Belt Clamp Back 1 Belt Tensioner Housing 2 M6 x 12mm Hex Bolt 2 M6 x 24mm Hex Bolt 4 M6 Hex Nut Fig 3 A Fig 3 B 3 2 Now you will assemble one 1 Belt Tensioner Housing to Belt Bracket B Do this...

Страница 48: ...amp using two 2 M6 x 24mm Hex Bolts and two 2 M6 Hex Nuts as shown in Fig 4 C Thread the bolts into the nuts only until they grab the first thread so that the front and back clamps remain loose 4 4 Pa...

Страница 49: ...ig 5 C Use one 1 10 x 1 2 Hex Screw by placing it through the other hole of the Belt Bracket B as pictured and tighten the screw Do not over tighten the screw 5 6 Using the included Allen wrench tight...

Страница 50: ...t on the machine and then replace the Jewel Handle Bar Key Block being sure all three holes line up as shown in Fig 6 C using the same screw you removed from the machine in step 3 6 4 Reattach the Jew...

Страница 51: ...your carriage is on the frame See Fig 7 A and 7 B 7 2 Slide the Belt Tension Clamp with the Belt Tension Housing on it over the other Frame Side Again finger tighten the M6 x 25mm Socket Button Head...

Страница 52: ...in Fig 8 A 8 2 Feed the end of your belt into the gearbox in the carriage as shown in Fig 8 B 8 3 Push the belt back down and keep feeding it through until you can see it come out just below where it...

Страница 53: ...your carriage to one side of the frame and then to the other to verify the alignment If necessary you can adjust your Mount Clamps along the Frame End 8 8 As a final check measure how far the belt is...

Страница 54: ...A 9 3 Pull about half of the belt through the gearbox across the top half of the Motor Plate 9 4 Now carefully place the Jewel Sewing Machine onto the carriage aligning the wheels with the carriage t...

Страница 55: ...ine up with the belt in the carriage This is easily accomplished by pushing your carriage forward and back to verify the alignment If necessary you may need to loosen the hex nuts that attach your Bel...

Страница 56: ...he LCD USB Cable back underneath the plastic casing leaving most of the slack to the back of the machine Next plug the LCD cord into the QuiltMotion Plate as shown in Fig 10 G 10 7 Gather the slack fo...

Страница 57: ...ng machine all the way forward and all the way back Make sure that the USB Cable does not drag on the table or interfere with the wheels as shown in Fig 10 L 10 11 There is a ribbon cable that comes w...

Страница 58: ...nd of the ribbon cable into the box on the Power Strip Bracket located under the rear of the carriage as shown in Fig 10 P 10 15 Replace the cover to the Cable Box on the Power Strip Bracket as show i...

Страница 59: ...uter and then double click setup exe 2 When the License Agreement screen comes up please read the agreement and then check I accept the agreement and click Next QuiltMotion QuiltCAD Software Installat...

Страница 60: ...tion on this screen and click Next 4 We recommend you leave the installation location as is for ease and click Next 5 The program installer will automatically put a shortcut in the Start menu in a fol...

Страница 61: ...n on your desktop Click Next when you re done 7 This screen identifies the program location along with other icon and shortcut locations Click Install after verifying the settings 8 During the install...

Страница 62: ...con 10 Launch QuiltCAD by either selecting the desktop icon if you created one during install or go into the Start menu in the folder you selected in step 5 default QuiltCAD 11 This window will come u...

Страница 63: ...correct and then click Submit You will get a Thank You screen that you can read and close 16 Within a couple minutes you will have an email addressed from register cabinlogic com in your email inbox I...

Страница 64: ...tion screen and click in the Registration Key field then paste in the key by pressing ctrl v on your keyboard 18 The Cabin Logic License Agreement will appear again Read and click I have read and agre...

Страница 65: ...Pg 64 20 Now that the program has been registered it will now launch to the QuiltCAD main screen...

Страница 66: ......

Отзывы: