Axxess AXPIO-JT1 Скачать руководство пользователя страница 16

K

NOWLEDGE IS 

P

OWER

E

nhance your installation and fabrication skills by 

enrolling in the most recognized and respected 

mobile electronics school in our industry.

Log onto www.installerinstitute.edu or call 

386-672-5771 for more information and take steps 

toward a better tomorrow.

®

Metra recommends MECP 
certified technicians

AxxessInterfaces.com 

© COPYRIGHT 2021 METRA ELECTRONICS CORPORATION 

REV. 6/18/21 INSTAXPIO-JT1

I N S T A L L A T I O N   I N S T R U C T I O N S

AXPIO-JT1

Having difficulties? We’re here to help.
 

Contact our Tech Support line at:


386-257-1187


Or via email at:


[email protected]

Tech Support Hours (Eastern Standard Time)

Monday - Friday: 9:00 AM - 7:00 PM
Saturday: 10:00 AM - 7:00 PM
Sunday: 10:00 AM - 4:00 PM

• RCA output for aftermarket radios or monitors
• Can be viewed while driving with compatible monitor
• ABS plastic housing to mount camera
• (4) Stainless steel screws provided for mounting
• Direct OE replacement
• Resolution: 550 TV Lines
• Selectable parking lines
• Viewing angle - 160 degrees
• Water resistant - IP68

Kit Includes
  • 1 camera and extension cable
  • Front and back - ABS camera housing
  • 4 stainless steel screws
  • Instruction booklet
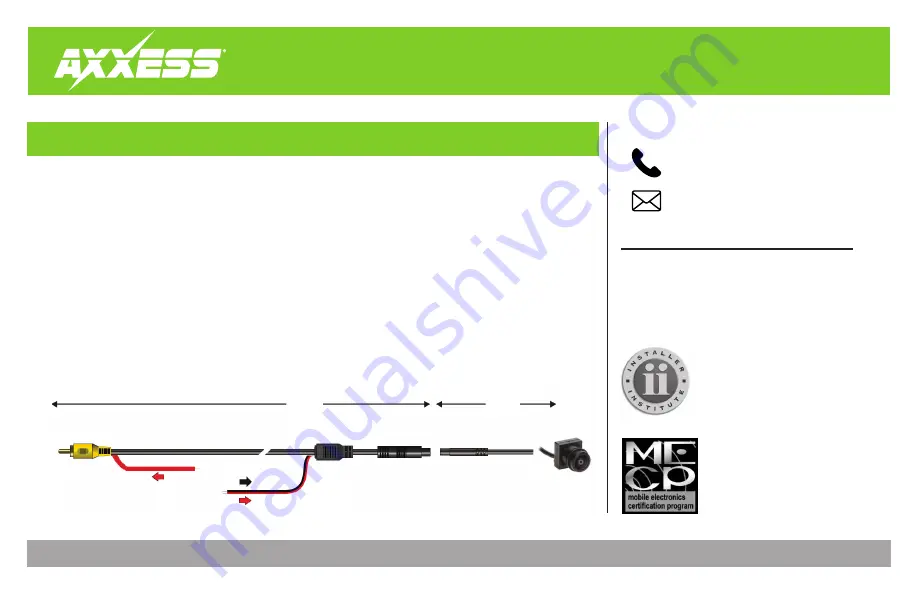
6.4 FT

26 FT

3.9 FT

RED wire at the RCA is the same wire as in the 
back of the extension harness

RED wire = Camera power
BLACK wire = Chassis ground

SPECIFICATIONS

Содержание AXPIO-JT1

Страница 1: ...cles will only get status feedback of the HVAC functions while Dual Zone vehicles can also be controlled through the radio screen All HVAC functions will be retained Compass is only retained on vehicl...

Страница 2: ...on 1 Secure the shallow radio brackets to the radio using screws supplied with the radio Figure A 2 Locate the factory wiring harness and antenna connector in the dash and complete all necessary conne...

Страница 3: ...crews supplied with the radio Figure B 3 Route the RGB extension cable from the radio chassis to the display screen then connect it to the display screen 4 Locate the factory wiring harness and antenn...

Страница 4: ...on Settings Plug n Play installation Designed for Pioneer s DMH W4600NEX WC4660NEX Painted scratch resistant matte black to match the OE finish Includes radio antenna adapter antenna adapter for GPS I...

Страница 5: ...d remove the Media Hub from the backside of the panel Figure C 3 Snap in the AXUSB RAM1 and route the harness to the radio location Note A Micro HDMI to HDMI cable is necessary if HDMI input is desire...

Страница 6: ...ide 3 Remove the two 5 32 bit screws from the smaller blue panel Figure B 4 Remove the panel and safely set aside NOTE Some trucks that do not have a bed cover may look different Make sure to safely r...

Страница 7: ...there is no rattle in the tailgate Remove the retention clip around the camera Slide in the direction of the arrow and set aside this will be needed this later when installing the new camera There is...

Страница 8: ...number 2 is for the surround view version NOTE This kit does not RETAIN the 360 system It replaces the backup camera of the system The 360 or surround view system will be lost 2 Both types of cameras...

Страница 9: ...correctly The top of the factory housing is the longer part of the housing The top of the camera is indicated by the QC sticker and the top of the bracket is indicated by the arrow pointing towards th...

Страница 10: ...with the YELLOW RCA if the user wants the camera powered with an accessory circuit 4 Run the wire down the length of the vehicle care fully Make sure not to run near any objects that can cause extrem...

Страница 11: ...LD CAN3T harness behind the glovebox and connect to the junction pictured below Any available spot can be used If no spots are available unplug one of the 2 pin connectors and connect to the other en...

Страница 12: ...ot be used in this application See Camera Installation Connect the Yellow Male RCA from the JP JTKT Installation to the Rear Camera input Connect the 40 GPS PIO To the radio and to the GPS antenna in...

Страница 13: ...l functions are verified Mount the radio into place using the 4 screws removed from dash disassembly Attached the supplied radio faceplate and secure it with two screws below the radio Snap the climat...

Страница 14: ...ehicle Selection Allows you to select the vehicle the radio is being installed in Vehicle type must be selected to activate menu HVAC functions as well as steering wheel controls Press Make to change...

Страница 15: ...stomizations Menu Allows full control of vehicle personalization options Access this menu by selecting the gear icon on the previous screenshot Vehicle Info Screen Displays various information of the...

Страница 16: ...87 Or via email at techsupport metra autosound com Tech Support Hours Eastern Standard Time Monday Friday 9 00 AM 7 00 PM Saturday 10 00 AM 7 00 PM Sunday 10 00 AM 4 00 PM RCA output for aftermarket r...

Отзывы: