General Instructions for 230V Machines
6
Specific Precautions Using Planer Thicknessers
Most machines currently, are well interlocked to ensure that
the machine must be in the correct configuration to perform
one task or the other. Make yourself familiar with these
configurations and do not try to use the machine in a half
and half state; or rig the interlocks to enable you to do so.
These machines are designed for cutting timber only. They will,
but are not designed to, cut timber derivatives or composites.
Glue lines in plywood, block board etc, will ‘notch’ blades as
sure as eggs is eggs. The bonding agent in chipboard is likewise
detrimental to the health of your planer irons.
It is best to leave them alone. If you have to machine
composites, work out the costs of tungsten, against HSS (plus
the sharpening costs), and proceed accordingly. On larger
machines it is common practice to leave a portion of the blade
(usually the offside 30mm) to be used on ‘aggressive’ materials.
Make sure during overhand planing operations, that the fence
is set to the required angle, is securely fastened and locked in
position. Ensure the planer block guarding is in position and
secured.
• Disengage the autofeed for the thicknesser.
• Ensure both tables are correctly seated and locked down.
• Ensure the dust extraction hood is in place and is not blocked.
• Fit dust extraction.
Overhand planing
Check the sharpness of planer irons, check for ‘nicks’ and ‘
notches’, if there are damaged sections on the blades, try to
plane in the ‘clear’ areas. Especially when planing material
down to ‘thin’ dimensions, maintain pressure on the ‘front’ of
the material i.e., that portion of the stuff that has passed over
the block, but use a push stick or a pusher shoe to clear the end
of the stuff over the block.
Thicknessing
When thicknessing, remove the fence and place the assembly
onto the fence storage brackets to the rear of planer
thicknesser. Lower the thicknessing table slightly. Unlock and
swing both tables ‘up and out of the way’,taking care not to foul
the overhand guard/arm assembly, which will probably swing
free. Turn the dust extraction hood up and over the block.
• Connect the dust extraction. Ensure the hose will not foul
any stuff being passed through the machine.
• Check the height of the thicknessing table.
• Engage the autofeed mechanism.
• Periodically, clean any excess build up of resin from the
thicknessing table, and apply any proprietary brand of
lubricating agent.
NOTE, Consideration should be given to the type of finish you
will be applying to the surface when you select your cleaning/
lubrication agent.
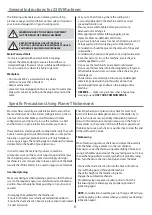
The following will enable you to observe good working
practices, keep yourself and fellow workers safe and maintain
your tools and equipment in good working order.
WARNING!! KEEP TOOLS AND EQUIPMENT
OUT OF REACH OF YOUNG CHILDREN
Mains Powered Tools
• Tools are supplied with an attached 16 Amp plug.
• Inspect the cable and plug to ensuree that neither are
damaged. Repair if necessary by a suitably qualified person.
• Do not use when or where it is liable to get wet.
Workplace
• Do not use 230V a.c. powered tools anywhere
within a site area that is flooded.
• Keep machine clean.
• Leave machine unplugged until work is about to commence.
• Always disconnect by pulling on the plug body and not the
cable.
• Carry out a final check e.g. check the cutting tool
is securely tightened in the machine and the correct
speed and function set.
• Ensure you are comfortable before you start work,
balanced, not reaching etc.
• Wear appropriate safety clothing, goggles, gloves,
masks etc. Wear ear defenders at all times.
• If you have long hair wear a hair net or helmet to prevent it
being caught up in the rotating parts of the machine.
• Consideration should be given to the removal of rings and
wristwatches.
• Consideration should also be given to non-slip footwear etc.
• If another person is to use the machine, ensure they are
suitably qualified to use it.
• Do not use the machine if you are tired or distracted
• Do not use this machine within the designated safety areas
of flammable liquid stores or in areas where there may be
volatile gases.
• Check cutters are correct type and size, are undamaged
and are kept clean and sharp, this will maintain their
operating performance and lessen the loading on the
machine.
• OBSERVE…. make sure you know what is happening
around you and USE YOUR COMMON SENSE.
KEEP WORK AREA AS UNCLUTTERED AS IS
PRACTICAL. UNDER NO CIRCUMSTANCES SHOULD
CHILDREN BE ALLOWED IN WORK AREAS.
Содержание AT260PT
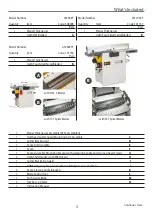
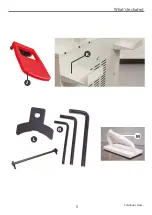
Страница 4: ...What s Included 4 C D F E G H I ...
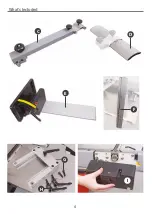
Страница 5: ...What s Included 5 L N K J M Continues Over ...
Страница 34: ...Exploded Diagrams Lists 34 DIAGRAM A AT260PT AT260SPT PlanerThicknesser ...
Страница 36: ...Exploded Diagrams Lists 36 AT260PT AT260SPT PlanerThicknesser DIAGRAM B ...
Страница 38: ...Exploded Diagrams Lists 38 AT260PT AT260SPT PlanerThicknesser DIAGRAM C ...
Страница 40: ...Exploded Diagrams Lists 40 AT260PT AT260SPT PlanerThicknesser DIAGRAM D ...
Страница 42: ...Exploded Diagrams Lists 42 AT260PT AT260SPT PlanerThicknesser DIAGRAM E ...
Страница 46: ...Exploded Diagrams Lists 46 DIAGRAM A AT310SPT PlanerThicknesser ...
Страница 48: ...Exploded Diagrams Lists 48 DIAGRAM B AT310SPT PlanerThicknesser ...
Страница 50: ...Exploded Diagrams Lists 50 DIAGRAM C AT310SPT PlanerThicknesser ...
Страница 52: ...Exploded Diagrams Lists 52 DIAGRAM D AT310SPT PlanerThicknesser ...
Страница 54: ...Exploded Diagrams Lists 54 DIAGRAM E AT310SPT PlanerThicknesser ...
Страница 58: ...Spiral Cutter Block Diagram 58 Spiral Cutter Block 10 Inch Spiral Cutter Block 12 Inch ...
Страница 59: ...Wiring Diagrams 59 AT260PT AT260SPT DIAGRAM AT310SPT DIAGRAM ...

