background image


AXIS StorPoint NAS


100 User’s Guide

Accessing the Hard Disks


27


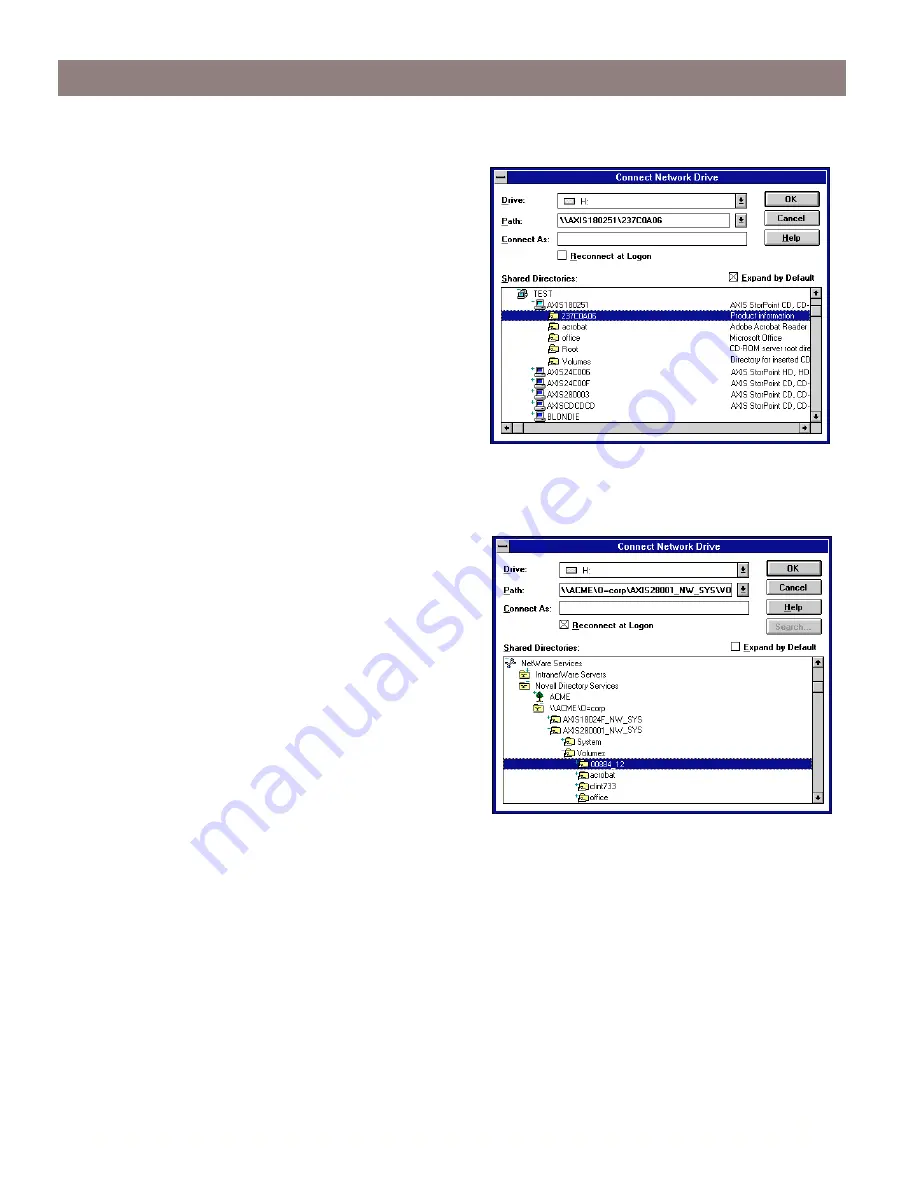
Windows NT 3.51 Clients using Microsoft Networking

1. Start the File Manager. 

2. From the 

Disk

 menu, select 

Connect Network 

Drive…

3. In the Shared Directories listing, double click 

the entry for your StorPoint NAS. The default 
name is AXIS<nnnnnn>, where <nnnnnn> are 
the six last digits of the StorPoint NAS serial 
number.

4. Select the StorPoint NAS resource you want to 

map.

5. Select a drive letter and click 

OK

.

Windows NT 3.51 Clients using NetWare NDS

1. Start the File Manager.

2. From the 

Disk

 menu, select 

Connect Network 

Drive…

3. In the Shared Directories listing, open the 

Novell Directory Servers

 folder.

4. Open the NDS tree and the context in which 

the StorPoint NAS is installed. The default 
name is AXIS<nnnnnn>_NW_SYS, where 
<nnnnnn> are the six last digits of the StorPoint 
NAS serial number.

5. Select the StorPoint NAS resource you want to 

map.

6. Select a drive letter and click 

OK

.

Windows NT 3.51 Clients using NetWare Bindery Mode

1. Start the File Manager.

2. From the 

Disk

 menu, select 

Connect Network Drive...

3. In the listing, open the IntranetWare Servers folder. 

4. Double click the entry for your new StorPoint NAS. The default name is AXIS 

<nnnnnn>_NW, where <nnnnnnn> are the last six digits of the StorPoint NAS serial number. 

Содержание SHDUG

Страница 1: ...nly required on IP based networks When you have completed the Basic Installation proceed to the section that is relevant to your network environment Basic Installation See Stage 1 Connecting the StorP...

Страница 2: ...al if you detect any inaccuracies or omissions please inform us at an address which can be found in the last appendix of the User s Manual Axis Communications cannot be held responsible for any techni...

Страница 3: ...4 Clients using Microsoft Networking 24 Windows 95 98 NT 4 Clients using NetWare NDS 24 Windows 95 98 NT 4 Clients using NetWare Bindery 25 Windows for Workgroups 3 x Clients using Microsoft Networkin...

Страница 4: ...sk space for individual or shared use The StorPoint NAS 100 enclosure and connectors are designed for installation into a 5 25 tower As well as easy installation and ease of use the StorPoint NAS supp...

Страница 5: ...5 98 and NT platforms Windows 3 x users are required to navigate to the CD root directory and click on the setup31 exe file from within the Windows File Manager Startup Procedures for UNIX OS 2 and Ma...

Страница 6: ...baseT or 100baseTX full or half duplex mode Use a Category 5 UTP cable for the 100baseTX operation Note SCSI Connector The StorPoint NAS has a SCSI connector for connecting hard disk drives Push Butto...

Страница 7: ...for 100baseTX and 10baseT 3 Switch on the tower The StorPoint NAS LED indicators will flash during power up and self test When the Status indicator stops flashing and turns solid green the StorPoint...

Страница 8: ...to Setting the TCP IP Parameters on page 13 If you are not using IP addressing in your network environment i e if you are using the StorPoint NAS in Windows SMB over NetBEUI or NetWare pure IPX you do...

Страница 9: ...tp www axis com Follow these steps 1 Locate the setup file Setup exe and choose the Run option from the Windows Start menu 2 Follow the instructions on the screen When finished AXIS IP Installer will...

Страница 10: ...ser s Manual Appendix A Parameter List for more information Note Accessing the StorPoint NAS Web Pages The StorPoint NAS Web interface is divided into two parts The File View page for browsing and acc...

Страница 11: ...ess of your StorPoint NAS in the location address field The StorPoint NAS Home Page is displayed From this page users can display and access the discs inserted in the connected drives accord ing to th...

Страница 12: ...tatistics on the StorPoint NAS Help Contents Displaying general help information External Link Optional link to a Web site on the Internet or your company s intranet Notes Setting the Server Password...

Страница 13: ...tion Web pages click Network Settings 2 Click Wizard The Network Settings Wizard dialog appears 3 Choose TCP IP Click Start to proceed with the installation 4 Follow the instructions on the screen Whe...

Страница 14: ...cated The installation wizard available via the StorPoint NAS Web interface is a convenient way to set up the StorPoint NAS Follow these steps 1 From within the Administration Web pages click Network...

Страница 15: ...access control will grant specific users access to specific resources This method also allows the StorPoint NAS to be integrated with existing Windows NT or OS 2 domains Share level Access Control 1 F...

Страница 16: ...managed from the Windows NT Explorer The access rights are additive which means that the user s access rights are the summary of the rights granted from individual assignments and group memberships F...

Страница 17: ...that load DSREPAIR on the server in the NDS tree and select Unattended full repair Important When installing the first StorPoint NAS into the NDS tree it is recommended that you use an account with S...

Страница 18: ...ocols dialog box appears 7 Open the NetWare NCP page and verify the settings 8 Click OK 9 To verify that the StorPoint NAS was successfully installed check the Event Log for errors Using a Text Editor...

Страница 19: ...ame Specify the distinguished name of a user or administrator with Supervisor or Create rights to the context where you want to install the StorPoint NAS e g Admin Medtec NDSAdminPassword Specify the...

Страница 20: ...ou are using Bindery mode without user authentication Bindery mode with user authentication NDS mode The StorPoint NAS acts as a normal NetWare file server which means that you use standard procedures...

Страница 21: ...ings 3 Click OK Note Access Control In the UNIX NFS environment the NFS export list is used for access control You can add clients with specific host names or IP addresses to the export list You can a...

Страница 22: ...u want to change the parameter settings follow these steps 1 From within the Administration Web pages click Network Settings 2 Click Wizard The Network Settings Wizard dialog appears 3 Choose Web HTTP...

Страница 23: ...ed by a password Follow these steps 1 From within the Administration Web pages click File Properties 2 Locate the resource you want to protect in the file tree and click Properties 3 Open the Web Secu...

Страница 24: ...dows 95 98 NT 4 Clients using Microsoft Networking 1 Start the Windows Explorer and expand the Network Neighborhood icon 2 Expand the Entire Network icon and locate your StorPoint NAS By default the S...

Страница 25: ...he six last digits of the StorPoint NAS serial number 4 Right click the resource and select Map Network Drive Windows for Workgroups 3 x Clients using Microsoft Networking 1 Start the File Manager 2 F...

Страница 26: ...Resources listing and click Map Windows for Workgroups 3 x Clients using Netware Bindery 1 Start the File Manager and Network Connections from the Disk menu If you also have Microsoft Network install...

Страница 27: ...the Disk menu select Connect Network Drive 3 In the Shared Directories listing open the Novell Directory Servers folder 4 Open the NDS tree and the context in which the StorPoint NAS is installed The...

Страница 28: ...1 Open an OS 2 window 2 At the OS 2 prompt type where nnnnnn are the six last digits of your StorPoint NAS serial number and folder is any shared StorPoint NAS folder UNIX NFS Clients You will need r...

Страница 29: ...brings you to the File View page of the StorPoint NAS From this page you can display and access the shared discs according to the access restrictions set up by the Administrator We recommend that you...

Страница 30: ...take several hours depending on the hard disk size To format a hard disk follow these steps 1 Start the Web browser 2 Enter the name or IP address of the StorPoint NAS in the location address field 3...

Страница 31: ...sk follow these steps 1 Start the Web browser 2 Enter the name or IP address of the StorPoint NAS in the location address field 3 Click admin You will be prompted for User Name and Password By default...

Страница 32: ...rting a new installation it is recommended to Quick Format all hard disks prior to enabling RAID 1 To enable RAID 1 follow these steps 1 Start the Web browser 2 Enter the name or IP address of the Sto...

Страница 33: ...ving a RAID 1 Volume To break up a pair of mirrored disks follow these steps 1 Start the Web browser 2 Enter the name or IP address of the StorPoint NAS in the location address field 3 Click admin You...

Страница 34: ...and hold the Push button 2 Start the StorPoint NAS 3 Wait until the Status indicator flashes yellow one flash second 4 Let go of the button at least two seconds 5 Press and hold the Push button again...

Отзывы: