background image

-13-

7. Saturation: press RIGHT to enter the

list, use UP/DOWN to select, press
ENTER to confirm, press ENTER
again to exit the setting, or press UP
/DOWN to select another option.

5. MP4 Subtitle Language: press RIGHT to

enter the subtitle language list, use
UP/DOWN to select, press ENTER to
confirm.

6. 1st Audio Language: press RIGHT to

enter Audio Language list, use UP/DOWN
to select, press ENTER to confirm.

7. 2nd Audio Language: press RIGHT to

enter Audio Language list, use UP/DOWN
to select, press ENTER to confirm.

8. After setting, press ENTER confirm, press

EXIT or MENU to exit the setup, it will
show “Successfully updated”.

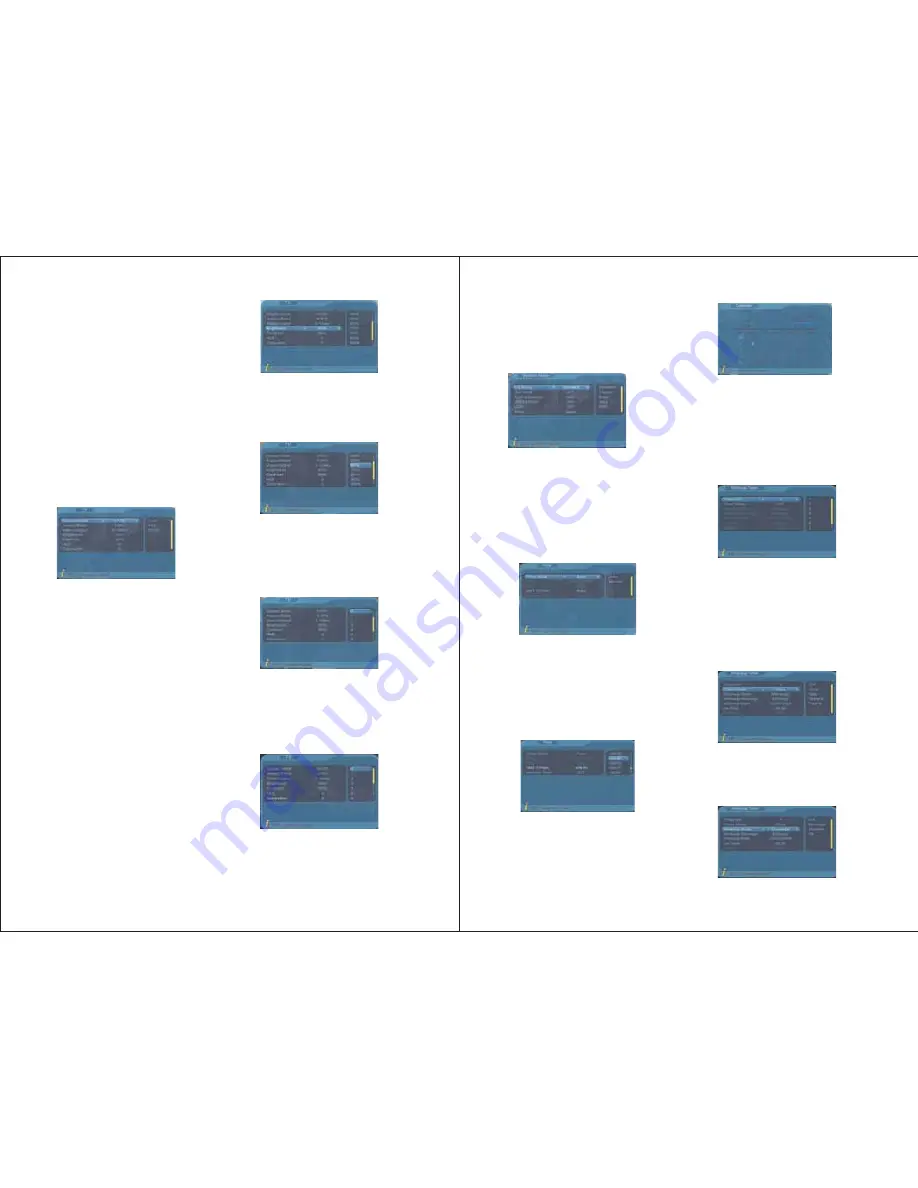
This option allows the users to set their
preferred TV output settings.

6.3.2 TV

Left of the menu lists all the options. Press
UP/DOWN to select an option.
1. Display Mode: press LEFT/RIGHT to

select between AUTO, PAL, & SECAM,
press ENTER to confirm and exit the
setting. Or press UP/DOWN to select
another option.

2. Aspect Ratio: press LEFT/RIGHT to select

between 16:9, 4:3 Pan Scan, 4:3 Letter
Box, press ENTER to confirm and exit the
setting. Or press UP/DOWN to select
another option.

3. Video Output: press LEFT/RIGHT to

select between S-Video and CVBS, press
ENTER to confirm and exit the setting. Or
press UP/DOWN to select another option.

4. Brightness: press RIGHT to enter the list,

use UP/DOWN to select, press ENTER to
confirm, press ENTER again to exit the
setting, or press UP/DOWN to select
another option.

5. Contrast: press RIGHT to enter the list,

use UP/DOWN to select, press ENTER
to confirm, press ENTER again to exit
the setting, or press UP/DOWN to select
another option.

6. HUE: press RIGHT to enter the list, use

UP/DOWN to select, press ENTER to
confirm, press ENTER again to exit the
setting, or press UP/DOWN to select
another option.

-14-

8. After setting, press ENTER, EXIT or

MENU to exit the setup, it will show
“Successfully updated”.

Press UP/DOWN to select an option, use
LEFT/RIGHT to change the settings.
After setting, press ENTER, EXIT or MENU
to exit the setup, it will show “Successfully
updated”.

You can set Timer Mode, Date, Time, GMT
Offset, and Summer Time under Time menu.
There are two Timer modes, one is Auto,
and one is Manual.

The system default is Auto timer mode,
press UP/DOWN to select Timer Mode or
GMT Offset, use RIGHT/LIFT to change.

In Manual timer mode, press UP/DOWN
to select an option, use RIGHT/LEFT or
numbers to change the Date, Time, GMT
Offset or Summer Time.

Press ENTER to confirm, press EXIT or
MENU to exit the setup, it will show
“Successfully updated”.

6.3.5 Wakeup Timer

If you know what time a program will be
on, or want a hint when it is on, you can set
this through Wakeup Timer.

You can set Timer Mode, Wakeup Mode,
Wakeup Message, Wakeup Channel,
Wakeup Date, Time, and Duration.

1. Timer No: the number of this Wakeup

timer setting.

2. Timer Mode: select between Once, Daily,

Weekly, Yearly or Off.

3. Wakeup Mode: use LEFT/RIGHT to

choose to show a message, a channel,
or a hint asking whether to turn on or
switch off the TV.

6.3.3 System Setup

6.3.4 Time

Содержание DA700B

Страница 1: ...August International Ltd United Kingdom Telephone 0870 850 3525 www augustint com User Manual DA700B 7 Inch Digital Analogue LCD TV with built in card reader and USB port ...

Страница 2: ...V or MODE on the remote is for switching between 3 modes Analogue TV Digital Freeview TV Media Player and AV Input 3 When turning on the device for the first time Initial Install will show follow the instructions to select OSD Language and Area then press ENTER it will ask whether to install select YES the auto search will then start Once the search has finished press CH CH or EPG to select channe...

Страница 3: ...on varies in different regions across the UK As mentioned on the Freeview website only 73 of the UK population is able to receive Freeview at present and only a small number of households might be able to use a set top aerial at present This only applies if you live in an area with coverage close to a transmitter but reception would still be unreliable and they strongly recommend that you use a ro...

Страница 4: ...ethis machinewith abrasivecloth detergentpowder alcoholand benzeneetc variouspropellants orchemical cleaningproducts 2 1 Please do not tune your headphone earphone at high volumes otherwise it may lead to ear damage 2 For open designed earphone to avoid annoying those close by please tune down the volume 3 In case of any tinnitus please turn down the volume or stop using this machine 4 It is recom...

Страница 5: ...t D A 70 0B 4 3 Part Names and Functions OK TFT COLOR DPF DVB ATV MONITOR u A g u st 1 2 3 4 5 6 7 8 9 10 12 13 11 1 Remote receiver 2 Base Support 3 OK confirm 4 TV AV Shift 5 Volume Left 6 Volume Right 7 Menu 8 Channel Down 9 Channel Up 10 Power Indicator Standby Red Turn on Green 11 Power Switch 12 Telescopic Antenna 13 TFT LCD Screen 15 16 17 18 19 14 20 21 14 AV OUT 15 AV IN 16 Earphone jack ...

Страница 6: ...IT REPEAT MUTE DISPLAY AUTO MODE MENU TTX AUDIO PRLIST RETURN GREEN YELLOW BLUE DA700 1 POWER 2 DISPLAY 3 MUTE 4 SUBTITLE 5 LANGUAGE 6 SLOW 7 MENU 8 LEFT RIGHT UP DOWN 9 ENTER 10 TTX 11 REV RADIO 12 FWD EPG 13 STOP 14 PLAY 15 P P 16 SLEEP 17 MODE 18 AUTO 19 NUMBER 20 REPEAT 21 RETURN 22 EXIT 23 PRLIST 24 AUDIO 25 FAV 26 NEXT 27 PREV 28 29 ZOOM 30 VOL 31 VOL 32 RED 33 GREEN 34 BLUE 35 YELLOW 4 Remo...

Страница 7: ...e support Unscrew the oval handle on the ball joint it will split into halves embrace them on the top of the base support then tighten the oval handle Slide the metal surface of the ball joint into the slot on the back of the TV then tighten the wheel screw 5 2 Connecting the power supply Insert the power supply plug on the AC adapter to the jack on the TV marked DC 12V Insert the earphone plug to...

Страница 8: ...ent categories News Science Sports Movie Kids Music Fashion and None 1 Channel Sorting can be accessed by selecting MENU Digital TV Channel Manager Channel Grouping 2 If there is no channel saved on the TV Channel Grouping can not be accessed and it will show Channel not available 3 Use UP DOWN to select the channel and then select the category by pressing the numbers 1 8 4 After setting press EXI...

Страница 9: ...tallation 6 2 Installation Pressing ENTER it gives two search options Auto Search and Manual Search 12 6 2 1 Auto Search Select Auto Search press ENTER it will start the search After searching the system will automatically exit the searching page save program information and return to Installation menu press EXIT or MENU to exit 6 2 2 Manual Search If you know a channel s broadcasting frequency an...

Страница 10: ... DOWN to select another option 5 Contrast press RIGHT to enter the list use UP DOWN to select press ENTER to confirm press ENTER again to exit the setting or press UP DOWN to select another option 6 HUE press RIGHT to enter the list use UP DOWN to select press ENTER to confirm press ENTER again to exit the setting or press UP DOWN to select another option 14 8 After setting press ENTER EXIT or MEN...

Страница 11: ...rd changed 6 3 6 Parental Lock User can change system password under this option The system default password is 0000 6 4 Software Upgrade This function is for manufacturer use only 16 Press PLAY PAUSE to start pause and resume the play Press FWD to search forward at 2 4 8 and 20 times of the normal speed Press REV to reverse at 2 4 8 and 20 times of the normal speed Press SLOW to start slow playba...

Страница 12: ...ticlockwise Press UP for mirror effect press UP again to back to normal Press DOWN for upside down effect press DOWN again to back to normal Press ZOOM to view the picture at 2 3 4 1 2 1 3 or 1 4 times of the normal view Press STOP and EXIT to exit the playback 18 Reset Press repeatedly to enter Reset menu Press or to reset the Brightness Contrast Colour Hue and Volume settings to the default leve...

Страница 13: ...between Color Sys Sound Sys Swap and Copy settings 20 I 0 0 SYSTEM AUTO SOUND SYS SWAP COPY COLOR SYS Select Adjust PRESET VHFL 0 ON AUTO SEARCH SEARCH FINE BAND POSITION SKIP Select Adjust Color Sys Press LEFT or RIGHT to select between AUTO PAL and SECAM Sound Sys Press LEFT or RIGHT to select between I L BG and DK Swap Use LEFT RIGHT UP or DOWN to swap channel positions Copy Use LEFT RIGHT UP o...

Страница 14: ...signal is too weak the image will remain poor whatever you do and may output loud noises shaking images and inferior sound etc which is not the TV s fault If the image remains poor when using the telescopic antenna please try to use a roof top aerial or an amplified external antenna Select Adjust 22 11 AV Input VOLUME VOLUME 50 Press MODE on the remote control to switch to the AV mode Press MENU r...

Страница 15: ...er supply Power switch on the side of the TV is off TV is on standby as it was switched off by pressing the POWER on remote Check the channel selection Scan for channels again Always rescan for channels in new locations Ensure video settings are correct Check the sound volume If you are using earphones test them on another item Check that the cable is plugged in Sound System is not correctly set i...

Страница 16: ...e correctly installed and operated in accordance with the instructions given in the user s manual The product must be used solely for domestic purposes The warranty only covers the main unit and does not cover the accessories The warranty does not cover the damage caused by misuse negligence accident and natural disaster The warranty will be rendered invalid if the product is resold or has been da...

Отзывы: