background image

25

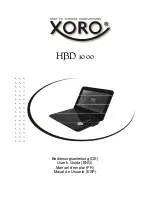
SSID setting is sensitive to upper and lower case characters and symbols. You must enter it 

exactly as set up in your router. The three controls on the right-hand side of the screen have 

special functions. You can quickly access these by pressing the Info button and then use the 

Tuning/Seek/Select control as needed: 


Select ‘BKSP’ to erase a character just entered (long press to clear)


Select ‘OK’ when the complete key has been entered


Select ‘CANCEL’ to cancel and go back to the DNS settings screen


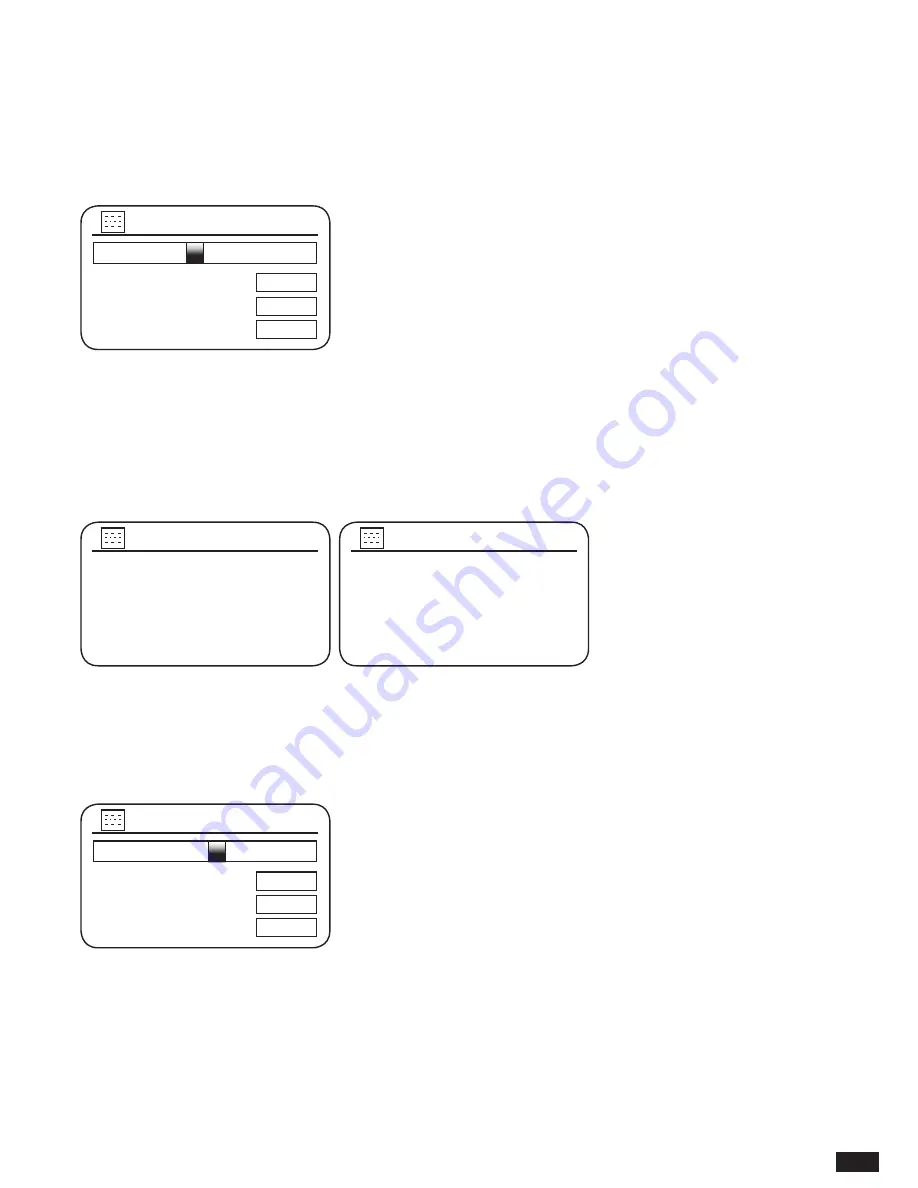
8. Having entered the SSID, you must enter details of the encryption system used on your 

wireless network. This should be the same as specified in your router settings. If your 

network does not use encryption, then select the ‘Open’ option. Audisse Shirudo should then 

connect to the network, so skip to step 11.  If your network uses WEP (Wired Equivalent 

Privacy) select the ‘Pre-Shared Key’ option, then go to step 8. The remaining options are for 

WPA or WPA2 (WiFi Protected Access) - see step 9. 


9. If you chose ‘Pre-Shared Key’ in step 7, you should then choose the WEP option. The 

key should be entered using only the numbers 0-9 and the letters A-F. The key will be 10 

characters long for 64-bit encryption and 26 characters long for 128-bit encryption. The radio 

will accept lower-case letters a-f as equivalent to upper-case A-F. Spaces or special symbols 

are not permitted in WEP keys.

0123456789 . _ - @ ,

       abcdefghijklmn

opqrstuvwxyz ABC

DEFGHIJKLMNOPQR

Key:

BKSP

OK

CANCEL

Password123

The three controls on the right-hand side of the screen have special functions. You can 

quickly access these by pressing the Info button and then use the Tuning/Seek/Select control 

as needed:


Select ‘BKSP’ to erase a character just entered (long press to clear)


Select ‘OK’ when the complete key has been entered


Select ‘CANCEL’ to cancel and go back to the SSID settings screen

0123456789 . _ - @ ,

       abcdefghijklmn

opqrstuvwxyz ABC

DEFGHIJKLMNOPQR

SSID:

BKSP

OK

CANCEL

WiFiName

6/9

Authentication

7/9

Open   


            >

WEP   


            >

WPA/WPA2   

            >

Encryption type

8/9

PSK AES / TKIP 


9/9

Содержание Shirudo

Страница 1: ...1 INSTRUCTION MANUAL shīrudo シールド NL DE FR UK ...

Страница 2: ... Keep network connected 27 Internet Radio the basics 28 Selecting a radio station by location 29 If your radio cannot connect to a radio station 31 Selecting a radio station by genre 32 Searching for a radio station by name 34 Selecting a Podcast 36 Selecting a polupair station 38 Presetting stations 39 Storing a preset 39 Recalling a preset 40 Last listened 40 Display modes 41 Customising your ra...

Страница 3: ...ervers 65 Using USB memory devices 66 Playing files from USB memory devices 67 Display modes 68 Playlists 70 Adding a single track to your playlist 70 Adding an entire album or folder 71 Viewing your playlist 71 Erasing a track from the playlist 71 Clearing the playlist 72 Playing your playlists 73 DAB Digital Radio 74 Using DAB mode for the first time 74 Selecting a DAB radio station 75 Secondary...

Страница 4: ...2 Clock and Alarms 102 Automatically updating the clock 102 Manually setting the clock 103 Setting the alarm clock 106 When the alarm sounds 109 Disabling alarms 110 Snooze timer 110 Sleep timer 111 Equaliser function 112 Setting up your My EQ profile 113 Brightness control 114 Headphone socket 115 Factory reset 115 Software update 117 Network Profiles 118 Software version display 119 Volume 120 C...

Страница 5: ...NTY BECOMES VOID ONCE THE DEVICE CABINET HAS BEEN OPENED OR ANY MODIFICATIONS OR ALTERATIONS TO THE ORIGINAL DEVICE HAVE BEEN MADE NEVER OPEN THE DEVICE CASING THE MANUFACTURER WILL NOT ACCEPT ANY LIABILITY FOR DAMAGE RESULTING FROM IMPROPER HANDLING THE TYPE PLATE IS LOCATED ON THE BOTTOM OF THE DEVICE CAUTION RISK OF ELECTRIC SHOCK DO NOT OPEN ...

Страница 6: ...3 Source 10 Preset Play Pause 4 Power 11 Alarm 5 Preset Skip backward 12 Forward 6 Volume EQ control 13 Back 7 LCD Display Top view 14 Metal handle 16 Top cover 15 Telescopic antenna Only required for DAB and FM band 5 9 6 7 8 1 2 3 4 13 12 11 10 14 15 16 GB 2 CONTROLS Button overview 1 Info 8 Tuning Seek Select Phone control 2 Menu 9 Preset Skip forward 3 Source 10 Preset Play Pause 4 Power 11 Al...

Страница 7: ...d LED 18 Speakers BOTTOM VIEW 19 Microphone 3 CONTROLS Front view 17 Bluetooth connected LED 18 Speakers Bottom view 19 Microphone 17 18 19 3 CONTROLS Front view 17 Bluetooth connected LED 18 Speakers Bottom view 19 Microphone 17 18 19 ...

Страница 8: ...t 23 DC In Jack 21 Headphone Jack 24 Lithium Polymer battery compartment 22 AUX IN Jack 4 CONTROLS Rear view 20 USB In and DC Out socket 23 DC in jack 21 Headphone jack 24 Lithium Polymer battery compartment 22 AUX IN jack 22 21 20 23 24 GB ...

Страница 9: ... high volume levels for long periods 22 Use only the AC DC adaptor that is provided by the manufacturer KINGWALL model AS360 150 AE240 Input AC 100 240V 50 60Hz Output 15V DC 2 4A 6 Do not block any ventilation openings Install in accordance with the instructions 7 Do not install near any heat sources such as radiators heat registers stoves or other apparatus including amplifiers that produce heat...

Страница 10: ...ication MP3 WMA AAC FLAC Apple Lossless and WAV formats are supported Supports remote control from Apple iPhone iPad and Android using UNDOK app The Audisse Shirudo connects to your home computer network by using WiFi WiFi Protected Setup WPS is supported for simpler setting up with compatible wireless routers All radio station presets network configuration details and user settings are retained i...

Страница 11: ...sed for encryption so you can get the sound system to communicate with the network or your router needs to offer WiFi Protected Setup WPS Spotify Connect requires a Spotify Premium subscription If connecting using WiFi the sound system will typically work within a 10 20 metres radius from your wireless access point The actual range achieved will depend upon the building type other nearby wireless ...

Страница 12: ... display When the battery power level is very low the empty icon will start flashing Under this condition the battery should be recharged as soon as possible to continue normal operation of the Audisse Shirudo Charging time from empty to full battery is approximately 5 6 hours at room temperature with the radio in Standby mode The Audisse Shirudo can be charged in Standby mode as well as in On mod...

Страница 13: ...Do not attempt to replace or repair the built in lithium battery If you have any doubts about the built in lithium battery please contact the service department for further assistance WARNING Danger of explosion if the battery is incorrectly replaced Do not expose the battery to excessive heat such as sunshine fire or the like Batteries should not be disposed of by incineration and with household ...

Страница 14: ... leave charge or use the battery in a car under direct sunlight near fire or a heated source Do not immerse throw wet the battery in water seawater Do not use or charge the battery if it appears to be abnormally hot discoloration deformation or abnormal conditions is detected during use charge or storage Do not leave a charging battery unattended Keep the battery away from babies and children ...

Страница 15: ...he current portion of the menu that is displayed If there are many items in a menu then the sound system allows the menu to wrap around in either direction This can make it easier to reach items at the end of a long menu such as a list of countries or Internet radio stations The Forward button may also be used to make selections from the displayed menu or to select the next character in text entry...

Страница 16: ...n accessible during normal use In order to disconnect the radio from the mains the mains adaptor should be removed from the mains socket outlet completely When you apply power the display on the sound system will light up and say Audisse Shirudo After a few seconds the radio will then enter Standby and the clock will display 00 00 as shown To continue to setup Audisse Shirudo press the Power butto...

Страница 17: ...uto update option for the clock This can be updated from DAB or FM radio from the Network or not updated The default is to auto update from the network If you choose another option go to Connecting to your computer network Otherwise you will first need to select the correct time zone and daylight savings setting see the next steps If you choose No update you will need to set the clock manually lat...

Страница 18: ... the Setup Wizard These instructions also apply to the Network Wizard in the Network Settings menu 1 After setting the Daylight Savings options the display will show the Keep network connected option You should choose Yes if you wish to keep the sound system connected to the network when it is in Standby mode This will allow remote control software to switch on Audisse Shirudo when needed If you c...

Страница 19: ...router or you may be too far from the router When the sound system finds your wireless network it displays the Network Name SSID for the wireless access point on the screen This is a name that is allocated to the access point in your router by the person who set up the network for example Wilson or Jame s group If the router supports WiFi Protected Setup then WPS will be shown in front of the SSID...

Страница 20: ...S may be via push button or using an identification number WPS Button WPS PIN Skip WPS WPS Menu WPS Button the display prompts you to press the WPS button on your router and then the Select control on the sound system The two devices should then connect with the encryption key sent automatically to the sound system WPS PIN the display shows an identification number that you must enter into your ro...

Страница 21: ...include WPA2 WEP keys are 10 or 26 characters long using 0 9 and A F Some wireless routers can also use pass phrases for WEP but these are not supported by the sound system WPA keys are usually set up using a pass phrase of between 8 and 63 characters Audisse Shirudo accepts pass phrases for WPA keys 9 To enter the WEP or WPA key characters are selected and entered using the Tuning Seek Select con...

Страница 22: ... connected Audisse Shirudo to the network and therefore also to the Internet it will display the Main menu Press the Power button to put the sound system into Standby Off mode It should then display the time as obtained from the Internet If the time display is not correct for any reason it can easily be adjusted later Manually setting the clock CHANGING THE NETWORK CONNECTION In the sections above...

Страница 23: ...f you do not wish to use DHCP for automatic configuration or if your network is configured with a hidden SSID then you will need to enter some network settings manually Note a hidden SSID may prevent casual observers from detecting your network but it is not recommended as a means of network security 1 From the sound systems Network settings menu select Manual settings You must then choose whether...

Страница 24: ...e IP address are common across your network For most small networks the subnet mask will be 255 255 255 0 and this is entered in the same way 5 The Gateway address is normally the IP address of the router through which the sound system connects to the Internet and is entered in the same way as the previous addresses 6 In most installations the DNS settings DNS Domain Name Server will be set to the...

Страница 25: ...ep 8 The remaining options are for WPA or WPA2 WiFi Protected Access see step 9 9 If you chose Pre Shared Key in step 7 you should then choose the WEP option The key should be entered using only the numbers 0 9 and the letters A F The key will be 10 characters long for 64 bit encryption and 26 characters long for 128 bit encryption The radio will accept lower case letters a f as equivalent to uppe...

Страница 26: ...ols on the right hand side of the screen have special functions You can quickly access these by pressing the Info button and then use the Tuning Seek Select control as needed Select BKSP to erase a character just entered long press to clear Select OK when the complete key has been entered Select CANCEL to cancel and go back to the SSID settings screen Once the key is entered the sound system shoul...

Страница 27: ...nnects to Audisse Shirudo You may change the PIN if desired using the NetRemote PIN Setup option in the Network settings menu The updated PIN should then be used to reconnect the sound system to the application KEEP NETWORK CONNECTED Audisse Shirudo has the option to shut down its WiFi when it is in Standby This minimises power consumption but it does mean that you will need to switch the sound sy...

Страница 28: ...ation and the country from which a station is broadcast this may be the easiest method to find a station It is also a great way to experience radio from other parts of the world You may also search for an internet radio station by Genre If you prefer a particular type of music Blues for example you may search for a radio station that broadcasts that type of music and you can choose from a list of ...

Страница 29: ...nited Kingdom and BBC stations for example 4 Rotate the Tuning Seek Select control until Location is highlighted on the display and then press the control to select 5 Rotate the Tuning Seek Select control to scroll through the list of continents When the desired continent is highlighted press the control to enter your selection SOURCE MENU FWD BACK INFO TUNING SEEK SELECT VOLUME EQUALIZER PRESET P...

Страница 30: ...sound system connects to the new station The station should then start playing Adjust the volume as needed 9 If the station has on demand content that is it gives the option of 8 9 listening to programmes that have already been broadcast or to Podcasts there will be an additional screen showing the radio station name as well as a Podcasts option These are selected using additional menus determined...

Страница 31: ...ing at the present time The radio station may not be able to accommodate any more connections from internet listeners The broadcaster may limit listening to specific countries or regions There may be network congestion either locally or at a distance that is affecting the reliability of the connection If Audisse Shirudo can connect but the audio is not continuous and the radio keeps having to reco...

Страница 32: ...l the list continually in either direction When the chosen genre is highlighted press the Tuning Seek Select control 5 You then have the choice of All Stations of the chosen genre or a list of countries Note if a country is not shown then the station may still appear in the All Stations list Rotate and then press the Tuning Seek Select control to choose as needed SOURCE MENU FWD BACK INFO TUNING S...

Страница 33: ...cting while it finds the new station If the radio is unable to connect this may be for one of the reasons explained 8 Adjust the Volume EQ control as needed to set the listening level All Stations Highlighted Stations Argentina Australia Austria Alternative 001A_A Rock 1 Fm Alternative Rock 1 Fm Gorilla FM Radio 100 5 The Drive 100hitz 90 s Alternat All Stations URCE ENU WD ACK FO TUNING SEEK SELE...

Страница 34: ...ing Seek Select control to highlight each character for the search in turn and press the Tuning Seek Select control to enter If you make an error rotate the control or use the Info button to access the delete character BKSP on the screen and then press the Tuning Seek Select control Rotate the control or press Info again to go back to the character selection After the final character of the search...

Страница 35: ...uld find a station called Raido10 Classic Rock Hits as well as a station called Radio 10 Rocks 6 Rotate the Tuning Seek Select control to highlight the station that you wish to listen to and press the control to confirm your choice The display will show Connecting while it finds a new station 0123456789 _ abcdefghijklmn opqrstuvwxyz ABC DEFGHIJKLMNOPQR Stations BKSP OK CANCEL Radio 10 Radio 10 Top...

Страница 36: ...en press the control to select 3 You may then search by location genre or using part of the name of the podcast The searches operate in exactly the same way as when searching for a conventional radio station Searching by location is done first by continent then by country You may then list All shows or search within a country by genre Searching by genre is more direct since once the genre is chose...

Страница 37: ...elect control and then press the control to confirm your chosen podcast The display will show Connecting while it finds the new programme AVRO Andermans Vere AVRO Sandwich AVRO Schiffers FM Musical Moods NOS Met het Oog op Podcasts ...

Страница 38: ... control until Stations is highlighted on the display and then press the control to select 3 Rotate the Tuning Seek Select control until Popular stations or New stations is highlighted on the display Press the Tuning Seek Select control to enter your choice 4 Rotate the Tuning Seek Select control to highlight the station that you wish to listen to and then press the control to enter your choice Th...

Страница 39: ...d Configuring My Favourite Stations STORING A PRESET 1 Press the Power button to switch on Audisse Shirudo Tune to the required station using one of the methods described on the preceding pages 2 To store the currently playing radio station as a preset press and hold the Preset button until the display shows the Save to preset screen 3 Use the Tuning Seek Select control to scroll through the prese...

Страница 40: ...o the oldest item is deleted from the list The Last Listened list is stored when the sound system is disconnected from the mains 1 With the sound system switched on and in Internet radio mode press the Menu button The first item on the menu is Last listened With this item highlighted press the Tuning Seek Select control 2 The display will then show a list of the last ten Internet radio stations or...

Страница 41: ...ic News etc and the location of the current radio station c Reliability Displays the reliability of the data stream from the station currently being received URCE ENU WD ACK FO TUNING SEEK SELECT VOLUME EQUALIZER ESET SET SET 1 1 fm Absolute Top 40 2 NDR 2 3 Antenne Bayern 4 SWR3 5 NPO 3FM Last listened NPO 3FM Description Serious Radio Internet radio 10 02 SOURCE MENU FWD BACK INFO TUNING SEEK SE...

Страница 42: ...ams f Date Display the current date Additional or alternative information may be displayed when listening to Podcasts Categories displayable can include Episode name Show genre Show description Show language Episode URL Bit rate Codec Sampling rate Whenever the sound system is displaying an information screen as opposed to a menu screen the time is displayed in the top right corner of the display ...

Страница 43: ...mputer Click on the Register here link and follow the on screen instructions to register an account During the registration process the web site asks for an access code This allows it to uniquely identify your internet radio from the many others that it also provides data for To obtain the access code please follow these steps 2 With Audisse Shirudo switched on and in Internet radio mode press the...

Страница 44: ...may have a great many after a while the web site will allow you to specify the name for a category or group under which the radio station will be listed on Audisse Shirudo Suitable names might be Rock Smooth Mum s stations and so on When ever you add another radio station to your favourites you can either add it to an existing category or create a new one 4 Once you have Internet radio stations av...

Страница 45: ...message of some kind The Audisse Shirudo can only play MP3 WMA FLAC AAC and Real Audio streams 5 To look at modify or delete your added stations list on the web site use the link My added stations in the My account area To delete an added radio station click on the icon with a heart and minus symbol SELECTING YOUR FAVOURITE STATIONS 1 Press the Menu button to enter the main Internet radio menu 2 R...

Страница 46: ...s are not always on line SELECTING YOUR ADDED STATIONS 1 Press the Menu button to enter the main Internet radio menu Rotate the Tuning Seek Select control until Station list is highlighted on the display and then press the control to select 2 Rotate the Tuning Seek Select control until My Added Stations is highlighted on the display and then press the control to select myRadio list My Favourites A...

Страница 47: ...is possible to specify audio streams for My added stations that are not compatible with Audisse Shirudo In this event the station will not be playable The Audisse Shirudo can only play MP3 WMA FLAC AAC and Real Audio streams Note that the audio coding formats listed are generic terms There are many variations of each format as well a variety of streaming protocols in use by different radio broadca...

Страница 48: ...the following identifier NOTE Spotify Connect requires a Spotify Premium subscription SETTING UP SPOTIFY CONNECT For more details about setting up Spotify Connect please go to spotify com connect To use Spotify with your AUDISSE Shirudo radio you will need to download the Spotify app and you will need a Spotify Premium account The Spotify software is subject to third party licenses found here www ...

Страница 49: ...ill be shown with a circle When another device is playing the Spotify Connect icon will be become green Tapping the Connect icon will show a list of Connect enabled devices and allow remote control of the volume 4 To select your radio choose Audisse Shirudo on the Spotify Connect devices screen You are now ready to play music through your radio using Spotify Connect The next time you open Spotify ...

Страница 50: ...nt where it was paused 3 Press the PRESET SKIP FORWARD button to start playback of the next track in the current Spotify playlist 4 Press the PRESET SKIP BACKWARD button to start playback of the previous track in the current Spotify playlist 5 Rotate the VOLUME EQ control to set the required volume level The volume may also be controlled from within the current Spotify app MENU FWD BACK INFO TUNIN...

Страница 51: ...fy Connect 1 Press the Info button to cycle through the different options a Progress bar Displays the playback progress for the track currently playing b Artist Displays the name of the artist for the track currently playing c Album Displays the name of the album from which the current track is taken SOURCE MENU FWD BACK INFO TUNING SEEK SELECT VOLUME EQUALIZER PRESET PRESET PRESET SOURCE MENU FWD...

Страница 52: ...streaming although at the expense of some loss of audio quality The data rate used for Spotify Connect is configured via using a web browser This is the same page this is used to change the Friendly Name of your radio 1 Access the radio s configuration web page 2 The Spotify options at the top of the web page allow you to specify the data rate used either 96k 160k or 320k bits per second Select th...

Страница 53: ...ations that you may use with Audisse Shirudo The Music Player on the sound system can playback audio files in MP3 FLAC AAC and WMA formats WMA Lossless files can also be played when using Windows Media Player 11 as it will convert these to a PCM format before streaming them to the sound system Note that the playback of files encoded using WMA Voice WMA 10 Professional and files that have DRM prote...

Страница 54: ... the first choice for the majority of users SET UP UPNP ACCESS ON A WINDOWS PC 1 If your PC is running Microsoft Windows XP or Windows Vista then you can use Microsoft s Windows Media Player version 11 to act as your UPnP Universal Plug and Play media server If not already installed on your PC Windows Media Player 11 may be downloaded from Microsoft s web site and installed by following the instru...

Страница 55: ... Make sure the box Share my media to is ticked 7 In the Media Sharing window the sound system will be listed as an unknown device Click on the unknown device shown to select it then click the Allow button and then click OK Note If you are using Microsoft Windows firewall software this should be correctly configured by WMP 11 If you are using third party firewall software you may need to manually c...

Страница 56: ...erver and then press the Tuning Seek Select control If the display shows multiple media types select Music Some UPnP servers can serve pictures and video content to suitable devices 4 The sound system will now list the media categories that are made available by the UPnP server for example Album Artist and Genre Rotate the Tuning Seek Select control to highlight which category you wish to browse t...

Страница 57: ... UPnP server applications allow the search options to be customised The searches described here are just examples of the possibilities 1 Use the Tuning Seek Select control to choose content by Artist Album Genre etc according to your needs then press the control to enter your choice 2 When you reach the album or folder the menu will then switch to showing the tracks in that album or folder When se...

Страница 58: ... Select control The track will begin playing The radio will then play subsequent tracks from the same album or folder CONTROLLING PLAYBACK 1 To pause playback of the current track press the Preset Play Pause button 2 Press the Preset Play Pause button again playback will resume from the point where it was paused 3 To start playback of the previous track in the list press the Preset Skip Backward b...

Страница 59: ...display 4 To turn off the repeat option highlight Repeat play and press the Tuning Seek Select control so that Off appears on the display PLAY TRACKS IN RANDOM ORDER 1 Ensure you are in the main Music Player menu 2 Rotate the Tuning Seek Select control until Shuffle play is highlighted PRESET PRESET URCE ENU WD TUNING SEEK SELECT Shared media My Playlist Repeat play Off Shuffle play On Clear My Pl...

Страница 60: ...do has a range of display options when in Music Player mode Note that the availability of information depends on the specific media files their format and upon the server capability Not all UPnP servers make information from the media files available in the same way 1 Press the Info button to cycle through the different options a Progress bar Displays the playback progress for the track currently ...

Страница 61: ...h the radio is obtaining the media either from a UPnP server PLAYLISTS Sometimes you may wish to set up a list of music tracks or albums that can then be played without further action as background music for a party for example Audisse Shirudo can be configured to hold a queue of up to 500 tracks in a playlist menu The tracks or albums for the playlist can be selected from your UPnP serve The play...

Страница 62: ...lows any unwanted tracks to be removed from the playlist if needed VIEWING YOUR PLAYLIST 1 Press the Power button to switch on the unit Press the Source button as needed until the Music Player mode display is shown The Music Player menu will then be shown on the display URCE ENU WD ACK FO TUNING SEEK SELECT VOLUME EQUALIZER ESET SET SET Hello When We Were Young Rolling In The Deep Set Fire To The ...

Страница 63: ... to erase is highlighted Press and hold the Tuning Seek Select control 4 You will be asked to confirm the deletion To delete the track rotate the Tuning Seek Select control until YES is highlighted on the display Press the control to cause the track to be deleted URCE ENU WD ACK FO TUNING SEEK SELECT VOLUME EQUALIZER ESET SET SET Hello When We Were Young Rolling In The Deep Set Fire To The Rain So...

Страница 64: ...ontrol until YES is highlighted on the display Press the control to cause the playlist to be cleared 4 If you do not wish to clear the playlist rotate the Tuning Seek Select control to highlight NO and press the control to confirm Delete from My playlist My playlist YES NO SOURCE MENU FWD BACK INFO TUNING SEEK SELECT VOLUME EQUALIZER PRESET PRESET PRESET URCE ENU WD ACK FO TUNING SEEK SELECT VOLUM...

Страница 65: ...y If you use the radio at different locations you may find that there are servers listed by the radio that you are no longer interested in This prune servers functions allows the list to be updated so that only active UPnP servers on the currently connected network are shown when selecting Shared Media from the Music Player menu 1 Press the Menu button to enter the main Music Player menu 2 Rotate ...

Страница 66: ...te with your radio Your radio is unable to play from media formatted using the exFAT or NTFS formats It is possible to use SD or SDHC cards for media storage and playback when held in a suitable USB adaptor However due to the wide variation of such adaptors it is not possible to guarantee that all adaptor card combinations will work in the radio Audio formats supported are MP3 WMA AAC FLAC and WAV...

Страница 67: ...elect control to select Yes and skip to step 4 below If the USB memory was not automatically detected proceed as follows 2 To select USB playback mode press the Mode button as needed until the Music Player mode is selected 3 Rotate the Tuning Seek Select control until USB playback is highlighted on the display and press the control The radio will now list the content stored on the USB memory devic...

Страница 68: ...range of display options when in Music Player mode Note that the availability of information depends on the specific media files their format and upon the server capability Not all UPnP servers make information from the media files available in the same way 1 Press the Info button to cycle through the different options a Progress bar Displays the playback progress for the track currently playing b...

Страница 69: ...t Displays the bit rate and format of the track currently playing g Buffer Displays the radios internal buffer status during media playback Music player 10 02 USB Hello Album 25 Hello Folder AAC music Music player 10 02 USB Hello Path usb AAC music Hello m4a Music player 10 02 USB Hello Bit rate 320 kbps Codec AAC Sampling rate 44 1 kHz Music player 10 02 USB Music player 10 02 USB Hello Playback ...

Страница 70: ...ed from your UPnP server and from a USB memory device The playlist is held in the memory in your radio until the external power is removed or until the playlist is cleared from the menu Note that the playlist is not retained in Standby mode when the radio is running on batteries ADDING A SINGLE TRACK TO YOUR PLAYLIST 1 When selecting or when playing a track using a UPnP server or a USB memory devi...

Страница 71: ...otate the Tuning Seek Select control until My Playlist is highlighted on the display Press the control to enter the playlist 3 Rotate the Tuning Seek Select control to scroll through the playlist Tracks which are served via UPnP will show their track name and USB tracks will show their file name ERASING A TRACK FROM THE PLAYLIST 1 Press the Menu button to enter the main Music Player menu 2 Rotate t...

Страница 72: ...ar My playlist is highlighted on the display Press the control 3 To clear the whole playlist rotate the Tuning Seek Select control until YES is highlighted on the display Press the control to clear the playlist 4 If you do not wish to clear the playlist rotate the Tuning Seek Select control to highlight NO and press the control to confirm URCE ENU WD ACK FO TUNING SEEK SELECT VOLUME EQUALIZER ESET ...

Страница 73: ...laylist you can use this function to jump to a particular track within the playlist 5 While playing from the playlist you may add additional tracks or albums or remove specific tracks SOURCE MENU FWD BACK INFO TUNING SEEK SELECT VOLUME EQUALIZER PRESET PRESET PRESET URCE ENU WD ACK FO TUNING SEEK SELECT VOLUME EQUALIZER ESET SET SET Shared media USB playback My Playlist Repeat play Off Shuffle play...

Страница 74: ...l be selected instead During the scanning process as new stations are detected the station counter will increase and the stations will be added to the list that is stored in the sound system The bar graph indicates the progress of the scan 5 When scanning is completed the radio will list the stations found in numeric alpha order 0 9 A Z unless it has previously been tuned to a DAB station Rotate t...

Страница 75: ...ation the display normally shows the name of the current station with other related information 2 Rotate the Tuning Seek Select control to access the radio station list and to scroll through the available stations 3 Press the Tuning Seek Select control to select the highlighted station The display may show Connecting while the radio re tunes URCE ENU WD ACK FO TUNING SEEK SELECT VOLUME EQUALIZER E...

Страница 76: ...t of station names beneath the main or primary station To listen to a secondary service use the Tuning Seek Select control to scroll to the chosen station and press the control to tune to the station If the secondary service is not available off air then the primary service will be selected DISPLAY MODES Audisse Shirudo has a range of display options when in DAB mode 1 Press the Info button to cyc...

Страница 77: ...he signal strength graph can be used when positioning the radio or its antenna For good reception the graph should occupy three or more blocks e Bit rate and audio type Displays the digital bit rate and audio coding information for the station being listened to f Date Displays the current date NPO 3FM Pop Music DAB radio 10 02 NPO 3FM DAB NPO Freq 223 936MHz DAB radio 10 02 NPO 3FM Strength DAB ra...

Страница 78: ...ou wish to use Audisse Shirudo for DAB reception in a new location or if no stations were detected during the initial scan you can follow this procedure to allow Audisse Shirudo to find out which DAB radio stations are available 1 Ensure that the telescopic antenna is extended and then press the Source button as needed to select DAB radio mode 2 Once in DAB mode press the Menu button 3 Rotate the ...

Страница 79: ... the display shows the DAB menu 2 Rotate the Tuning Seek Select control until Manual tune is highlighted 3 Press the Tuning Seek Select control to enter manual tune mode URCE ENU WD ACK FO TUNING SEEK SELECT VOLUME EQUALIZER ESET SET SET Station list Full scan Manual tune Prune DRC DAB radio Scan 10 02 Stations 35 Scanning URCE ENU WD ACK FO TUNING SEEK SELECT VOLUME EQUALIZER ESET SET SET SOURCE ...

Страница 80: ...e list stored in the radio 6 Press the Menu or Back button to choose a different frequency 7 Press the Menu or Back button a second time to access the main DAB menu then select Station list to return to normal tuning DYNAMIC RANGE CONTROL SETTINGS Dynamic Range Control also known as DRC can make quieter sounds easier to hear when your radio is used in a noisy environment by reducing the dynamic ra...

Страница 81: ...ct control to confirm the setting Note Not all DAB broadcasts use the DRC function If the broadcast does not provide DRC information then the DRC setting in the sound system will have no effect STATION ORDER SETUP Audisse Shirudo has 3 station order settings from which you can choose The station order settings are alphanumeric ensemble and valid Note The default station order on your radio is alph...

Страница 82: ...NE STATIONS If you move to a different part of the country some of the stations that were listed may no longer be available Also from time to time some DAB services may stop broadcasting or may change location or frequency Stations which cannot be found or that have not been received for a very long time are shown in the station list with a question mark The Prune stations function will delete the...

Страница 83: ...lid station names to be removed from the station list If you do not wish to prune stations highlight NO and then press the control The display will revert to the previous menu Note If you have moved Audisse Shirudo to a different part of the country you should also carry out a search for new stations SOURCE MENU FWD BACK INFO TUNING SEEK SELECT VOLUME EQUALIZER PRESET PRESET PRESET Full scan Manua...

Страница 84: ...erence simply press the Tuning Seek Select control to scan further Audisse Shirudo may have found a spurious interference signal 5 To find more FM stations press the Tuning Seek Select control to repeat the scan operation To scan down in frequency rotate the Tuning Seek Select control in a anti clockwise direction first and then press the control Your radio will scan down the FM band from the curr...

Страница 85: ...om the opposite end of the waveband 4 Use the Volume EQ control to adjust the sound level as needed DISPLAY MODES Audisse Shirudo has a range of display options when in FM mode 1 Press the Info button to cycle through the different options a Text Displays text messages such as the artist or track name phone in number traffic alerts etc SOURCE MENU FWD BACK INFO TUNING SEEK SELECT VOLUME EQUALIZER ...

Страница 86: ...provides displays when there is information available So if there is no text for example that display is not available The stereo speaker display shows that the radio is receiving a stereo broadcast SCAN SETTING When using the FM mode Audisse Shirudo can be set to either scan local stations or to scan all stations including distant radio stations 1 Press the Source button as needed to select FM ra...

Страница 87: ...nt transmissions rotate the Tuning Seek Select control until NO is highlighted Press the Tuning Seek Select control to confirm the setting 5 Press the Menu button to return to the normal FM mode display STEREO MONO SWITCHING If the FM radio station being listened to has a weak signal some hiss may be audible It is possible to reduce this hiss by forcing the radio to play the station in mono rather...

Страница 88: ...Alternatively to return to the normal automatic stereo or mono mode rotate the Tuning Seek Select control until NO is highlighted Press the Tuning Seek Select control to confirm the setting 5 Press the Menu button to return to the normal FM mode display SOURCE MENU FWD BACK INFO TUNING SEEK SELECT VOLUME EQUALIZER PRESET PRESET PRESET FM radio FM SOURCE MENU FWD BACK INFO TUNING SEEK SELECT VOLUME...

Страница 89: ...ton until the display shows a preset menu Save to Preset 4 Rotate the Tuning Seek Select control to the desired preset number until it is highlighted Press the Tuning Seek Select control to confirm and the display shows Preset Stored The station will be stored under the chosen preset button Repeat this procedure as needed for the remaining presets 5 Stations that are already stored in the presets ...

Страница 90: ...ext one preset station in the list For example if you are playing 5 P2 the Preset Skip Forward button will recall the P3 station if it exists Note If the P3 station is not existing in the preset menu the sound system will directly search for the next available station in the list then play Note If there is no available station in the preset list the sound system will display a pop up screen with a...

Страница 91: ...ay lead to operational difficulties Bluetooth is a short range radio communication system and generally Bluetooth devices can communicate with each other clearly within a regular sized room or office The reliability of a Bluetooth connection between different rooms will greatly depend upon the construction of the building Bluetooth communication range may be substantially reduced if the signal pas...

Страница 92: ...th each device 2 Press the Power button to switch on the Audisse Shirudo sound system 3 Press the Source button on your sound system until the Bluetooth is selected 4 Press the Menu button to enter Bluetooth menu 5 Press the Tuning Seek Select control to select Discoverable and press the control to start enter Bluetooth discovery mode The Audisse Shirudo sound system will immediately enter discove...

Страница 93: ...pair with your radio then enter a code of 0000 four zeroes PLAYING AUDIO FILES When you have successfully connected your sound system with your chosen Bluetooth device you can start to play your music using the controls on the device 1 Once playing has started adjust the volume to the required setting using the Volume buttons on your sound system or the connected Bluetooth device 2 Provided that y...

Страница 94: ...nd Previous buttons on the radio system Note That not all player applications or devices may respond to all of these buttons DISPLAY MODES In Bluetooth mode the sound system can display a range of information of the current playing music on the display Press the Info button to cycle through the various types a Artist Displays the artist s name of the current playback music b Album Displays the alb...

Страница 95: ...The ringtone of iPhone will be streamed to the radio via Bluetooth But because of Android system the ringtone of Android phone or other phones will only be sounded on the mobile REDIALLING LAST NUMBER The Hands Free Calling feature allows you redialling your last dialled phone number on your mobile phone in Bluetooth mode only 1 Press the Power button to switch on the sound system 2 Select Bluetoo...

Страница 96: ...ons and press the control to select the setting a On in all modes Bluetooth is turned on when the Audisse Shirudo sound system is on You can playback music in the Bluetooth mode and use the Hands Free Calling feature to answer incoming phone calls in all operation modes for example also when you are listening to the radio As an indication the blue Bluetooth connected LED will be on blinking with l...

Страница 97: ...o check the current Bluetooth status of the sound system 1 Press the Power button to switch on the Audisse Shirudo sound system 2 Press the Source button on your sound system until the Bluetooth is selected 3 Press the Menu button to enter Bluetooth menu 4 Rotate the Tuning Seek Select control to select View details from the menu 5 Press the Tuning Seek Select control to enter 6 Rotate the Tuning ...

Страница 98: ...n the Audisse Shirudo sound system 2 Press the Source button on your sound system until the Bluetooth is selected 3 Press the Menu button to enter Bluetooth menu 4 Rotate the Tuning Seek Select control to select View details from the menu 5 Press the Tuning Seek Select control to enter 6 Rotate the Tuning Seek Select control to select Connected device from the menu and press the control to enter S...

Страница 99: ...enu button to enter Bluetooth menu 3 Press the Tuning Seek Select control to enter Bluetooth discoverable from the menu to start enter Bluetooth discovery mode Your Audisse Shirudo sound system will become discoverable by other devices The Bluetooth indicator on the front panel will flash fast and showing Bluetooth Discoverable Please connect with a device to Audisse Shirudo on the display The sou...

Страница 100: ... Shirudo sound system 2 Press the Source button on your sound system until the Bluetooth is selected 3 Press the Menu button to enter Bluetooth menu 4 Rotate the Tuning Seek Select control to select View details from the menu 5 Press the Tuning Seek Select control to enter 6 Rotate the Tuning Seek Select control to select Paired Device List from the menu and press the control to enter After these ...

Страница 101: ...dphone output of your MP3 or CD player to the Aux In socket located at the rear of the sound system Typically this lead will have a 3 5mm stereo plug at both ends 2 Switch on Audisse Shirudo by pressing the Power button briefly 3 Press the Source button until AUX in mode is shown on the display 4 Press the play on the connected audio device If you are using its headphone output for the connection ...

Страница 102: ...ically when connected to the internet If you enter a time setting manually the sound system will calculate a local time offset which is then stored in memory Whenever it synchronises the clock using the internet including after a power failure Audisse Shirudo will then set the clock automatically using this information You may wish to use the sound system away from the internet in which case you m...

Страница 103: ...THE CLOCK The Audisse Shirudo sound system will normally set its clock automatically to the time zone as you selected in the setup wizard after a connection to the Internet has been established Should you need to set the time manually change the time zone or manually switch from winter to summer time then please follow this procedure 1 Press the Power button to switch on Audisse Shirudo URCE ENU W...

Страница 104: ...rol until Set Time Date is highlighted on the display Press the control to enter the clock setup The day digits will flash 6 Rotate the Tuning Seek Select control until the correct day is shown on the display Press the control to enter the selection The month digits will then flash SOURCE MENU FWD BACK INFO TUNING SEEK SELECT VOLUME EQUALIZER PRESET PRESET PRESET URCE ENU WD ACK FO TUNING SEEK SEL...

Страница 105: ...us menu 11 Rotate the Tuning Seek Select control until Set time zone is highlighted on the display then press the control 12 Rotate the Tuning Seek Select control to highlight the time zone which is applicable to your location then press the control to confirm the setting Press the Menu button to exit or go to step 13 to set the summer winter time option URCE ENU WD ACK FO TUNING SEEK SELECT VOLUM...

Страница 106: ...be used when the radio is operated on AC power In Standby mode on battery power the radio will turn off fully after 30 seconds battery power save mode and will not be turned on by the alarm function settings Ensure that the time is set correctly before setting the alarms 1 With Audisse Shirudo switched on press the Menu button to access the menu for the current mode Rotate the Tuning Seek Select c...

Страница 107: ... the Tuning Seek Select control to choose the alarm minute Press the control to confirm the setting The display will then return to the alarm setting menu If the sound system has been set to use a 12 hour clock format there will also be an option here for setting AM or PM for the alarm time URCE ENU WD ACK FO TUNING SEEK SELECT VOLUME EQUALIZER ESET SET SET Bluetooth AUX IN Sleep Alarms System set...

Страница 108: ...ge it Rotate the Tuning Seek Select control to highlight either Buzzer or the required radio mode Press the control to confirm the selection 9 If setting the alarm to a radio option rotate the Tuning Seek Select control to highlight the Preset option then press the control if you wish to change it Choose from either the radio station Last listened to or from the presets 1 40 Scroll to the chosen o...

Страница 109: ...ous screen WHEN THE ALARM SOUNDS The buzzer or radio alarm will sound at the selected times for up to 60 minutes unless cancelled The volume used for the alarm will be as specified during the alarm setting procedure If the radio cannot connect to the specified radio station the buzzer alarm will be used instead To cancel an alarm press the Power button to return to standby mode The alarm icon will...

Страница 110: ... will now be disabled SNOOZE TIMER 1 The buzzer or radio alarm can be silenced for 5 minutes by pressing the Tuning Seek Select control Should you wish for a longer snooze duration this can be extended Pressing the control again while the sound system is snoozed will set the available snooze time to 5 10 15 or 30 minutes 2 While the snooze timer is active the remaining snooze time is shown next to...

Страница 111: ...cted Press the Tuning Seek Select control to confirm the setting The sleep timer can be set to between 5 and 120 minutes or to Off 5 Audisse Shirudo will switch into stand by mode after the preset time has elapsed An active sleep timer is shown using a small timer indicator at the bottom of the playing displays This indicator also shows the sleep time remaining before the radio switches itself int...

Страница 112: ...isplay Press the control to enter the system settings menu 3 Rotate the Tuning Seek Select control until Equaliser is highlighted on the display Press the control 4 Rotate the Tuning Seek Select control to cycle through and highlight the various modes Press the control to confirm your selection a Normal Flat b Jazz c Rock d Movie e Classic f Pop g News h My EQ The currently selected mode is marked...

Страница 113: ... Press the control when you are happy with the bass setting 4 To adjust the treble level rotate the Tuning Seek Select control until Treble is highlighted on the display Press the control to enter adjustment mode and rotate the control until the desired level between 10 and 10 is displayed The sound will change as you turn the control Press the control when you are happy with the treble setting 5 ...

Страница 114: ...Tuning Seek Select control until System settings is highlighted on the display Press the control to enter the system settings menu Rotate the Tuning Seek Select control until Brightness is highlighted on the display Press the control 3 To adjust the display brightness when the sound system is switched on rotate the Tuning Seek Select control until Normal is highlighted on the display To adjust the...

Страница 115: ...ing volume to a low level before connecting headphones to the sound system Note The EQ settings have no effect on the sound when using a headphone to listen to the Audisse Shirudo IMPORTANT Excessive sound pressure from earphones and headphones can cause hearing loss WARNING Never use the headphone socket in rainy or moist conditions to prevent moist from entering the radio Keep the rubber cover w...

Страница 116: ...etails will be lost All configuration settings will be restored to their defaults the clock and alarms will be reset In case of malfunction for any reason reset the product as described above to resume normal operation It may be necessary in some cases to disconnect the mains power then reconnect power after 10 seconds In case of malfunction due to electrical fast transient burst reset the product...

Страница 117: ...k settings Then press the control and select YES If you do not want your radio to check for updates select the NO option 2 To check if there are any software updates available currently rotate the Tuning Seek Select control to highlight Check now and then press the control The sound system will check to see if an update is available The display will show Checking for new versions If there are no u...

Страница 118: ...s the four most recent profiles in memory identified by their SSID Normally the sound system will attempt to connect to one of the stored profiles and only if it is unable to do so will you need to use the Network Wizard In the event that you visit a location only once you may wish to delete the profile for the network in that location to avoid losing other profiles 1 Access the menu for the curre...

Страница 119: ...cess the menu for the current mode by pressing the Menu button Rotate the Tuning Seek Select control until System settings is highlighted on the display Press the control to enter the System settings menu 2 Rotate the Tuning Seek Select control until Info is highlighted on the display Press the control to display the software version and radio ID Jame s group Wilson Network profile Conform detele ...

Страница 120: ...anufacturer of the mobile phone to verify if it supports charging from an USB power The USB socket is suitable for DC power out only and cannot be used for e g playback of music from a USB stick Warning Never use the USB socket in rainy or moist conditions to prevent moist from entering the radio and so to prevent potential short circuit Always keep the rubber cover well closed under these conditi...

Страница 121: ... may be configured using the menu items Main Menu System settings Network Manual settings This will ask first whether you wish to configure a wireless connection For wireless you then need to choose DHCP enable or DHCP disable If you enable DHCP then the radio will negotiate with your router or DHCP server and will be provided with an IP address as well as the other settings needed If you wish to ...

Страница 122: ...se the menu items Main Menu System settings Network Manual settings Wireless DHCP disable You will also need to enter the SSID the encryption type and the encryption key If Audisse Shirudo can connect to the network but is unable to play a particular internet radio station it may be due to one these causes 1 The station is not broadcasting at this time of the day 2 The station has reached its maxi...

Страница 123: ... system blocked in firewall software Some third party UPnP servers are much less dependent upon other parts of Windows than WMP 11 If the greater flexibility that these offer is attractive then it may be found in some cases that they are easier to get working AUDIO CODECS Your radio supports a range of audio codec that provide compatibility with a wide range of Internet Radio stations and also all...

Страница 124: ...with liquids such as vases shall be placed on the radio It is recommended to operate the product such that there is a minimum distance 10cm recommended to adjacent objects in order to ensure good ventilation The ventilation of the product should not be restricted by covering it with items such as newspapers tablecloths curtains etc No naked flame sources such as lighted candles should be placed on...

Страница 125: ...ter first cleaning with a dry cloth thinly apply a universal protection oil like e g WD40 with a cloth to prevent rust and corrosion and to ensure normal operation WARRANTY This radio has a 2 year limited warranty WARNING Warranty becomes void once the radio cabinet has been opened or any modifications or alterations to the radio have been made The terms of the warranty of this radio do not cover ...

Страница 126: ...s Headphone socket 3 5mm stereo Aux In socket 3 5mm stereo Aerial System WiFi Built in antenna DAB Telescopic aerial FM Telescopic aerial The company reserves the right to amend the specifications without notice ENVIRONMENTAL NOTE This product has been manufactured with high quality parts and materials that can be reused and recycled Therefore do not throw the product away with normal household wa...

Страница 127: ...127 ...

Страница 128: ...128 Prime Europe B V Everdenberg 9a 4902 TT Oosterhout The Netherlands www audisse com 03 17 ...

Отзывы: