background image

CHAPTER 5    Cabling the Device

MP-1288 | Hardware Installation Manual

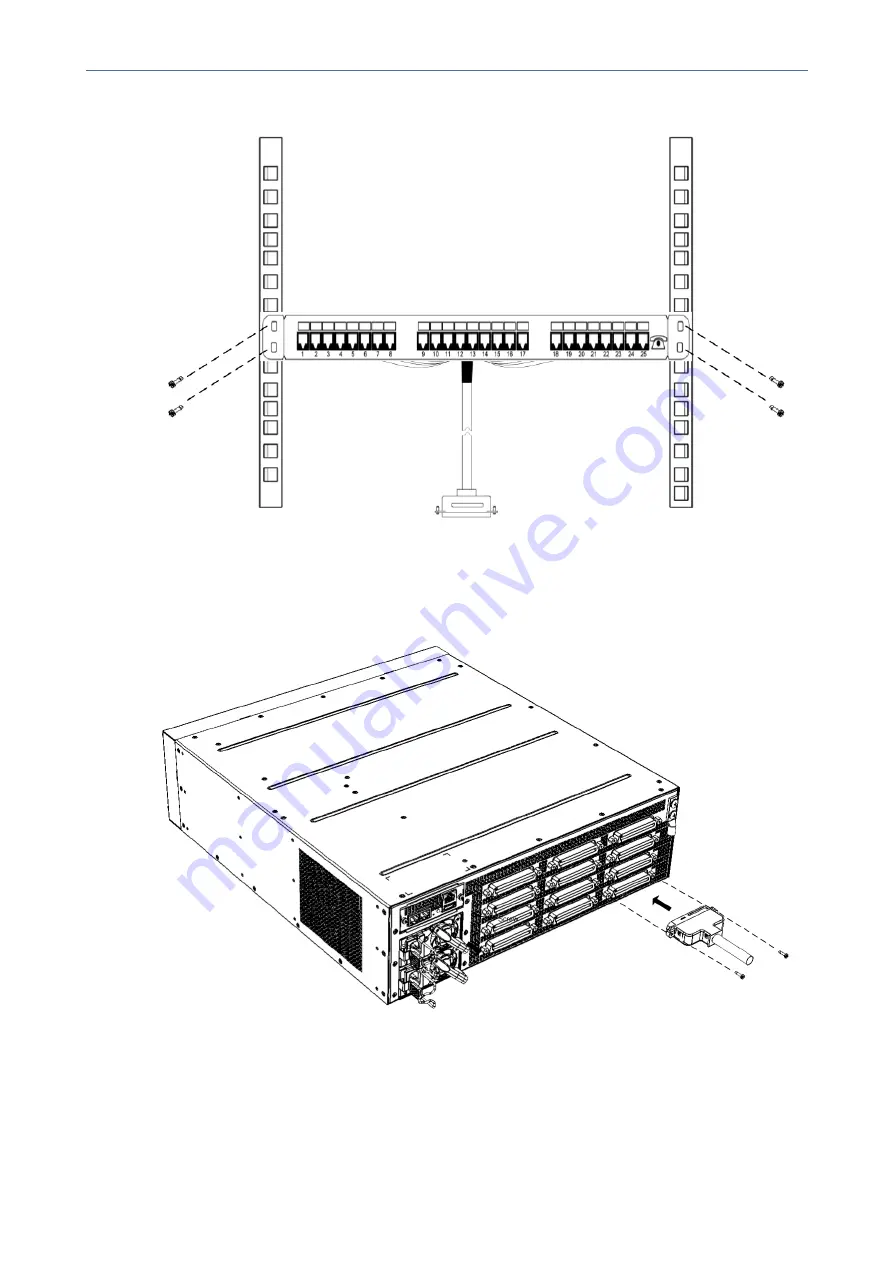
Figure 5-8:

Mounting Patch Panel in Rack

2.

Connect the Patch Panel's 50-pin male connector to one of the FXS blade's 50-pin female
Telco connectors located on the chassis' rear panel, and secure the connector with the
two captive screws located on either side of the connector, using a flat-head screwdriver:

Figure 5-9:

Connecting 50-Pin Telco Connector to Port on FXS Blade

3.

Connect your analog equipment to the Patch Panel, by plugging the RJ-11 connectors into
the RJ-11 sockets on the Patch Panel's front panel:

- 26 -

Содержание MediaPack MP-1288

Страница 1: ...Hardware Installation Manual AudioCodes MediaPack Analog Gateway Series MP 1288 High Density Analog Media Gateway Version x y...

Страница 2: ...thority for disposal of this product Customer Support Customer technical support and services are provided by AudioCodes or by an authorized AudioCodes Service Partner For more information on how to b...

Страница 3: ...e device carries high voltage and contact with internal components may expose you to electrical shock and bodily harm The device must be installed and serviced only by qualified service personnel The...

Страница 4: ...ation only upon power outage FXS off hook current 28026 Fan tray section and air filter replacement section updated 28027 Off hook loop current and ring voltage updated regarding ports 28028 Power sur...

Страница 5: ...FXS LEDs 14 Power Supply LED 16 4 19 Inch Rack Mounting 17 5 Cabling the Device 19 Grounding and Surge Protection 19 Connecting Ethernet Interfaces 21 Connecting FXS Interfaces 22 Connecting FXS Inte...

Страница 6: ...Content MP 1288 Hardware Installation Manual Adding an FXS Blade 46 Replacing the CPU Module 49 50 Replacing Power Supply Modules 51 vi...

Страница 7: ...cabling the device The device supports the following Up to 288 FXS ports 72 FXS ports per FXS blade can house up to four FXS blades Two 100 1000 Base T Gigabit Ethernet ports Fan Tray module 1 1 AC o...

Страница 8: ...n 3 Check that there is no equipment damage 4 Ensure that in addition to the chassis the package contains the following items 2 x front mounting brackets for 19 inch rack mounting 1 x RJ 45 to DB 9 se...

Страница 9: ...erating Environment Physical Specification Description Dimensions H x W x D 3U high 19 inch rack wide 132 5 x 438 x 482 5 mm 5 22 x 17 24 x 19 inches Weight 21 kg 46 3 lbs for fully populated chassis...

Страница 10: ...cription Color State Description Green On LED lit as a result of one of the following Device is operating normally During first stage of boot up when device is powered on Orange On Chassis is approach...

Страница 11: ...the following table Table 3 5 PWR LED Description Color State Description Green On Chassis receiving power and Power Supply modules are functioning normally If the device is configured to use only one...

Страница 12: ...n from the outside through the perforated fan tray cover on the front panel see following figure A replaceable air filter located inside the fan tray cover removes dust particles from the sucked in ai...

Страница 13: ...t even when the device is powered on The Fan Tray module fan tray cover and air filter are available as field replaceable units FRU For replacing the Fan Tray module see Replacing the Fan Tray Module...

Страница 14: ...lades providing FXS port interfaces For more information see FXS Blades on the next page 4 Protective grounding for connecting a grounding lug for chassis ground connection for ESD preventive equipmen...

Страница 15: ...ting the status of the CPU module For more information see STAT LED on page 14 4 O O RJ 45 port for RS 232 serial communication 5 USB Type A port which can be used for example for various storage capa...

Страница 16: ...nd S4 are located on the rear panel Figure 3 8 Chassis Slot Assignment for FXS Blades Front Panel The FXS channel port number range of each FXS connector on an FXS blade is indicated by the labels FXS...

Страница 17: ...5 mA maximum on the first 1 and last 24 ports per FXS connector In other words it applies to up to six ports per FXS Blade This applies to emergency elevator phones Ring Voltage Sine 54 Vrms 80 Vrms o...

Страница 18: ...for load sharing and power redundancy The power source is a standard electrical outlet providing AC power Power surge protection caused for example from lightning is also supported For more informatio...

Страница 19: ...es for load sharing and power redundancy Power surge protection caused for example from lightning is also supported For more information see Grounding and Surge Protection on page 19 The Power Supply...

Страница 20: ...tus of the CPU module as described in the following table Table 3 13 STAT LED Description Color State Description Green On LED is lit because of one of the following Device is operating normally Durin...

Страница 21: ...lade Figure 3 13 FXS LED Location on Rear Panel per FXS Blade Table 3 14 FXS LEDs Description Color State Description Green On FXS blade initialization completed and is functioning normally Orange On...

Страница 22: ...Description Color State Description Green On Connected to power source chassis receiving power and Power Supply module s fan operating normally Amber Flashing Connected to power source but chassis no...

Страница 23: ...mpatible with the maximum ambient temperature Tma of 40 C 104 F Reduced Air Flow Installation of the equipment in a rack should be such that the amount of air flow required for safe operation on the e...

Страница 24: ...gned with the holes on the front rack post as shown in the following figure Figure 4 2 Front Mounting Brackets Flush and Aligned with Front Rack Posts 4 Hold the chassis in position while the second p...

Страница 25: ...ended to feed the unit It is essential that the impedance will be kept below 0 5 ohms Proper grounding is crucial to ensure the effectiveness of the lightning protection connect the device permanently...

Страница 26: ...ashers 3 Insert one end of the grounding wire into the grounding lug supplied as shown in the following figure and then use a crimping tool not supplied to secure the wire to the grounding lug Figure...

Страница 27: ...edundancy where one port serves as the active port while the other as standby When the active port fails the device switches to the standby port The cabling specifications and procedure for connecting...

Страница 28: ...XS telephone lines are routed outside the building additional protection usually a 350V three electrode Gas Discharge Tube GDT as described in ITU T K 44 must be provided at the entry point of the tel...

Страница 29: ...Codes orderable Centronics cable connector 10 m to open leads which needs to be connected to a distribution panel see Connecting FXS Interfaces using Centronics Cable on page 28 Third party main distr...

Страница 30: ...ing AudioCodes FXS Patch Panel You can purchase AudioCodes FXS Patch Panel shown in the following figure to connect the FXS interfaces to FXS equipment The patch panel can be mounted in a 19 inch rack...

Страница 31: ...atch Panel in a 19 inch rack using the integrated mounting brackets located on either side of the Patch Panel Use four 19 inch rack bolts not supplied to securely attach the brackets to the front rack...

Страница 32: ...female Telco connectors located on the chassis rear panel and secure the connector with the two captive screws located on either side of the connector using a flat head screwdriver Figure 5 9 Connecti...

Страница 33: ...t to FXS Patch Panel For outdoor FXS cabling installations you must install additional power surge protection as illustrated in the following figure For indoor FXS cabling installations there is no ne...

Страница 34: ...n leads on the other end which need to be connected to your patch panel or distribution frame Figure 5 12 Orderable Centronics Cable and Pinouts To connect the FXS interfaces using the Centronics cabl...

Страница 35: ...m the following instructions To reduce noise interference use a twisted pair Octopus cable that is terminated on a metal hooded 50 pin Telco connector To connect FXS interfaces directly to an MDF 1 Wi...

Страница 36: ...ereby it automatically connects an FXS port Lifeline extension or phone to the PSTN PBX upon a power outage This enables the phone to make and receive calls to and from the PSTN respectively instead o...

Страница 37: ...co Connector for FXS Lifeline Connector Pinouts Table 5 3 50 pin Telco Connector Pinouts for FXS Lifeline Telco Connector Pins Description 1 26 Connects to FXS Lifeline extension 25 50 Connects to PST...

Страница 38: ...2 serial interface port on its rear panel The RS 232 interface port is used to access the device s command line interface CLI Port Type RJ 45 Cable RJ 45 to DB 9 female cable adapter supplied Figure 5...

Страница 39: ...Not used To connect the serial interface port to a computer 1 Connect the RJ 45 connector at one end of the cable to the device s serial port labeled 0 0 located on the CPU module on the rear panel Fi...

Страница 40: ...trical outlet The connection is made using the supplied AC power cord Table 5 5 AC Power Specifications Physical Specification Value Input Voltage Dual universal AC power supply 100 240V AC Input Freq...

Страница 41: ...being pulled out Figure 5 21 Strain Relief for Power Cord using Cable Anchor Clip Strain relief for the power cord using the cable anchor clip is not mandatory 4 Connect the male end of the power cord...

Страница 42: ...the DC mains power must be done only by a certified electrician and in accordance with local national electrical regulations Both Power Supply modules must be connected Ensure that you connect each on...

Страница 43: ...the captive screw located above the installed wire lead to secure the wire to the terminal block 6 Repeat steps 1 through 5 for the second wire Figure 5 22 Wiring DC Power Leads to Terminal Block 7 M...

Страница 44: ...CHAPTER 5 Cabling the Device MP 1288 Hardware Installation Manual Figure 5 23 Wired DC Power Supply Modules 10 Connect the DC power leads to a 48 VDC power source 38...

Страница 45: ...module Instead hold the module only on the edges where no electrical components are located Make sure that the modules are securely installed in the chassis To attach an ESD wrist strap to the chassi...

Страница 46: ...tesse Aussi patientez quelques secondes pour permettre aux lames de s arr ter avant d extraire le module du ch ssis To replace the Fan Tray module 1 Remove the Fan Tray module a On the front panel loo...

Страница 47: ...s on the front panel of the module You can use a flat head screwdriver d Orientate the Fan Tray cover as shown in Step 1 above and then place it over the Fan Tray module so that the screws are flush w...

Страница 48: ...hat you can replace it immediately The air filter is hot swappable To replace the air filter 1 On the front panel remove the Fan Tray cover by loosening the four Philips head spring loaded captive scr...

Страница 49: ...an FXS blade Power off the device when removing or installing FXS blades To replace an FXS blade 1 Remove the faulty FXS blade a Identify the faulty FXS blade by the color of its LED located on the re...

Страница 50: ...iver Each FXS port has two hex standoff screws 7 mm on either side and therefore you need to remove all six screws Figure 6 9 Removing Hex Standoff Screws on Rear Panel Example FXS Blade S4 e On the f...

Страница 51: ...cated making sure that you do not touch the blades electrical components b On the chassis front panel orientate the FXS blade as shown in the previous figure c Gently slide the blade into the slot kee...

Страница 52: ...anel connect the 50 pin Telco connector cables to the FXS ports of the new FXS blade h On the front panel re install the Fan Tray module and Fan Tray cover as described in Replacing the Fan Tray Modul...

Страница 53: ...he blade on its front where the captive screws are located making sure that you do not touch the blades electrical components 5 On the chassis front panel orientate the FXS blade as shown in the figur...

Страница 54: ...lot s Guiding Rails for FXS Blade 6 On the rear panel secure the FXS blade to the chassis by inserting the hex standoff screws using a 3 16 in hex head nut driver Do not tighten the screws Figure 6 16...

Страница 55: ...e To replace the CPU module 1 Power off the device 2 Remove the faulty CPU module a Power down the device by disconnecting the power cord from the power source and then unplugging the power cord from...

Страница 56: ...nder the module to support it b Orientate the module as shown above and align the module with the guiding rails in the chassis slot c Gently slide the module into the slot until it has engaged with th...

Страница 57: ...panel as shown below To replace a Power Supply module 1 Remove the faulty Power Supply module a Disconnect the Power Supply module from the power source For AC Power Disconnect the one end of the pow...

Страница 58: ...le from Chassis Example using AC Module 2 Install the new Power Supply module a Grip the handle on the Power Supply module with one hand while supporting it underneath with the other hand b Orientate...

Страница 59: ...This page is intentionally left blank CHAPTER 6 Hardware Maintenance MP 1288 Hardware Installation Manual 53...

Страница 60: ...com documentation feedback 2020 AudioCodes Ltd All rights reserved AudioCodes AC HD VoIP HD VoIP Sounds Better IPme dia Mediant MediaPack What s Inside Matters OSN SmartTAP User Management Pack VMAS V...

Отзывы: