AUBER INSTRUMENTS
WWW.AUBERINS.COM
2020.06
P9/10
7.3.
Controlling a 24V valve
TC
N
1 13 14 6
2
3
4
5
7
8
9
10
L
120VAC
SYL-5342P
+
-
S
24VAC
Solenoid valve
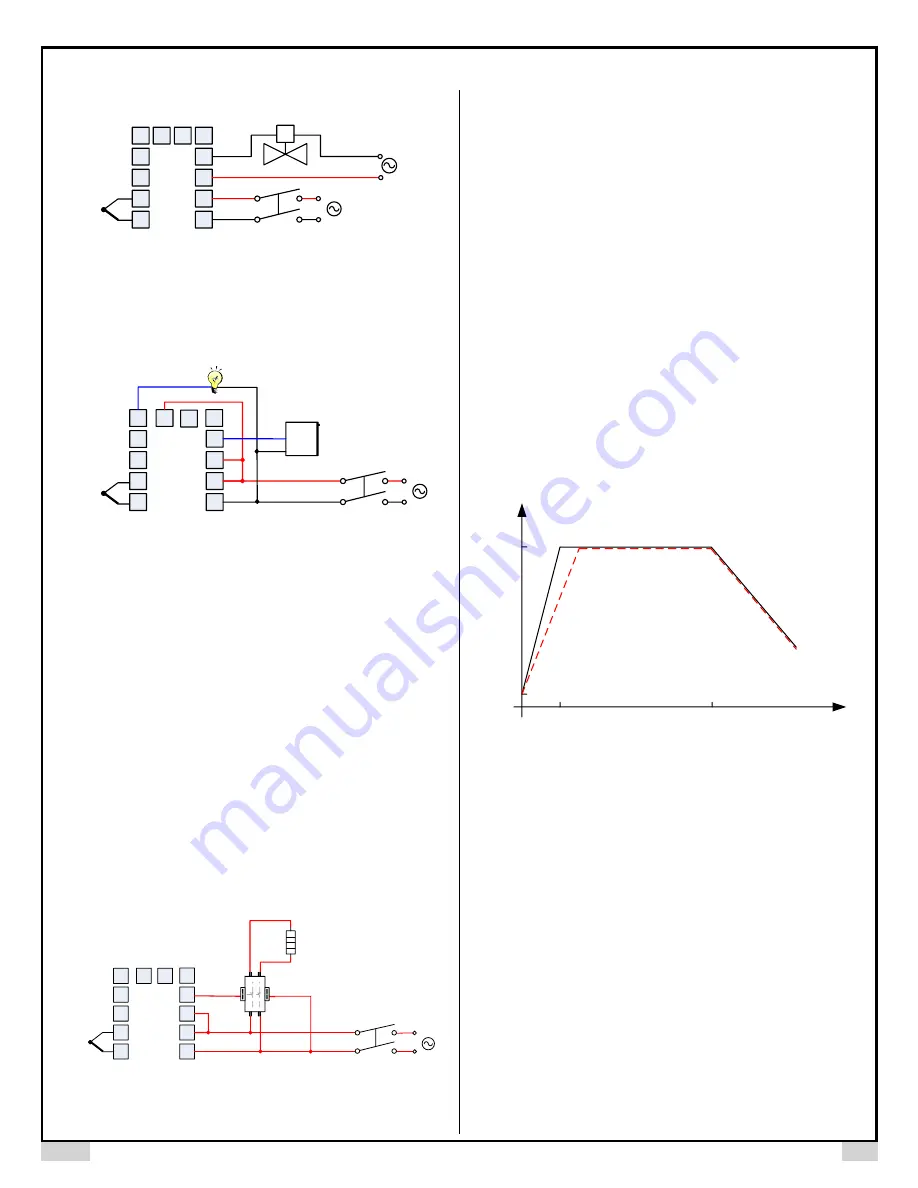
Figure 8. Controller a solenoid valve with SYL-5342P.
This is a typical wiring set up for a 24V gas valve, hot water valve, or a contactor
with 24V coil voltage. A separate 24V power is needed to drive the valve.
Temperature is measured with a thermocouple input on pin 4 and 5.
7.4.
Cooling and heating with the same controller (single step mode)
TC
N
1
13 14
6
2
7
8
9
10
L
120VAC
Refrigerator
SYL-5342P
3
4
5
Bulb
+
-
Figure 9. A refrigerator connected to SYL-5342P directly.
This is an example for beer fermentation. The refrigerator is driven by the internal
relay of the controller directly.
Please note that the internal relay output
(terminals 7 and 8) is not powered by itself.
A power supply
must
be used to
drive the external relay. The refrigerator must consume less current than the
internal relay’s maximum rating (7A at 240V AC and 10A at 120V AC).
The bulb
(less than 100 - 300 W) is for heating. The example is setup to have the heater
to turn on when temperature drops to below 62° F. The refrigerator will turn on
when temperature is above 69° F and turn off at 65° F.
Set up for the controller:
1). RUN = 0. Single step mode.
2). COOL = 1. Set the controller to cooling mode.
3). CF = 1. Set the controller to Fahrenheit temperature unit display.
4). P = 0. ON/OFF mode for cooler.
5). AL1 = 62 & ALP = 2. Set the low limit alarm to 62 ° F. Heater will be on at
62° F (AL1) and off at 62.5 ° F (AL1 + 0.5).
6). Hy = 2.0. Set hysteresis band for cooler to 2 degree.
7). SP = 67. Refrigerator will be on at 69 ° F (SP + Hy) and off at 65 ° F (SP - Hy).
8). T = 60. To prevent refrigerator from cycling on/off frequently, output cycle
time is recommended to set as 60s or longer.
7.5.
Controlling the load via external contactor in a 240V system.
L2
TC
+
-
1
13
14
6
2
3
4
5
7
8
9
10
L1
240VAC
Heater
Contactor
240V Coil
L2
L1
C1
C2
T1
T2
L1
L2
Figure 10. SYL-5342P with an external contactor to control the heating element
in a 240V system.
This example is very similar to example 7.2, but both the controller and the
contactor’s coil are drove by 240VAC power.
8.
Programming Examples
Programs in the SYL-53X2P series controllers (including SYL-5342P and SYL-
5342P) have a uniform format of ramp time-soak time-temperature. The
temperature set point of the last step will linearly ramp to the set point of the
current step over the ramp time of current step. Then the set point of current step
will be held over the soak time of current step (optional). Due to the parameter
SSb, even your program a ramp step that is faster than what is the system
capable of achieving, which will result in actual temperature fall behind the
schedule, this controller will automatically pause its timer to wait (see note
5.3.19). The time units are in minutes by default. To change timer unit in seconds,
please see note 5.3.16.
8.1.
Example 1: holding the oven temperature at 800° C for 2 hours.
Assuming that the heater is able to heat the oven from ambient (25° C) to
800° C within 30 minutes, we can write a program like this:
Step 1: r01 = 2000, t01 = 0, C01 = 25.
Initial step.
Step 2: r02 = 30, t02 = 120, C02 = 800.
Ramp up from 25° C to 800° C in 30
minutes, then hold there for 120 minutes.
Step 3: r03 = 0, t03 = 0, C03 = 0.
End of the program.
The temperature profile is shown below in Figure 11.
25
Time (min)
800
Temp
(° C)
30
150
1. Ramp
2. Soak
3. Natural cooling
Figure 11. Temperature profile of an oven that is programmed to hold
temperature at 800° C for 2 hours. The solid line is the temperature when the
oven is capable of ramping up from 25° C to 800° C in 30 min; the dashed line is
the temperature profile when the oven needs longer time to ramp up to 800° C.
Note 1:
To turn off the heater after the program, change LOOP to 0, so the
program will not auto restart.
Note 2
: The value of C[n] is the end temperature of step n. For instance, C01 is
always the temperature at the end of step 1, and C02 is the end temperature of
step 2. Usually C01 should be the ambient temperature, and r02 is the ramp time
from step 1 to step 2.
Note 3
: If the heater is not capable of heat the oven from 25° C to 800° C in 30min,
the actual oven temperature can fall behind the schedule. Safety start band will
be triggered to pause the timer until the reading temperature gets close. The
timer for step 2 (the soak section) will start even when temperature is still a little
bit below 800° C; and so the actual soaking time will be less than 2 hours. Please
see the dashed line in Figure 11.
8.2.
Example 2: program alarm relay actions
The following example includes 4 steps: linear temperature heating, maintaining
a constant temperature, linear temperature cooling and maintaining a constant
temperature. At the end of all steps, the controller will jump to step 1 and restart
the program.


