Atrust T180L Скачать руководство пользователя страница 25

Setting Up Your t180L / t180LB

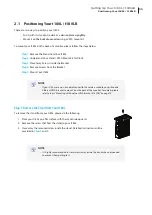
Positioning Your t180L / t180LB

15

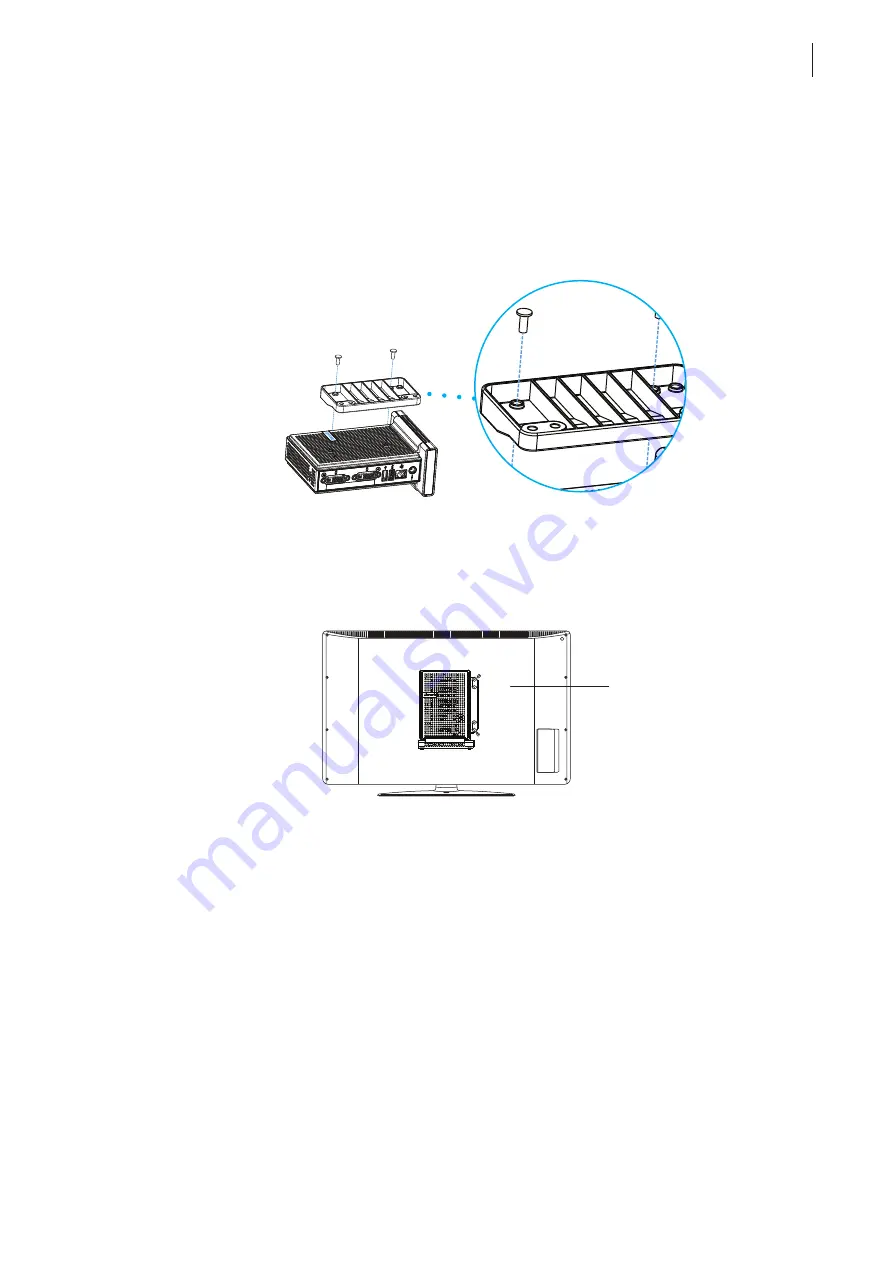
Mounting with Another VESA Bracket (t180LB)

In case that your t180 uses a non-standard stand with the wireless module (t180LB), a different VESA bracket will be 

provided for you to mount your t180LB on the back of a monitor.

To mount your t180LB, follow the steps below:

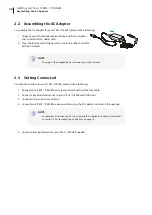
1.  Align two mount holes on the VESA bracket with two mount holes on your t180LB, and then secure the 

bracket to your t180LB with two (2) screws as shown below.


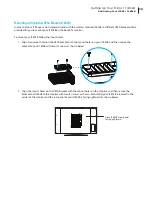
2.  Align the mount holes on the VESA bracket with the mount holes on the monitor, and then secure the 

bracket and t180LB to the monitor with two (2) screws as shown. Ensure that your t180LB is located in the 

center of the monitor and the rear panel of your t180LB is facing rightward as shown below.

Have t180LB’s rear panel 

facing rightward.

Содержание T180L

Страница 1: ...Atrust t180L t180LB Thin Clients User s Manual Internal Draft 0 04 Copyright 2014 16 Atrust Computer Corp...

Страница 2: ...UM t180L LB EN 16050510...

Страница 3: ...rein The information in this document is subject to change without notice Trademark Statements Atrust is a trademark of Atrust Computer Corp Microsoft Windows Windows Server RemoteFX and MultiPoint ar...

Страница 4: ...ices Provides supplementary instructions on advanced settings maintenance and upgrade for Atrust t180L t180LB thin clients Specifications Provides detailed information on key components of Atrust t180...

Страница 5: ...or entry lists first letter capitalized Confirm Dialog window RDP Connection list ICA Connection list View Connection list buttons or tabs on a window toolbars taskbar or menu bold OK Next Save Appli...

Страница 6: ...measures Reorient or relocate the receiving antenna Increase the separation between the equipment and receiver Connect the equipment into an outlet on a circuit different from that to which the recei...

Страница 7: ...battery is replaced by an incorrect type Dispose of used batteries according to the instructions WARNING For safety do not make mechanical or electrical modifications to the equipment Do not remove e...

Страница 8: ...vi...

Страница 9: ...39 4 1 1 Interface Overview 39 4 1 2 Client Settings at a Glance 40 4 2 Configuring System Settings 41 4 2 1 System Tab Overview 41 4 2 2 Available Settings at a Glance 42 4 2 3 Configuring Time Zone...

Страница 10: ...9 Changing the Host Name of Your Thin Client 105 4 5 10 Enabling or Disabling the Wireless Interface 106 4 5 11 Configuring the Trigger Threshold for Roaming 107 4 5 12 Establishing and Stopping a Wir...

Страница 11: ...imple endpoint devices 3 1 2 Features Key features of Atrust t180L t180LB 3 1 3 Package Contents Check your package contents 4 1 4 Exterior Views Overview of thin client outside elements 5 1 5 Panel C...

Страница 12: ......

Страница 13: ...of work environments Drastically reduced endpoint software hardware issues Simplified system maintenance Improved system security More scalability with low cost endpoint devices 1 2 Features The key f...

Страница 14: ...ckage If any items are missing or damaged please contact your dealer immediately Atrust t180L AC Adapter DVI I to VGA Adapter Quick Start Guide Atrust t180LB AC Adapter DVI I to VGA Adapter Quick Star...

Страница 15: ...Overview Exterior Views 5 1 4 Exterior Views Front Right Side Left Side Rear Standard Stand Front Right Side Left Side Rear Selectable Stand with Wireless Module...

Страница 16: ...wer 2 Power button Press to turn on the thin client Press to exit the System Sleep mode See page 20 for Suspend feature Long press to power off the thin client 3 Microphone port Connects to a micropho...

Страница 17: ...me Description 6 DVI I port Connects to a monitor 7 DVI D port Connects to a monitor 8 USB port USB 2 0 Connects to a USB device 9 USB port USB 3 0 Connects to a USB device 10 LAN port Connects to a n...

Страница 18: ...t is on The LAN port of your t180L t180LB has two LED indicators showing the state of networking The meanings of LED signals are described as follows SPEED LED transmission rate LINK ACT LED linking t...

Страница 19: ...nd from Your t180L Step 2 Understand Your Stand VESA Mount Kit for t180L Step 3 Store Screws inside the Bracket Step 4 Remove Screws from the Bracket Step 5 Mount Your t180L Mounting with Another VESA...

Страница 20: ......

Страница 21: ...non standard stand with the wireless module you will need a different VESA bracket to mount it on the back of the monitor For details please refer to topic Mounting with Another VESA Bracket t180LB o...

Страница 22: ...sed to secure the bracket to a monitor as a VESA mount if the middle size screws cannot firmly secure the bracket and your t180L to the monitor 2 4 The middle size screws used to secure the bracket to...

Страница 23: ...e screw into the space with your finger until it clicks into place For the smallest size screw use the tip of a screwdriver instead to push the screw NOTE Please refer to the figure and descriptions i...

Страница 24: ...hole side upward 3 Refer to Step 2 to choose two of the four VESA mount holes on the bracket to align with two mount holes on your t180L such that the bracket projects out and is closer to the rear pa...

Страница 25: ...the steps below 1 Align two mount holes on the VESA bracket with two mount holes on your t180LB and then secure the bracket to your t180LB with two 2 screws as shown below 2 Align the mount holes on t...

Страница 26: ...may vary with your area 2 3 Getting Connected To make connections for your t180L t180LB please do the following 1 Connect your t180L t180LB to your local network with an Ethernet cable 2 Connect a key...

Страница 27: ...he basics of how to use your t180L t180LB 3 1 Learning the Basics Topic 1 Powering On Your t180L t180LB Topic 2 Configuring the Time Zone Topic 3 Returning to the Quick Connection Screen Topic 4 Acces...

Страница 28: ......

Страница 29: ...e launching a new session Restarting the thin client Turning off the thin client 2 Autostart The client will start up directly with the desired RDP ICA View session and perform the configured action a...

Страница 30: ...ent Wait a moment for Atrust Quick Connection screen to appear 3 a Go to Topic 2 to set the time zone for the first time use b Go to Topic 4 if the time zone had been set Power Off Click the icon to s...

Страница 31: ...ngs and customize your t180L t180LB with Atrust Client Setup please refer to chapter 4 Configuring Client Settings on page 37 2 On Atrust Client Setup click System Time Zone 3 Click the Time Zone drop...

Страница 32: ...ics 22 Topic 3 Returning to the Quick Connection Screen To return to Atrust Quick Connection screen when on local Linux desktop please double click Atrust Quick Connection on that desktop Local Linux...

Страница 33: ...ypes of desktop virtualization services Remote Desktop Citrix and VMware View Icon Description Page Remote Desktop Click to access Microsoft Remote Desktop services 24 Citrix Click to access Citrix Xe...

Страница 34: ...domain if any and then click Connect NOTE To discover available Windows MultiPoint Server systems over your network please do the following 1 Click on the left of the Computer field 2 Upon completion...

Страница 35: ...nDesktop and XenApp you may need to further specify the sub path of the server Refer to the following table for details Citrix Product Component to Connect Connection Address XenApp 6 5 or earlier Web...

Страница 36: ...IT administrator for details and ensure the connection is secure first To import a security certificate please refer to section 4 2 14 Importing Certificates for Remote Computers on page 64 To bypass...

Страница 37: ...ield XenApp 6 5 Platinum NOTE To return to Atrust Quick Connection screen press Esc If your XenApp server doesn t belong to any domain type the computer name of the server in the Domain field Citrix L...

Страница 38: ...sc XenApp and XenDesktop 7 5 Platinum NOTE To return to Atrust Quick Connection screen press Esc Citrix Logon Screen Type the required user name password and then click Log On to access virtual deskto...

Страница 39: ...desktop directly if only one type of virtual desktop is assigned to the provided credentials TIP Use Alt Tab to select and restore a hidden or minimized application or desktop The following are some...

Страница 40: ...6 5 Platinum 1 The Application Selection screen appears after logon 2 Click to select the desired application s 3 The selected application s will be displayed on the screen Application Selection Scre...

Страница 41: ...to the Desktop Selection or Application Selection screen On the screen you can Click to launch another virtual desktop if any or to launch other applications Click Log Off on the top of the screen to...

Страница 42: ...r desktop will be displayed on the screen Two buttons may be available for your to switch between Application and Desktop Selection screen depending on your server side deployment You might see this s...

Страница 43: ...rtual desktop or application will return to the Desktop Selection or Application Selection screen On the screen you can Click to launch another virtual desktop if any or to launch other applications C...

Страница 44: ...k New Server in the top left corner A window appears prompting for the name or IP address of the VMware View Connection Server 3 Enter the required information and then click Connect NOTE To return to...

Страница 45: ...certificate please refer to section 4 2 14 Importing Certificates for Remote Computers on page 64 To bypass click Connect Insecurely 6 The Desktop and Application list appears with available desktops...

Страница 46: ...You can Click File Return to Desktop and Application List on the top tool bar to recall the Desktop and Application list Click View on the top tool bar to switch to a virtual desktop or application V...

Страница 47: ...ttings System tab overview Available settings at a glance 41 42 4 3 Configuring User Interface Settings User Interface tab overview Available settings at a glance 69 70 4 4 Configuring External Device...

Страница 48: ......

Страница 49: ...cription 1 Applications tab Click to configure settings for service access through the client 2 User Interface tab Click to configure settings for the user interface of the client 3 Devices tab Click...

Страница 50: ...em language Hiding Showing Quick Access shortcuts Using a custom wallpaper Adjusting keyboard settings Adjusting mouse settings Configuring screensaver settings 4 3 Configuring User Interface Settings...

Страница 51: ...settings for the operation and maintenance of clients To access available settings of System tab click the tab on Atrust Client Setup Interface Elements No Name Description 1 Navigation area Click to...

Страница 52: ...er exiting the session 4 2 7 50 Auto Setup Click to enable Auto Setup to allow the client to get its preset configuration on startup and enter the desired user environment automatically 4 2 8 54 Quick...

Страница 53: ...Setup click System Time Zone 2 Under the Time Zone section click the drop down menu to select the desired time zone 3 Under the NTP Network Time Protocol section use the default or type in the desired...

Страница 54: ...fault You can make changes as desired using this setting Setting Access Privileges and Password Only for Administrators To set access privileges and password only for administrators please do the foll...

Страница 55: ...llowing 1 On Atrust Client Setup click System Password 2 Under the User section click to check Active User Authorization NOTE The User section appears only when Active Admin Authorization is checked 3...

Страница 56: ...the Atrust Device Manager console on that computer and add your t180L t180LB into a managed group under Atrust Device Manager For details please refer to the User s Manual for Atrust Device Manager To...

Страница 57: ...ager 4 Type in the desired password and then click OK to confirm 5 Click Save to save all the changes NOTE When the Shadow feature is performed from a remote Atrust Device Manager on the target client...

Страница 58: ...that you have imported client firmware files into Atrust Device Manager These are prerequisites of this feature For more information on firmware update and Atrust Device Manager please refer to the Us...

Страница 59: ...nually restart the system later Keep the User Data Click to choose if to keep the setting values under Atrust Client Setup NOTE If Yes is selected all setting values under Atrust Client Setup will rem...

Страница 60: ...desired RDP ICA View session and perform the configured action after exiting the session Available actions include Re launching a new session Restarting the thin client Turning off the thin client 2...

Страница 61: ...Settings on page 116 4 6 6 Configuring Basic ICA Connection Settings on page 146 4 6 12 Configuring Basic VMware View Connection Settings on page 198 NOTE Please note that the Autostart mode also ena...

Страница 62: ...x ICA Remote Desktop or VMware View the specific service available in that type and the desired action after exiting a session NOTE No matter which Resolution option you choose for the selected RDP IC...

Страница 63: ...ssion virtual desktop press Ctrl Alt NOTE Please note that the View session virtual desktop will remain on the background after you release the keyboard and mouse from the View session virtual desktop...

Страница 64: ...instructions on how to use your t180L t180LB under the Quick Connection mode please refer to section 3 1 Learning the Basics on page 19 There are three similar but different modes for your t180L t180...

Страница 65: ...the Appliance Mode on page 50 For more information on the Autostart mode please refer to the following sections 4 6 5 Configuring Advanced RDP Connection Settings on page 131 4 6 11 Configuring Advan...

Страница 66: ...Client Setup Advanced Quick Connection Settings for Remote Desktop Sessions To configure advanced Quick Connection settings for Remote Desktop sessions please refer to the table below Remote Desktop O...

Страница 67: ...CA session Use H264 Compression Check to enable H 264 compression support on the client allowing session data are sent from the server side using H 264 format encoding Citrix ICA Option Item Descripti...

Страница 68: ...h information on 1 NOTE All attached USB devices will be listed under Plugged USB Devices 1 with vender and product information needed for creating rules Advanced Quick Connection Settings for VMware...

Страница 69: ...Use Redirection Rules 3 to manage specific USB devices Refer to 2 to fill in the Vender and Product IDs for a specific device click the drop down menu to select Allow or Deny Click Add on the right t...

Страница 70: ...d line functions please do the following 1 On Atrust Client Setup click System Terminal 2 Click to check uncheck Enable to allow disallow the execution of the command line functions 3 Click Save to co...

Страница 71: ...LB please do the following 1 Plug a USB flash drive into your t180L t180LB NOTE This USB flash drive will be used for storing the event logs of your t180L t180LB Ensure that you have enabled the acces...

Страница 72: ...On Atrust Client Setup click System Error Report 2 Click Launch Snapshot to open the screen capturing program 3 Configure screen capturing settings directly on the opened window if needed and then cl...

Страница 73: ...reporting To upload files to an FTP server please do the following 1 On Atrust Client Setup click System Error Report 2 Under the Upload Files section type the IP address of the FTP server and credent...

Страница 74: ...Atrust Device Manager a remote and group management console for multiple thin clients For more information please refer to the User s Manual for Atrust Device Manager Importing certificates through a...

Страница 75: ...stem Settings 65 4 In the From File section click Browse to locate the desired certificate file and then click Open to confirm 5 Click Import to start importing the certificate 6 On completion the cer...

Страница 76: ...cate from a remote computer through the network please do the following 1 On Atrust Client Setup click System Certificate Manager 2 Click Add on the top of the Certificate list 3 In the From Server se...

Страница 77: ...client has been added into a managed group in the management console that is Atrust Device Manager and that 2 you have imported certificates into the management console 1 On Atrust Client Setup click...

Страница 78: ...both sides thin clients and target Atrust Device Manager In addition some configurations on DHCP or DNS server over your network are required For details please refer to the User s Manual for Atrust D...

Страница 79: ...configure settings for the user interface of clients To access available settings of User Interface tab click the tab on Atrust Client Setup Interface Elements No Name Description 1 Navigation area C...

Страница 80: ...Keyboard Click to adjust keyboard settings 4 3 7 77 Mouse Click to adjust mouse settings 4 3 8 79 Screensaver Click to configure screensaver settings 4 3 9 80 4 3 3 Configuring Display Settings To con...

Страница 81: ...main display for local desktop when Extend is selected DVI D DVI I horizontal Use dual displays Two displays are arranged horizontally the DVI D one is on the left the DVI I the right The DVI D one i...

Страница 82: ...n menu when Auto Detection at Power up is disabled Please note that some resolutions may not be applicable to your monitor s Monitor Resolution Use this item to set an appropriate resolution for the a...

Страница 83: ...y vary with the firmware version of your device NOTE You need to restart the system for the change to take effect Desktop Fonts Item Description Default Font Click the drop down menus to select the de...

Страница 84: ...uts Desktop Background Item Description Enable Desktop Wallpaper Check Uncheck to enable disable the use of Atrust wallpaper NOTE If disabled the solid color background dark blue will be used Enable C...

Страница 85: ...s services quickly when the Quick Connection mode is disabled you can choose to show Quick Access shortcuts Remote Desktop Citrix VMware View on the START menu and local Linux desktop These shortcuts...

Страница 86: ...cons section to show hide the quick access shortcuts Remote Desktop Citrix VMware View on the START menu and local Linux desktop 3 Click Save to apply the change 4 The selected shortcuts will be shown...

Страница 87: ...t Please see Enabling or Disabling Auto Setup on page 54 for more information If Device Manager is selected your thin client must be managed by Atrust Device Manager For details please refer to the Us...

Страница 88: ...ard type Enable NumLock on Boot Check Uncheck to enable disable the NumLock key after system startup Cursor Show Blinking Check Uncheck to enable disable the cursor blinking local desktop only Blink D...

Страница 89: ...menu or move sliders to choose desired setting values Refer to the following table for a description of each setting item Mouse Item Description Button Order Click the drop down menu to switch mouse...

Страница 90: ...ptions are available Blank and Logo Option Description Blank Displays a black screen Logo Displays the Atrust floating logo Display After minute Click to select the wait time for screensaver Enable Di...

Страница 91: ...external devices of clients To access available settings of Devices tab click the tab on Atrust Client Setup Interface Elements No Name Description 1 Navigation area Click to select a setting item und...

Страница 92: ...udio devices 4 4 5 4 4 6 84 85 Printer Click to add local or network printers 4 4 7 4 4 8 86 89 4 4 3 Configuring Settings for USB Storage Devices To configure settings for USB storage devices please...

Страница 93: ...t Tick Untick this checkbox to enable disable the automount of USB storage devices NOTE If this setting is disabled users need to manually mount the attached USB storage devices For detailed instructi...

Страница 94: ...ession you need to enable locally attached audio devices here the Audio setting item under Devices tab and configure audio related settings in the RDP ICA View connection settings For detailed instruc...

Страница 95: ...gure default audio devices please do the following 1 Connect the desired USB audio device to your thin client 2 On Quick Connection screen or local desktop click icon in the bottom right corner to ope...

Страница 96: ...r 2 On Atrust Client Setup click Devices Printer 3 Click Add on the top of the Printer list 4 The system automatically start searching for available local printers 5 Upon completion the discovered loc...

Страница 97: ...t 9 Click the Manufacturer and Printer Model drop down menus to select the manufacturer and model for the attached local printer NOTE For the printer to operate normally you need to specify the correc...

Страница 98: ...ers EPS 5 Click Next to continue 6 Select the manufacturer and model of the printer and then click OK to install the correct driver 7 Upon completion a success message appears Click Next to continue 8...

Страница 99: ...ters will be listed on the Printer Port drop down menu 5 Click the Printer Port drop down menu to select the desired network printer Three types of network printers are available TCP Network Printer L...

Страница 100: ...s for clients To access available settings of Network tab click the tab on Atrust Client Setup Interface Elements No Name Description 1 Navigation area Click to select a setting item under Network tab...

Страница 101: ...settings and create a VPN connection 4 5 5 4 5 6 96 100 Hosts Click to create the mapping of IP addresses to the names of host servers and create the Failover Cluster list 4 5 7 4 5 8 101 103 Host Na...

Страница 102: ...do the following 1 On Atrust Client Setup click Network Ethernet 2 Under the IP address section click the drop down menu to select DHCP for the IP type field NOTE If DHCP is selected the DHCP server o...

Страница 103: ...your t180L t180LB connects The red asterisks indicate the required fields 5 Click Save to apply NOTE You need to further specify DNS server addresses manually if you choose to use a static IP address...

Страница 104: ...ch domain Nameserver 1 and Nameserver 2 fields appear in the DNS section NOTE If you choose to use a static IP address for your t180L t180LB thin client then you need to specify DNS server addresses m...

Страница 105: ...pports Wake On LAN enabling you to wake it up remotely with Atrust Device Manager the client management console developed by Atrust To enable disable Wake On LAN please do the following 1 On Atrust Cl...

Страница 106: ...k settings For instructions on how to configure and manage virtual private network settings please refer to section 4 5 6 Configuring Virtual Private Network Settings on page 100 Adding a Virtual Priv...

Страница 107: ...e information about configuration and authentication NOTE Consult your network administrator for required information on configuration and authentication 5 On Options tab configure the DNS related set...

Страница 108: ...t will be empty For instructions on adding a virtual private network please see the preceding topic 2 Click to check the desired virtual private network The Connect button then appears on the top of t...

Страница 109: ...irtual Private Network list 2 Click to check the desired virtual private network The Disconnect button appears on the top of the Virtual Private Network list 3 Click Disconnect to stop the virtual pri...

Страница 110: ...s on the top of the Virtual Private Network list 3 Click Edit to adjust the settings and then click Save to apply Configuring General Settings for Virtual Private Network Connections To configure gene...

Страница 111: ...es or aliases please do the following 1 On Atrust Client Setup click Network Hosts to open the Host list 2 Click Add to start adding a new host entry 3 Type in the name IP address alias of a host leav...

Страница 112: ...ng List To manage the Mapping list please do the following 1 On Atrust Client Setup click Network Hosts to open the Host list 2 Select to manage entries on the Host list To adjust the settings of an e...

Страница 113: ...create a Failover Cluster list please do the following 1 On Atrust Client Setup click Network Hosts to open the Host list 2 Click Add to start adding a new host entry 3 Type in the name IP address al...

Страница 114: ...list please do the following 1 On Atrust Client Setup click Network Hosts to open the Host list 2 Select to manage entries on the Host list To adjust the settings of an entry double click the entry or...

Страница 115: ...e Host Name of Your Thin Client To change the host name of your thin client please do the following 1 On Atrust Client Setup click Network Host Name 2 Change the default host name of your thin client...

Страница 116: ...B based wireless network adapter for your t180L Ensure that you have set up the required adapter Your t180L package may not include a wireless network adapter optional Please contact your dealer for c...

Страница 117: ...ming trigger threshold for your wireless connection please do the following 1 On Atrust Client Setup click Network Wireless and then click Wireless sub tab 2 Under the Roaming section click the drop d...

Страница 118: ...ompatible adapters if needed It s recommended to check with your dealer first if you plan to purchase one by yourself Establishing a Wireless Network Connection To establish a wireless network connect...

Страница 119: ...e password will be automatically recorded for future access In this case you don t need to provide the password again you only need to confirm the establishment of a wireless connection Consult your n...

Страница 120: ...ct the used wireless security method and then provide the required information 4 Click Connect to create a wireless connection NOTE For instructions on how to configure the IP address settings please...

Страница 121: ...al tab click the drop down menu to configure the automatic connection when this wireless network is in range and other connection settings NOTE By default your client will connect to a wireless networ...

Страница 122: ...able here are only applicable to services that use Web based access such as Microsoft Remote Web Access and Citrix Web Logon connection types 1 On Atrust Client Setup click Network Proxy 2 Click the M...

Страница 123: ...utomatically Manual proxy configuration Configures the proxy settings manually Auto proxy configuration Loads proxy settings automatically through the connection to a proxy configuration file Mode Man...

Страница 124: ...rvice access on clients To access available settings of Applications tab click the tab on Atrust Client Setup Interface Elements No Name Description 1 Navigation area Click to select a setting item un...

Страница 125: ...31 Citrix ICA Click to configure ICA Independent Computing Architecture connection settings and create shortcuts on the local desktop and START menu for ICA sessions 4 6 6 4 6 7 4 6 8 4 6 9 4 6 10 4 6...

Страница 126: ...mote desktops or applications for work simply through these shortcuts NOTE For more information on Mirosoft Remote Desktop services please visit Microsoft website at www microsoft com Three connection...

Страница 127: ...g 1 On Atrust Client Setup Click Applications Remote Desktop 2 The RDP Connection list appears in the Configuration area NOTE If you haven t created any entry the RDP Connection list will be empty 3 C...

Страница 128: ...lected server will be filled out in the corresponding fields automatically The default session name will be the name of the selected MultiPoint host server but you still can change the default Windows...

Страница 129: ...OTE Atrust t180L t180LB supports only RD Web Access based on Windows Sever 2012 R2 Windows Server 2008 R2 based is not supported 1 On Atrust Client Setup Click Applications Remote Desktop 2 The RDP Co...

Страница 130: ...e in the session name and connection URL through which Web based remote applications is accessible NOTE The red asterisks indicate the required fields Consult your IT administrator about the appropria...

Страница 131: ...st t180L t180LB supports only RD Web Feed based on Windows Sever 2012 R2 Windows Server 2008 R2 based is not supported 1 On Atrust Client Setup Click Applications Remote Desktop 2 The RDP Connection l...

Страница 132: ...the Connection Type drop down menu to select Web Feed 5 Type in the session name Web Feed URL through which remote applications is accessible and your credentials for Web Feed NOTE The red asterisks...

Страница 133: ...sult will be shown as below in that section NOTE You can and need to use Update Now to refresh the Web Feed summary if there are newly published applications Otherwise new applications will not be acc...

Страница 134: ...ss Settings 124 9 Access shortcuts for available applications can be found in that folder NOTE You need to use Update Now described in Step 6 to refresh the Web Feed if there are newly published appli...

Страница 135: ...Type Remote Desktop To access remote desktops please do the following 1 Double click the created shortcut on the desktop 2 Follow the on screen instructions and provide required credentials if needed...

Страница 136: ...onnection type of Remote Desktop also allow you to launch application only sessions only a specific application is launched rather than a full desktop For details please refer to section 4 6 5 Configu...

Страница 137: ...This Connection is Untrusted might appear Consult the IT administrator for details and ensure the connection is secure first To import a security certificate please refer to section 4 2 14 Importing...

Страница 138: ...l be shown on the screen 5 Click or Double click to select the desired application 6 A window appears prompting for credentials 7 Provide your credentials and then click OK to launch the selected appl...

Страница 139: ...ng Service Access Settings 129 Connection Type Web Feed 1 Double click Work Resources folder on the local desktop 2 Access shortcuts for available applications can be found in that folder 3 Double cli...

Страница 140: ...s Configuring Service Access Settings 130 4 A window appears prompting for credentials 5 Provide your credentials and then click OK to launch the selected application Remote Application Examples Mozil...

Страница 141: ...cription Session Name Type in the name for Remote Desktop sessions Computer Type in the computer name or IP address of the server where to deliver a Remote Desktop session Connection Type This table o...

Страница 142: ...ot connect Disallows the connection NOTE To import certificates for remote computers please refer to section 4 2 14 Importing Certificates for Remote Computers on page 64 Login Settings Item Descripti...

Страница 143: ...ill start up directly with the desired Microsoft RDP session and perform the configured action after exiting the session Available actions include Returning to the local desktop Re launching a new ses...

Страница 144: ...h of the desired application in this field and specify only the name of the application in Program path and file name the next field Or you can type in the full path and name of the application in Pro...

Страница 145: ...sion window size or suspend a session Cursor Auto hide Click the drop down menu to enable disable the auto hiding of the mouse cursor or pointer on inactivity in Remote Desktop sessions Use RemoteFX C...

Страница 146: ...client but saves server resources decreases the bandwidth usage and improves audio and video playback experiences USB Storage Mapping Click the drop down menu to enable disable USB storage mapping Whe...

Страница 147: ...to configure the audio playback setting in a Remote Desktop session Three options are available Play on this computer Play on remote computer and Do not play Option Description Play on this computer...

Страница 148: ...on page 135 3 Click to check Use RemoteFX USB Redirection 4 A new checkbox appears with the required device driver Check to enable the driver 5 Click Save to apply NOTE You also need to configure the...

Страница 149: ...al Sub tab Server Settings Item Description Session Name Type in the name for Remote Web Access sessions Connection URL Type in the URL of the server where to deliver Remote Web Access sessions Connec...

Страница 150: ...start up directly with the desired Microsoft RDP session and perform the configured action after exiting the session Available actions include Returning to the local desktop Re launching a new sessio...

Страница 151: ...s Settings 141 Options Sub tab NOTE No options are available under the Options sub tab in the connection type of Remote Web Access RD Gateway Sub tab NOTE No options are available under the RD Gateway...

Страница 152: ...r Web Feed sessions Connection Type This table only provides descriptions for available settings when Web Feed is selected Three connection types are available Option Description Remote Desktop Select...

Страница 153: ...moteFX Click the drop down menu to disable enable RemoteFX NOTE Windows RemoteFX is a technology that offers a rich user experience over a network for remote desktop users NOTE To enable the RemoteFX...

Страница 154: ...r your t180L t180LB please refer to section 4 4 7 Adding a Local Printer on page 86 or 4 4 8 Adding a Network Printer on page 89 Serial Port Mapping Click the drop down menu to enable disable serial p...

Страница 155: ...operating systems NOTE RemoteFX USB Redirection is only applicable to the virtual machine based Remote Desktop service not to session based one For more information please visit Microsoft Support webs...

Страница 156: ...Logon Select to access desktop application services through a Web browser 147 StoreFront Select to access desktop application services through a StoreFront 149 VDI in a Box Select to access desktop s...

Страница 157: ...he Web Logon connection type please do the following 1 On Atrust Client Setup click Applications Citrix ICA 2 The available ICA Connection list appears in the Configuration area NOTE If you haven t cr...

Страница 158: ...QDN XenDesktop 5 6 or earlier Web Interface IP URL FQDN XenApp and XenDesktop 7 5 StoreFront IP URL FQDN plus sub path For example FQDN X75 CTX poc Sub path Citrix StoreWeb default Connection Address...

Страница 159: ...rix Product Recommended Connection Type XenApp 6 5 or earlier XenApp Web Logon XenDesktop 5 6 or earlier XenDesktop Web Logon XenApp and XenDesktop 7 5 StoreFront Web Logon VDI in a Box VDI in a Box W...

Страница 160: ...the Search icon to help you discover available desktop groups or applications for a given set of credentials 6 Click Save to confirm The customized access shortcuts are automatically created on the lo...

Страница 161: ...itrix Product Recommended Connection Type XenApp 6 5 or earlier XenApp Web Logon XenDesktop 5 6 or earlier XenDesktop Web Logon XenApp and XenDesktop 7 5 StoreFront Web Logon VDI in a Box VDI in a Box...

Страница 162: ...Search icon to help you discover available desktop groups for a given set of credentials 6 Click Save to confirm The customized access shortcuts are automatically created on the local desktop and STA...

Страница 163: ...rix Product Recommended Connection Type XenApp 6 5 or earlier XenApp Web Logon XenDesktop 5 6 or earlier XenDesktop Web Logon XenApp and XenDesktop 7 5 StoreFront Web Logon VDI in a Box VDI in a Box W...

Страница 164: ...arch icon to help you discover available desktop groups for a given set of credentials 6 Click Save to confirm The customized access shortcuts are automatically created on the local desktop and START...

Страница 165: ...Product Recommended Connection Type XenApp 6 5 or earlier XenApp Web Logon XenDesktop 5 6 or earlier XenDesktop Web Logon XenApp and XenDesktop 7 5 StoreFront Web Logon VDI in a Box VDI in a Box Web L...

Страница 166: ...CTX poc 8080 depending on your server side configuration NOTE You can use the Search icon to help you discover available applications for a given set of credentials 6 Click Save to confirm The customi...

Страница 167: ...g NOTE This connection type is used to connect to XenApp server for administration and supports only XenApp 6 5 and earlier 1 On Atrust Client Setup click Applications Citrix ICA 2 The available ICA C...

Страница 168: ...NOTE Only connections to XenApp servers are supported by this connection type You can use the Search icon to help you detect the server name 6 Click Save to confirm The customized access shortcuts ar...

Страница 169: ...etting the change will affect all Citrix connections 1 On Atrust Client Setup click Applications Citrix ICA Global 2 Click the drop down menu to select the desired Citrix Receiver version Two options...

Страница 170: ...lected you can use both Esc and Alt F4 to quit the Web Logon screen If No is selected only Alt F4 works To enable or disable Esc to Quit on the Web Logon screen please do the following NOTE This is a...

Страница 171: ...the used keyboard layout and type for all Citrix ICA sessions please do the following 1 On Atrust Client Setup click Applications Citrix ICA Global 2 Click drop down menus to select what determines th...

Страница 172: ...customized shortcut on the desktop and then provide your credentials if needed 2 The desired desktop or application will be displayed on the screen For Connection Type of Web Logon To access Citrix se...

Страница 173: ...Configuring Client Settings Configuring Service Access Settings 163 Citrix Logon Screen Example XenDesktop 5 6 Platinum Citrix Logon Screen Example VDI in a Box...

Страница 174: ...Access Settings 164 3 Type in the required credentials and then click Log On NOTE If your XenApp server doesn t belong to any domain type in the server name in the Domain field instead Citrix Logon Sc...

Страница 175: ...tion Selection screen click to select the desired desktop or application s NOTE You might enter the virtual desktop directly if only one type of virtual desktop is assigned to the provided credentials...

Страница 176: ...Configuring Client Settings Configuring Service Access Settings 166 Selection Screen Example XenDesktop 7 5 Platinum Selection Screen Example XenApp 7 5 Platinum...

Страница 177: ...cess Settings 167 5 The selected virtual desktop or application s will be displayed on the screen Virtual Application Examples PowerPoint Viewer Adobe Reader and Notepad Virtual Application Examples A...

Страница 178: ...Configuring Client Settings Configuring Service Access Settings 168 Virtual Desktop Example Windows 7 Ultimate Virtual Desktop Example Windows Server 2008 R2...

Страница 179: ...ngs for the connection type of StoreFront please refer to Settings for the Connection Type of StoreFront on page 173 For descriptions of available settings for the connection type of VDI in a Box plea...

Страница 180: ...rovides access to virtual applications for an earlier version of XenApp Server Connection Provides access to servers for administration XenApp servers only Refer to the table below for Citrix products...

Страница 181: ...thin client Turning off the thin client 2 Autostart The client will start up directly with the desired Citrix ICA session and perform the configured action after exiting the session Available actions...

Страница 182: ...e the local barcode scanner in a virtual desktop Mapping Local Printers Click the drop down menu to enable disable the mapping of the local printer s in a Citrix ICA session If Yes is selected the loc...

Страница 183: ...tab Server Settings Item Description Session Name Type in the name for Citrix ICA sessions Connection Type This table only provides descriptions for available settings when StoreFront is selected Six...

Страница 184: ...tostart mode NOTE There are three similar but different modes for your t180L t180LB and only one mode will take effect if all are enabled Three modes and the order of priority are listed as follows No...

Страница 185: ...ocal USB Storage Click the drop down menu to enable disable the mapping of the local USB drive s in a Citrix ICA session NOTE You need to enable local USB storage drive s as well See section 4 4 3 Con...

Страница 186: ...rop down menu to select the number of retries ranging from 1 to 10 Delay between Retries Click the drop down menu to select the delay time between retries ranging from 5 to 60 seconds Enable Audio Che...

Страница 187: ...e local computer Applies to the local desktop only On the remote server Applies to the virtual desktop only In full screen mode only Applies to the virtual desktop only when the desktop is running in...

Страница 188: ...b Server Settings Item Description Session Name Type in the name for Citrix ICA sessions Connection Type This table only provides descriptions for available settings when VDI in a Box is selected Six...

Страница 189: ...imilar but different modes for your t180L t180LB and only one mode will take effect if all are enabled Three modes and the order of priority are listed as follows No Mode Description 1 Appliance The c...

Страница 190: ...pping of the local USB drive s in a Citrix ICA session NOTE You need to enable local USB storage drive s as well See section 4 4 3 Configuring Settings for USB Storage Devices on page 82 for details M...

Страница 191: ...rop down menu to select the number of retries ranging from 1 to 10 Delay between Retries Click the drop down menu to select the delay time between retries ranging from 5 to 60 seconds Enable Audio Che...

Страница 192: ...e local computer Applies to the local desktop only On the remote server Applies to the virtual desktop only In full screen mode only Applies to the virtual desktop only when the desktop is running in...

Страница 193: ...tab Server Settings Item Description Session Name Type in the name for Citrix ICA sessions Connection Type This table only provides descriptions for available settings when XenDesktop is selected Six...

Страница 194: ...re three similar but different modes for your t180L t180LB and only one mode will take effect if all are enabled Three modes and the order of priority are listed as follows No Mode Description 1 Appli...

Страница 195: ...pping of the local USB drive s in a Citrix ICA session NOTE You need to enable local USB storage drive s as well See section 4 4 3 Configuring Settings for USB Storage Devices on page 82 for details M...

Страница 196: ...citrix com Number of Retries Click the drop down menu to select the number of retries ranging from 1 to 10 Delay between Retries Click the drop down menu to select the delay time between retries rangi...

Страница 197: ...screen mode only Option Description On the local computer Applies to the local desktop only On the remote server Applies to the virtual desktop only In full screen mode only Applies to the virtual des...

Страница 198: ...eral Sub tab Server Settings Item Description Session Name Type in the name for Citrix ICA sessions Connection Type This table only provides descriptions for available settings when XenApp is selected...

Страница 199: ...your t180L t180LB and only one mode will take effect if all are enabled Three modes and the order of priority are listed as follows No Mode Description 1 Appliance The client will start up directly w...

Страница 200: ...ur options are available Full Screen 1280x1024 1024x768 and 800x600 Window Mode Click the drop down menu to select the desired window mode Two options are available Regular Window and Seamless Window...

Страница 201: ...DX RealTime WebCam This item is available only when Client Rendering is selected When Yes is selected a locally attached webcam can be used in an ICA session Use H264 Compression Check to enable H 264...

Страница 202: ...significant decrease in the quality of the sound This option is suitable for low bandwidth connections allowing reasonable audio performance during a low speed connection Enable Audio Input Check Unch...

Страница 203: ...b Server Settings Item Description Session Name Type in the name for Citrix ICA sessions Connection Type This table only provides descriptions for available settings when Server Connection is selected...

Страница 204: ...180L t180LB and only one mode will take effect if all are enabled Three modes and the order of priority are listed as follows No Mode Description 1 Appliance The client will start up directly with the...

Страница 205: ...g of the local USB drive s in a Citrix ICA session NOTE You need to enable local USB storage drive s as well See section 4 4 3 Configuring Settings for USB Storage Devices on page 82 for details Mappi...

Страница 206: ...is a known issue For more details please visit Citrix websites at support citrix com or www citrix com Number of Retries Click the drop down menu to select the number of retries ranging from 1 to 10 D...

Страница 207: ...screen mode only Option Description On the local computer Applies to the local desktop only On the remote server Applies to the virtual desktop only In full screen mode only Applies to the virtual des...

Страница 208: ...n demand services for work simply through these shortcuts NOTE For more information on VMware desktop virtualization solutions please visit VMware website at www vmware com To quickly configure VMware...

Страница 209: ...ve to confirm NOTE These are the only required fields for the creation of a service access shortcut on the desktop Other data can be provided during the period of service access Depending on your need...

Страница 210: ...or for details and ensure the connection is secure first To import a security certificate please refer to section 4 2 14 Importing Certificates for Remote Computers on page 64 To bypass click Connect...

Страница 211: ...tion will be displayed on the screen NOTE Your desktop or application will be displayed in full screen You can Click File Return to Desktop and Application List on the top tool bar to recall the Deskt...

Страница 212: ...select if to check server identity certificates and if to connect to untrusted servers Three options are available Do not verify server identity certificates Warn before connecting to untrusted serve...

Страница 213: ...credentials Preferred Display Protocol Click the drop down menu to select the desired display protocol Three options are available Manual Microsoft RDP and PCoIP Option Description Manual Manually sel...

Страница 214: ...urning off the thin client 2 Autostart The client will start up directly with the desired VMware View or Horizon View session and perform the configured action after exiting the session Available acti...

Страница 215: ...ns on page 58 for detailed instructions on these similar settings Smart Card Human Interface Device Printer Plugged USB Devices Redirection Rules Connection Settings Item Description Printer Mapping C...

Страница 216: ...ription Use SECUREMATRIX Check to use SECUREMATRIX authentication GSB Server Address Type the server address of GSB server the server for SECUREMATRIX authentication service Username Type your user na...

Страница 217: ...Secure SHell connection settings please do the following 1 On Atrust Client Setup click Applications SSH 2 The SSH Connection list appears in the Configuration area NOTE If you haven t created any ent...

Страница 218: ...ction type Two types are available SSH and Telnet 5 Type in the desired session name the computer name or IP address of the remote server the user name and then click Save to confirm 6 The new entry i...

Страница 219: ...s 209 Example SSH Session Example Telnet Session 4 6 16 Launching SSH and Telnet Sessions To launch an SSH or Telnet session please do the following 1 Double click the created shortcut on the local de...

Страница 220: ...Configuring Client Settings 210...

Страница 221: ...ctory Default How to restore factory default settings for your t180L t180LB 213 A 2 Updating Firmware for Your t180L t180LB Four ways to update firmware for your t180L t180LB 214 A 3 Using SECUREMATRI...

Страница 222: ......

Страница 223: ...ptions are available on Atrust Thin Client Menu Normal Mode Safe Mode Reset Mode Firmware update Reboot and Shutdown See the table below for the description of each option Menu Option Description Norm...

Страница 224: ...nter Atrust Thin Client Menu 3 Select Firmware update and then follow the on screen instructions to complete the task NOTE You need to specify the IP address of the firmware server over the network A...

Страница 225: ...using Atrust Client Setup please refer to section 4 2 6 Updating Firmware from the Management Computer on page 48 Using Atrust Device Manager To update firmware using Atrust Device Manager please ref...

Страница 226: ...following NOTE SECUREMATRIX authentication is not available in Quick Connection mode 1 On the local desktop click START Settings Atrust Client Setup to launch Atrust Client Setup 2 Click Applications...

Страница 227: ...to provide SECUREMATRIX related information Type the server address of GSB server the server for SECUREMATRIX authentication service 6 Configure other connection settings if needed and then click Sav...

Страница 228: ...ars to prompt for the Login ID of SECUREMATRIX authentication 3 Type your Login ID and then click OK to confirm NOTE To change your password pattern click Change Password For details please see Changi...

Страница 229: ...uthentication is completed Click OK to continue 7 A message appears prompting to provide credentials for access to VMware virtual desktops and applications Click OK to continue 8 Type your credentials...

Страница 230: ...220...

Страница 231: ...ease do the following 1 On the window prompting for the Login ID as shown type your Login ID and then click Change Password 2 Type or click numbers under your old password pattern and then click OK to...

Страница 232: ...e or click numbers under your new password pattern again and then click OK to continue 5 A window appears showing your new password pattern in numerical order and prompting for confirmation Click OK t...

Страница 233: ...40Vac 1A 50 60 Hz DC 12Vdc 3A Operating system Atrust Linux Supported Protocols Microsoft RDP with RemoteFX Citrix ICA with HDX VMware PCoIP Management Atrust Client Setup Atrust Device Manager Securi...

Страница 234: ...224...

Страница 235: ...UM t180L LB EN 16050510...

Страница 236: ......

Отзывы: