2920 1257 04
27
Instruction book
2.2.1 LE/LF/LT
Install the compressor horizontally, in a cool but frost-free
and well-ventilated room. Place the compressor as level as
possible; however, LE/LT can be operated with an angular
deviation below 22.5 degrees in any direction, LF can operate
with any angular deviation, in any direction. The air should
be clean.
A Pack Unit must be installed away from walls to allow easy
maintenance. Keep the ventilation openings free.
It is recommended to install an automatic condensate drain
(available as an option) on the air receiver to ensure continuous
condensate removal.
2.2.2 LE/LF/LT Trolley
-
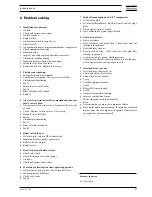
The compressors are equipped with a lifting eye or yoke
(1-Figs. 1.15 and 1.16).
-
When running, the compressor must be installed as level
as possible; however, it can be operated temporarily in an
out-of-level position not exceeding 15 degrees. Keep the
compressor in a frost-free and well-ventilated place.
2.3 Electrical connections
The electrical installation must be carried out by an electrician
and correspond to the local codes.
The indications on the motor data plate must correspond to
the mains supply voltage and frequency. The installation must
include an isolating switch in the power line near to the unit
and be protected against short-circuits by fuses in each phase.
See section 2.4.
The mains supply and earthing lines must be of suitable size.
See section 2.4.
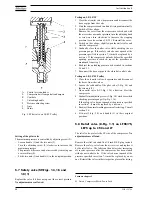
For DOL starters, connect the power supply cables as shown
on Figs. 2.22/2.23. For Y/D starters, connect the power supply
cables to strip (X1-Fig. 2.21) as shown on Figs. 2.24/2.26.
Check the setting of the overload relay. See section 2.4.
F1
Fuse
K1 Line contactor with integrated Y-D timer
K2 Star contactor
K3 Delta contactor
P1
Hourmeter, running hours
X1 Terminal strip
S1
On/off switch
Fig. 2.21 Electric cabinet
F1/3
Fuses
F4
Overload relay
K1
Line contactor
K2
Star contactor
K3
Delta contactor
M
Compressor motor
MDR Air pressure switch
P1
Hourmeter, running hours
S1
On/off switch
T1
Transformer
Y1
Loading solenoid valve
X1
Terminal strip
Figs. 2.22 up to 2.26 Electrical diagrams (see pages 28-29)
S1
F1 K1
K3
K2
P1
X1
50959F
Содержание LE110
Страница 11: ...2920 1257 04 11 Instruction book Fig 2 2 Dimension drawing LE LT55 75 and LF40 55 Power Pack ...
Страница 13: ...2920 1257 04 13 Instruction book Fig 2 4 Dimension drawing LT15 up to 40 Complete Unit vertical 250 l receiver ...
Страница 14: ...2920 1257 04 14 Instruction book Fig 2 5 Dimension drawing LE LT40 Complete Unit horizontal 250 475 l receiver ...
Страница 18: ...2920 1257 04 18 Instruction book Fig 2 9 Dimension drawing LE LF LT Pack with optional silencing hood ...
Страница 19: ...2920 1257 04 19 Instruction book Fig 2 10 Dimension drawing LE LT15 up to 40 Unsilenced Pack ...
Страница 20: ...2920 1257 04 20 Instruction book Fig 2 11 Dimension drawing LE LT55 75 and LF40 55 Unsilenced Pack ...
Страница 21: ...2920 1257 04 21 Instruction book Fig 2 12 Dimension drawing LE LT15 up to 150 with CD dryer ...
Страница 22: ...2920 1257 04 22 Instruction book Fig 2 13 Dimension drawing LE LF LT Trolley with electrical motor ...
Страница 23: ...2920 1257 04 23 Instruction book Fig 2 14 Dimension drawing LE LT75 up to 150 and LF75 Power Pack ...


