background image

Chapter 3. Front Panel Configuration

27

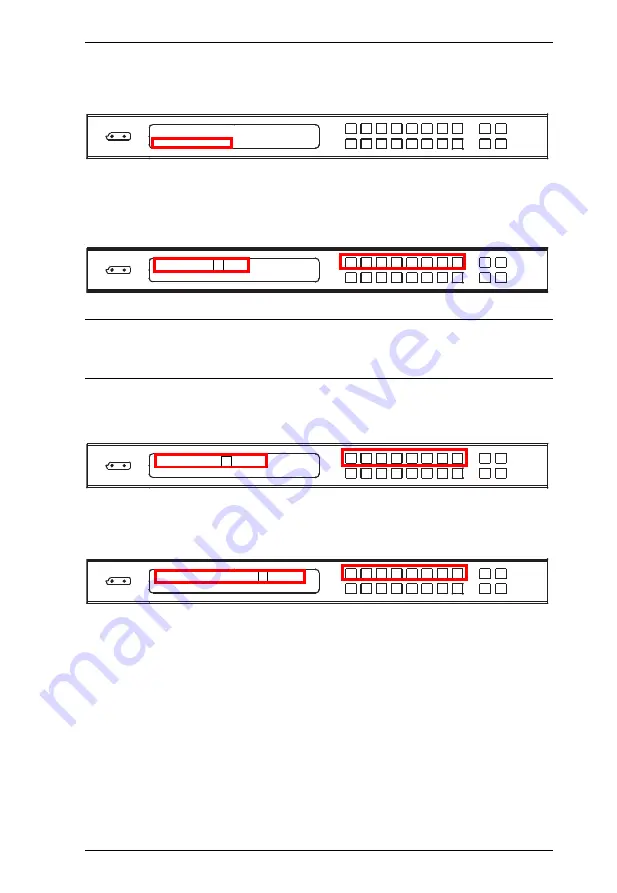
Change Password

1. To change the password for accessing the unit, press pushbutton 

2

.

2. In the Old Password field, the cursor flashes at the first digit. Enter the old 

password (see 

Enter Password

, page 14). If the old password is entered 

correctly, you can proceed to the next step.

Note:

If you entered an incorrect password, an error message appears and the 
cursor goes back to the first digit (flashing). The Incorrect Password 
message clears as soon as a new digit is entered.

3. In the New Password field, the cursor flashes at the first digit. Enter the 

new password using the front panel number pushbuttons (1111–8888).

4. Re-enter the new password in the following screen. The new password is 

applied by the VM5808H immediately.

If the password you entered does not match the one entered in the previous 
screen, an error message appears. Enter the new password correctly. 

5. Press 

Menu

 to return to the Menu page.

6. Press 

Cancel

 to return to the previous step without saving.

1. Password:  Disable
2. Change Password

Old Password:  *  *  *  *

Incorrect Password

New Password:   *   *   *   *

Re-enter New Password:   *   *   *   *

Содержание VM5808H

Страница 1: ...8 x 8 HDMI Matrix Switch with Scaler VM5808H User Manual www aten com ...

Страница 2: ...ul interference to radio communications Operation of this equipment in a residential area is likely to cause harmful interference in which case the user will be required to correct the interference at his own expense FCC Caution Any changes or modifications not expressly approved by the party responsible for compliance could void the user s authority to operate this equipment CE Warning This is a ...

Страница 3: ...tive following their purchase the buyer and not the manufacturer its distributor or its dealer assumes the entire cost of all necessary servicing repair and any incidental or consequential damages resulting from any defect in the software The manufacturer of this system is not responsible for any radio and or TV interference caused by unauthorized modifications to this device It is the responsibil...

Страница 4: ...s manual thoroughly and follow the installation and operation procedures carefully to prevent any damage to the unit and or any of the devices connected to it Features may have been added to the VM5808H since this manual was published Please visit our website to download the most up to date version Copyright 2014 ATEN International Co Ltd Manual Date 2014 01 14 ATEN and the ATEN logo are registere...

Страница 5: ...on Overview 1 Features 2 Requirements 3 Source Devices 3 Display Devices 3 Cables 3 Source Device Operating Systems 4 Components 5 Front View 5 Rear View 6 IR Remote Control 7 2 Hardware Setup Rack Mounting 9 Grounding 10 Cable Connection 11 Installation Diagram 12 3 Front Panel Configuration Overview 13 Front Panel Pushbuttons 13 Enter Password 14 Main Screen 15 Port Switching 15 Input Port Selec...

Страница 6: ...n Output display 30 Power on off individual Output displays 30 Power on off all Output displays 31 4 System Operation Overview 33 Logging In 33 Main Page 34 Connection 36 Connection Status 36 Status Colors 37 Output Audio Adjust 37 Setup 38 Web Setup 39 System Setup 40 Port Name 41 EDID Mode Setting 42 Customized Mode 44 EDID Settings 45 CEA Settings 48 Video Data 49 Video Processing Mode 50 Syste...

Страница 7: ... input to specified output 59 11 SV Save the current connections into a profile 59 12 TI Set timeout 59 13 VR Software version information 59 5 RS 232 Commands Serial Control Protocol Commands 61 Configuring the Serial Port 61 Switch Port Commands 61 EDID Commands 64 Mute Commands 65 CEC Commands 66 Power On Detection 67 Read 68 Reset 68 Baud Rate Setting 69 Save Load Profile Commands 70 OSD Comma...

Страница 8: ...ur VM5808H installation Chapter 3 Front Panel Configuration explains the fundamental concepts involved in operating the VM5808H at the local site via the front panel LCD display using pushbuttons Chapter 4 System Operation provides a complete description of the VM5808H s Browser Graphical User Interface GUI and how to use it to remotely configure and operate the VM5808H Chapter 5 RS 232 Protocol C...

Страница 9: ...Indicates keys you should press For example Enter means to press the Enter key If keys need to be chorded they appear together in the same bracket with a plus sign between them Ctrl Alt 1 Numbered lists represent procedures with sequential steps Bullet lists provide information but do not involve sequential steps Indicates selecting the option on a menu or dialog box for example that comes next Fo...

Страница 10: ...VM5808H User Manual x This Page Intentionally Left Blank ...

Страница 11: ...ion to give you the best image quality You can easily configure the VM5808H via the front panel LCD display pushbuttons and through the use of an IR Remote Control the LCD provides a quick view of all port connections and lets operators access the unit s built in configuration utility Furthermore the VM5808H allows convenient configuration and operation via an intuitive Graphical User Interface GU...

Страница 12: ...display and pushbuttons IR Remote Control System Operation Serial controller Browser Graphical User Interface GUI Telnet Built in bi directional RS 232 serial port for high end system control Superior video quality HDTV resolution of 480p 720p 1080i and 1080p 1920 x 1080 Supports Dolby True HD and DTS HD Master audio Consumer Electronics Control CEC support Power On Detection If an HDMI source is ...

Страница 13: ...es Display devices or receivers with an HDMI Type A input connector Cables 1 HDMI cable for each source device you will be connecting 1 HDMI cable for each display device you will be connecting 1 Cat 5e cable 1 RS 232 serial cable Note No cables are included in this package We strongly recommend that you purchase high quality cables of appropriate length since this will affect the quality of the a...

Страница 14: ...re shown in the table below OS Version Windows 2000 and higher Linux RedHat 6 0 and higher SuSE 8 2 and higher Mandriva Mandrake 9 0 and higher UNIX AIX 4 3 and higher FreeBSD 3 51 and higher Sun Solaris 8 and higher Novell Netware 5 0 and higher Mac OS 9 and higher DOS 6 2 and higher ...

Страница 15: ...anel pushbuttons have built in LEDs that light to indicate they have been selected 3 Output Pushbuttons These pushbuttons refer to the HDMI Output ports found on the VM5808H rear panel Press to select the Output port These pushbuttons may also correspond to connection profiles P9 P16 Note The OUTPUT 1 8 front panel pushbuttons have built in LEDs that light to indicate they have been selected 4 Fun...

Страница 16: ...r HDMI source devices plug into these ports 5 HDMI Output Ports The cables from your HDMI display devices plug into these ports 6 IR Port Connect the IR Receiver unit included with your product via this 3 5 mm Mini Stereo Jack 7 RS 232 Serial Port Connect a computer or high end system controller via this serial port 8 Ethernet Port In order to access the VM5808H s Browser Graphical User Interface ...

Страница 17: ...all ports see IR Remote Control Operation page 30 2 Output Pushbuttons 1 8 Press Output display pushbuttons 1 8 to select the Output display you want to configure see IR Remote Control Operation page 30 3 Input Pushbuttons 1 8 Press Input source pushbuttons 1 8 to select the Input source you want to display on a selected output see IR Remote Control Operation page 30 1 2 3 ...

Страница 18: ...VM5808H User Manual 8 This Page Intentionally Left Blank ...

Страница 19: ...nting brackets onto the front of the unit 2 Position the unit in the front of the rack and align the holes in the mounting brackets with the holes in the rack 3 Screw the mounting brackets to the rack 1 Important safety information regarding the placement of this device is provided on page 73 Please review it before proceeding 2 Make sure that the power to all devices connected to the installation...

Страница 20: ...nt that all devices are properly grounded 1 Use a grounding wire to ground the VM5808H by connecting one end of the wire to the grounding terminal and the other end of the wire to a suitable grounded object 2 Make sure that all devices in your VM5808H installation are properly grounded ...

Страница 21: ...from surges or static electricity 2 Connect up to 8 HDMI video sources to the HDMI Input ports 3 Connect up to 8 HDMI display devices to the HDMI Output ports 4 Connect the IR Receiver into the IR port 5 Optional If using the System Operation features see System Operation page 33 plug a Cat 5e cable from the LAN into the VM5808H s Ethernet port 6 Optional If you are using the serial control functi...

Страница 22: ...VM5808H User Manual 12 Continues on next page Installation Diagram 5 6 1 3 2 4 7 ...

Страница 23: ...ings configuring the serial port setting the EDID Mode CEC OSD Output Status selecting security settings and loading saving connection profiles Note the following front panel pushbutton functions Use the MENU pushbutton to access the Menu page options IP Setting Serial Port Setting Operation Mode Security Mode and Save to a Profile see LCD Menu Organization page 19 Use the PROFILE pushbutton to sw...

Страница 24: ... Enter Password field check that the cursor is at the first asterisk and flashing 2 Use the front panel Input Port pushbuttons 1 8 to enter the 4 digit password After the fourth digit has been entered correctly the Main Screen displays 3 Press Cancel to clear the password The digits revert to 4 asterisks and the cursor goes back to the first asterisk Note 1 The VM5808H password can be any four dig...

Страница 25: ... Profile page 52 Port Switching From the Main Screen users can configure the Input to Output port connections to associate an Input source device to an Output display Input Port Selection Use the Input Port pushbuttons to select the Input port you want to configure To select which input source displays on each output port do the following 1 Press any Input port pushbutton 1 8 The Output port LED s...

Страница 26: ...port 2 press the Output port 2 pushbutton The Output port 2 LED flashes 0 5 sec on 0 2 sec off As a result Input port 2 is now connected to Output ports 2 3 and 4 Once the signal from the selected Input port is successfully tied to the Output port the LEDs turn off and the LCD information is updated Note 1 Pressing an Input port a second time deselects it 2 Input ports that are not configured or t...

Страница 27: ...ushbutton has been pressed It is not tied to any Input port 2 If an Output port pushbutton is pressed a second time it is deselected and the LED turns off 3 To connect the selected Output port s to an Input port press the Input port pushbutton to which you want the Output port s tied The newly selected Input port LED flashes 0 5 sec on 0 2 sec off and the LCD information is updated In the example ...

Страница 28: ...the example below Input port 3 has been pressed and is now connected to Output ports 2 3 and 4 Note 1 Pressing an Output port a second time deselects it 2 Pressing the Cancel pushbutton once stops the Output Port Selection operation and the LCD displays the active setting Pressing the Cancel pushbutton again turns all LEDs off 3 After 30 seconds of inactivity all the LEDs turn off ...

Страница 29: ...nu is active the MENU pushbutton s built in LED lights up From the Menu page Press 1 to go to the IP Setting page see IP Setting page 20 Press 2 to go to the Serial Port Setting page see Serial Port Setting page 21 Press 8 to go to the next page s for the sub menu pages Press Menu or Cancel to return to the Main Screen Menu Page Sub Menu Page s IP Setting IP Address Subnet Mask Gateway Serial Port...

Страница 30: ...dress is 192 168 0 60 The default Subnet Mask is 255 255 255 0 2 Press 8 to go to the next page 3 Press Menu to return to the Menu page 4 Press Cancel to return to the previous page Gateway To view the VM5808H s gateway address do the following 1 From the Menu page press 1 to see the IP Setting submenu then press 8 to get to the next page The gateway address displays Note The default Gateway is 19...

Страница 31: ...llowing 1 Select Baud Rate Setting from the Serial Port Setting submenu by pressing 1 2 Press pushbuttons 1 4 to make your selection Baud Rate options are 1 9600 2 19200 3 38400 4 115200 Note The default baud rate is 19200 3 Press Menu to return to the Menu page 4 Press Cancel to return to the previous step without saving 1 IP Setting 2 Serial Port Setting 8 Next 1 Baud Rate Setting 1 9600 3 38400...

Страница 32: ... one remote control The OSD when enabled for a port lets an attached display monitor show real time port switching information The Output Status shows whether the video audio of an Output port is turned on or off To configure the VM5808H s operation mode settings from the Main Screen use the Menu pushbutton to access the Menu page press 8 to navigate to the next page then press pushbutton 1 to acc...

Страница 33: ...the Menu page 4 Press Cancel to return to the previous step without saving EDID Option Description 1 Port1 The EDID from port1 is passed to all video sources 2 Default The default EDID is passed to all video sources 3 Remix Uses the EDID of each connected display according to its connection when the VM5808H is first powered on or immediately after pressing 3 to select the Remix option 4 Customized...

Страница 34: ...I To configure the OSD setting for each output port do the following 1 From the Operation Mode page press 8 to go to the next page then press pushbutton 1 2 Press pushbuttons 1 8 to enable ON or disable NA the OSD feature for the output port Note The default OSD setting is On 3 Press Menu to return to the Menu page 4 Press Cancel to return to the previous step without saving 1 OSD 7 Back 2 Output ...

Страница 35: ... press 8 to go to the next page then press pushbutton 2 2 Press pushbuttons 1 8 to enable ON or disable NA the video audio of the output port Note The default Output Status setting is On 3 Press Menu to return to the Menu page 4 Press Cancel to return to the previous step without saving 1 OSD 7 Back 2 Output Status OUTPUT 1 2 3 4 5 6 7 8 ON ON ON NA ON NA ON NA ...

Страница 36: ... access the Menu page press 8 to navigate to the next pages then press pushbutton 2 to access the Security Mode page Password 1 To set the VM5808H to require a password for local operation press pushbutton 1 2 To require a password after the LCD display times out or is powered off on press pushbutton 1 Otherwise press pushbutton 2 Note If Password is Enabled the LCD display s default time out is 5...

Страница 37: ...assword message clears as soon as a new digit is entered 3 In the New Password field the cursor flashes at the first digit Enter the new password using the front panel number pushbuttons 1111 8888 4 Re enter the new password in the following screen The new password is applied by the VM5808H immediately If the password you entered does not match the one entered in the previous screen an error messa...

Страница 38: ...en the select Save to a Profile page 2 In the page that opens you are asked to give the profile a number Use the front panel number pushbuttons to select a profile number into which you want to save the configuration Options are P1 P16 when saving a profile via the LCD where Input port pushbuttons 1 8 correspond to Profile P1 to P8 Output port pushbuttons 1 8 correspond to Profile P9 to P16 3 Pres...

Страница 39: ...to Profile P9 to P16 where Output Port 1 Profile 9 Output Port 2 Profile 10 Output Port 8 Profile 16 The selected pushbutton lights steady and the VM5808H immediately applies the port connections configured in the selected profile When the Profile pushbutton is pressed for 3 seconds or more the LCD directs to the Save to a Profile page see Save to a Profile page 28 Press the Cancel pushbutton to t...

Страница 40: ... control do the following 1 Press the Output port number 1 8 you want to change 2 Within 2 seconds press the Input port number 1 8 you want the Output port to display 3 Repeat steps 1 2 to change additional ports For the change to occur the Input number must be pressed within 2 seconds of pressing the Output number Power on off individual Output displays To power on off individual Output displays ...

Страница 41: ...imultaneously with the remote control do the following 1 Press the ON or OFF pushbutton 2 Repeat step 1 to simultaneously change back the power status of all Output ports to on or off respectively The ON or OFF pushbuttons bring all displays to the same power status regardless of the individual power statuses ...

Страница 42: ...VM5808H User Manual 32 This Page Intentionally Left Blank ...

Страница 43: ...rivileges and up to 32 users can log into the GUI at one time For full details see the sections that follow Logging In To access the Browser GUI type the VM5808H s IP address into the address bar of any browser If a Security Alert dialog box appears accept the certificate it can be trusted The welcome screen appears The VM5808H s default IP address is http 192 168 0 60 See Setup page 38 for furthe...

Страница 44: ...u to control them Setup This page enables you to configure the VM5808H s IP settings serial settings port names EDID mode and video processing mode System The page enables you to upgrade the VM5808H s firmware Profile This page allows you to add delete and name port connection configurations for easy Profile selection using the front panel PROFILE pushbutton User Management This page enables you t...

Страница 45: ...le through the Browser GUI menu options in the order shown in the table below Menu Page Sub Menu Page s Connection Connection Status Output Audio Adjust Setup Web System Port Name EDID Mode Setting Video Processing Mode System Firmware Upgrade Profile Selection Name User Management User Management ...

Страница 46: ...t Audio Adjust page 37 Connection Status The Connection Status Page has a drop down menu which allows you to quickly save port connection configurations and load stored connection profiles It also has a table to easily configure Input to Output port connections This page can be configured as follows 1 Select the radio button at the corresponding intersection of the input output ports you want to c...

Страница 47: ...1 Status Colors Connections display in colors to indicate their status as follows Blue Connected White Not Connected Note The latest connections will load automatically when the VM5808H is reset Output Audio Adjust The Output Audio Adjust page lets you select which features Video Audio CEC and OSD are active for each Output port For each output port 1 8 put a check mark at the corresponding featur...

Страница 48: ...gure the VM5808H s IP settings It also links to the System setup page System Setup page 40 Port Name page Port Name page 41 EDID Mode Setting page EDID Mode Setting page 42 and Video Processing Mode page Video Processing Mode page 50 The proceeding sections further discusses the Setup screens ...

Страница 49: ...a few seconds and automatically redirect you to the IP address specified Or click the Clear button to revert to the stored configuration Click Default Setting to use the following default values IP Address 192 168 0 60 Subnet Mask 255 255 255 0 Default Gateway 192 168 0 1 Website Timeout 5 minutes Telnet Configuration enabled checked This option controls how long an inactive web connection stays l...

Страница 50: ...e next powered on device when one of the HDMI source devices is powered off Check the box to enable the Power On Detection feature and leave it blank to disable it Use the drop down menu to select the Baud Rate for the serial connection Click Save for the changes to take effect Or click the Clear button to revert to the stored configuration Click Default Setting to use the following default values...

Страница 51: ... easy identification To name an Input Output port enter a descriptive name of up to 16 characters including 0 9 a z A Z _ in the corresponding field and click Save To change an Input Output port s name enter another value and click Save Click Clear to revert to the previously stored name Note The Input and Output port names can be the same ...

Страница 52: ...data format that contains a display s basic information and is used to communicate with the video source system In the left most panel of the page users can select a preconfigured EDID Mode from the EDID Mode Selection drop down menu Options are Port 1 Mode Default Mode Remix Users can also configure and store an EDID Mode aside from the pre configured modes available see Customized Mode see page ...

Страница 53: ...t to view and or edit There are two categories EDID Extended Display Identification Data and CEA Consumer Electronics Association When you highlight the menu items on the left column the right column displays the current settings for the corresponding EDID configuration Some of the screens are read only See EDID Settings page 45 for more information on these two columns ...

Страница 54: ...from the EDID Mode Selection drop down menu and click Confirm EDID Data for source Select into which input source port you want to store the EDID configuration 01 08 Retrieve from EDID Retrieve and view the EDID settings of a stored EDID configuration Customized EDID 01 08 or the Default Customized EDID The right panel displays a summary of the acquired EDID settings Click Save to use the configur...

Страница 55: ...ort 1 Default and Remix cannot be edited The pages for the Customized EDID which can be edited are discussed in the proceeding sections Established Timings This page lists video resolutions timings that display devices can support Select the resolution s you want to use for the attached monitor display device Click Clear All to deselect all the items Click Select All to check all the items Click S...

Страница 56: ... page Select the H Active Pixel from the drop down menu Select the Aspect Ratio from the drop down menu Click Save to apply the changes Detail Timing Display Description This screen gives more video resolution options and provides resolution timing details In the drop down menu choose a resolution with values that fit the attached monitor display device and click Save ...

Страница 57: ...cription This screen lets you specify the viewing specifications namely horizontal and vertical scan ranges and pixel clock rate of your monitor display device Enter the values that correspond to your device and click Save to apply the changes ...

Страница 58: ... EDID structure which further extends the standard definitions of EDID to support advanced features of monitors display devices Display Support This screen describes the display s basic digital components Select the YCbCr mode applicable to your display and click Save ...

Страница 59: ...resolution of the attached display device Select the resolutions that work with the attached monitor display device Click Clear All to deselect all the items Click Save to apply the changes Audio Data This screen lets you select advanced audio configurations for your device Use the drop down menu to select the Audio Format 1 6 applicable to your audio output device and click Save to apply the chan...

Страница 60: ...ble or disable Instant Switching for the Output Video Ports 1 8 as well as scale up the port s video resolution Instant Switching also known as Seamless Switching Check the corresponding box if you want to enable Seamless Switching for the output video port Note If Seamless Switching is enabled the video output will not display 3D Deep Color or interlace resolution i e 1080i features To avail of t...

Страница 61: ...Browse button to locate the firmware upgrade file Make sure you have the correct file saved in your local PC 2 Click Upgrade Firmware to start the upgrade Note Check the box to enable the utility to compare the VM5808H s current firmware version with that of the upgrade file If it finds that the VM5808H s firmware version is the same or higher than the selected upgrade version it brings up a dialo...

Страница 62: ...les to the Profile List simply press the front panel Profile pushbutton to switch between the stored profiles To Add a profile to the Profile List do the following 1 From the Profile drop down menu select the connection profile 01 32 you want to add to the list 2 Click the Add button By default new profiles are added to the bottom of the Profile List To Delete a connection profile from the Profile...

Страница 63: ... in the Profile List for easy identification To name a profile enter a descriptive name of up to 16 characters including 0 9 a z A Z _ in the corresponding field and click Save Note Enter the name and click save one profile at a time To change a profile name enter another value and click Save Click Clear to revert to the previously stored name ...

Страница 64: ...ist The VM5808H supports up to 32 users at one time See page 55 for more details Edit Use the radio button to select a user and click the Edit button to change the information This option allows an Administrator to rename the user set reset the selected user s password add a description of the user and to set the user s privileges See page 55 for more details Delete Use the radio button to select ...

Страница 65: ...ssword and re type the password to confirm Note Usernames and passwords are case sensitive and must be 5 16 alphanumeric characters Add or edit the description for the user Select the status that you want to grant the user see Privileges page 56 Click Submit to save the data Click Reset to clear all the fields or revert to the last saved values If a user is logged from the VM5808H s GUI their user...

Страница 66: ... available privilege levels are as follows Administrator this level provides full access and control of the VM5808H functions in addition to full User Management privileges Super User this level provides full access and control with no User Management privileges User this level provides basic functions only create connections save and recall presets ...

Страница 67: ...ame that is already in session the newest login takes effect and the previous session is replaced Configuration Menu Once a Telnet connection to the VM5808H is established the device s text based Configuration Menu comes up with the following items 1 H Call up the command list for help Command list GT Set gateway address IM Set IP subnet mask IP Set IP address LO Load connections from profile nn P...

Страница 68: ...mask 4 IP Set IP address IP Old IP address 192 168 0 60 New IP address 5 LO Load connections from profile LO 01 Load profile 01 OK 6 PW Change password PW Old password New password 7 RI Read what input is connected to nn output RI 01 Output port 02 04 08 is connected input port 01 8 RO Read what output is connected to nn input RO 01 Input port 02 is connected to output port 01 ...

Страница 69: ... 01 to output 03 00 Local Port 11 SV Save the current connections into a profile SV 01 Save the current connections into profile 01 12 TI Set timeout TI 30 Set 30 minute timeout 13 VR Software version information VR Software version 1 0 Note For further information about these functions please reference the equivalent Browser GUI functions earlier in this chapter ...

Страница 70: ...VM5808H User Manual 60 This Page Intentionally Left Blank ...

Страница 71: ...llows Switch Port Commands The formula for Switch commands is as follows Switch Command Input Command Port Number Output Command Port Number Control Enter 1 For example to switch input port 02 to output port 05 type the following sw i02 o05 Enter 2 To switch output port 04 to the next port input the following sw o04 Enter 3 To turn off video output on port 03 type the following sw o03 off Enter Ba...

Страница 72: ...t port 02 is tied to output port 02 and so on until port 08 i e o01 i01 o02 i02 o08 i08 Command Description sw Switch command Input Command Description i Input command Port number Description xx 01 08 port Output Command Description o Output command Port number Description yy 01 08 port All output ports Control Description on Turn on the display off Turn off the display Next Port Previous Port ...

Страница 73: ...d and the default value will be used Command Input Command Input Port Output Command Output Port Control Enter Description sw i xx o yy Enter Switch Input Port xx to Output Port yy xx 01 08 yy 01 08 sw o yy on off Enter Turn on Output Port yy Turn off Output Port yy yy 01 08 sw o yy Enter Switch Output port yy to next Output port Switch Output port yy to previous Output port yy 01 08 ...

Страница 74: ...the available command list Command Description edid Enable EDID selection Control Description port1 Implement the EDID of the connected display to Port 1 and pass it to the video source remix Implement the EDID of each connected display according to its connection when the VM5808H is first powered on or immediately after selecting the Remix option default Implements ATEN s default EDID default Com...

Страница 75: ...ed with a space 2 Skip the output port command to mute or enable the audio of all output ports The following table shows the available command list Command Description mute Enable Disable audio of HDMI output port Output Command Description o Output command Port number Description yy 01 08 port default is 01 All output ports Control Description on Mute on audio from HDMI output port is disabled of...

Страница 76: ...er The following tables show the possible values and formats for the Control command Note Each command string can be separated with a space The following table shows the available command list Command Description cec CEC control Output Command Description o Output command Port number Description yy 01 08 port default is 01 All output ports Control Description off Disable CEC default on Enable CEC ...

Страница 77: ...n Detection commands is as follows Power On Detection Control command Enter For example to turn on the Power On Detection feature input the following pod on Enter The following tables show the possible values for the Control string Note Each command string can be separated with a space Command Description pod Power On Detection command Control Description on Turn on Power On Detection off Turn off...

Страница 78: ...n reset the VM5808H to default factory settings The formula for the Reset command is as follows Reset Command Enter The following tables show the possible values and formats for the Command command The following table shows the available command list Note Each command string can be separated with a space Command Description read Reads and displays information from the VM5808H Command Description r...

Страница 79: ...e the following baud 38400 enter The following tables show the possible values and formats for the Control command Note Each command string can be separated with a space The following table shows the available command list Command Description baud Sets the RS 232 baud rate Control Description 9600 Use 9600 baud rate 19200 Use 19200 baud rate 38400 Use 38400 baud rate 115200 Use 115200 baud rate Co...

Страница 80: ...on to profile 02 type the following profile f 02 save Enter The following tables show the possible values for commands Note Each command string can be separated with a space Command Description profile Save Load profile Profile Description f Profile number Profile Number Description yy 01 32 default is 01 Control Description save Save the current connection configuration load Load a saved profile ...

Страница 81: ...d with a space The following table shows the available command list Verification After entering a command a verification message appears at the end of the command line as follows Command OK indicates that the command is correct and successfully performed by the switch Command incorrect indicates that the command has the wrong format and or values Command Description osd Enable Disable OSD Control ...

Страница 82: ...VM5808H User Manual 72 This Page Intentionally Left Blank ...

Страница 83: ...entilation has been provided Never spill liquid of any kind on the device Unplug the device from the wall outlet before cleaning Do not use liquid or aerosol cleaners Use a damp cloth for cleaning The device should be operated from the type of power source indicated on the marking label If you are not sure of the type of power available consult your dealer or local power company The device is desi...

Страница 84: ...ts or short out parts resulting in a risk of fire or electrical shock Do not attempt to service the device yourself Refer all servicing to qualified service personnel If the following conditions occur unplug the device from the wall outlet and bring it to qualified service personnel for repair The power cord or plug has become damaged or frayed Liquid has been spilled into the device The device ha...

Страница 85: ...and stable before extending a device from the rack Do not overload the AC supply branch circuit that provides power to the rack The total rack load should not exceed 80 percent of the branch circuit rating Make sure that all equipment used on the rack including power strips and other electrical connectors is properly grounded Ensure that proper airflow is provided to devices in the rack Ensure tha...

Страница 86: ...eforehand Product model number serial number and date of purchase Your computer configuration including operating system revision level expansion cards and software Any error messages displayed at the time the error occurred The sequence of operations that led up to the error Any other information you feel may be of help Email Support support aten usa com Online Technical Support Troubleshooting D...

Страница 87: ...r 1 x 3 prong AC Socket LCD 1 x LCD Module Switches In Out 8 x 8 Pushbuttons Cancel 1 x Pushbutton Menu 1 x Pushbutton Profile 1 x Pushbutton Enter 1 x Pushbutton Power 1 x Rocker I P Rating 100 240Vac 50 60Hz 1 0A Power Consumption 120V 60W 230V 62W Environment Operating Temp 0 50ºC Storage Temp 20 60ºC Humidity 0 80 RH Non condensing Physical Properties Housing Metal Weight 4 03 kg Dimensions L ...

Страница 88: ...ct vendor makes no warranty or representation expressed implied or statutory with respect to the contents or use of this documentation and especially disclaims its quality performance merchantability or fitness for any particular purpose The direct vendor also reserves the right to revise or update the device or documentation without obligation to notify any individual or entity of such revisions ...

Отзывы: