background image

9

Chapter 2

Hardware Setup

Before you Begin

1. Important safety information regarding the placement of this 

device is provided on page 35. Please review it before 
proceeding.

2. Make sure that power to all the devices you will be connecting 

up has been turned off. You must unplug the power cords of any 
computers that have the Keyboard Power On function.

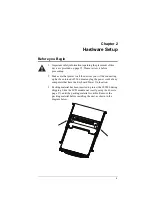
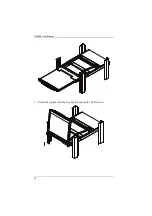
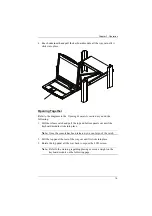
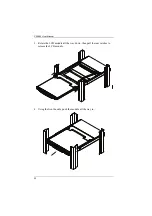
3. Packing material has been inserted to protect the CL5800 during 

shipping. Slide the LCD module out (see 

Opening the Console

page 17), until the packing material is visible. Remove the 
packing material before installing the unit, as shown in the 
diagram below.

Содержание CL5800

Страница 1: ...CL5800 LCD Console User Manual...

Страница 2: ...of this equipment in a residential area is likely to cause harmful interference in which case the user will be required to correct the interference at his own expense The device complies with Part 15...

Страница 3: ...CL5800 User Manual iii Industry Canada Statement This Class A digital apparatus complies with Canadian ICES 003 RoHS This product is RoHS compliant...

Страница 4: ...ting the CL5800 Chapter 4 Firmware Upgrade explains how to upgrade the CL5800 s firmware with the latest available versions An Appendix provides specifications and other technical information regardin...

Страница 5: ...components are present and in good order If anything is missing or was damaged in shipping contact your dealer Read this manual thoroughly and follow the installation and operation procedures carefull...

Страница 6: ...ons and telephone numbers User Information Online Registration Be sure to register your product at our online support center Telephone Support For telephone support call this number International http...

Страница 7: ...programs prove defective following their purchase the buyer and not the manufacturer its distributor or its dealer assumes the entire cost of all necessary servicing repair and any incidental or conse...

Страница 8: ...atures 2 Requirements 3 LCD Console 3 External Console 3 Cables 3 Operating Systems 4 Components 5 Front View 5 Keyboard Module 6 LCD Module 7 Rear View 8 Chapter 2 Hardware Setup Before you Begin 9 S...

Страница 9: ...grade Mode 28 Performing the Upgrade 29 Starting the Upgrade 29 Upgrade Succeeded 31 Upgrade Failed 32 Exiting Firmware Upgrade Mode 33 Appendix Safety Instructions 35 General 35 Rack Mounting 37 Cons...

Страница 10: ...CL5800 User Manual x This Page Intentionally Left Blank...

Страница 11: ...ch pad modules slide independently of each other To maximize space in your data center the keyboard touch pad module slides back to hide away when not in use while the thin profile LCD monitor rotates...

Страница 12: ...n Up to 1280 x 1024 75Hz Supports DDC DDC2 DDC2B DDC emulation of the LCD monitor Video settings of attached computers are automatically adjusted for optimal output to the LCD monitor Standard 105 key...

Страница 13: ...onsole A VGA SVGA or MultiSync monitor capable of displaying the highest resolution provided by any computer in the installation USB or PS 2 keyboard and mouse Cables For optimum signal integrity and...

Страница 14: ...ng systems are shown in the table below OS Version Windows NT or later Linux RedHat 7 1 or later SuSE 9 0 or later Mandriva Mandrake 9 0 or later UNIX AIX 4 3 or later FreeBSD 4 2 or later Sun Solaris...

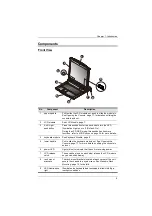
Страница 15: ...4 for more details 4 keyboard module See Keyboard Module page 6 5 lower handle Pull to slide the keyboard module out See Opening the Console page 17 for more details on sliding the console in and out...

Страница 16: ...recover from a failed firmware upgrade Pressing and holding this button for more than three seconds performs a system reset Note The button is recessed and must be pushed with a thin object such as t...

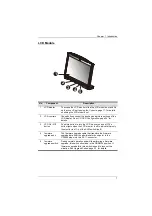
Страница 17: ...is button to turn the LCD monitor on and off The button lights when the LCD monitor is off to indicate that only the monitor is off not the KVM switch itself 4 firmware upgrade port The firmware upgra...

Страница 18: ...the CL5800 supports an independent external KVM console The external console s keyboard monitor and mouse cables plug in here 4 KVM port section The cable linking the CL5800 to a computer or switch p...

Страница 19: ...the devices you will be connecting up has been turned off You must unplug the power cords of any computers that have the Keyboard Power On function 3 Packing material has been inserted to protect the...

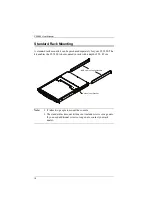
Страница 20: ...CL5800 The kit enables the CL5800 to be mounted in rack with a depth of 52 85 cm Note It takes two people to mount the console The standard rack mount kit does not include screws or cage nuts If you n...

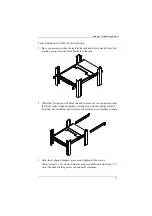
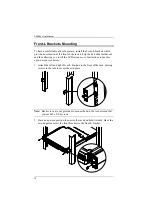
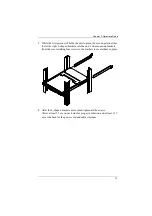
Страница 21: ...irst person still holds the unit in place the second person slides the left right L shaped brackets into the unit s side mounting brackets from the rear installing four screws in the brackets to secur...

Страница 22: ...tilt the LCD screen more Instructions to use this option are shown below 1 Attach the left and right Front L brackets to the front of the rack placing screws in the tabs to secure them in place Note...

Страница 23: ...haped brackets into the unit s side mounting brackets from the rear installing four screws in the brackets to secure them in place 4 After the L shaped brackets are secured tighten all the screws Allo...

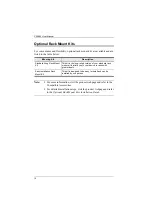
Страница 24: ...ible Accessories For detailed installation steps visit the product webpage and refer to the Optional Rack Mount Kits Installation Guide Mounting Kit Description Standard Long Rack Mount Kit This kit i...

Страница 25: ...e connectors of the KVM cable into their respective ports on the console section of a KVM switch 3 If you are installing an external console plug your keyboard monitor and mouse into their respective...

Страница 26: ...CL5800 User Manual 16 This Page Intentionally Left Blank...

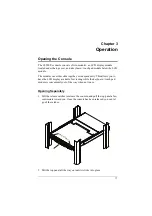
Страница 27: ...or independently This allows you to have the LCD display available for viewing while the keyboard touch pad module is conveniently out of the way when not in use Opening Separately 1 Pull the release...

Страница 28: ...CL5800 User Manual 18 3 Rotate the top panel all the way back to expose the LCD screen...

Страница 29: ...ll the release catch and pull the top and bottom panels out until the keyboard module clicks into place Note Once the console has been released you can let go of the catch 2 Pull the top panel the res...

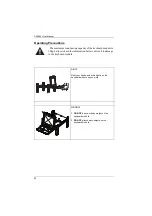
Страница 30: ...the keyboard module as you work WRONG DO NOT lean your body weight on the keyboard module DO NOT place heavy objects on the keyboard module The maximum load bearing capacity of the keyboard module is...

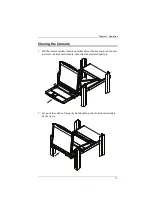
Страница 31: ...onsole 1 Pull the release catches located on either side of the keyboard toward you to release the keyboard module then slide the module slightly in 2 Let go of the catches Using the front handle push...

Страница 32: ...CL5800 User Manual 22 3 Rotate the LCD module all the way down then pull the rear catches to release the LCD module 4 Using the front handle push the module all the way in...

Страница 33: ...nd Restarting If it becomes necessary to Power Off the CL5800 to upgrade the firmware for example simply turn off the power to the unit using the rear panel power switch To restart the CL5800 turn the...

Страница 34: ...h the menus this button moves you Right or Up When making an adjustment it increases the value When navigating through the menus this button moves you Left or Down When making an adjustment it decreas...

Страница 35: ...e these problems Clock If vertical banding is visible on the display your LCD may have the wrong clock setting Adjust the clock setting to eliminate vertical banding H Position Positions the display a...

Страница 36: ...P C Enter To select normal mode pc etc Ctrl Alt Shift S U N Enter To select SUN Ctrl Alt Shift u p g r a d e Enter Activates the Firmware Upgrade Mode Note this Hotkey sequence only works when the Fir...

Страница 37: ...ges and information relating to them Before You Begin To prepare for the firmware upgrade do the following 1 From a computer that is not part of your CL5800 installation go to ATEN s Internet support...

Страница 38: ...the Firmware Upgrade Mode using a hotkey sequence the firmware upgrade switch see page 7 must be switched to the Normal position 1 Turn off the CL5800 using the power switch on the back side of the c...

Страница 39: ...e Mode run the downloaded Firmware Upgrade Package file from your computer either by double clicking the file icon or by opening a command line and keying in the full path and filename The Firmware Up...

Страница 40: ...e device s firmware level with that of the upgrade files If it finds that the device s version is newer than the upgrade version it brings up a dialog box informing you of the situation and gives you...

Страница 41: ...Chapter 4 Firmware Upgrade 31 Upgrade Succeeded When the upgrade completes a success message will appear An example is shown Click Finish to close the Firmware Upgrade Utility...

Страница 42: ...are becomes corrupted for some reason and you are unable to operate it When a firmware upgrade procedure is interrupted When a firmware upgrade procedure fails To recover a failed firmware upgrade do...

Страница 43: ...upgrade switch back to the Normal position 7 Power the unit back on again Exiting Firmware Upgrade Mode To exit the Firmware Upgrade Mode do the following 1 Slide the firmware upgrade switch see page...

Страница 44: ...CL5800 User Manual 34 This Page Intentionally Left Blank...

Страница 45: ...aced in a built in enclosure unless adequate ventilation has been provided Never spill liquid of any kind on the device Unplug the device from the wall outlet before cleaning Do not use liquid or aero...

Страница 46: ...ire or electrical shock Do not attempt to service the device yourself Refer all servicing to qualified service personnel If the following conditions occur unplug the device from the wall outlet and br...

Страница 47: ...level and stable before extending a device from the rack Use caution when pressing the device rail release latches and sliding a device into or out of a rack the slide rails can pinch your fingers Af...

Страница 48: ...de ventilation se trouveraient bloqu es De m me l unit ne doit pas tre plac e dans un meuble ferm moins qu une ventilation adapt e ne soit assur e Ne renversez jamais de liquides de quelque sorte que...

Страница 49: ...syst me et les c bles d alimentation avec pr caution veillez ce que rien ne repose sur aucun des c bles Lors du branchement ou du d branchement des blocs d alimentation permettant la connexion chaud v...

Страница 50: ...onne pas normalement bien que les instructions d utilisation soient respect es N utilisez que les commandes qui sont abord es dans le mode d emploi Le r glage incorrect d autres commandes peut tre l o...

Страница 51: ...ans les rails Une fois qu une unit a t ins r e dans le b ti tendez avec pr caution le rail dans une position de verrouillage puis faites glisser l unit dans le b ti Ne surchargez pas le circuit de l a...

Страница 52: ...Product model number serial number and date of purchase Your computer configuration including operating system revision level expansion cards and software Any error messages displayed at the time the...

Страница 53: ...grade 1 x RJ 11 Power 1 x 3 prong AC Socket Switches Reset 1 x Semi recessed Pushbutton Power 1 x Rocker F W Upgrade 1 x Slide LCD Power 1 x Pushbutton LCD Adjustment 4 x Pushbutton LEDs Power 1 Dark...

Страница 54: ...HD Connectors This product uses SPHD connectors for its KVM and or Console ports We have specifically modified the shape of these connectors so that only KVM cables that we have designed to work with...

Страница 55: ...keys The corresponding functions are shown in the table below Note When using key combinations press and release the first key Ctrl then press and release the activation key PC Keyboard Sun Keyboard C...

Страница 56: ...cable with one of an appropriately short length Some characters I enter from the keyboard do not display correctly The keyboard layout setting for the port does not match the keyboard you are using O...

Страница 57: ...option to 1 repair said product with new or repaired components or 2 replace the entire product with an identical product or with a similar product which fulfills the same function as the defective pr...

Страница 58: ...CL5800 User Manual 48 This Page Intentionally Left Blank...

Страница 59: ...K Keyboard Emulation 45 L LCD Adjustment Settings 25 Buttons 24 OSD configuration 24 O Online Registration vi Opening the Console 17 Operating Precautions 20 P Port ID Numbering Selection 23 Powering...

Страница 60: ...CL5800 User Manual 50 U User Notice vii W Warranty 47...

Отзывы: