


Chapter 1. Introduction
5
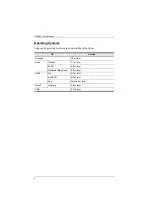
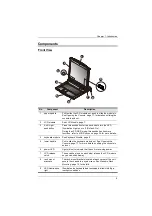
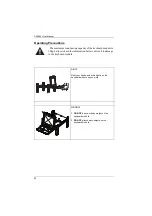
Components
Front View
No.
Component
Description
1
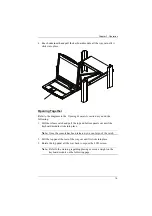
upper handle
Pull to slide the LCD module out; push to slide the module in.
See
, page 17, for details on sliding the
console in and out.
2
LCD module
3
Exit / Light
pushbutton
Press this pushbutton for two seconds to turn the LED
Illumination Light on or off. (Default: On)
During the LCD OSD mode, this pushbutton has more
functions, refer to
on page 24 for more details.
4
keyboard module
5
lower handle
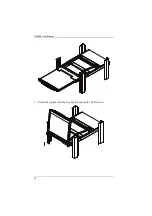
Pull to slide the keyboard module out. See
, page 17, for more details on sliding the console in
and out.
6
power LED
Lights (blue) to indicate that the unit is receiving power.
7
LCD release
catch
These catches (one on each side) release the LCD module
so you can slide it away.
8
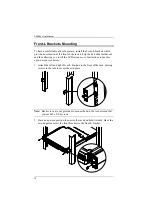
rack mount
brackets
The rack mount brackets located at each corner of the unit
secure the chassis to a system rack. See
, page 10, for details.
9
LED illumination
light
Illuminates the keyboard and touchpad to allow visibility in
low-light conditions.
7 8
9
4
5
6
1
2
EXIT
/
LIGHT
3
Содержание CL5800
Страница 1: ...CL5800 LCD Console User Manual...
Страница 10: ...CL5800 User Manual x This Page Intentionally Left Blank...
Страница 26: ...CL5800 User Manual 16 This Page Intentionally Left Blank...
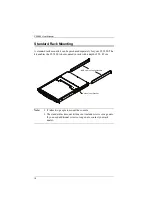
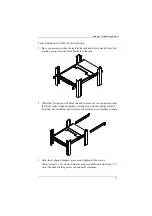
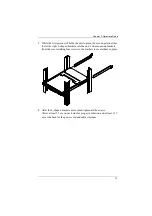
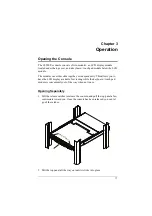
Страница 28: ...CL5800 User Manual 18 3 Rotate the top panel all the way back to expose the LCD screen...
Страница 44: ...CL5800 User Manual 34 This Page Intentionally Left Blank...
Страница 58: ...CL5800 User Manual 48 This Page Intentionally Left Blank...
Страница 60: ...CL5800 User Manual 50 U User Notice vii W Warranty 47...


