CL3800 / CL3700 / CL3100 User Manual
38
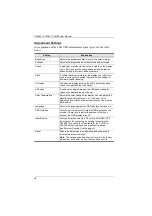
Adjustment Settings
An explanation of the LED OSD adjustment settings is given in the table
below:
Setting
Explanation
Brightness
Adjusts the background black level of the screen image.
Contrast
Adjusts the foreground white level of the screen image.
Phase
If pixel jitter or horizontal line noise is visible on the display,
your LED may have the wrong phase setting. Adjust the
phase setting to eliminate these problems.
Clock
If vertical banding is visible on the display, your LED may
have the wrong clock setting. Adjust the clock setting to
eliminate vertical banding.
H-Position
Positions the display area on the LED panel horizontally
(moves the display area left or right).
V-Position
Positions the display area on the LED panel vertically
(moves the display area up or down).
Color Temperature
Adjusts the color quality of the display. You can adjust the
warmth value, color balance, etc. The
Adjust Color
selection has a further submenu that lets you fine tune the
RGB values.
Language
Selects the language that the OSD displays its menus in.
OSD Duration
Lets you set the amount of time the OSD displays on the
screen. If there is no input for the amount of time you
choose, the OSD display turns off.
Input Source
Lets you select an
Analog
(VGA) or
Digital
(HDMI, DVI)
input source for connecting an external console to the
CL3800. This option is not available for the CL3700 or
CL3100 as they only have one input source option.
See
Reset
Resets the adjustments on all menus and submenus to
their factory default settings.
Note:
The
Language
setting does not return to the factory
default, but remains at the one that you have set it to.
Содержание CL3100
Страница 1: ...Short Depth WideScreen LCD Console CL3800 CL3700 CL3100 User Manual www aten com...
Страница 17: ...Chapter 1 Introduction 7 Operating Systems Supported operating systems include Windows Mac Linux and Sun...
Страница 26: ...CL3800 CL3700 CL3100 User Manual 16 This Page Intentionally Left Blank...
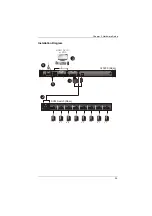
Страница 35: ...Chapter 2 Hardware Setup 25 Installation Diagram 5 3 4 1 CL3800 Rear HDMI DVI D or VGA 2 KVM Switch Rear...
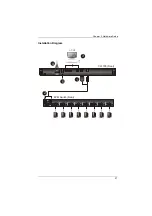
Страница 37: ...Chapter 2 Hardware Setup 27 Installation Diagram 5 3 4 1 CL3700 Rear HDMI 2 KVM Switch Rear...
Страница 39: ...Chapter 2 Hardware Setup 29 Installation Diagram 5 3 4 1 CL3100 Rear VGA 2 KVM Switch Rear...
Страница 40: ...CL3800 CL3700 CL3100 User Manual 30 This Page Intentionally Left Blank...
Страница 52: ...CL3800 CL3700 CL3100 User Manual 42 This Page Intentionally Left Blank...
Страница 60: ...CL3800 CL3700 CL3100 User Manual 50 This Page Intentionally Left Blank...

