


4-4
Chapter 4: BIOS setup
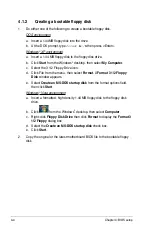
4.1.2
Creating a bootable floppy disk
1. Do either one of the following to create a bootable floppy disk.
DOS environment
a. Insert a 1.44MB floppy disk into the drive.
b. At the DOS prompt, type
format
A:
/
S
then press <Enter>.
Windows
®
XP environment
a. Insert a 1.44 MB floppy disk to the floppy disk drive.
b. Click
Start
from the Windows
®
desktop, then select
My Computer
.
c. Select the 3 1/2 Floppy Drive icon.
d. Click File from the menu, then select
Format
. A
Format 3 1/2 Floppy
Disk
window appears.
e. Select
Create an MS-DOS startup disk
from the format options field,
then click
Start
.
Windows
®
Vista environment
a. Insert a formatted, high density 1.44 MB floppy disk to the floppy disk
drive.
b. Click
from the Windows
®
desktop, then select
Computer
.
c. Right-click
Floppy Disk Drive
then click
Format
to display the
Format 3
1/2 Floppy
dialog box .
d. Select the
Create an MS-DOS startup disk
check box.
e. Click
Start
.
2. Copy the original or the latest motherboard BIOS file to the bootable floppy
disk.
Содержание Z7S WS - Motherboard - SSI CEB
Страница 1: ...Motherboard Z7S WS ...
Страница 14: ...xiv ...
Страница 16: ...ASUS Z7S WS Chapter summary 1 1 1 Welcome 1 1 1 2 Package contents 1 1 1 3 Special features 1 2 ...
Страница 66: ...2 44 Chapter 2 Hardware information ...
Страница 67: ...3 Chapter 3 Powering up This chapter describes the power up sequence and ways of shutting down the system ...
Страница 68: ...ASUS Z7S WS Chapter summary 3 3 1 Starting up for the first time 3 1 3 2 Turning off the computer 3 2 ...
Страница 108: ...4 36 Chapter 4 BIOS setup ...
Страница 153: ...A Appendix CPU features The Appendix describes the CPU features and technologies that the motherboard supports ...
Страница 154: ...ASUS Z7S WS Chapter summary A A 1 Intel EM64T A 1 A 2 Enhanced Intel SpeedStep Technology EIST A 1 ...