


ASUS Z7S WS
2-5
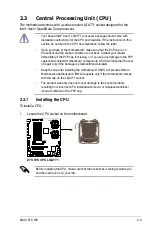
6. Before installing the motherboard
into the chassis, locate the standoffs
that should match the eight (8) CEK
spring screw holes.
8. Secure the motherboard with eight (8) screws. Refer to section
2.2.2 Screw
holes
for illustration.
Make sure that the standoffs perfectly match the CEK spring screw holes;
otherwise, you can not install the CPU heatsinks properly.
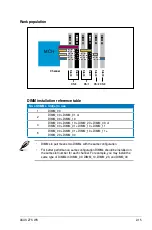
Standoffs for CPU0
Standoffs for CPU1
7. Install the motherboard with the
external I/O ports toward the chassis
rear panel. The CPU sockets should
be right on top of their respective
standoffs.
Socket for CPU1 Socket for CPU0
Содержание Z7S WS - Motherboard - SSI CEB
Страница 1: ...Motherboard Z7S WS ...
Страница 14: ...xiv ...
Страница 16: ...ASUS Z7S WS Chapter summary 1 1 1 Welcome 1 1 1 2 Package contents 1 1 1 3 Special features 1 2 ...
Страница 66: ...2 44 Chapter 2 Hardware information ...
Страница 67: ...3 Chapter 3 Powering up This chapter describes the power up sequence and ways of shutting down the system ...
Страница 68: ...ASUS Z7S WS Chapter summary 3 3 1 Starting up for the first time 3 1 3 2 Turning off the computer 3 2 ...
Страница 108: ...4 36 Chapter 4 BIOS setup ...
Страница 153: ...A Appendix CPU features The Appendix describes the CPU features and technologies that the motherboard supports ...
Страница 154: ...ASUS Z7S WS Chapter summary A A 1 Intel EM64T A 1 A 2 Enhanced Intel SpeedStep Technology EIST A 1 ...